Enabling Enhanced Mode in the Windows Search

In case you don’t know, Microsoft has included an Enhanced Search Mode in the new Windows 10 v1903. This new Enhanced Search mode, compared to the Classic Mode, indexes everything on your Windows 10 computer, and in this post you will be guided on how you can disable this new feature as well as discuss how it is different from the Classic Search mode.

Over the years, the Windows 10 Start Search has changed. When you tap the Start button and when you type, the results that appear are categorized into Apps, Documents, Email, Web, Folders, Music, People, Photos, Settings, Videos, and many more. This is the reason why the Enhanced Mode was brought into the picture. So unless everything is indexed, this new feature wouldn’t be of much use.

A Classic Search is the term used for the old search technique in Windows 10. The Classic Search mode is restricted to Libraries and Desktop and end-users can only select to customize the search location by adding them manually to the indexer. To simply put it, it would only index files and folders which you want to get indexed and if the search term is not in the index, it would initiate the regular search which would take quite a while and this is where the Enhanced Windows Search comes in. It indexes everything as it is its default nature which is the exact opposite of the Classic Search mode. This feature allows you to exclude folders where the Search will not look and index anything that could be personal to you. In addition, it can also impact the life of the battery of laptops, if you are using one. The initial crawl of your data will take place only when connected to power and during that time, both the CPU usage and battery will take a bit of a hit.

To enable the Enhanced Search Mode in your Windows 10 computer, here’s what you have to do:

Step 1: Go to Settings > Search > Searching Windows.

Step 2: Next, click on the radio button for Enhanced.

Step 3: After that, select the folders which the Windows Indexer should exclude from the Enhanced Search mode.

And that’s about it. The next time you search anything on your computer, Windows will be looking at all the locations except for the ones you excluded and the results will be a lot faster compared to the Classic Search.

Now that you’ve enabled the Enhanced Search mode, there are two settings you need to check out.

  • Advanced Search Indexer Settings – this setting allows you to configure how or where Windows will search or what file types it will search in your computer. It will also open the same setting that’s available in the Classic Search.
  • Run the Indexing Troubleshooter – when you click on the Indexing Troubleshooter, it will start to troubleshoot any Search and Indexing issues on your Windows 10 computer and fix them automatically.
If you like to learn and find out more about various Windows errors, and how to repair them go to our vast archive or use search to find articles that will explain and help you in solving your issue.
However, if you prefer to do things fast and with automatization then we are proposing to use an automated solution for your issues. The application that we are recommending is Advanced System Repair Pro
Advanced System Repair utilizes multiple tools all in one to give you a quick, simple, reliable, and very thorough diagnosis of your PC. It brings you all the tools you need in one program to clean, fix, protect, optimize and boost your PC!
1-Click Maintenance
All the tools to make it simple and easy! It's like having a professional technician at the click of a mouse.

Junk Cleaner
Keeping your computer free from unnecessary clutter also helps make your computer last longer. Like any other machine, if you keep it clean and take care of it, it will serve you better for longer!

Optimize background apps
Optimize applications background activity with the built-in Application Optimizer feature.

Disk Defrag
With a simple 1-click, Advanced System Repair speeds up your PC by assembling fragmented files on your machine and organizing them more efficiently.

Malware Removal
Finds and removes all types of harmful malware including trojans, worms, bots, adware, spyware, PUPs, and more!

Privacy Cleaner
The all-in-one privacy suite to Clean Your Tracks & Protect Your Privacy! Make your computer safe, secure, and more efficient!

System Tweak/Optimizer
ASR will analyze your complete system and settings to adjust your PC to function at its maximum performance.

Registry Cleaner
Over time, as you install and uninstall applications, the registry can become cluttered with old entries and broken settings which can result in program crashes, and annoying messages and slow the computer down.
Visit our Advanced System Repair Pro Download page to inform yourself about all the benefits of this software and get a free trial copy of it.
advanced system repair pro

Advanced System Repair Pro

One-click automated PC repair solution
ASR logo
With Advanced System Repair Pro you can easily
Replace damaged files
Restore performance
Free disk space
Remove Malware
Protects WEB browser
Remove Viruses
Stop PC freezing
DOWNLOAD
Privacy Policy | Terms of Use | Uinstall
Advanced System Repair Pro is compatible with all versions of Microsoft Windows including Windows 11

Share this article:

You might also like

Create BlueTooth shortcut on desktop
If you have a BlueTooth device on your computer, you know that each time you need to receive or transfer the file you need to find the icon in the system tray, right-click on it and choose the desired option. But there is a simpler solution, create a Bluetooth icon on the desktop so it is always easy to access. Open File Explorer by pressing ⊞ WINDOWS + E Go to C:\Windows\System32 Find fsquirt.exe Right-click on it and choose copy Go to the desktop and right-click, choose paste Rename the file to Bluetooth And, you are done!
Read More
Parallels Desktop 17 brings Windows 11 to MAC
Parallels Desktop 17
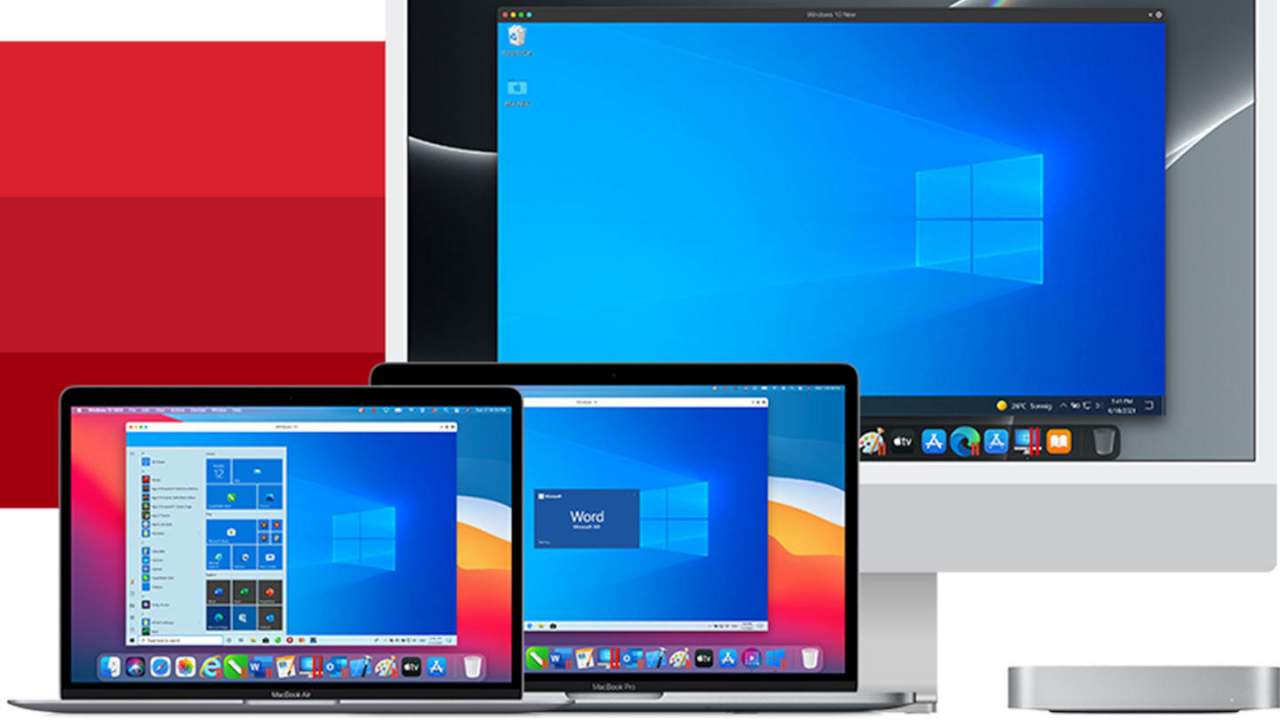
Parallels is an application developer for MAC OS mostly known for its PC virtualization software Parallels Desktop, a PC virtualization software running on Macs enabling running Windows and Linux with respective software on your MAC. With its latest Desktop 17 version, the software can run natively on both Intel-based and M1-based MACs. Thanks to this feature MAC users will be able to benefit from various speed improvements while running both Windows 10 or Windows 11 preview. On both Intel and M1 setups, Parallels resumes Windows and Linux up to 38% faster, provides an up to 25% bump in 2D graphics and a six-time increase in OpenGL graphics processing. M1-centric stats include 33% faster Windows start-up times, up to 28% faster DirectX 11 performance, and up to 20% better disk performance on Windows 10 Insider Preview. Parallels Desktop 17 delivers a set of fresh features including a new video driver that enhances video and game playback and boosts Windows UI responsiveness. An improved Coherence mode lets users run Windows apps within the Mac environment, cutting down on distracting changes in appearance during Windows sign-in, shut down, and software updates. Drag-and-drop operations are also improved, with support for text and graphics between Mac and Windows applications. This function works well with MAC OS Monterey's Quick Note feature, which can accept content from any Windows app. USB support, disk management, copy and paste unformatted text, and automatic virtual machine optimization also receive upgrades.
Read More
Easy Remove ShopAtHome Guide

ShopAtHome Toolbar is a browser extension. This extension tracks information when you visit a website, whether typing in the URL or clicking a link, the Browser App recognizes whether the URL is that of an Affiliate Store, and, if so, may redirect you through the affiliate network site to the Affiliate Store’s website, at which time, a tracking cookie will be placed in your browser. This cookie is the tracking mechanism that will follow your transaction with the Affiliate Store.

During installation, the Browser App may automatically change the default search engine used by your Web browser, whether via a built-in search box or otherwise, to our search engine. Upon installation and setup, it defines an auto-start registry entry which makes this program run on each Windows boot for all user logins. A scheduled task is added to Windows Task Scheduler in order to launch the program at various scheduled times.

Multiple anti-virus scanners have detected possible malware in ShopAtHome.com Helper and are therefore classified as potentially unwanted and flagged for optional removal.

About Browser Hijackers

Browser hijacking is actually a form of an unwanted program, often a web browser add-on or extension, which then causes modifications in the browser’s settings. Browser hijackers can do a variety of things on your PC. The idea would be to force users to visit certain sites that are looking to increase their visitor traffic and generate higher ad income. A lot of people assume that these kinds of sites are legitimate and harmless but that is incorrect. Almost every browser hijacker poses an actual threat to your online safety and it is important to classify them under privacy risks. They do not just screw up your web browsers, but browser hijackers could also modify the system registry, leaving your computer or laptop susceptible to other forms of hacking.

Browser hijacking signs and symptoms

Signs that your web browser is hi-jacked include: 1. the home page of your web browser is changed suddenly 2. you find yourself regularly directed to some other web page than the one you actually meant 3. The default search page of the browser is changed 4. you find many toolbars in your web browser 5. you see a lot of pop-ups on your computer screen 6. your internet browser starts running sluggishly or displays frequent glitches 7. Inability to navigate to particular sites, particularly anti-malware as well as other security software sites.

How browser hijacker infects PCs

Browser hijackers infect computers through malicious email attachments, downloaded infected documents, or by checking out infected internet sites. They also come from add-on programs, also called browser helper objects (BHO), web browser extensions, or toolbars. Other times you may have unintentionally accepted a browser hijacker as part of a software program package (generally freeware or shareware). Popular examples of browser hijackers include Conduit, CoolWebSearch, Coupon Server, OneWebSearch, RocketTab, Delta Search, Searchult.com, and Snap.do.

The best ways to get rid of browser hijackers

Some hijackers could be removed simply by uninstalling the related freeware or add-ons from the Add or Remove Programs in the Microsoft Windows Control Panel. Sadly, the majority of the software packages utilized to hijack a web browser are deliberately designed to be hard to detect or remove. Besides, browser hijackers can modify the Windows registry so it can be very difficult to fix manually, particularly if you are not a very tech-savvy person.

Help! Malware Preventing Anti-virus Installation And Access To The Web

All malware is inherently dangerous, but certain kinds of malware do a lot more damage to your computer or laptop than others. Some malware sits in between the computer and the net connection and blocks some or all websites that you would like to visit. It might also block you from adding anything on your PC, especially anti-malware applications. If you’re reading this, odds are you’re stuck with a virus infection that is preventing you to download and/or install Safebytes Anti-Malware software on your PC. Do as instructed below to get rid of the malware by alternate methods.

Boot your PC in Safe Mode

In the event the malware is set to load at Windows startup, then booting in Safe Mode should avoid it. Just the minimum required applications and services are loaded when you boot your personal computer in Safe Mode. To launch your Windows XP, Vista, or 7 PCs in Safe Mode with Networking, please do as instructed below. 1) Press the F8 key repeatedly as soon as your PC boots, but before the big Windows logo shows up. This will conjure up the “Advanced Boot Options” menu. 2) Make use of the arrow keys to choose Safe Mode with Networking and press ENTER. 3) Once you get into this mode, you should have online access again. Now, obtain the virus removal application you need by utilizing the browser. To install the application, follow the guidelines in the installation wizard. 4) Right after installation, do a full scan and let the software delete the threats it detects.

Use an alternate web browser to download a security program

Malicious program code can exploit vulnerabilities in a particular browser and block access to all antivirus software websites. The best solution to avoid this problem is to choose a browser that is well known for its security features. Firefox contains built-in Phishing and Malware Protection to keep you secure online.

Install and run anti-virus from a USB drive

Here’s another solution which is using a portable USB anti-virus software package that can check your system for viruses without the need for installation. Try these simple actions to clean up your affected computer by using portable anti-malware. 1) Make use of another virus-free computer system to download Safebytes Anti-Malware. 2) Put the USB drive into the clean PC. 3) Double click on the downloaded file to run the installation wizard. 4) When asked, choose the location of the USB drive as the place where you would like to store the software files. Follow the on-screen instructions to finish the installation. 5) Now, plug the thumb drive into the corrupted system. 6) Run the Safebytes Anti-malware directly from the pen drive by double-clicking the icon. 7) Run Full System Scan to identify and clean-up up all types of malware.

SafeBytes Anti-Malware Features

If you’re planning to purchase anti-malware for your computer system, there are many brands and utilities for you to consider. Some are very good ones, some are ok types, while some are simply just fake anti-malware software that could harm your PC themselves! While looking for an antimalware tool, pick one that provides reliable, efficient, and total protection against all known computer viruses and malware. While considering the dependable software programs, Safebytes AntiMalware is undoubtedly the highly recommended one. Safebytes is among the well-established computer solutions firms, which provide this complete anti-malware tool. With its cutting-edge technology, this application can help you remove multiples types of malware including computer viruses, worms, PUPs, trojans, adware, ransomware, and browser hijackers. SafeBytes anti-malware takes computer protection to a totally new level with its enhanced features. Here are a few popular features found in this program: Antimalware Protection: With a critically acclaimed anti-malware engine, SafeBytes offers multilayered protection that is intended to find and get rid of viruses and malware that are hidden deep inside your computer’s operating system. Live Protection: SafeBytes provides complete and real-time security for your PC. It’ll continuously monitor your pc for hacker activity and also gives users sophisticated firewall protection. Extremely Speed Scanning: SafeBytes Anti-Malware has got a multi-thread scan algorithm that works up to 5x faster than any other anti-malware software. Web Filtering: SafeBytes provides an instant safety rating on the pages you are about to check out, automatically blocking harmful sites and make sure that you’re certain of your online safety while browsing the net. Lightweight Application: This software program is not “heavy” on the computer’s resources, so you will not find any overall performance troubles when SafeBytes is operating in the background. 24/7 Customer Service: Skilled technicians are at your disposal 24/7! They will quickly fix any technical issues you might be encountering with your security software.

Technical Details and Manual Removal (Advanced Users)

If you wish to manually remove ShopAtHome without the use of an automated tool, it may be possible to do so by removing the program from the Windows Add/Remove Programs menu, or in cases of browser extensions, going to the browsers AddOn/Extension manager and removing it. You will likely also want to reset your browser. To ensure the complete removal, manually check your hard drive and registry for all of the following and remove or reset the values accordingly. Please note that this is for advanced users only and may be difficult, with incorrect file removal causing additional PC errors. In addition, some malware is capable of replicating or preventing deletion. Doing this in Safe Mode is advised.

The following files, folders, and registry entries are created or modified by ShopAtHome

Files: File %PROGRAMFILESSelectRebatsToolbarShopAtHomeToolbar.dll. File %WINDIRDownloaded Program Filesinstall.inf. File %WINDIRDownloaded Program Filessahagent-cdt1004.exe. File %LOCALSETTINGSTempsahagent-cdt1004.exe. File %LOCALSETTINGSTempcdt1004.sah. File %LOCALSETTINGSTempsetup4002b.cab. File %LOCALSETTINGSTempsetup4002b.ini. File %SYSDIRap9h4qmo.ini. Search and Delete: ap9h4qmo.ini. File %SYSDIRap9h4qmo.exe. File %SYSDIRBundleLite_westfrontier1001.exe. File %SYSDIRap9h4qmo.ini. File %WINDIRa95kfrhe.exe. File %SYSDIRa95kfrhe.ini. File %SYSDIRa95kfrhe.ini. File %SYSDIRq17i9a4j.ini. Search and Delete: ap9h4qmo.ini. Directory %LOCALSETTINGSTempSahUpdate. Registry: Key 759C257C-F750-4F52-AB58-FB8A7B8770FE at HKEY_CLASSES_ROOTTypeLib. Key HKEY_CLASSES_ROOT named GRInstall7.Installer Key HKEY_CLASSES_ROOT named GRInstall7.Installer.1
Read More
Delete a Volume or Drive Partition in Windows 10
Operating systems now give users a feature that allows them to create separate partitions out of HDD or SSD-based storage in order to store data in an organized manner. This small yet powerful feature has always been supported by Microsoft. However, there are times when users might fill up on some particular very soon. This may result in the lack of space for that partition which makes the entire process of using PCs slower since there is a large chunk of files that has to be indexed in a smaller partition. If you are one of the users experiencing this dilemma, you need to either delete the other partitions to allocate their storage to the partition that is short on storage or simply recreate the partition so that all the useless data will be deleted and you can start afresh with the overflowing partition. In this post, you will be guided on how you can delete any storage partition from your Windows 10 PC via Disk Management, Command Prompt as well as Windows PowerShell.

Option 1 – Delete storage partition via Disk Management

This is one of the simplest ways you can use to delete a storage partition. Go to the WinX Menu and from there, open Disk Management and then select the Drive you want to get rid of, right-click on it and then select Delete Volume.

Option 2 – Delete storage partition via Command Prompt

  • Tap the Win + X keys or right-click on the Start button and select Command Prompt (Admin) or you could also type in “cmd” in the Cortana search box and right-click on the Command Prompt icon and then select the “Run as Administrator” option from the context menu.
  • Once you have Command Prompt pulled up as admin, type in and enter this command – diskpart
  • After entering this command, the Diskpart Utility will start. Diskpart Utility is a command line-based utility just like Command Prompt but it will get a UAC Prompt after you invoke it so you have to click Yes for the UAC Prompt.
  • After that, type in list volume and tap Enter to see the list of all the partitions created on your PC. This includes both types of partitions that are visible to a normal user in the File Explorer as well as the ones that are created by Windows 10 by default which helps it in storing the boot files and other essential system files.
  • You should see a list of all the partitions made on your computer. Select the partition you want to delete by its Unique Identification number as Volume X where X denotes the Unique Identification Number.
  • Next, type in the select volume number command and hit Enter to select the desired volume.
  • Then delete the volume you’ve selected and type in the delete volume command and hit Enter to delete the volume you just selected and convert it into unallocated space.

Option 3 – Delete storage partition via Windows PowerShell

  • Start by tapping the Win + X keys or simply right click on the Start button and select Windows PowerShell (Admin) or you could also type in “windows powershell” in the Cortana search box and right-click on the Windows PowerShell icon and select the “Run as administrator” option.
  • Once you’ve opened the Windows PowerShell, type in the Get-Volume command and hit Enter to get a list of all the partitions on your PC.
  • Next, select the drive letter you want to delete and then type in the Remove-Partition –DriveLetter command and hit Enter to delete the selected partition. Note that you need to replace the drive letter with the letter of the partition you want to get rid of.
  • After that, it will ask you for confirmation. Just hit the Y key for Yes or hit the A key to say Yes to All. This will delete all the partition you’ve selected and will move them in as unallocated space.
And that’s how you delete a Drive Partition or Volume in Windows 10. Note that you should only follow the last two options given in case the Disk Management is not able to fulfill the user requirements.
Read More
Close non responsive application in Windows
We have all been there, unfortunately, the application freezes, and sometimes it can even freeze whole windows. Well if the whole Windows freezes because of the application there is not much we can do except hard reset but if only the application freezes we can still kill it and return the PC in working condition. The first thing you can try is to press ALT + F4, this shortcut is for closing the program, if the application is frozen Windows will try to close it when using this shortcut, and if it succeeds you will find yourself on the desktop environment in Windows with non-responsive application taken care of. If however, this fails and the application is not closed, try ending it in the task manager. To open task manager press CTRL + SHIFT + ESC, locate unresponsive application select it, and click on the end task button on the bottom right.
Read More
Fix Adobe causes high CPU usage in Windows 11
adobe creative suiteIn today's world any professional, whatever be design, print, web design or similar is using one or more Adobe programs. Adobe has cemented itself as a must-have software for any kind of serious and even amateur work. Sadly in the latest Windows 11 adobe software in some instances can slow down your computer and put some hard load on the CPU. If you are one of these unfortunate users, keep reading because we have a few things you can do to solve this.

1. Run SFC scan

SFC scan is a built-in Windows tool aimed at diagnosing and repairing system files inside Windows itself. Running an SFC scan usually solves most issues of these kinds so we will try that one first.
  1. Press ⊞ WINDOWS + S to open the Search bar and type in cmd
  2. Select command prompt and on the right side click on Run as administrator
  3. Inside command prompt type in: sfc /scannow and press ENTER
  4. Wait for the whole process to finish and reboot your system

2. Update Windows

Windows updates are designed to fix issues and solve problems, check to see if a new update is available to install.
  1. Press ⊞ WINDOWS + I to open the Settings app
  2. Click on Windows Update in the bottom left pane
  3. On the right check visually if there is an update pending and if there is, install it

3. Temporary turn off antivirus and firewall

Antivirus and firewall can interfere with adobe applications and background services, try turning your preferred protection software temporarily off and check if your CPU is still under high load.

4. Reinstall Adobe suite

Uninstall and install a clean version of the adobe creative suite or individual applications that you are using. Check your CPU load after reinstallation.

5. Uninstall Adobe CEF Helper

This is not a really advisable course of action but if non of the previous solutions have produced results then this might be the only option if you would like to keep using the software. Open File Explorer and paste the following line in the path box on top: C\:Program Files>Adobe Systems>Adobe CEF Helper or Adobe Creative Cloud >Adobe CEF Helper_uninstall.exe. Double click on the file and uninstall the CFT helper.
Read More
Screen of death colors in Windows 10
Receiving a screen of death is not a pleasant experience at all and most users would agree that they would very much like not to face one during their work with the computer. Sadly PC is not a perfect machine and it is not working in a perfect environment so errors happen. The most famous and well-known death screen is blue which is also the most common one, my bet would be that there is not a user which has not been faced with this blue error screen. There is no simple explanation why these stop errors occur as several factors can be involved. However, it is known that the malfunctioning of hardware drivers or drivers that are installed by third-party software drive this unwanted change. But did you know that there is more colors for infamous death screens and not just blue one? Microsoft has coded different errors to different colors in the goal for the technical team to be aware right away of what type and kind of error they are dealing with. Color for screen errors are: Blue, Black, Pink, Brown, Yellow, Red, Orange, Green and White If you are interested in what color represents what keep reading.

BLUE

blue screen of deathA stop error or exception error commonly called the blue screen of death (BSoD) or blue screen, is an error screen displayed on Windows computers following a fatal system error. It indicates a system crash, in which the operating system has reached a condition where it can no longer operate safely. This is caused by many different problems, such as a general hardware failure or a crucial process terminating unexpectedly.

BLACK

black screen of deathOn Windows 10 systems, a Black Screen of Death can be caused by an unfinished Windows Update. To resolve this problem, simply hold the power button down on your PC or laptop to switch off the computer. A cold start should result in the system booting properly.

PINK

pink screen of deathIt is a diagnostic screen with a white type on a pink background. Pink Screen is mainly seen when the VMkernel of an ESX/ESXi host experiences a critical error, becomes inoperative, and terminates any virtual machines that are running. It is not fatal and generally considered more of a developer testing issue. When encountered, it can be fixed quickly by following the simple action of pressing and holding your computer’s power button to shut down the device.

BROWN

brown screen of deathThe Microsoft Windows 10 Operating System Brown Screen of Death is an on-screen fatal error notification with bug check codes which is seen when a computer crashes due to graphics hardware or software-related problems (failing graphics drivers).

YELLOW

yellow screen of deathIt affects the functioning of a browser, particularly Mozilla Firefox. The Yellow Screen of Death makes the appearance with a weird buzzing sound in the background when the XML parser refuses to process an XML document causing a parsing error and a weird buzzing sound. The issue persists unless the computer is manually rebooted.

RED

red screen of deathCommonly the Windows 10 red screen is caused due to the hardware error, particularly if you overclock your Windows PC/laptop. Despite this, sometimes the red screen of death is also caused by outdated or incompatible drivers or due to BIOS issues.

ORANGE

orange screen of deathThe Orange Screen of Death on Windows occurs due to fatal hardware errors. Multiple reasons have been reported for the Orange Screen of Death. Some had this issue when watching a YouTube video, some were not able to boot into Windows. It can even occur when waking up from Sleep.

GREEN

green screen of deathThe green screen of death only appears when you're running an Insider Preview version of Windows 10. It's the same as the blue screen of death, and it will show the same error messages. ... If you see a green screen of death (GSOD) on your PC, that's a sign you're using an Insider Preview build of Windows 10.

WHITE

white screen of deathThe White Screen on Windows is also an error where the screen of the computer just turns white and freezes. There can be several things that can cause the white screen to appear on the Windows laptop monitor. But the main issue could be because of malfunctioning of the graphics hardware.
Read More
New toys in new PowerToys for Windows
A new update to popular Microsoft PowerToys has brought a few new features that are aimed at speeding up the workflow. PowerToysThe first new feature that was slid in is Always on top utility. With this cool utility, you can keep the window as the name suggests, always on top of other windows. To enable this cool feature all you have to do is press the key combination of ⊞ WINDOWS + CTRL + T and an active window will be now always on top of all other windows. To reverse and unlock this window from being always on top just press key combination again. A second new feature is a really great one and my favorite thing to happen in power toys. Often we are making the search in our browsers to find stuff, things, maybe some explanations, information, etc. The newest update in power toys brings this to a whole new dimension. While you are on PC you just simply need to type ?? followed by questions like: ?? When doctor strange 2 is coming out and that will launch your default browser with your chosen search engine and provide you with the answer. Third and final thing is G-code support in the file explorer preview pane and thumbnails, meaning that if you work with CNC equipment you can now have a thumbnail preview of the code itself inside File Explorer. And that’s it for now, thank you for coming and reading, Take care and I hope to see you next time.
Read More
Bluetooth flaw, Android and Windows in danger
bluetoothResearchers have discovered 16 vulnerabilities in Bluetooth connections that could be exploited and make from minor to some serious damage to your device. The flaw can be used on chips manufactured by Intel, Qualcomm, and Texas Instruments while connecting to external devices like speakers, headphones, keyboards, mice, etc.

Who is affected?

Mentioned chips are used by many in a vast range of devices including big players with their products like Microsoft Surface laptops, Dell desktops, Samsung Phones, Google Pixel, and OnePlus handsets. The Bluetooth bug affects a wide range of devices, including smartphones, laptops as well as smart home gadgets. In total, more than one billion devices that rely on Bluetooth are believed to be impacted.

What is the damage?

The amount of damage possible with this flaw depends on the type of device with the chipset. Some devices can only be crashed after a specially crafted packet is sent to the flawed chip. If that's the case with your gadget, it can be easily resolved with a simple restart. With other devices, hackers can take advantage of the Bluetooth Classic flaw to remotely run malicious code. That could allow malware to be installed remotely. Researchers say vendors were informed about these issues months ago before the findings were published. The good news is this should have given plenty of time for the relevant patches to be pushed out that remedy the flaws. However, you'll need to make sure that you're running the latest version of the operating system to be protected by the patch crafted by the manufacturers.

Android Bluetooth threat

The researchers emphasize the lack of basic tests in Bluetooth certification to validate the security of Bluetooth Low Energy (BLE) devices. The BrakTooth family of vulnerabilities revisits and reasserts this issue in the case of the older, but yet heavily used Bluetooth classic (BR/EDR) protocol implementations. We would also advise users to disable Bluetooth on devices that do not need it. This way you can prevent attackers from sending you malformed LMP packets. Since BrakTooth is based on the Bluetooth Classic protocol, an adversary would have to be in the radio range of the target to execute the attacks. So, in a safe environment Bluetooth can be enabled.
Read More
0x80070780, The file cannot be accessed
Error 0x80070780 is a particularly nasty error since it means we can not access files on our hard drive. This might be an important file from work or anything similar and it can be frustrating when we can access it. In this article, we will address solutions to this error so you can continue with your activities where you have left off. Follow the guide step by step in the given order to minimize file damage and find the solution quickly.
  1. Run File and Folder built-in troubleshooter

    The simple and clean solution, try first by running Windows built-in tools. Leave troubleshooter to scan and attempt repairs and try to access a file after that.
  2. Run disk checker

    Maybe the file is corrupted or slightly damaged but repairable, run a built-in Windows disk checker and let it scan and repair any error found. Try accessing your file after the scan.
  3. Try copying file

    If the file is under a bad sector or cluster on a disk drive that could be a reason why you can not access it, try copying the file to another location and then opening it, if the operation fails, boot Windows in safe mode and try to copy or move file then. If you are successful with copying files in safe mode, reboot your computer and try to open the file.
  4. Reinstall the driver for the hard drive

    Like when the driver for USB is not working and you can not access files same can happen on your hard drive. Go to the device manager and reinstall the driver for your hard drive.
Read More
1 2 3 162
Logo
Copyright © 2022, ErrorTools. All Rights Reserved
Trademarks: Microsoft Windows logos are registered trademarks of Microsoft. Disclaimer: ErrorTools.com is not affiliated with Microsoft, nor claim direct affiliation.
The information on this page is provided for information purposes only.
DMCA.com Protection Status