In case you don’t know, Windows now comes with an all-new Light Mode theme which gives a light accent color to the Taskbar, Start, and Notification Area. Aside from that, it also brings new improvements and features. This new theme is somewhere between dark and completely white and in this post, you will be guided on how you can enable this new feature in your Windows 10 computer.
Although the Light Mode sure looks stunning and a lot of users love it, it actually switches all the apps plus the Taskbar and Start Menu to the light mode which was not the case before. In addition, the icons in the system tray area, as well as the notification center, are also inverted. To resolve that, there are several ways you can customize the light mode theme as well as activate it in the Windows 10 v1903. How? Refer to each one of the options given below.
Windows 10 brought a new theme called “Windows (Light)” which will enable the light mode automatically and will set the accent colors to automatic. This will also apply the new Windows 10 wallpaper on your desktop. To enable Windows (Light), all you have to do is right-click on the desktop and select Themes from the left menu. After that, select the Windows (Light) option under the Change Themes section. This will apply to the Windows (Light) mode.
The second and more customizable way to activate the light mode is via Settings. Aside from the Light and Dark, Windows also introduced a Custom color option which allows you to decide the default Windows and App mode independently. To enable Light mode via Settings, refer to the steps below.
Note: If after activating light mode, you find that you don’t like it and you want to keep things as they were before (Light App Mode and Dark Windows Mode), you can achieve that using the Custom option. All you have to do is select Custom from the drop-down menu to decide the default Windows and app mode independently. After that, select light under the default app mode and dark under the default Windows mode so that you can keep things as they were before the update. On the other hand, you can also try the opposite version of the light Windows mode and Dark app mode since Windows increased the level of customizability which allows users to use an option of a completely light mode.

Windows 10 isn’t activated error occurs when Windows users attempt to upgrade to Windows 10 for free and end up in a non-activated state. It is a Windows 10 activation error affecting PC owners who attempt to upgrade their Windows 7 or Windows 8.1 operating systems. A message box will appear with the following message: “Windows 10 isn’t activated after upgrading for free from Windows 7 SPI or Windows 8.1 update.”
Common symptoms of this error code include the following:
 Error Causes
To understand the cause of this activation error, users will need to understand activation within Windows. Activation is a process that allows Windows to verify that you are upgrading your operating system based on the Microsoft Software Licensing Terms. These terms specify, for instance, the number of devices upon which you can use Windows.
Once you have a genuine copy of Windows and you are following the terms mentioned earlier, you should be able to activate and complete the upgrade to Windows 10. However, the activation fails when these conditions are not met. Note also that the error may occur if users fail to upgrade to Windows 10 before reinstalling, requiring them to repeat the installation process by first going back to the previous version of Windows present on their system. Once the upgrade process is not done as should, you might encounter other Windows 10 errors such as error code 0xc0000142
If you see this error code, “Windows 10 isn’t activated after upgrading for free” proceed to rectify it using manual repair methods below.
To fix this activation error code in Windows 10, users will need to employ at least one manual repair procedure. This process can successfully be completed by non-technical Windows users. However, you may also consider getting assistance from a Windows repair technician if you are not certain you have the requisite skills needed to complete the manual repair tasks below.
The main methods to resolve the error code “Windows 10 isn’t activated after upgrading for free from Windows 7 SPI or Windows 8.1 update” is as follows:
If you attempted upgrading for free to Windows 10 and ended up with the activation error you will need to first perform a manual activation. Follow the steps below to complete the process.
The steps above enable users to successfully activate Windows 10 if the issue involves a connection problem. However, if Windows is not activated, it may mean your copy of Windows is not genuine. This may require you purchase a copy of Windows to rectify the issue. However, if you have a genuine copy of Windows proceed by applying the steps found in method two.
A valid product key is one way you can verify your copy of Windows is genuine. This will enable you to complete activation and allow you to access the free upgrade to Windows 10. Follow the steps below.
Error codes in Windows often occur due to poor maintenance of one’s PC. To improve your system and reduce your machine’s risk of experiencing error codes, download a powerful automated tool. This tool is both powerful and user-friendly, making its benefits accessible to even the most non-technical Windows users.
Get-AppxPackage Microsoft.BingWeather | Remove-AppxPackage
taskkill /IM "processname" /T /F processname – it is the name of the process which you can see on the Details tab of the Windows Task Manager. /IM – it is the one that specifies the image name of the process, which follows, that is to be terminated. /T – it is the one that kills not just the main process but also the child process. /F – it is the one that terminates the process forcefully.
wmic process where name='processname.exe' deleteNote: In the given command, you need to replace “processname.exe” with the name of the particular process you want to terminate which is found in the Details tab of the Windows Task Manager.
kill -id pidNote: In the given command above, “pid” is the Process ID number of the process you want to terminate. And for you to identify this number, you need to open the Details tab of the Windows Task Manager once again and take note of the number against the process you want to get rid of. Alternatively, you can also run the following command in the PowerShell prompt that you’ve pulled up to get the process ID number:
Get-ProcessFor example, “5364” is the process ID number for the DimScreen.exe process which is the process you want to terminate. In order for you to kill this process, you need to type in this command:
kill -id 5364
Error Causes
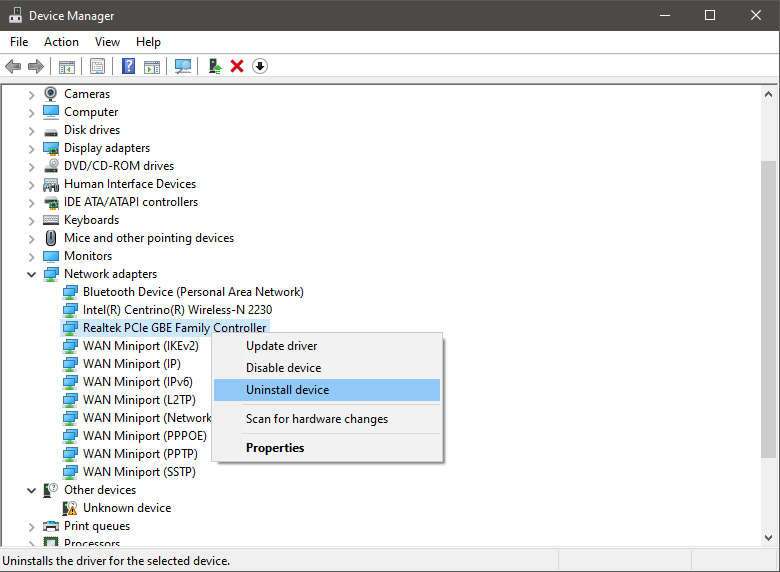
 In the Device Manager expand Network adapters, choose adapter, right-click on it and choose Uninstall.
 Install latest driver or reboot so Windows will install the driver automatically
In the Device Manager expand Network adapters, choose adapter, right-click on it and choose Update Driver.
Install latest driver or reboot so Windows will install the driver automatically
In the Device Manager expand Network adapters, choose adapter, right-click on it and choose Update Driver.

 In command prompt type next line and press ENTERDEL /F /S /Q /A “C:\Windows\System32\drivers\mfewfpk.sys
Reboot the system
In command prompt type next line and press ENTERDEL /F /S /Q /A “C:\Windows\System32\drivers\mfewfpk.sys
Reboot the systemError Code 0x80070570 is a common Windows 10 error code that generally is seen by users who are attempting to install a new version of the operating system. While it is most often associated with Windows 10, variations on this same error code have been present in previous versions of the operating system, going all the way back to Windows 7.
Common symptoms include:
Error CausesIn some cases, Error Code 0x80070570 arises erroneously when the system isn’t able to find a particular file that it needs. Other times, it happens when there is a conflict with the antivirus software that you are running and the installation software. Finally, there may be a faulty source of RAM in your computer that needs to be removed before the installation can be completed.
Regardless of what you believe to be the cause behind the error code, there are at least two different methods that you can use to try to resolve Error Code 0x80070570 on your device. The first is fairly simple and easy to follow, while the second requires a little bit more knowledge of your hardware in order to complete it successfully.
There are two common ways that users can attempt to get around Error Code 0x80070570 on their devices. Each requires a little more skill and technical knowledge than the last. If you don’t feel like you have the skill, time, or ability to invest in the methods below, be sure to get in touch with a Windows repair technician who can help you to complete the necessary steps in the right ways.
Here are the best ways to attempt to resolve Error Code 0x80070570 on your Windows device:
In some cases, when Error Code 0x80070570 appears on your computer, you can simply click on the OK button and then go back to the screen immediately proceeding where your installation has left off, choosing to restart the process of installation. For some users, repeating this method at least four times has allowed them to bypass the error without undertaking more serious and time-consuming methods to resolve the issue at hand.
If you have more than one source of RAM in your computer, first remove one of the sources, then re-attempt installation. If you are still encountering Error Code 0x80070570 after removing one of the sources, continue to remove each until you are down to a single source, then trade that last source for one of the ones that have been pulled.
If you have a bad source of RAM, this can help you to figure out which input is causing the error to appear and to address the problem appropriately. Once you have determined which specific source is causing the problem, you can reboot your computer and attempt to run the installation process one more time.
If your RAM sources are not specifically causing the issue, you may still need to run diagnostics tests on your hardware to identify the source of the problem at hand.
If you wish to always have at your disposal a utility tool to fix these Windows 10 and other related issues when they do arise, download and install a powerful automated tool.
Error Code 0x8007000d is a common error code that can be found on the Windows 10 Operating system, although it can also appear in previous versions of the operating system, as well.
Common symptoms include:
There are four basic ways to try to resolve Error Code 0x8007000d on your Windows machine. Three of these are pretty simple for even the most basic users, while the final method requires some familiarity with running commands in the Command Prompt. If you don’t feel that you have the skill or confidence to complete the steps listed below, it is generally recommended that you get in touch with a qualified computer repair technician that can assist you in error resolution.
The main cause for the appearance of Error Code 0x8007000d on a Windows machine is that one of the files that the Update tool uses to run one or more updates cannot be found or has experienced damage. Fortunately, there are a few things that you can try on your machine that can be used to attempt to resolve the issues at hand.
Three primary methods exist for the resolution of Error Code 0x8007000d on a Windows machine. As mentioned above, two of these methods can usually be accomplished by basic users, while the third requires some degree of familiarity with the tools associated with the Command Prompt. If you don’t feel that you have the knowledge or skill necessary to follow these steps, contact a computer repair technician to aid you.
Here are the best ways to try to resolve Error Code 0x8007000d on your device:
From the Windows Update tool, you can attempt to run a scan using the Windows Update Troubleshooter, which can try to identify the specific issue that is occurring and to fix it automatically.
Not only will this tool often fix the problem at hand, but it can also help you to avoid other errors that you may have encountered later on in the Update process. This tool should always be your starting point when you encounter an error as you attempt to download or install updates for your Windows machine.
After the tool has been run, restart your computer to apply any changes and then reopen the Update tool to reattempt installation.
In some cases, the missing or corrupted files may be extensive enough that you need to restore your computer to an earlier point. If you create regular backups of your information or have a past version of the software that you can install, this can help you to resolve the issue. Otherwise, you may need to restore your device to its factory settings to resolve the error.
Always make sure to backup your important files and information before you perform a reset of your device, in order to ensure that you are able to return the computer to its original state when you have finished.One of the ways that you can try to resolve this particular error code is the use a DISM tool. This is accessed through the Command Prompt. In order to use this method, follow the steps below:
If you have not been able to resolve the error code using the steps above or if you are unsure of your ability to follow these steps on your own, get in touch with a trusted computer repair professional that is familiar with the Update process and the errors associated with it.
Congratulations, you have just fixed Error Code 0x8007000d in Windows 10 all by yourself. If you would like to read more helpful articles and tips about various software and hardware visit errortools.com daily. Now that’s how you fix Error Code 0x8007000d in Windows 10 on a computer. On the other hand, if your computer is going through some system-related issues that have to get fixed, there is a one-click solution known as Restoro you could check out to resolve them. This program is a useful tool that could repair corrupted registries and optimize your PC’s overall performance. Aside from that, it also cleans out your computer for any junk or corrupted files that help you eliminate any unwanted files from your system. This is basically a solution that’s within your grasp with just a click. It’s easy to use as it is user-friendly. For a complete set of instructions in downloading and using it, refer to the steps below Perform a full system scan using Restoro. To do so, follow the instructions below.
 Error Causes