What to do if USB tethering is not working

This post will guide you in what to do if you are trying to share the internet connection from your Android smartphone to your Windows 10 computer but USB tethering is not working. Although you can always connect your Android phone to your computer using a USB cable, you still won’t be able to access the internet. However, if you’ve already enabled the USB tethering option in your smartphone, you should be able to access the internet but if you still can’t then you can fix this issue by reading this post.

There are several potential fixes you can check out to fix the USB tethering issue. You can try running both the Internet Connections and Network Adapter troubleshooters or try installing the USB RNDIS adapter or disable any unnecessary network adapters.

Option 1 – Try to run the Internet Connections and Network Adapter troubleshooter

There are various built-in troubleshooters in Windows 10 that can help fix system issues. Since you are dealing with an internet connection problem, you can try running both the Internet Connections and the Network Adapter troubleshooters. To run them, follow these steps:

  • Go to Settings > Update & security > Troubleshoot.
  • From there, you can select the Internet Connections troubleshooter.
  • Click on the Run troubleshooter button to troubleshoot the problem.
  • Wait until the troubleshooter is done identifying and fixing the problem automatically.
  • Then follow the next on-screen instructions that may appear.
  • Once it’s done, check if the USB tethering issue is now fixed.

Note: You can also try to run the Network Adapter troubleshooter. It is also located under the Troubleshoot section. Just scroll down until you see it and then run it.

Option 2 – Try installing or updating the USB RNDIS adapter

RNDIS or Remote Network Driver Interface Specification can also help you resolve the USB tethering problem. If the pre-installed driver does not help you in connecting to the internet, then you can try installing the USB RNDIS driver that is, if it’s not installed yet. If it is already installed, you can try to update it instead.

  • Tap the Win + R keys to open Run and type “devmgmt.msc” in the field and hit Enter to open the Device Manager.
  • Next, expand the Network adapters section and look for the Remote NDIS based Internet Sharing Device. But if you are using a Samsung smartphone, you might see “Samsung” instead of under Network adapters.
  • Right-click on it and then select the “Update driver” option.
  • Then select the “Browse my computer for driver software” option.
  • After that, select the “Let me pick from a list of available drivers on my computer” option.
  • Now uncheck the checkbox for “Show compatible hardware”.
  • From the given list on your left-hand side, look for Microsoft and then select the Remote NDIS based Internet Sharing Device on your right-hand side.
  • Click on Next. A new popup will appear where you have to click on Yes. This will install the driver.
  • Now click on the Close button and restart your computer.

Option 3 – Try disabling any unnecessary network adapters/connections

Assuming that your Ethernet connection is showing ping loss which indicates that the internet is not stable. In such time, if you use the USB tethering functionality, you won’t be able to access the internet connection from your smartphone. The internet connection will be frequently disconnected since your computer gives priority to the Ethernet connection. Thus, you have to disable the Ethernet connection temporarily.

  • Right-click the network icon on your Taskbar and select the option “Network and Sharing Center”.
  • After that, click the network connection. And then click the Disable button from the status box that opens.
  • After that, check if you can now connect to the internet or not.
If you like to learn and find out more about various Windows errors, and how to repair them go to our vast archive or use search to find articles that will explain and help you in solving your issue.
However, if you prefer to do things fast and with automatization then we are proposing to use an automated solution for your issues. The application that we are recommending is Advanced System Repair Pro
Advanced System Repair utilizes multiple tools all in one to give you a quick, simple, reliable, and very thorough diagnosis of your PC. It brings you all the tools you need in one program to clean, fix, protect, optimize and boost your PC!
1-Click Maintenance
All the tools to make it simple and easy! It's like having a professional technician at the click of a mouse.

Junk Cleaner
Keeping your computer free from unnecessary clutter also helps make your computer last longer. Like any other machine, if you keep it clean and take care of it, it will serve you better for longer!

Optimize background apps
Optimize applications background activity with the built-in Application Optimizer feature.

Disk Defrag
With a simple 1-click, Advanced System Repair speeds up your PC by assembling fragmented files on your machine and organizing them more efficiently.

Malware Removal
Finds and removes all types of harmful malware including trojans, worms, bots, adware, spyware, PUPs, and more!

Privacy Cleaner
The all-in-one privacy suite to Clean Your Tracks & Protect Your Privacy! Make your computer safe, secure, and more efficient!

System Tweak/Optimizer
ASR will analyze your complete system and settings to adjust your PC to function at its maximum performance.

Registry Cleaner
Over time, as you install and uninstall applications, the registry can become cluttered with old entries and broken settings which can result in program crashes, and annoying messages and slow the computer down.
Visit our Advanced System Repair Pro Download page to inform yourself about all the benefits of this software and get a free trial copy of it.
advanced system repair pro

Advanced System Repair Pro

One-click automated PC repair solution
ASR logo
With Advanced System Repair Pro you can easily
Replace damaged files
Restore performance
Free disk space
Remove Malware
Protects WEB browser
Remove Viruses
Stop PC freezing
DOWNLOAD
Privacy Policy | Terms of Use | Uinstall
Advanced System Repair Pro is compatible with all versions of Microsoft Windows including Windows 11

Share this article:

You might also like

3 Methods To Fix Qtcore4.dll Error

Fix Qtcore4.dll Error

Qtcore4.dll Error - What is it?

Qtcore4.dll is a dynamic link library file that helps Microsoft Windows in loading several key components of the system. The Qtcore4.dll error occurs when the Qtcore4.dll file cannot be loaded to run the application supported by this .dll file. The Qcore4.dll missing error message may occur while booting your system or launching a certain program. It is a blue screen of death error type. The Qtcore4.dll error code is often displayed as:

BLUE SCREEN ERROR - QtCore4.dll Not Found

Filei386QtCore4.dll could not be loaded. The error code is 7. Setup cannot continue. Press any key to exit.

Solution

Restoro box imageError Causes

This error code is triggered by a variety of reasons such as:
  • Windows file allocation file gets damaged
  • Your computer BIOS (Basic Input/Output System) are misconfigured
  • The Qtcore4.dll file gets corrupt
  • Registry gets damaged and corrupt
  • Non-Microsoft program not running in tandem with Windows
  • Malware attack
  • Improper hardware driver software
It is advisable to fix the Qtcore4.dll error code immediately as this error can pose serious threats to your system. Qtcore4.dll error can lead to system breakdown.

Further Information and Manual Repair

Here are some ways of fixing the Qtcore4.dll error on your system:

1. Re-install the Program Causing Qtcore4.dll error message to pop up

As dll files are shared files sometimes due to program deletion and installation .dll file settings can get misconfigured, damaged, and corrupt. In such a scenario, you can try reinstalling the program that is causing Qtcore4.dll error message to appear on the screen.

2. Reconfigure your Mis-configured BIOS

If BIOS misconfiguration is the cause of this error code on your system, then try reconfiguring your system’s misconfigured BIOS.
  • To do this boot the computer and then press the BIOS designated keys to enter the BIOS. The keys may vary from manufacture to manufacture but typically, the setup keys are F2, F10, F12, and Del.
  • Once you figure out the setup keys, press them rapidly when booting the computer.
  • After successfully hitting the setup keys, the BIOS will load and you will see the BIOS setting menu on your screen. Adjust settings. Go to SATA Operation and change RAID AHCI to RAID ATA. Save changes and then exit.

3. Scan Your PC with a Registry Cleaner and an Antivirus

However, after adjusting the BIOS if the error still pops up on your screen, then this indicates the problem is bigger than you think. It triggers either malware attack or registry corruption. If these are the underlying causes for the Qtcore4.dll error on your system then you need to scan your PC with a registry cleaner and an antivirus. Registry is the main database of your system; if this gets corrupt it is most likely to result in system failure and valuable data loss. And as for malware, the biggest concern is data security threats. Today’s advanced and lethal malware like viruses and spyware can give easy access to hackers to enter your system from a remote location, browse through your confidential and private data and manipulate it to their advantage. This has led to a surge in various types of cyber crime, data breaches, and identity theft cases over the years. To avoid all this while resolving the error code Qtcore4.dll on your PC, registry cleaning and repair and antivirus scan are needed. You can either download 2 separate tools on your system to scan your PC which by the way will take a lot of time and increase your chances of the system slow down or you can download Restoro.

Why Restoro?

  • Total System Care is an advanced, user-friendly, high, and multi-functional repair.
  • It is deployed with a powerful and intuitive registry cleaner. It also functions as a system optimizer. It spares you from downloading numerous tools to address and resolve different errors on your PC.
  • It is your one-stop solution for not only Qtcore4.dll problems but practically all PC-related issues.
  • The registry cleaner utility detects all the malicious, unnecessary, and obsolete files overloading and corrupting your RAM.
  • This includes junk and temporary files. It wipes them out thus clearing your disk space. Simultaneously, it also repairs the damaged and misconfigured dll files including the Qtcore4.dll file, and fixes the corrupt registry.
  • The privacy error utility has the properties of an antivirus. It detects and removes malware, viruses adware, and spyware from your system in seconds.
  • Total System Care resolves the Qtcore4.dll error on your system and boosts the performance of your system. It has a simple and neat interface which makes it quite easy for users to operate it, even those who are not technically adept.
  • It is compatible with all Windows versions
Click here to download Restoro and repair the Qtcore4.dll error on your PC.
Read More
How to Fix Remote Computer requires network level authentication Error in Windows 10
A couple of Windows 10 users have reported an error on domain-connected systems when they tried accessing their computer systems remotely. This occurs when the network level authentication or NLA is enabled on the computer. If you are one of these users, you better keep reading as this post will guide you on how you can fix this error. To resolve this issue, there are several workarounds you can try. You can either disable this option directly via properties or you can also modify some registry entries or sub-keys and restart the system. When you encounter this problem, an error message pops up that states:
“The remote computer that you are trying to connect to requires network level authentication (NLA), but your windows domain controller cannot be contacted to perform NLA. If you are an administrator on the remote computer, you can disable NLA by using the options on the Remote tab of the System Properties dialog box.”
Or you could also see this error message instead:
“The remote computer requires Network Level Authentication, which your computer does not support. For assistance, contact your system administrator or technical support.”
Before you proceed in troubleshooting the problem using the options provided below, you need to create a backup for your data or system restore point as well as make a copy of any registry entries you are going to modify.

Option 1 – Disable Network Level Authentication via Properties

The NLA is a useful tool that provides your computer with extra security and helps network administrators in controlling who can log into the system with just a click of a single box. However, there are times when it can become a disadvantage and could prevent you from accessing your system remotely. Thus, you need to disable it using Properties.
  • Tap the Win + R keys to open the Run dialog box.
  • After that, type in “sysdm.cpl” and tap Enter to open System Properties.
  • Next, go to the remote tab and uncheck the checkbox for the “Allow connections only from computers running Remote Desktop with Network Level Authentication (recommended)” option.
  • Now click the Apply button to save the changes made and exit System Properties and then try logging into the remote computer again and see if the problem is fixed or not.

Option 2 – Disable NLA via Registry Editor

Note that you can only use this option if the first one didn’t work for you. Take note that this option will require you to restart your PC completely which could mean some downtime if your computer is running a production server. So make sure to save all your work.
  • Tap the Win + R keys to open the Run dialog box and then type in “Regedit” in the field and tap Enter to open the Registry Editor.
  • From there, click on File > Connect Network Registry and input the details of the remote computer and then try to connect.
  • Navigate to the path below after you’re connected:
HKLM >SYSTEM > CurrentControlSet > Control >Terminal Server > WinStations > RDP-Tcp
  • After that, change the values given below to “0”
    • SecurityLayer
    • UserAuthentication
  • The navigate to PowerShell and execute this command – restart-computer

Option 3 – Disable NLA via PowerShell

PowerShell allows you to tap into the remote computer and once you’ve targeted the machine, you can execute the commands given below to disable NLA.
  • Tap the Win + S to open Search and then type in “PowerShell” in the field. Right-click on the related result and select the “Run as administrator” option.
  • After opening PowerShell, execute the command below:
  1. Once in the PowerShell, execute the following command:
$TargetMachine = “Target-Machine-Name” (Get-WmiObject -class “Win32_TSGeneralSetting” -Namespace rootcimv2terminalservices -ComputerName $TargetMachine -Filter “TerminalName=’RDP-tcp'”).SetUserAuthenticationRequired(0) Note: In the command given, the “Target-Machine-Name” is the name of the machine you are targeting.

Option 4 – Use the Group Policy Editor to disable NLA

Another option you can use to disable NLA is via the Group Policy Editor. This is ideal for you if you are blanket disabling. Just take note that the Group Policy Editor is a powerful tool and that if you make some mistakes by changing values you have no clue about, you can render your computer useless so make sure that you create a backup for all the values before you proceed.
  • Tap the Win + R keys to open the Run dialog box.
  • Then type in “gpedit.msc” and tap Enter to open the Group Policy Editor.
  • From there, go to this path – Computer Configuration > Administrative Templates > Windows Components > Remote Desktop Services > Remote Desktop Session Host > Security
  • After that, search for “Require user authentication for remote connections by using Network Level Authentication” and set it to disabled.
  • Now check if the error is fixed or not.
Read More
Fix 0X800F080C Error in Windows 10
Error 0X800F080C is tied to corrupted system files and .NET framework issues. In this article, we will focus on how to fix it starting first with .NET fixes and then moving to system-related ones. Follow the guide step by step so you can fix this error fast and easily.

Use third party automatic solution

If you are not tech-savvy or you do not wish to manually tackle with Windows system you can use RESTORO (guide and download link below) to automatically repair this error. RESTORO will automatically scan your system and fix all errors with just a single click of a mouse. If you wish to fix the error manually keep on reading.

.NET issues

As previously stated 0X800F080C error can occur due to issues with .NET framework, 3.5 framework to be more precise and there are two ways we can fix this error. Follow the guide below as presented:
  1. Install .NET 3.5 framework from Windows features

    First thing is to try and install the framework from Window features itself. Sometimes installation and activation of .NET 3.5 in other ways can result in this error. To install it do the following: Press ⊞ WINDOWS + R to open the run dialog Inside run type in appwiz.cpl and press ENTER to open up the Programs and Features menu Inside the Programs and Features menu click on Turn Windows features on or off. Check the box associated with .NET Framework 3.5 (this package includes .NET 2.0 and 3.0) Press OK Click on YES and wait for the package to be installed then reboot your PC
  2. Run the .NET Repair Tool

    If the previous step was not successful or you already had .NET 3.5 installed then run the troubleshooter in order to fix issues. Go to the official Microsoft .NET framework repair tool website here and download it. Once downloaded install the tool and follow onscreen instructions.

Corrupted system files

If the previous solution has not provided you with results then you have system file corruption that needs to be fixed. Move from one solution to another as presented below:
  1. Run SFC scan

    SFC scan is a built-in Windows tool for solving corrupted system files issues, it is fully automated and does not require from the user any kind of knowledge or information. To run it and scan the system do the following: Press ⊞ WINDOWS + X to open the secret menu Left-click on the command prompt (admin) In command prompt type SFC /SCANNOW and press ENTER Wait for the process to finish, do not interrupt it and once it is done, restart your computer
  2. Run DISM scan

    DISM scan is similar to SFC scan but it tackles different types of system file corruption and it is recommended to run it also after SFC has been completed. Please note that for DISM scan to be successful you will need a stable internet connection since DISM will replace corrupted files with new ones downloaded from Microsoft. To run it do the following: Press ⊞ WINDOWS + X to open the secret menu Left-click on the command prompt (admin) inside command prompt type: exe /online /cleanup-image /scanhealth followed by ENTER, then type: Dism.exe /online /cleanup-image /restorehealth also followed with ENTER. Leave scan to finish and reboot your PC
Read More
Unhandled Exception occurred in Application
If you encountered an error message that says, “Unhandled exception has occurred in your application”, when you start your Windows 10 computer, read on as this post will guide you on how you can fix it. This kind of error usually appears in a Microsoft .NET Framework window and it mostly pops up as soon as you turn on your computer. Here’s the complete context of the error message:
“Unhandled exception has occurred in your application. If you click Continue, the application will ignore this error and attempt to continue. If you click Quit, the application will close immediately.”
When this error occurs, your computer may freeze or display other suspicious behavior at times. Either way, there are several options you can check out in this post to resolve this issue, so read on. This kind of error could be caused by several factors. It could be due to your antivirus program or other third-party programs installed on your computer. It is also possible that the installation of the Microsoft .NET framework id corrupted or some of its installation files are corrupted. Thus, to fix the error, there are a few suggestions you need to follow such as:

Option 1 – Try to temporarily disable your anti-virus program

As mentioned, the error could be due to the antivirus program or the Windows Defender Firewall installed on your computer. Thus, disabling them or any security software installed in your computer is always a good idea you can try when you’re not able to access the shared drive in your computer. There are times when you encounter problems like the “Unhandled exception has occurred in your application” error due to interference of antivirus or security programs. Thus, you have to disable both your antivirus program in the meantime and check if it fixes the error or not.

Option 2 – Put your computer in a Clean Boot State

As pointed out, it is possible that some third-party program or service is the one that’s behind the problem. To isolate this possibility and to identify the culprit, you have to put your computer into a Clean Boot State. To do so, follow the steps below.
  • Log onto your PC as an administrator.
  • Type in MSConfig in the Start Search to open the System Configuration utility.
  • From there, go to the General tab and click “Selective startup”.
  • Clear the “Load Startup items” check box and make sure that the “Load System Services” and “Use Original boot configuration” options are checked.
  • Next, click the Services tab and select the “Hide All Microsoft Services” check box.
  • Click Disable all.
  • Click on Apply/OK and restart your PC. (This will put your PC into a Clean Boot State. And configure Windows to use the usual startup, just simply undo the changes.)
  • Once your computer has restarted, check if the error is now gone. If it is, then the culprit is some third-party program. Thus, you have to enable the third-party programs one by one to find out which one of them is causing the the “Unhandled exception has occurred in your application” error.

Option 3 – Try to run a System File Checker scan

System File Checker or SFC is a built-in command utility that helps in restoring corrupted files as well as missing files. It replaces bad and corrupted system files with good system files that might be the cause why you’re getting the “Unhandled exception has occurred in your application” error. To run the SFC command, follow the steps given below.
  • Type “cmd” in the Start search and then right-click on the appropriate search result.
  • Next, select “Run as administrator” to open Command Prompt with admin privileges.
  • After opening Command Prompt, type in sfc /scannow
The command will start a system scan which will take a few whiles before it finishes. Once it’s done, you could get the following results:
  1. Windows Resource Protection did not find any integrity violations.
  2. Windows Resource Protection found corrupt files and successfully repaired them.
  3. Windows Resource Protection found corrupt files but was unable to fix some of them.
  • Now restart your computer and see if the problem is fixed or not.

Option 4 – Install and update Dependencies

There are times when programs and applications need to have drivers and supporting software installed for them to properly work. Although the installation usually takes care of it, it’s time for you to do some manual check especially if you are getting this issue of abnormal program termination.
  • Install some qualified drivers – A number of high-end games and applications need to have correct and valid drivers for them to work. They just don’t work with general drivers though. Microsoft has this Windows Hardware Quality Labs testing also known as WHQL testing which makes sure that drivers meet the correct experience and pass through the proper testing before certification. Thus, when installing drivers, you need to ensure that they are qualified drivers for your Windows 10 PC.
  • Download and install or Update DirectX – As you know, Microsoft DirectX is a suite of technologies developed by Microsoft to provide hardware acceleration for heavy multimedia applications like HD videos and 3D games. Since you are using Windows 10, you have the DirectX 12 version while the earlier Windows versions use the DirectX 11 version.
  • Install the Microsoft DirectX End-user runtime – The Microsoft DirectX end-user runtime gives updates to version 9.0c as well as previous versions of DirectX. To install it, click on this link and download it.
  • Update or install the .NET framework – The .NET framework is used by games and applications during development which means that without the runtime files that are installed in your computer, it definitely won’t work. Thus, you need to install or update this framework. You can also use the .NET setup verification tool to verify it.
Read More
A Quick Guide to Fixing Error 451

How to Fix Error 451

Error 451 - What is it?

This is a typical SMTP error code. SMTP is the abbreviation for Simple Mail Transfer Protocol. It is an internet standard for email transmission. In other words, SMTP is a text-based protocol in which the sender communicates with the mail receiver by issuing commands and receiving a response code. The SMTP error 451 is displayed in the following format:
‘451 Requested action aborted: local error in processing’
This error message indicates that the program cannot send more messages and the server has hit the limit. This is because some mail servers have limits. The sever stops the task of sending and receiving emails when this limit is achieved.

Solution

Restoro box imageError Causes

The causes of error 451 include:
  • Server limit reached
  • Email rejection due to a remote anti-spam filter
  • Request denied by the server
  • Viral infection
If you heavily rely on email communication with your business partners and colleagues, then it is advisable to immediately resolve this issue without any delays. Though this error is not fatal, you should repair it right away to avoid inconvenience. SMTP error code 451 can hamper your ability to communicate via email.

Further Information and Manual Repair

Here are some of the best, easy, and effective DIY methods that you can try to repair error code 451 on your PC.

Method 1

To fix this error, simply follow these steps:
  • login to Linux SSH
  • Open the file /etc/localdomains
  • Nano/etc/localdomains and then add the domain name that is triggering email sending error
  • Now reboot your PC
This will hopefully resolve the issue. Nonetheless, if the error code still persists, then try other methods given below.

Method 2 - Configure List Settings to change the server limit.

This can be done by accessing the List Settings then Outgoing Mail Server (SMTP) and then the Limit Feature. By accessing the limit feature, you can easily adjust the program to any limit of your choice. Configure the limit and save changes. Reboot PC to activate the changes made.

Method 3 - Scan and Remove Viruses.

This error code can also be triggered due to viral infection. If this is the cause, then simply download an anti-virus on your PC. Scan the entire system and remove all detected malicious programs like Trojans, malware, adware, viruses, and spyware. This will repair the error 451 on your system.

Method 4

If the error still persists, then contact your SMTP provider to check the situation and resolve it. There is a possibility the error is generated from the SMTP provider’s end.
Read More
YOU ARE NOT AUTHORIZED TO ACCESS ...
If you have encountered the “YOU ARE NOT AUTHORIZED TO ACCESS THIS WEB PAGE AS PER THE DOT COMPLIANCE” error while trying to visit a website using either Firefox or Chrome browser, then read on as this post will guide you on how you can fix this error. Apart from this error message, you might also see an alternative message that says, “Web Page Blocked! The page you have requested has been blocked because the URL is banned as per the Government Rules”. When you get any of the aforementioned error messages when visiting a website, this means that it has been marked. It is mostly recommended to not access the site as it might be blocked for some illegal reason. However, if you are certain that the website is legitimate and safe and you believe that it has been blocked by accident, then you can check out the given methods in this post to unblock and access the blocked or restricted website. There isn’t actually a straightforward way to remove the restriction on the website or the DOT compliance. And it won’t matter what browser you use as you will still get the same error. Thus, the best way to go about this issue is for you to bypass the ISP restriction. But before you proceed, keep in mind that the ISPs (Internet Service Providers) can block any website when a request goes through their servers.

Option 1 – Try changing the DNS

If the request to access the website does not go through the ISP’s DNS server, you might have a chance in accessing it by changing your DNS settings. You can try using the Google Public DNS.
  • Tap the Win + R keys to open the Run dialog box.
  • Then type “inetcpl.cpl” in the field and hit Enter to pull up the Internet Properties.
  • After that, go to the Connections tab and select the LAN settings.
  • From there. Uncheck the “Use a Proxy Server” option for your LAN and then make sure that the “Automatically detect settings” option is checked.
  • Now click the OK and the Apply buttons.
  • Restart your PC.
Note: If you are using a third-party proxy service, you have to disable it.

Option 2 – Try to install a Proxy Extension

You could also try installing a Proxy extension or Proxy software as it could also help you access the website you are trying to open as it allows you to access the blocked websites by routing the request through their server. Aside from that, it can also hide it from ISPs to make them look like the content is coming from the proxy servers.

Option 3 – Try using a VPN connection

There are instances when the network that your computer is logged on might have blocked your access to the website you are trying to open and so to fix it, you can try to use a VPN connection. There is a lot of free VPN software out there but just make sure that you install a trusted one. Once you’ve connected using VPN, try to open the website again and see if you can now access it.

Option 4 – Check the Windows Host file

You can also try to cross check the Windows Hosts file to find out if the website you are trying to open has been blocked because if it is, then it’s no wonder why you’re getting the ERR CONNECTION TIMED OUT error in Chrome. There are instances when some third party application modifies the file and add some websites to the block lists. So if the website is indeed blocked, you need to remove it from the list.

Option 5 – Try to contact your ISP

If none of the options given above worked, then you can try to contact your ISP as there are times when DOT clears a website, the ISPs are still blocking it. Thus, it’s probably better if you reach out to them and ask them to unblock the website from their end.
Read More
Rollback any driver in Windows 10
Installing Windows updates, installing a new driver from the manufacturer, or even just installing an application or game can cause sometimes certain components of your computer to stop working properly or introduce issues that were not present just before mentioned installation. Luckily for all of us, Microsoft seems aware of this potential issue and we have the option to roll back an older driver which performed well and had no issues at all. In order to do this first press ⊞ WINDOWS + X to open the hidden start menu and click on Device Manager. keyboard with windows and x markedFrom the Device Manager choose the troublesome device and right-click on it, choose properties. AMD device driver inside device managerDevice properties floating Window will appear. AMD driver properties WindowClick on the top tab which says, Driver. From the Driver tab, click on Roll Back Driver. AMD driver rollback markedNote that if the device is working properly, the Roll Back Driver button will be greyed out and you will not be able to click on it meaning that chosen device is not the issue. If the device is not working properly and you can click on Roll Back driver, do it, choose the previous version, and reboot your computer. You can use this method to get back to the previous driver version for any device that is causing issues in your computer.
Read More
Razer unveils their first internal PC hardware
razer pc hardware components
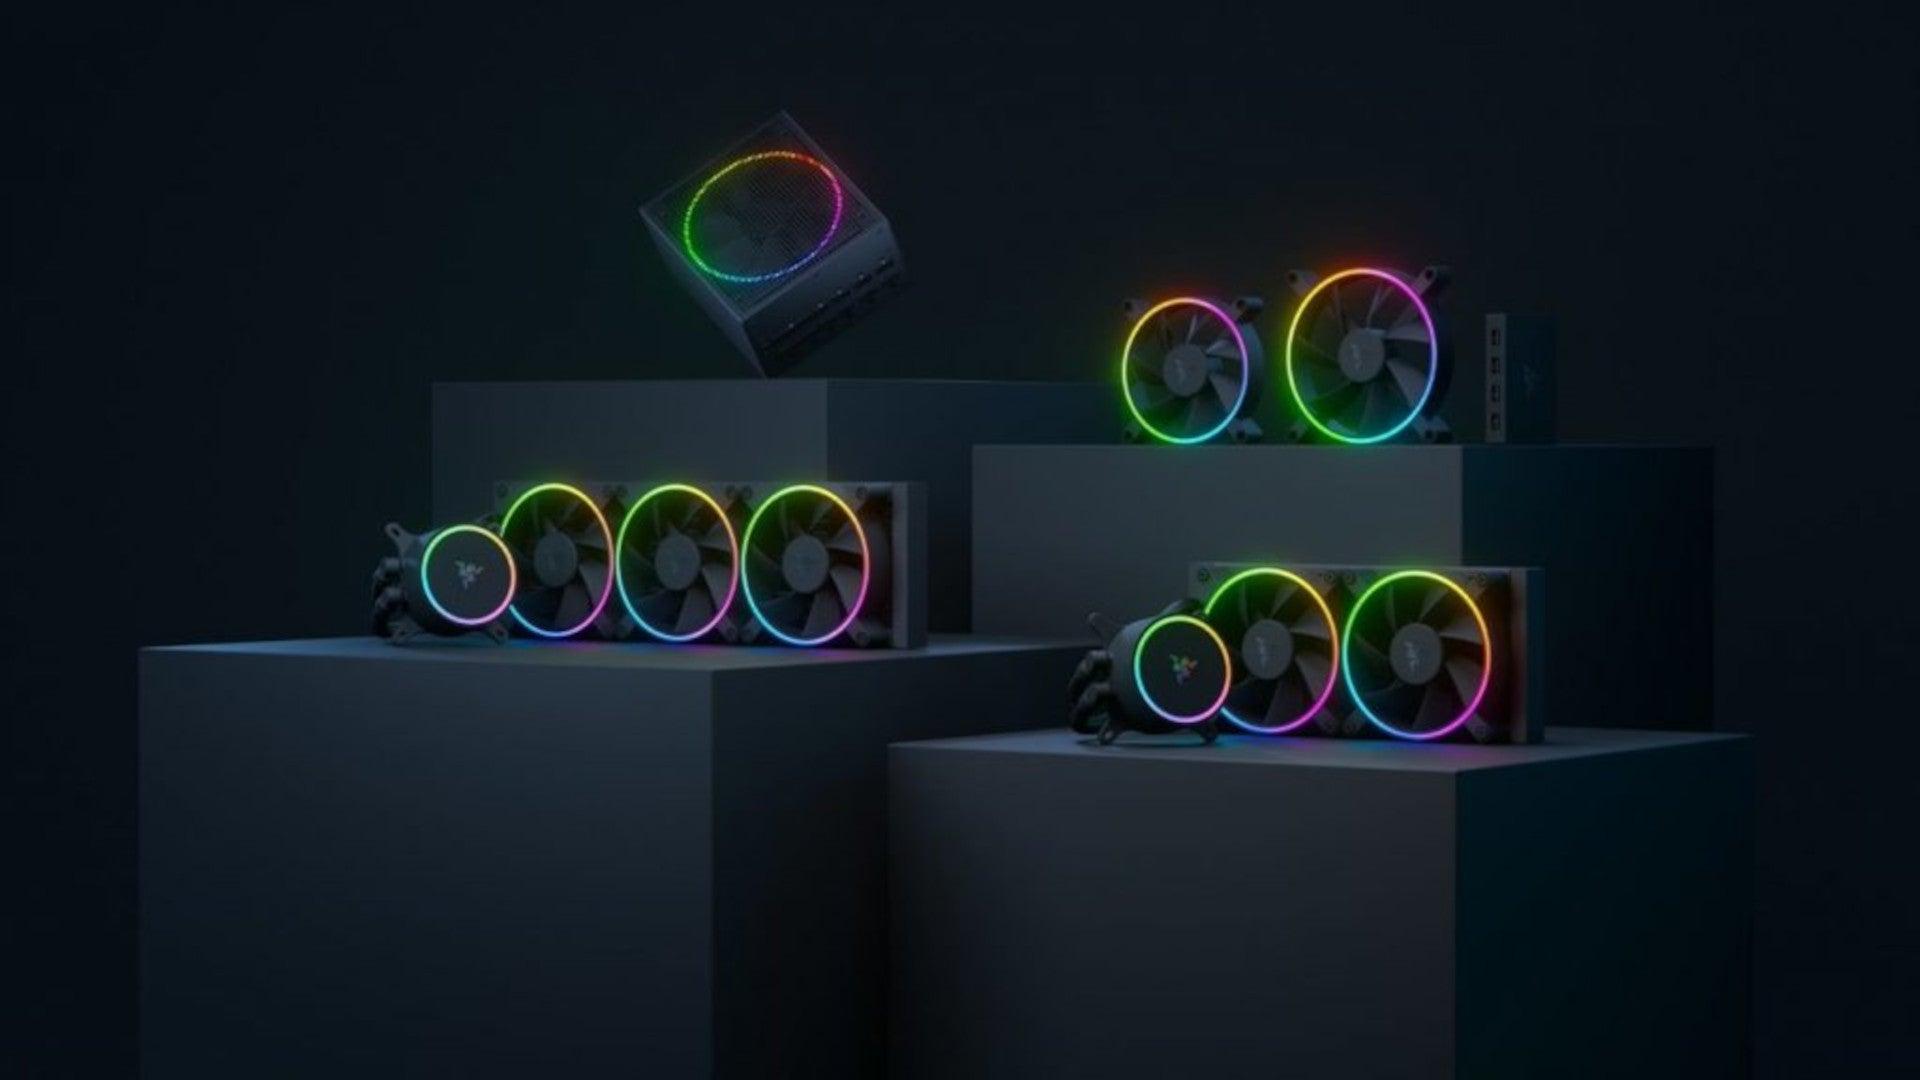
Razer is a well-known brand among PC gamers and users, it started as a peripheral manufacturer focused on keyboards and mouse but after years passed Razer expanded its inventory offerings. It soon started offering headphones and lately has branched into wider product lines like gaming chairs and protection masks. It is not a big surprise that Razer is expanding into other branches of the PC industry. This time, however, it has revealed not one but three new hardware for your PC. Case fans, all in one liquid cooler and power supply. There are not many details about the products themselves but one thing is one hundred percent confirmed, they come with Razer Chroma, all of them, even the fans.

Katana Chroma ATX PSU

razer power supply
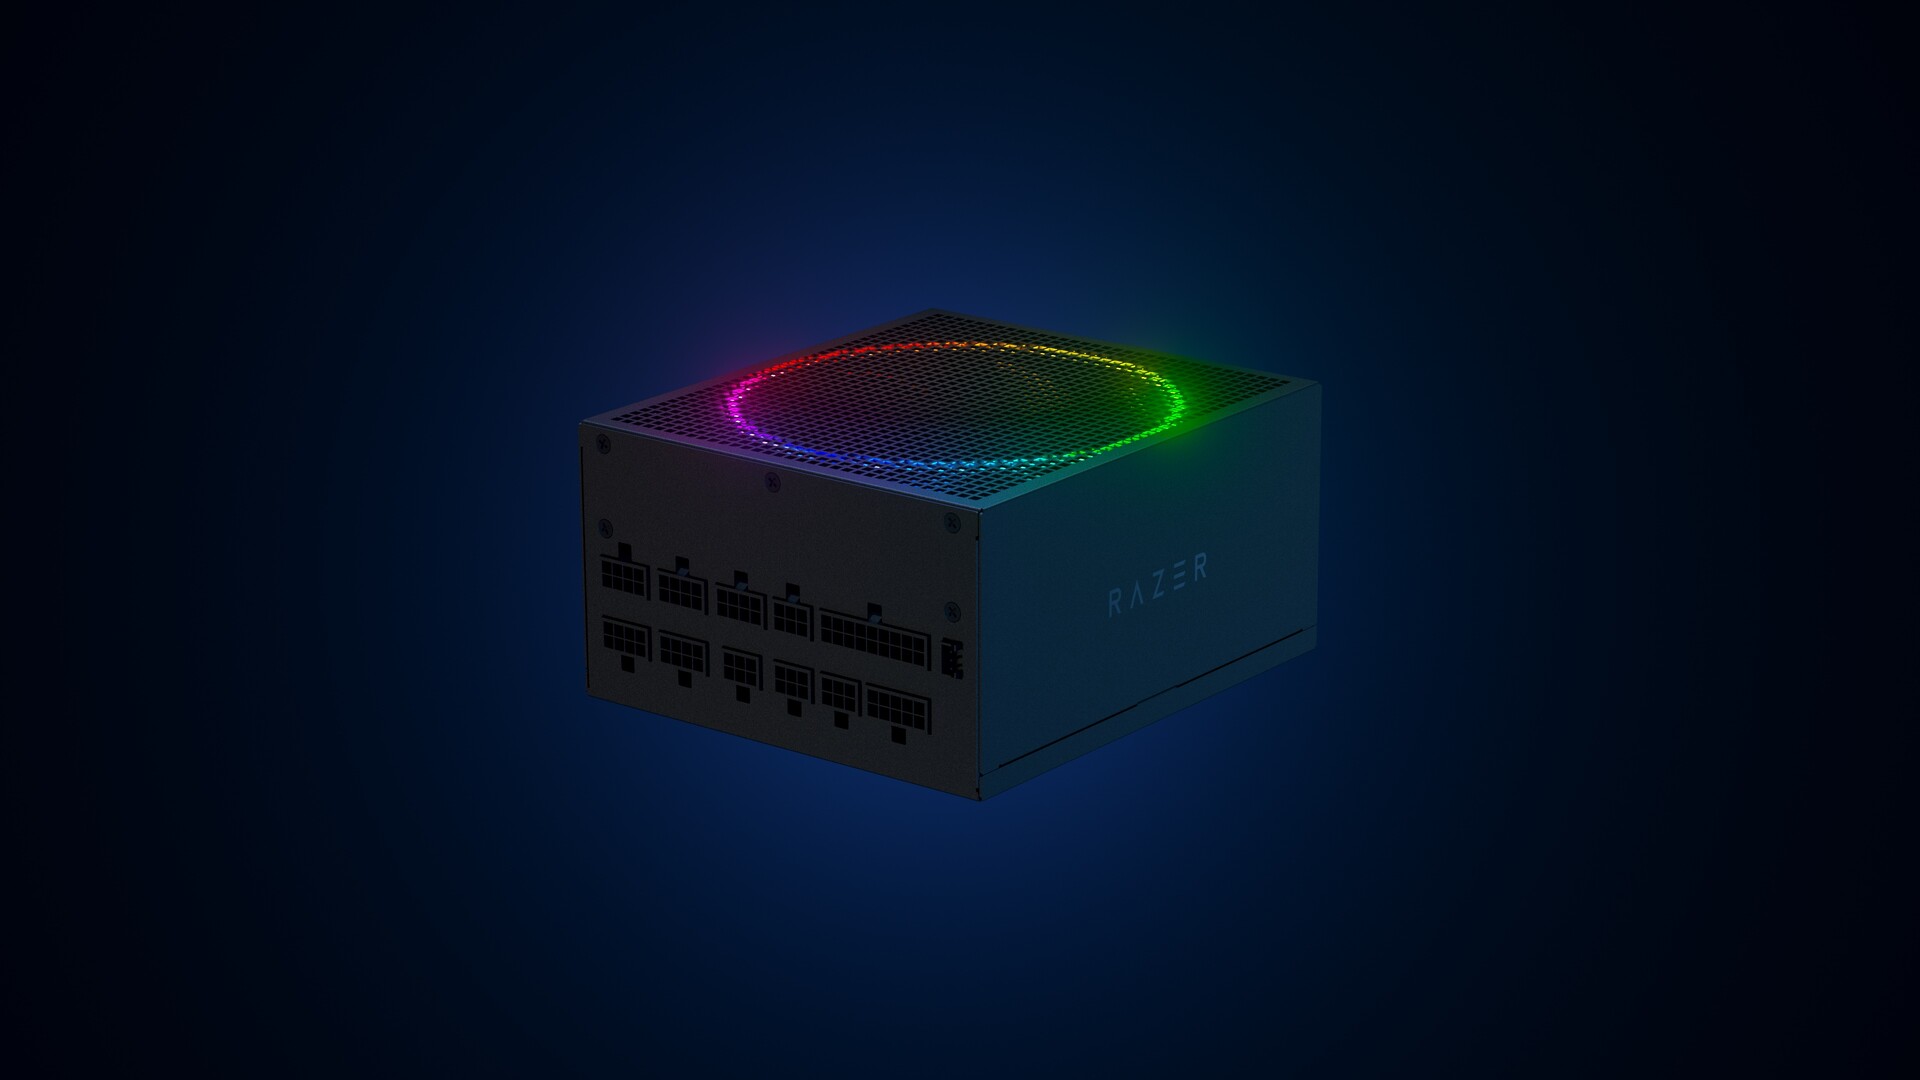
Most interesting for me personally is Razers Katana, the power supply unit. It is a modular power supply ranging from 750W to 1200W with the additional option of Titanium rated one with an impressive 1600W of power. Power supply will start shipping in early 2022 and at the time of writing this article no price range has been released.

Razer Hanbo AIO

razer water cooling
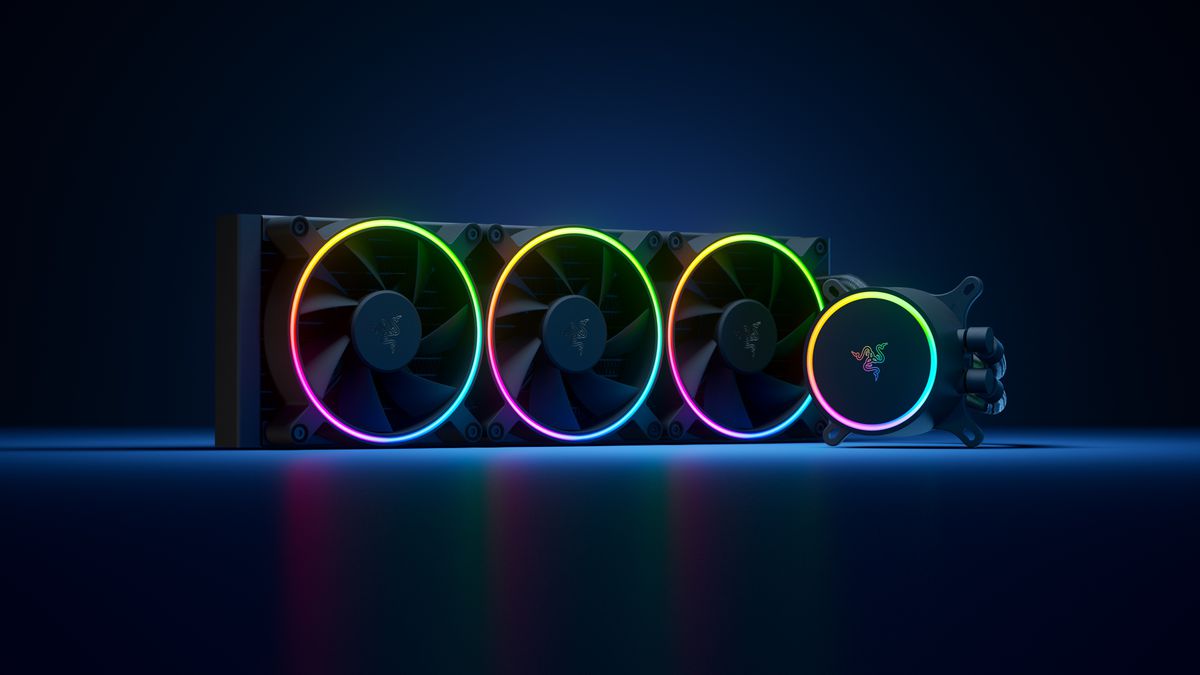
Hanbo liquid cooler will feature an optimized intake design so it can ensure greater heat transfer and fluid dynamic for improved reliability and silent operation. Radiator comes in 240mm size with two fans and a larger one of 360mm with three fans. The pump will be able to rotate in any direction of full 360 degrees so it can fit in any case. Hanbo will be released in November this year but no pricing has been released so far.

Razer Kunai Chroma case fans

razer case fans
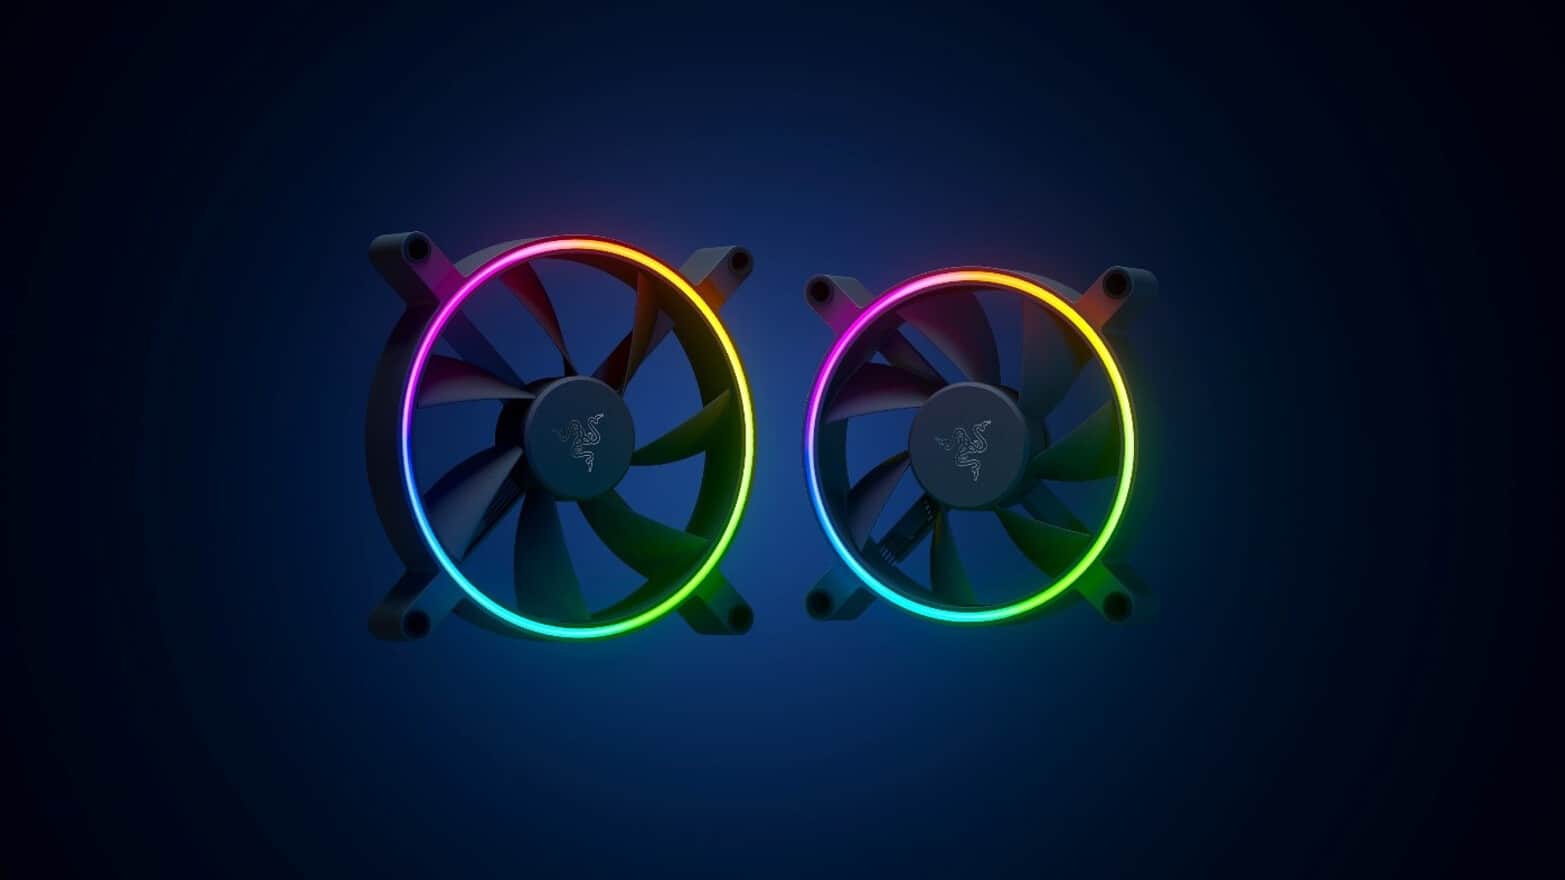
Kunai fans will boast high static pressure performance with lowered noise. They will go as far as 2200rpm for the 120mm version where the 140mm version will go up to 1600rpm. They will come with addressable LEDs and up to eight fans will be able to be connected to Razer’s PWM fan controller that will come with a magnet at the back for easy attachment to any steel part of PC casing. PWM will use Razer’s Synapse software to customize pulse width modulation in order to improve airflow and noise. PWM will be priced at $49.99 in the Razer Store and it is available for preorder. Fans are priced at $44.99 for one 120mm or $129.99 for a three-pack of 120mm. One 140mm will go for $49.99 and a three-pack will be $129.99.
Read More
Fix Feature Update failed, error 0x8007000e
In every task carried out in the Windows 10 operating system, some of them don’t go smoothly and it could encounter a couple of errors along the way. One of these errors you could encounter is the Windows Update error code 0x8007000e. This particular error was reported to occur a lot when downloading and installing a Feature update via Windows Updates. And recently, it has been reported to occur a couple of times for the Windows 10 1903 May 2019 update. According to security experts, this error could be caused by a lack of memory or disk space as well as issues in the Windows Update mechanism. Whatever the cause is, troubleshooting this problem shouldn’t be hard as this post will give you some potential fixes you can check out. To fix this error, here are some options you need to consider:

Option 1 – Clear up temporary or junk files

The error could be caused by some temporary or junk files in your computer and so you need to clear them up to fix the problem. You can achieve that using the Storage Sense feature.
  • Open Setting > System > Storage from the WinX Menu.
  • From there, you will see a list of all the local and connected storage devices along with the details on the free space. Make sure that Storage Sense is on.
  • Next, find a link that says “Free Up Space” and click it to open.
  • After that, a screen which is the built-in program in Windows 10 will appear and will scan your computer for the following junk files so you can free up disk space:
    • Windows Upgrade Log Files
    • System created Windows Error Reporting Files
    • Thumbnails
    • Temporary Internet Files
    • Previous Windows Installation Files
    • Delivery Optimisation Files
    • DirectX Shader Cache
  • Choose the files you want to get rid of and then click on the remove files option. Note that you’ll have an idea of the total size as you select any of the junk files listed above.
  • Now go to the “Free Up Space Now” section and click the Clear Now button. This will get rid of all the temporary or junk files in your computer and should hopefully fix the Windows Update error 0x8007000e.

Option 2 – Reset the Windows Update components

If by any chance that the second option didn’t work, resetting the Windows Update components could also help you resolve the problem. How? Refer to the following steps:
  • Open Command Prompt with admin privileges.
  • After that, type each one of the following commands and hit Enter after you key in one after the other.
    • net stop wuauserv
    • net stop cryptsvc
    • net stop bits
    • net stop msiserver
Note: The commands you entered will stop the Windows Update components such as Windows Update service, Cryptographic services, BITS and MSI Installer.
  • After disabling WU components, you need to rename both the SoftwareDistribution and Catroot2 folders. To do that, type each one of the following commands below and don’t forget to hit Enter after you type one command after the other.
    • ren C:/Windows/SoftwareDistribution/SoftwareDistribution.old
    • ren C:/Windows/System32/catroot2/Catroot2.old
  • Next, restart the services you’ve stopped by entering another series of commands. Don’t forget to hit Enter after you key in one command after the other.
    • net start wuauserv
    • net start cryptsvc
    • net start bits
    • net start msiserver
  • Close Command Prompt and reboot your PC.

Option 3 – Try configuring the Windows Update-related Services

  • Tap the Win + R keys to open the Run dialog box.
  • Then type “cmd” in the field and tap Enter to open an elevated Command Prompt.
  • Next, execute the following commands. Note that you have to type and enter each the command one after the other.
    • SC config wuauserv start= auto
    • SC config bits start= auto
    • SC config cryptsvc start= auto
    • SC config trustedinstaller start= auto
  • The commands you executed will make sure that the Windows Update-related services are available. Once it’s done, restart your computer and see if the Windows Update error is now fixed.

Option 4 – Try running the Windows Update troubleshooter

Windows 10 have various troubleshooters that can help you resolve many system issues. So if you’re dealing with Windows Update errors like Error 0x8007000e, you can run the Windows Update troubleshooter to resolve it. To run it, go to Settings and then select Troubleshoot from the options. From there, click on Windows Update and then click the “Run the troubleshooter” button. After that, follow the next on-screen instructions and you should be good to go.

Option 5 – Try to use the Media Creation tool

The Media Creation tool in Windows allows you to use the ISO installation file to make a bootable device that you can use to install Windows on your PC. Note that this is kind of different from the usual installation process as it could erase your computer’s current settings and data on the primary drive. Thus, before you proceed, you need to backup all your data into some removable drive and then use the Media Creation tool to make a bootable drive.
  • After making the bootable drive, you need to plug it in your computer and then reboot.
  • Next, tap the F10 or Esc key to open the boot options.
  • Now set the boot priority of the removable drive the highest. Once the setup comes forth, follow the next onscreen instructions and install Windows without any problems.
Read More
Fix UTCSVC high CPU and Disk usage in Windows
There is a lot of high resource utilization by any process that slows down a Windows operating system and one of the services that could cause such a thing is the utcsvc.exe process. This particular process at times can cause high CPU and disk usage. So if you are currently facing this problem, read on as this post will guide you on how you can resolve the problem. UTC which stands for Universal Telemetry Client is a software that runs a service named Diagnostic Tracking Service or DiagTrak. This service is used by Microsoft to collect customer feedback, analyze customer’s problems, and push resolution via updates in order to make the Windows 10 operating system better. This service is an executable file that could be translated to Service Host and even though the process does not usually cause problems, there are actually times when it does especially if it results in high resource utilization. In such cases, you might want to consider disabling it to fix its high CPU and disk usage.

According to Microsoft:

“We collect information about you, your devices, applications and networks, and your use of those devices, applications, and networks. Examples of data we collect include your name, email address, preferences, and interests; browsing, search and file history; phone call and SMS data; device configuration and sensor data; and application usage.”
There are several ways you can disable the utcsvc.exe process. You can disable it using the Service Manager, Registry Editor, and Group Policy Editor. For more details, refer to the instructions laid out below.

Option 1 – Disable the Connected User Experience & Telemetry Service via Service Manager

Note that this option is for standalone systems, so if you’re not using one, refer to the next given options below.
  • Tap the Win + R keys to open the Run dialog box.
  • Then type “services.msc” in the field and tap Enter or click OK to open the Services Manager.
  • From the given list of services, look for the Connected User Experience service. Once you found it, click on it and you’ll see its description which states:
“The Connected User Experiences and Telemetry service enables features that support in-application and connected user experiences. Additionally, this service manages the event-driven collection and transmission of diagnostic and usage information (used to improve the experience and quality of the Windows Platform) when the diagnostics and usage privacy option settings are enabled under Feedback and Diagnostics.”
  • Next, right-click on it and select Properties.
  • Now, change its Startup Type to Disabled and click on the Apply and OK buttons to save the changes made.

Option 2 – Disable the Connected User Experience & Telemetry Service via Registry Editor

  • Tap the Win + R keys to launch the Run utility and type “Regedit” in the field and click OK to open the Registry Editor.
  • Next, navigate to this registry path: HKEY_LOCAL_MACHINESOFTWAREPoliciesMicrosoftWindowsDataCollection
  • After that, right-click on the folder named “DataCollection” and select New > DWORD (32-bit) Value.
  • Now name the new value “AllowTelemetry” and make sure that its Value data is “0” and then click on OK to save the changes made.
  • Restart your computer.

Option 3 – Disable the Connected User Experience & Telemetry Service via Group Policy Editor

If you have to disable the service related to the Universal Telemetry Client for company-managed systems, then you can do that using the Group Policy Editor.
  • Tap the Win + R keys to open the Run utility and type “gpedit.msc” in the field and hit Enter to open the Group Policy Editor.
  • Next, navigate to this path: Computer Configuration > Administrative Templates > Windows Components> Data Collection and Preview Build
  • After that, double-click on Data Collection and Preview Build to open its settings.
  • From there, look for the “Allow Telemetry” item and double click on it to open its Properties.
  • Next, set the radio button to Disabled and then click on the Apply button to save the changes made.
  • Restart your computer.

Option 4 – Run the Hardware and Devices Troubleshooter or the Performance Troubleshooter

Hardware and Devices Troubleshooter:

  • The first thing you need to do is click on Start and then on the gear-like icon to pull up the window for Settings.
  • After opening Settings, look for the Update and Security option and select it.
  • From there, go to the Troubleshoot option located on the left-hand side of the list.
  • Next, select Hardware and Devices from the list and open the Troubleshooter and run it. Once it is doing its job, wait for it to complete the process and then restart the system.
  • After the system restarts, check if the problem’s now fixed. If not, refer to the next option given below.

Performance Troubleshooter:

  • Tap the Win + R keys to open the Run dialog box.
  • Type “exe /id PerformanceDiagnostic” in the field and hit Enter to open the Performance troubleshooter.
  • Then click on Next to get started. Wait until the process is completed.
Read More
1 2 3 162
Logo
Copyright © 2022, ErrorTools. All Rights Reserved
Trademarks: Microsoft Windows logos are registered trademarks of Microsoft. Disclaimer: ErrorTools.com is not affiliated with Microsoft, nor claim direct affiliation.
The information on this page is provided for information purposes only.
DMCA.com Protection Status