Reset Windows computer without Settings app

As you know, the Settings app is a vital part of Windows 10 as it helps in fixing issues in the system and offers users access to various Troubleshooters, as well as the Reset function and many more. So if you want to Reset this PC or a Windows Store app, you need to use the Settings app to do so. However, one of the most annoying errors you can encounter when using the Settings app is that it crashes or sometimes does not open at all. Thus, if you are having issues with this app, worry not for there are alternative ways you can try to reset your Windows 10 PC.

For you to reset your Windows 10 PC without using the Settings app, the main option you have is to use the Advanced Startup options and there are different methods by which it can be accessed. It can be accessed via Lockscreen, Command Prompt window, or via Start Menu.

Option 1 – Reset Windows 10 via Lockscreen

  • You need to first boot into the Advanced Startup options from the lock screen. If you’re already logged in to your account, you have to hit the Win + L keys to get on the lock screen.
  • Next, click on the Power button located at the bottom right corner of the screen.
  • After that, hold the Shift key and click on Restart to restart your computer into the Advanced Setup option mode. And from there, you can reset your Windows 10 computer.

Option 2 – Reset Windows 10 via Command Prompt

  • Search for “cmd” in the Cortana search box or hit the Win + R keys to open the Run box and type “cmd” in the field and hit Enter to open Command Prompt.
  • If a User Account Control or UAC prompt appears, click Yes to proceed in opening Command Prompt.
  • After that, type the following command and hit Enter to execute it:

shutdown /r /o /f /t 00

  • After you execute the command, it will restart your computer into the Advanced Startup options where you can reset your Windows 10 computer.

Option 3 – Reset Windows 10 via Start Menu

  • Tap the Win key or click on the Start button located in the Taskbar.
  • Then click on the Power button at the bottom right portion of the screen.
  • Next, press and hold the Shift key on your keyboard and then click on Restart. This will restart your Pc into the Advanced Startup options.

Note: Once you have access to the Advanced Startup options, you have to go to the setting which allows you to Reset your Windows 10 PC. All you have to do is select Troubleshoot > Reset this PC to reach the following screen

Afterward, select either the “Keep my files” option or the “Remove everything” option depending on your preference, and then proceed to the next on-screen instructions that follow to reset your Windows 10 computer.

If you like to learn and find out more about various Windows errors, and how to repair them go to our vast archive or use search to find articles that will explain and help you in solving your issue.
However, if you prefer to do things fast and with automatization then we are proposing to use an automated solution for your issues. The application that we are recommending is Advanced System Repair Pro
Advanced System Repair utilizes multiple tools all in one to give you a quick, simple, reliable, and very thorough diagnosis of your PC. It brings you all the tools you need in one program to clean, fix, protect, optimize and boost your PC!
1-Click Maintenance
All the tools to make it simple and easy! It's like having a professional technician at the click of a mouse.

Junk Cleaner
Keeping your computer free from unnecessary clutter also helps make your computer last longer. Like any other machine, if you keep it clean and take care of it, it will serve you better for longer!

Optimize background apps
Optimize applications background activity with the built-in Application Optimizer feature.

Disk Defrag
With a simple 1-click, Advanced System Repair speeds up your PC by assembling fragmented files on your machine and organizing them more efficiently.

Malware Removal
Finds and removes all types of harmful malware including trojans, worms, bots, adware, spyware, PUPs, and more!

Privacy Cleaner
The all-in-one privacy suite to Clean Your Tracks & Protect Your Privacy! Make your computer safe, secure, and more efficient!

System Tweak/Optimizer
ASR will analyze your complete system and settings to adjust your PC to function at its maximum performance.

Registry Cleaner
Over time, as you install and uninstall applications, the registry can become cluttered with old entries and broken settings which can result in program crashes, and annoying messages and slow the computer down.
Visit our Advanced System Repair Pro Download page to inform yourself about all the benefits of this software and get a free trial copy of it.
advanced system repair pro

Advanced System Repair Pro

One-click automated PC repair solution
ASR logo
With Advanced System Repair Pro you can easily
Replace damaged files
Restore performance
Free disk space
Remove Malware
Protects WEB browser
Remove Viruses
Stop PC freezing
DOWNLOAD
Privacy Policy | Terms of Use | Uinstall
Advanced System Repair Pro is compatible with all versions of Microsoft Windows including Windows 11

Share this article:

You might also like

Fix Can’t Find Games on Twitch
Can’t Find Games on Twitch is a common error happening to a vast variety of people. The issue can be traced back to browser issues to others like malware infection. In this guide, we will provide you with common fixes on how to overcome this issue so you can continue watching your favorite streamer.
  1. Sign out of Twitch, then sign back in

    If it is a browser issue or some glitch in the Twitch system simply signing out and then signing back in will solve the issue since information about the account will be resent to the twitch platform.
  2. Refresh the application

    Sometimes servers are having high traffic and can get overloaded, refresh the application in the upper left corner to reload content.
  3. Use browser instead of Twitch application

    If you are still having issues with the application, open the twitch website and access content there.
  4. Close twitch

    But in task manager. Sometimes just closing it via the X button is not enough, some glitches stay and the application is still running in the background. Open task manager and close it from there.
  5. Scan system for malware

    Scan the entire system for malware, various malware can halt twitch and cause issues.
  6. Reinstall application

    If everything else failed, reinstall the application.
Read More
What to do if Windows is stuck in Tablet Mode
To make the Windows 10 operating system a lot more user-friendly, Microsoft introduced the Tablet Mode for Windows 10 devices, especially the 2-in-1 devices like Surface Pro and Surface Book. Despite the Tablet Mode’s efficiency, it also encounters some errors from time to time. One of the issues users reported about tablet mode is that they can’t turn off or exit tablet mode. If you are one of these users, read on as this post will guide you in what you can do to fix the issue. To fix the problem with Tablet Mode, there are several suggestions you can check out. You can try to check the full-screen setting, or perform a full shutdown or perform two buttons to restart the Surface devices. You could also disable Tablet Mode via Registry Editor or perform System Restore or change the settings in the System tab or the Action Center.

Option 1 – Try to check the full-screen setting

  • Tap the Win + I keys to open the Windows Settings app.
  • Then navigate to this path, Personalization > Start.
  • Next, scroll down to toggle off the “Use Start Full Screen” option.
  • After that, restart your computer and see if the problem is fixed.

Option 2 – Perform a full shutdown

  • Open Command Prompt with admin privileges first.
  • Next, execute this command to perform a full shutdown: shutdown /s /f /t 0
  • The command you entered will shut down your computer and once it’s turned off, wait for a couple of minutes and then turn it back on.

Option 3 – Try to perform a two-button restart on your Surface device

  • Tap and hold the power button for about 30 seconds.
  • Then release them after 30 seconds.
  • After that, tap and hold the volume up + the power button for 20 seconds. This will cause the display to flash a few times but you have to keep those buttons pressed until your Surface device is turned off.
  • Wait for a couple of minutes and your Surface will turn back on. This should resolve the problem.

Option 4 – Try to disable the Tablet Mode via Registry Editor

  • In the Start Search, type “registry editor” and right-click on the Registry Editor from the results, and then select the Run as administrator option. This will open the Registry Editor with admin privileges.
  • Next, navigate to this registry key: ComputerHKEY_CURRENT_USERSoftwareMicrosoftWindowsCurrentVersionImmersiveShell
  • From there, look for the DWORD named “SignInMode” and double click on it.
  • Set its value to “1” and its base as hexadecimal.
  • After that, click on OK to save the changes made. This will make sure that you are signed in to the desktop mode when you log into your account.
  • Now look for the DWORD named “TabletMode” and double click on it and set its value data to “0” and it's base as hexadecimal.
  • Click on OK to save the changes made and then restart your computer.

Option 5 – Run System Restore

  • Tap the Win + R keys to open the Run dialog box.
  • After that, type in “sysdm.cpl” in the field and tap Enter.
  • Next, go to the System Protection tab then click the System Restore button. This will open a new window where you have to select your preferred System Restore point.
  • After that, follow the on-screen instructions to finish the process and then restart your computer and check if the problem is fixed or not.

Option 6 – Try changing the settings in the System tab or the Action Center

  • Go to Settings and navigate to System > Tablet Mode.
  • After that, scroll down to set the “Use desktop mode” from the drop-down menu under the “When I sign in” section.
  • Now restart your computer and see if the issue is fixed.
Read More
Cortana can’t connect to the Internet
One of the most sophisticated Artificial Intelligence or AI assistants there is in the market is Cortana. However, no matter how sophisticated this AI assistant may be, there are still times when you encounter issues with it. So if your Cortana is not connecting to the internet, worry not for this post will guide you in fixing the problem. This connection issue in Cortana might have something to do with the settings, network connectivity, or your Microsoft account. In addition, it could also be that the Firewall or antivirus program interferes with its connection. Whichever the case is, here are some possible solutions that could help you resolve the problem.

Option 1 – Try to power cycle the modem, router, and computer

  • Connect the modem, router, and the PC hard-wired and then switch all of these three devices off.
  • Turn on the modem and wait for 30 seconds.
  • Turn on the router and wait for 30 seconds as well.
  • Finally, turn on the computer and check if you can now successfully connect to the internet.

Option 2 – Check if your router or ISP is properly working

Since the basis for this issue is that Cortana is not connecting to the internet even though you are able to access websites using your browser, you might want to check your router or ISP (Internet Service Provider) and see if they’re functioning properly.

Option 3 – Try changing your internet connection

You can also try changing your internet connection and see if it fixes the problem. If you are using Ethernet, you can try connecting to a Wi-Fi connection and see if Cortana is able to connect or not.

Option 4 – Try to run the Search and Indexing troubleshooter

You might also want to run the Search and Indexing troubleshooter in Windows 10 as it checks whether the settings for Cortana are in place and automatically corrects any issues if the update or software installation has changed the settings. To run it just click on the Start button and select Settings > Updates and Security > Troubleshoot. From there, select the Search and Indexing Troubleshooter. Note: You can also run the Network Troubleshooter as it can also help in resolving the issue especially if the problem is in the network.

Option 5 – Try to remove Proxy

Removing the Proxy might also help you in fixing the connection issue in Cortana. Here’s how you can do it:
  • Tap the Win + R keys to open the Run dialog box.
  • Then type “inetcpl.cpl” in the field and hit Enter to pull up the Internet Properties.
  • After that, go to the Connections tab and select the LAN settings.
  • From there. Uncheck the “Use a Proxy Server” option for your LAN and then make sure that the “Automatically detect settings” option is checked.
  • Now click the OK and the Apply buttons.
  • Restart your PC.
Note: If you are using a third-party proxy service, you have to disable it.

Option 6 – Verify your Microsoft account

In some cases, Cortana might not be able to connect to the internet because your Microsoft account is no longer verified. This usually happens when you use a two-step authentication system with your Microsoft account. To verify it, just open Settings and click on Accounts. After that, check if you have a Verify hyperlink under your Microsoft account or not then click on Verify. Afterward, follow the next on-screen prompts to verify your Microsoft account. Once your account is verified, restart your computer.

Option 7 – Try resetting Cortana

  • Open Cortana and go to the Settings section where you’ll see the “Turning off Cortana clears what Cortana knows on this device, but won’t delete anything from the Notebook. After Cortana is off, you can decide what you’d like to do with anything still stored in the cloud” option. Turn this option off.
  • Restart your PC.
  • After your computer boots, launch Cortana again and check.

Option 8 – Try to reinstall Cortana

If none of the options given above works, you must consider reinstalling Cortana.
  • First, right-click on the Start button and click on the Windows Powershell (Admin) option from the list.
  • Next, type the following command and hit Enter to execute it:
Get-AppXPackage -Name Microsoft.Windows.Cortana | Foreach {Add-AppxPackage -DisableDevelopmentMode -Register "$($_.InstallLocation)AppXManifest.xml"}
  • Restart your computer and check if Cortana is now able to connect.
Read More
What to do if the Windows Wireless Service in Windows 10 is not running
When experiencing internet connection problems, most users run the built-in troubleshooter to fix the problem. However, you might come across another problem when instead of fixing the problem, the troubleshooter throws up an error message saying, “The Windows Wireless Service is not running on this computer”. After displaying this error message, the troubleshooter would exit. Usually, this kind of error indicates that Windows has failed to initialize the wireless service so it can start searching for broadcast signals and try to connect to them. So in this post, we have prepared some workarounds that might help you resolve the issue.

Option 1 – Try to check the WLAN Status

You have to make sure that the wireless service is enabled in your computer before you proceed to the other troubleshooting options below as this error could occur for a simple reason as the wireless capability is turned off from your PC either on some built-in settings or physically. This is why you need to make sure that Wireless is enabled. And if it turns out that it is disabled, you need to turn it back on and then reconnect to the wireless network again. You should now be able to connect to the internet without any issue.

Option 2 – Try to check the WLAN AutoConfig Service

The WLAN AutoConfig service is the one that provides the logic and functionality required to discover, connect and configure wireless networks with your PC. Aside from that, it also contains the module that allows your PC to be discoverable to other systems on a network. Thus, you need to verify if the WLAN AutoConfig service is on or not.
  • Tap the Win + R keys to open the Run dialog box.
  • And in the field, type in “services.msc” and hit Enter to open Services.
  • After opening the Services window, look for the entry named “WLAN AutoConfig” and then right-click on it and select Properties from the context menu.
  • Next, click on the Start button to turn on the service and then set the startup type as “Automatic”.
  • Then try to connect to your Wireless network again and check if the issue has been resolved.

Option 3 – Try to reset the Network Configurations

Resetting the Network Configurations can also help you in fixing the Windows Wireless service as the network settings often get disrupted or corrupted in a variety of different cases every now and then. Note that this module will reset all the network settings stored on your computer.
  • Tap the Win + S keys to open Search and then type in “command prompt” in the field.
  • From the search results that appear, right-click on Command Prompt and select the “Run as administrator” option.
  • After opening Command Prompt, copy and paste the following command and hit Enter to execute it:
netsh winsock reset
  • The command given will reset the Winsock data. Once it is executed, restart your PC for the changes to take effect and then check if the internet connection is now fine.
Note: Do make sure that the WiFi drivers are up to date. To do that, follow these steps:
  • Tap the Win + R keys to launch Run.
  • Type in devmgmt.msc into the box and tap Enter or click OK to open the Device Manager.
  • After that, a list of device drivers will be displayed. If you see a red or yellow sign that shows up against the driver, right-click on the driver’s name and select “Update Driver Software” or “Uninstall”. And if you find any “Unknown device”, you need to update it as well.
  • Select the “Search automatically for updated driver software” option and then follow the instructions to complete the process.
  • Restart your PC.
Note: You also have the option to go directly to the website of your graphics card manufacturer and check if there’s a new update – if there is, download it.

Option 4 – Perform System Restore

Recently, a lot of issues have resurfaced after users installed the latest Windows update. So the wireless service issue might also be related to it. To fix the problem, you can perform System Restore to roll back your Windows to the last time when it was working just fine. It automatically creates backups in time whenever you install a new update or periodically. Follow the steps below to perform System Restore.
  • Tap the Win + S keys to open Search and then type in “restore” in the field and select the topmost result.
  • Once you’ve opened the restore settings, click on System Restore located at the beginning of the window under the System Protection tab.
  • After that, a wizard will appear that will guide you through all the steps needed to restore the system. You can choose either the recommended restore point or a different one.
  • After you select the restore point, click Next to proceed to the next on-screen instructions.
  • Then select the restore point where the Windows Update was installed on your computer. If you have more than one restore point, you can just select the latest restore point and check the functionality from there. If it doesn’t work, you can just try another restore point.
  • Another prompt will appear and will ask you to confirm your actions. Click OK and wait for the system to be restored. Once it’s done, check if the problem’s now fixed.
Read More
Fix MOZILLA_PKIX_ERROR_MITM_DETECTED
If you’re having some problem browsing multiple websites on the Firefox browser on your Windows 10 computer, then this post might be of help. One of the most common problems you could encounter in Firefox is mostly related to HTTPS and one of them is the MOZILLA PKIX ERROR MITM DETECTED or ERROR SELF SIGNED CERT or SEC ERROR UNKNOWN ISSUER error which means that Firefox was unable to trust certificates issued on secured websites. If you encounter the MOZILLA_PKIX_ERROR_MITM_DETECTED error in Firefox, this indicates that something in your network or system is interrupting your connection and injecting certificates and when that happens, Firefox won’t trust it. In such cases, one of the culprits is malware. Malware will try to replace a legitimate certificate with its certificate. Another cause is security software where it keeps a tab on a secure connection and creates a false positive, for instance:
“In Microsoft Windows accounts protected by Family Safety settings, secure connections on popular websites like Google, Facebook and YouTube might be intercepted and their certificates replaced by a certificate issued by Microsoft in order to filter and record search activity.”
And if you are connected to a corporate network, there might be a monitoring/filtering product that could be replacing certificates. Moreover, there are also users who reported getting this issue when they use the Nightly version of Firefox. And if that’s the case, you have to try accessing secure websites using only the stable build especially when it comes to payments. However, if you are not doing that, then here are some options you need to check out.

Option 1 – Try turning off HTTPS Scanning on your security and antivirus programs

Each security-based software has a security option that allows you to turn off the HTTPS scanning functionality. They may be available under different names such as HTTPS Scanning, Scan SSL, Show safe result, Do not scan encrypted connections, etc. Find what is applicable for your security or antivirus software and then try turning it off temporarily and see if it helps in fixing the MOZILLA_PKIX_ERROR_MITM_DETECTED error in Firefox.

Option 2 – Try to disable security.enterprise_roots.enabled

The next thing you can do if the first option didn’t work is to disable security.enterprise_roots.enabled which is an HTTPS certificate check on Firefox. Note that this is not recommended but you have to at least try in order to fix the error.
  • Open Firefox and then type “about: config” in the Firefox address bar and hit Enter.
  • After that, if an info message appears, confirm it.
  • Next, search for the security.enterprise_roots.enabled preference and once you found it, double click on it.
  • Then change its value to true and restart the Firefox browser once. This will import all the custom certificates from the other security software into Firefox. As a result, it will make sure to mark those sources as trusted and you won’t get the MOZILLA_PKIX_ERROR_MITM_DETECTED error.
Read More
Fixing the “Failed to register a VB Script dll” Error in Windows 10
If you open any program in your Windows 10 PC such as Outlook and suddenly get an error message saying, “Failed to register a VB Script dll. Reinstall or run Regsvr32.exe Vbscript.dll to self-register”, read on, as this post will guide you on what you can do to fix it. The obvious solution to this problem is by re-registering the “vbscript.dll” file on your computer. Refer to the instructions given below to re-register the VB Script DLL file and to fix the error.
  • Step 1: Open the Command Prompt as an administrator from the WinX Menu.
  • Step 2: After opening Command Prompt, type in the following command and tap Enter on your keyboard.
regsvr32.exe vbscript.dll
  • Step 3: Once you enter the command, it will re-register the VB Script DLL file using the Windows OS tool called Regsvr32 or regsvr32.exe. This tool is a command-line utility used to register and unregister OLE controls such as DLL and ActiveX (OCX) controls in the Windows environment. After the execution of the command, you should see the following pop-up on your screen which means the re-registering of the concerned DLL file has succeeded.
On the other hand, if re-registering the DLL file didn’t work, then you can try logging in using an administrator account and then register the DLL file again or you could also use the System File Checker to figure out what the problem really is and automatically fix it. System File Checker or SFC is a built-in command utility that helps in restoring corrupted files as well as missing files. It replaces bad and corrupted system files with good system files. To run the SFC command, follow the steps given below.
  • Tap Win + R to launch Run.
  • Type in cmd in the field and tap Enter.
  • After opening Command Prompt, type in sfc /scannow
The command will start a system scan which will take a few whiles before it finishes. Once it’s done, you could get the following results:
  1. Windows Resource Protection did not find any integrity violations.
  2. Windows Resource Protection found corrupt files and successfully repaired them.
  3. Windows Resource Protection found corrupt files but was unable to fix some of them.
Read More
Cortana is Not Connecting to the Internet
Recently, a number of Windows 10 users reported that they were not able to use Cortana properly because it wasn’t able to connect to the internet. According to these users, Cortana won’t connect to the internet even when their internet connection is stable. According to security experts, this issue is confirmed to occur only with Microsoft accounts. This problem might have something to do with a proxy server that interferes with Cortana. There were reports that this issue was caused by a proxy that was filtering the network connection which also happens to interfere with Cortana’s ability to adapt search results and queries based on the user’s location. It could also be caused by some glitch in the home network or your Microsoft account information is inconsistent or your Microsoft account has to be verified. Here are some suggestions that could help fix the connection issue in Cortana, just start with the first one and work your way down until you encounter an option that fixes the problem.

Option 1 – Restart or reset your modem or router

The first thing you can try is restarting or resetting your modem or router. All you have to do is unplug the power cable of the modem and then plug it back in after a few seconds. You could also use the reset button of the modem at the back if it is one. But before you press the reset button, keep in mind that it will erase all the connection credentials and it will be set back to its default settings. After rebooting the network, you can restart your computer to force your modem or router to reassign an IP address to your computer.

Option 2 – Restart Cortana

Restarting Cortana can help you resolve the issue.
  • To restart Cortana, open the Task Manager, right-click on Cortana and select the “End process” option.
  • Then go to the File tab and select “Run new task”.
  • After that, type in “cortana.exe” and press Enter to restart the process.

Option 3 – Try to remove Proxy

Removing the Proxy might also help you in fixing the connection issue in Cortana. Here’s how you can do it:
  • Tap the Win + R keys to open the Run dialog box.
  • Then type “inetcpl.cpl” in the field and hit Enter to pull up the Internet Properties.
  • After that, go to the Connections tab and select the LAN settings.
  • From there. Uncheck the “Use a Proxy Server” option for your LAN and then make sure that the “Automatically detect settings” option is checked.
  • Now click the OK and the Apply buttons.
  • Restart your PC.
Note: If you are using a third-party proxy service, you have to disable it.

Option 4 – Open another app that uses a Microsoft account

This might seem like an odd fix, however, a couple of users tried doing this and it worked for them as it allowed Cortana to connect to the internet again. In this option, you just have to launch another app that uses your Microsoft account information in the same way as Cortana, for instance, the Store app. Once you open the app, a prompt should appear along with a dialog box that allows you to update your Microsoft account with the information required. After that, restart your computer and check if Cortana is now able to connect to the internet or not.

Option 5 – Verify your Microsoft account

In some cases, Cortana might not be able to connect to the internet because your Microsoft account is no longer verified. This usually happens when you use a two-step authentication system with your Microsoft account. To verify it, just open Settings and click on Accounts. After that, check if you have a Verify hyperlink under your Microsoft account or not then click on Verify. Afterward, follow the next on-screen prompts to verify your Microsoft account. Once your account is verified, restart your computer.

Option 6 – Reset Cortana settings

  • Open Cortana and go to the Settings section where you’ll see the “Turning off Cortana clears what Cortana knows on this device, but won’t delete anything from the Notebook. After Cortana is off, you can decide what you’d like to do with anything still stored in the cloud” option. Turn this option off.
  • Restart your PC.
  • After your computer boots, launch Cortana again and check.
Read More
An intelligent Solution to Repair Outlook PST Mailbox Errors

Repair Outlook PST Mailbox Errors

Outlook PST Mailbox Errors Malfunctions

Can you use an MS-Outlook e-mail account to send and get workplace e-mails on a daily basis? Are you using the exact same Outlook e-mail account for a long time? Are you getting PST Mailbox Errors? Then you have developed awareness and knowledge about Outlook PST Errors. Ms-outlook essentially stores the email items in a PST record. This includes all attachments, contacts, calendar items, your e-mails and records. You might encounter various kinds of Outlook Inbox error messages exhibited on the display in extended formats eg. 0x80040600 0x8004060c or 0x80040116. All all these are Outlook mailbox malfunctions that stop the Outlook program from executing jobs correctly and thus restricting your capacity to gain access to your e-mail account, see attachments, contacts, and calendar items that are significant.

Error Causes

There's not a single particular trigger for Outlook email malfunctions. A few causes can trigger these, but, the most frequent are virus contamination, 2 GB limit is exceeded by PST file and broken. There are no specific signals which will help help you identify but some pointers to look at include the following:-
  • You cannot access certain parts of your Outlook interface
  • Obscure error messages start popping on your screen
  • You can’t add new contacts or change entry data in your calendar

Further Information and Manual Repair

When you experience these signs related to PST Inbox errors, it is advisable to repair the problem immediately to ensure it does not cause inconvenience for you and hampers your communication via Outlook emails. Remember this error not only inconveniences you but also hinders proper communication between various business partners. Determining the ultimate reason for distinct Outlook email malfunctions could be tricky, time-consuming, and might need specialized knowledge to nail it down with regards to fixing the Outlook mailbox malfunctions. In case you are not a specialist, working out and fixing this problem is an uphill process. To simplify this process, obtain and install an Outlook PST Repair Tool! This is an intelligent solution to fix all kinds of Outlook errors. You do not have to go deeper into the technical details of the problem. The Outlook PST Repair tool does it for you. An inbox repair tool identifies and also repairs all sorts of MS Outlook errors in seconds. It is easy to use, highly functional, safe and efficient. By installing an Outlook repair tool, Outlook errors can be easily removed from your computer and keep the errors from happening again. It also fixes damaged PST files and damaged e-mails can help regain data. Whatever you should do is to begin:
  1. Click here to download the inbox repair tool
  2. Install the software on your system
  3. Run it and click restore to resolve Inbox errors
Read More
IW Unicorn and Scorpion PC Chair cockpits
Recently on errortools.com, we were talking about Cooler Master’s Orb X gaming chair that is an absolute beast and an amazing product. One downside of Orb X is its price. IW product line is somewhat competing with Orb X with a much more affordable price aiming to probably take customer base with lower income but offering them a great experience as well. The first thing you will notice is a different design and somewhat feeling of cheaper quality if you compare it to Orb X but that is quite reasonable considering the chair itself is around 3.5 times cheaper than Orb X which really puts it in range of everyone can get it. But does a much cheaper price means low quality? Let’s explore.

IW Unicorn

IW unicorn
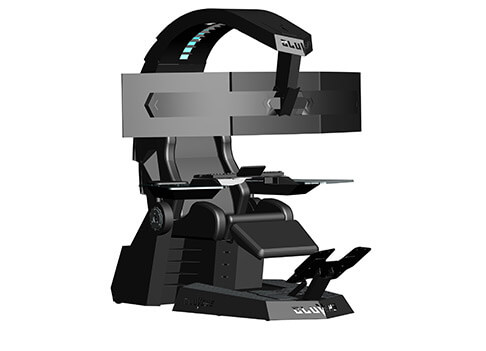
The 2021 CLUVENS BRAND newly issued model UNICORN has fully electrical tilting capabilities to 160 degrees, Reading light-two LED & RGB illumination lighting, manual open/close keyboard tray, and armrests. This model is suitable for home and office, and also gaming computer work environments. It offers functions that enable the user to experience unprecedented comfort and quasi total immersion through strategically positioned 1-3 monitors, audio systems, and accessories. The result is a complete computer office, ergonomically optimized, with a minimal footprint that improves overall performance and productivity and health and comfort. Sitting on a chair can help a lot for relieving health problems like lower back pain, herniated discs, sciatica, and neck pain and also enhance performance and viewing effects.

More Luxury and More comfortable:

Equipped with Luxury feeling reclining Gaming chair made with high-density Mold Shaping Foam and superior quality PU leather with very comfortable texture, electrical recline to 128 degrees, and more to 160 degrees for the flat position for the user.

More High-End Setting and more High-tech:

Manual push for open / close of big sized (87x34cm) Self-Balancing Keyboard tray, adjustable with 20cm distance range with Electrical control for the height of roof arm & monitors. Electrical control for reclining Zero Gravity position or even flat position, Manual adjusted Feet pedal for a more comfortable position for feet. Using a High-Quality PU leather Gaming chair that has Heat/Massage functions with it! The IW-Unicorn monitor mounts allow the use of a single monitor up to Ultra-wide 49” or 43” in size or triple monitor setups up to 3 x 29” other monitors configurations are available upon request. (VESA standard)

IW Scorpion

IW scorpion
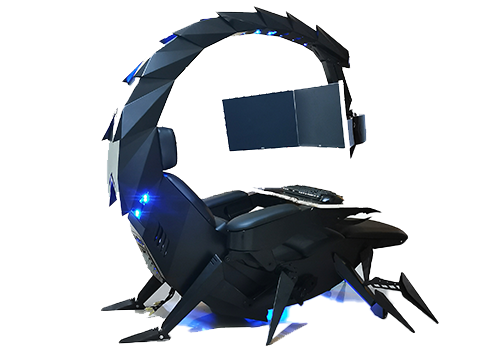
Scorpion is basically a premium version of Unicorn with being able to hold more weight, having cup holders on the armrest, etc. The look is also similar with Scorpion being more sinister-looking but overall Steel frame and chair are the same.

Conclusion

Sadly I have not personally experienced neither of these products including Orb X but from all information I have found and looked over, I would say these products are not trying to compete with each other. Although Products are similar in nature, Orb X is aimed at hi end-users focusing on privacy and robustness while IW is filling the gap of users that would like an advanced chair but are not willing or ready to shell hi amount of money for it offering advanced chairs with advanced features in somewhat affordable price.
Read More
Fix We couldn’t install some updates
If you encounter the “We couldn’t install some updates because the PC was turned off” while trying to run Windows Update on your Windows 10 computer, then read on as this post will give you a couple of suggestions you can use as a reference to fix this error. Make sure to follow the options given below carefully.

Option 1 – Perform basic computer troubleshooting

If you get the “We couldn’t install some updates because the PC was turned off” error on your laptop, then it’s recommended that you connect your laptop to a power source and then try clicking the Update button again. In addition, you also have to make sure that your computer stays awake until the Windows Update process is completed. This will ensure that your computer does not go into an idle state and interfere with the process.

Option 2 – Try deleting the files from the SoftwareDistribution folder and resetting the Catroot2 folder

The downloaded Windows Updates are placed in a folder called “SoftwareDistribution”. The files downloaded in this folder are automatically deleted once the installation is completed. However, if the files are not clean up or if the installation is still pending, you can delete all the files in this folder after you pause the Windows Update service. For complete instructions, refer to the steps below.
  • Open the WinX Menu.
  • From there, open Command Prompt as admin.
  • Then type in the following command – don’t forget to hit Enter right after typing each one of them.
net stop wuauserv net start cryptSvc net start bits net start msiserver
  • After entering these commands, it will stop the Windows Update Service, Background Intelligent Transfer Service (BITS), Cryptographic and the MSI Installer
  • Next, go to the C:/Windows/SoftwareDistribution folder and get rid of all the folders and files thereby tapping the Ctrl + A keys to select them all and then click on Delete. Note that if the files are in use, you won’t be able to delete them.
After resetting the SoftwareDistribution folder, you need to reset the Catroot2 folder to restart the services you just stopped. To do that, follow these steps:
  • Type each one of the following commands.
net start wuauserv net start cryptSvc net start bits net start msiserver
  • After that, exit Command Prompt and restart your computer and then try to run Windows Update once more.

Option 3 – Try restarting the Windows Update Services

  • Open the Services Manager.
  • From there, make sure that you set the following services and Startup types:
    • Background Intelligent Transfer Service: Manual
    • Cryptographic Service: Automatic
    • Windows Update Service: Manual (Triggered)

Option 4 – Try to run the Windows Update Troubleshooter

Running the built-in Windows Update troubleshooter could also help you resolve the “We couldn’t install some updates because the PC was turned off” error. To run it, go to Settings and then select Troubleshoot from the options. From there, click on Windows Update and then click the “Run the troubleshooter” button. After that, follow the next on-screen instructions and you should be good to go.

Option 5 – Try to install the Windows Updates manually

As mentioned, the error might be because Windows missed installing a particular update which is why you are not able to proceed with the current update. So to resolve the issue, you need to install the update that wasn’t installed by downloading it from the Microsoft Update Catalog website. You also have to make sure that you didn’t turn off the Windows update or have it delayed.

Option 6 – Run Microsoft’s online troubleshooter

Running Microsoft’s online troubleshooter might also help you fix the Windows update error. This online troubleshooter is known to help in fixing Windows Update errors, it scans your computer for issues that might be causing the problem and then fixes them automatically.
Read More
1 2 3 162
Logo
Copyright © 2022, ErrorTools. All Rights Reserved
Trademarks: Microsoft Windows logos are registered trademarks of Microsoft. Disclaimer: ErrorTools.com is not affiliated with Microsoft, nor claim direct affiliation.
The information on this page is provided for information purposes only.
DMCA.com Protection Status