Fix Windows Update Error 0x8000FFFF

If you are running Windows Update on your Windows 10 computer and you suddenly encounter error code 0x8000FFFF, E_UNEXPECTED – Unexpected failure then read on as this post will give you a couple of suggestions to resolve this problem. Note that you can encounter this error not only on Windows Update but also on Microsoft Store apps at times.

Follow the options given below to fix error code 0x8000FFFF, E_UNEXPECTED – Unexpected failure error on your Windows 10 PC.

Option 1 – Try to reset the Microsoft Store cache

Just like browsers, Microsoft Store also caches as you view apps and games so it is most likely that the cache is no longer valid and must be removed. To do so, follow the steps below.

  • Right-click on the start button and click on Command Prompt (administrator).
  • Next, type in the command, “wsreset.exe” and tap Enter. Once you do, the command will clear the cache for the Windows Store app.
  • Now restart your PC and afterward, try opening Microsoft Store again.

Option 2 – Check the Cryptographic Service

  • Tap the Win + R keys to open the Run dialog box.
  • Next, type “services.msc” in the field and hit Enter or click OK to open Services.
  • From the list of Services, look for the Cryptographic Service. Then right-click on it and select Properties from the context menu.
  • After that, check if the service is started by checking the Service status. If it is started, click on the Stop button to stop the service and if it is already stopped, leave it as it is, at least for now.
  • Next, make sure that the Startup type menu in the Service’s properties is set to Automatic before you go on.
  • Now confirm any dialog boxes that may appear as you set the Startup type and then click on the Start button located in the middle before you exit Properties.

Option 3 – Delete the contents in the Software Distribution folder and Catroot2 folder

  • Open the WinX Menu.
  • From there, open Command Prompt as admin.
  • Then type in the following command – don’t forget to hit Enter right after typing each one of them.

net stop wuauserv

net start cryptSvc

net start bits

net start msiserver

  • After entering these commands, it will stop the Windows Update Service, Background Intelligent Transfer Service (BITS), Cryptographic, and the MSI Installer
  • Next, go to the C:/Windows/SoftwareDistribution folder and get rid of all the folders and files thereby tapping the Ctrl + A keys to select them all and then click on Delete. Note that if the files are in use, you won’t be able to delete them.

After resetting the SoftwareDistribution folder, you need to reset the Catroot2 folder to restart the services you just stopped. To do that, follow these steps:

  • Type each one of the following commands.

net start wuauserv

net start cryptSvc

net start bits

net start msiserver

  • After that, exit Command Prompt and restart your computer, and then try to run Windows Update once more.

Option 4 – Check the Root Permissions

You might also want to check the permissions on the root of C: and make sure that “BUILTINUsers have read access because if it doesn’t, then no wonder why you’re getting the error code 0x8000FFFF.

Option 5 – Try to use the Media Creation tool

The Media Creation tool in Windows allows you to use the ISO installation file to make a bootable device that you can use to install Windows on your PC. Note that this is kind of different from the usual installation process as it could erase your computer’s current settings and data on the primary drive. Thus, before you proceed, you need to backup all your data into some removable drive and then use the Media Creation Tool to make a bootable drive.

  • After making the bootable drive, you need to plug it into your computer and then reboot.
  • Next, tap the F10 or Esc key to open the boot options.
  • Now set the boot priority of the removable drive the highest. Once the setup comes forth, follow the next onscreen instructions and install Windows without any problems.

Option 6 – Try installing the updates in a Clean Boot State

It could be that some third-party application is the one that’s causing the problem so it’s best if you put your computer in a Clean Boot state. During this state, you can start the system with a minimum number of drivers and startup programs that will surely help you in isolating the root cause of the issue.

  • Log onto your PC as an administrator.
  • Type in MSConfig in the Start Search to open the System Configuration utility.
  • From there, go to the General tab and click “Selective startup”.
  • Clear the “Load Startup items” checkbox and make sure that the “Load System Services” and “Use Original boot configuration” options are checked.
  • Next, click the Services tab and select the “Hide All Microsoft Services” checkbox.
  • Click Disable all.
  • Click on Apply/OK and restart your PC. (This will put your PC into a Clean Boot State. And configure Windows to use the usual startup, just simply undo the changes.)
  • After that, try to install the Windows app again.

Note: If you are able to install the app without any trouble at all then it means that the error is caused by some third-party application in your computer. You need to look for the culprit and uninstall it once you found it.

Option 7 – Run the Windows Update Troubleshooter

Running the built-in Windows Update troubleshooter is one of the things you can first check out as it is known to automatically resolve any Windows Update errors like error code 0x8000FFFF. To run it, go to Settings and then select Troubleshoot from the options. From there, click on Windows Update and then click the “Run the troubleshooter” button. After that, follow the next on-screen instructions and you should be good to go.

If you like to learn and find out more about various Windows errors, and how to repair them go to our vast archive or use search to find articles that will explain and help you in solving your issue.
However, if you prefer to do things fast and with automatization then we are proposing to use an automated solution for your issues. The application that we are recommending is Advanced System Repair Pro
Advanced System Repair utilizes multiple tools all in one to give you a quick, simple, reliable, and very thorough diagnosis of your PC. It brings you all the tools you need in one program to clean, fix, protect, optimize and boost your PC!
1-Click Maintenance
All the tools to make it simple and easy! It's like having a professional technician at the click of a mouse.

Junk Cleaner
Keeping your computer free from unnecessary clutter also helps make your computer last longer. Like any other machine, if you keep it clean and take care of it, it will serve you better for longer!

Optimize background apps
Optimize applications background activity with the built-in Application Optimizer feature.

Disk Defrag
With a simple 1-click, Advanced System Repair speeds up your PC by assembling fragmented files on your machine and organizing them more efficiently.

Malware Removal
Finds and removes all types of harmful malware including trojans, worms, bots, adware, spyware, PUPs, and more!

Privacy Cleaner
The all-in-one privacy suite to Clean Your Tracks & Protect Your Privacy! Make your computer safe, secure, and more efficient!

System Tweak/Optimizer
ASR will analyze your complete system and settings to adjust your PC to function at its maximum performance.

Registry Cleaner
Over time, as you install and uninstall applications, the registry can become cluttered with old entries and broken settings which can result in program crashes, and annoying messages and slow the computer down.
Visit our Advanced System Repair Pro Download page to inform yourself about all the benefits of this software and get a free trial copy of it.
advanced system repair pro

Advanced System Repair Pro

One-click automated PC repair solution
ASR logo
With Advanced System Repair Pro you can easily
Replace damaged files
Restore performance
Free disk space
Remove Malware
Protects WEB browser
Remove Viruses
Stop PC freezing
DOWNLOAD
Privacy Policy | Terms of Use | Uinstall
Advanced System Repair Pro is compatible with all versions of Microsoft Windows including Windows 11

Share this article:

You might also like

How to Fix fltmgr.sys in Windows 10
The fltmgr.sys file or the Filter Manager is the one that’s responsible in making sure that all the file stored in a computer’s hard drive stays on their respective locations and is located in C:/Windows/System32/drivers. Now when you encounter a Blue Screen of Death or BSOD error saying, “Your PC ran into a problem that it couldn’t handle, and now it needs to restart. SYSTEM_SERVICE_EXCEPTION”. This kind of Stop error is due to an error with the driver that’s responsible for enabling the communication between the hardware and the computer. It indicates that this driver allows direct access to the internal hardware from the CPU itself. What’s worse about the SYSTEM_SERVICE_EXCEPTION BSOD error is that there are times when you won’t be able to log in to your computer even after it reboots. However, you need not worry as this post will guide you into fixing this BSOD error. All you have to do is follow the given options below carefully and that before you proceed make sure that you create a System Restore point just in case something goes wrong.

Option 1 – Run the Windows Update

Obviously, since the fltmgr.sys file is a system file from Microsoft, you can try running the Windows Update and see if it fixes the problem or not.

Option 2 – Run the System File Checker

The System File Checker, also known as the SFC scan, is a built-in utility in Windows that can be found in the C:/Windows/System32 folder. This tool allows you to scan and restore any corrupted system files in Windows that might be causing the SYSTEM_SERVICE_EXCEPTION BSOD error. To use this tool, follow the steps below.
  • Tap Win + R to launch Run.
  • Type in cmd in the field and tap Enter.
  • After opening Command Prompt, type in sfc /scannow
The command will start a system scan which will take a few whiles before it finishes. Once it’s done, you could get the following results:
  1. Windows Resource Protection did not find any integrity violations.
  2. Windows Resource Protection found corrupt files and successfully repaired them.
  3. Windows Resource Protection found corrupt files but was unable to fix some of them.
  • Restart your computer and then check if it has fixed the error or not.

Option 3 – Run the Blue Screen Troubleshooter

The Blue Screen troubleshooter is a built-in tool in Windows 10 that can be found on the Settings Troubleshooters page. To use it, refer to these steps:
  • Tap the Win + I keys to open the Settings panel.
  • Then go to Update & Security > Troubleshoot.
  • From there, look for the option called “Blue Screen” on your right-hand side and then click the “Run the troubleshooter” button to run the Blue Screen Troubleshooter and then follow the next on-screen options. Note that you might have to boot your PC into Safe Mode.

Option 4 – Check your hardware for any physical issues

There are times when faulty hardware can result in serious problems in the system such as the SYSTEM_SERVICE_EXCEPTION Blue Screen error. Thus, it is highly recommended that you check the internal components of your CPU to find out if there are any problems. And if there is any physical damage, you need to bring that to a technician to get it fixed or have it replaced.

Option 5 – Run the CHKDSK utility

You can also run the Chkdsk utility to resolve the BSOD error. The Chkdsk utility is the one that repairs hard drive errors that might be causing the problem.
  • Open Command Prompt with admin privileges.
  • After opening Command Prompt, execute the commands listed below, and don’t forget to hit Enter right after you type in each one of them and if you have installed Windows to some different directory, you must replace “C” with the name of the drive you’ve installed Windows with.
  • chkdsk C: /r /x
  • chkdsk C: /f
Read More
How to create a public VPN Server on Windows
As you know, a Virtual Private Network or VPN is used to access a particular network from another network which is why it is also referred to as a mini-internet. Moreover, you can use it in two ways. One, you can use it to get you access to a closed server which means that you would not be getting access to the internet. Second, you can also use it to access a set of resources while at the same time get access to the internet. However, what if you want to access your resources at home even when you’re away? And what if you want to use the private server at home or at your office even when you’re away? This is where the callout for a VPN server for yourself comes in. And so in this post, you will be guided in how you can create a public VPN server on your Windows 10 computer. Follow each one of the given steps below to get started. Step 1: Find your IP address. This step is rather simple since all you have to do is open Control Panel > Network and Internet > Network and Sharing Center. From there, click on “Local Area Connection” and then click on Details where you’ll see your IP address next to “Autoconfiguration IPv4 Address”. Step 2: Next, set up port forwarding on your router. In this step, you will have to configure port forwarding in your router so that you would be able to connect to the VPN server through a public network like the internet.
  • Log in to the Admin Panel of your router. You have to do this since your router will be the gateway for your access to the network.
  • After you’re logged in, look for the “Port Forwarding” or “Applications and Gaming” or “NAT/QoS” menu tab and other similar names.
  • Now you need to set the port number to 1723 for connections based on Point to Point Tunneling Protocol.
  • Then save the configuration and reboot your router.
Step 3: Set up a VPN server on Windows 10.
  • In the Cortana search box, type “ncpa.cpl” and click on the related entry from the search results.
  • After that, tap the Alt + F keys to bring down the File Menu and then select New Incoming Connection which will open a mini window where you can allow the user accounts on the particular machine to access the VPN connection.
  • On the other hand, you can also click the “Add someone” button so that you can add someone else to the whitelist that can access the connection.
  • Now click on Next and you’ll see an option to select how people will connect to the network. Check the checkbox for the “Through the Internet” option.
  • After that, you will see a page where you have to configure the network. Just select IPv4 and then click on Properties.
  • From there, you will be asked to continue some additional settings like letting users access your Local Area Network or how IP addresses will be allocated to these users. Click on OK to save the changes you’ve made.
  • Click on Allow Access after you configure the network. And if you want to, you have the option to print this information for future reference or for the client machine.
  • Now click on Close to exit the configuration process.
Step 4: Allow the VPN Connections through the firewall In this step, you will have to allow the VPN connections through the firewall.
  • In the Cortana search box, type “Allow an app through Windows Firewall” and click on the related search result to open the intended Windows Firewall settings.
  • Next, click on Change Settings.
  • Then scroll down to check if Routing and Remote Access is Enabled for both the Public and Private networks and click on OK.
Step 5: Set up a VPN connection on Windows 10 Now all that’s left for you to do is to set up a VPN connection on Windows 10.
  • Go to Settings > Network and Internet.
  • From the list of options given, click on VPN located on the left pane to see the related settings.
  • After that, click on the “+” icon to add a VPN connection.
  • Next, select Windows Default under VPN Provider and under the Connection Name, input your VPN’s name, and then enter the IP address you got from the VPN service provider under the Server name or address section.
  • Now select PPTP under VPN type since it is the most commonly used protocol for VPNs.
Read More
Fix NTOSKRNL.exe high CPU, Memory & Disk usage
This post will guide you in fixing high CPU, Memory, and Disk usage problems caused by NTOSKRNL.exe. NTOSKRNL stands for “NT Operating System Kernel. This file is a kernel image that is responsible for a lot of systems-based processes such as Hardware Virtualization, Process, and Memory. Aside from that, it is also the one that compresses the old pages of memory that reduces the overall amount of memory being used. If you notice that your computer is running slowly and you find that the NTOSKRNL.exe file is hogging your resources such as disk usage, CPU usage as well as memory usage, then read on as this post will guide you in fixing the problem caused by NTOSKRNL.exe. Make use of the options given below to resolve the issues caused by NTOSKRNL.exe. 1] Scan your computer for potential malware There might be a good chance that your computer might be infected with malware. And this malware might be associated with the NTOSKRNL.exe file and hence making it consume a lot of system resources. So, I would really recommend you to make sure that your Antivirus is up to date and then scan your computer with it specifically the C:/Windows/System32 folder because this is the location where the NTOSKRNL.exe file is located.

Option 1 – Put your computer in a Clean Boot State

The first thing you have to do is to put your computer in a Clean Boot State as this can help you in finding any incompatible programs that are causing the problem.
  • Log onto your PC as an administrator.
  • Type in MSConfig in the Start Search to open the System Configuration utility.
  • From there, go to the General tab and click “Selective startup”.
  • Clear the “Load Startup items” check box and make sure that the “Load System Services” and “Use Original boot configuration” options are checked.
  • Next, click the Services tab and select the “Hide All Microsoft Services” check box.
  • Click Disable all.
  • Click on Apply/OK and restart your PC. (This will put your PC into a Clean Boot State. And configure Windows to use the usual startup, just simply undo the changes.)
  • From there, start to isolate the problem by checking which one of the programs you installed recently is the root cause of the problem.
Once you’ve found any incompatible programs, you need to uninstall them. Refer to the steps below to do so.
  • In the search box, type in “control” and then click on Control Panel (desktop app) among the search results.
  • After that, select Programs and Features from the list which will give you a list of all the programs installed on your computer.
  • From there, look for the concerned program and select it and then uninstall it.
Note: If you have downloaded the app from the Windows Store, you can simply right-click on it from the application list and then uninstall it.

Option 2 – Update or rollback drivers

If the first option didn’t work for you, then it’s time to either update or roll back the device drivers. It is most likely that after you updated your Windows computer that your driver also needs a refresh. On the other hand, if you have just updated your device drivers then you need to roll back the drivers to their previous versions. Whichever applies to you, refer to the steps below.
  • Open the Devices Manager from the Win X Menu.
  • Then locate the device drivers and right-click on them to open the Properties.
  • After that, switch to the Driver tab and click on the Uninstall Device button.
  • Follow the screen option to completely uninstall it.
  • Finally, restart your computer. It will just reinstall the device drivers automatically.
Note: You can install a dedicated driver on your computer in case you have it or you could also look for it directly from the website of the manufacturer.

Option 3 – Try to run the DISM tool

If the first two options didn’t work, then running the Deployment Imaging and Servicing Management might. Using this built-in tool, you have various options such as the “/ScanHealth”, “/CheckHealth”, and “/RestoreHealth”.
  • Open the Command Prompt with admin privileges.
  • Then type in the following commands and make sure to hit Enter right after you type each one of them:
    • Dism /Online /Cleanup-Image /CheckHealth
    • Dism /Online /Cleanup-Image /ScanHealth
    • exe /Online /Cleanup-image /Restorehealth
  • Do not close the window if the process takes a while as it will probably take a few minutes to finish.

Option 4 – Try to stop the Runtime Broker process

The RuntimeBroker.exe or the Runtime Broker process is the one that monitors access to Windows APIs to make sure that the apps do not violate the core security of Windows. This process usually leaves a very small footprint. However, there are times when it consumes more resources than it’s supposed to and does not release memory after the work is done that results in a memory leak. As a result, it affects NTOSKRNL.exe which is why you have to stop the Runtime Broker process. To do so, refer to these steps:
  • Tap the Ctrl + Shift + Esc to open the Task Manager.
  • After opening Task Manager, go to the Processes tab and look for the Runtime Broker process.
  • Once you find it, check if it is using more than 15% of your memory. If it is, then you most likely have an issue with an app installed on your computer.
  • Select the Runtime Broker process and right-click on it and then click on the End Task option to end its process.

Option 5 – Try to run the Performance Troubleshooter

  • Tap the Win + R keys to open the Run dialog box.
  • Type “msdt.exe /id PerformanceDiagnostic” in the field and hit Enter to open the Performance troubleshooter.
  • Then click on Next to get started. Wait until the process is completed.

Option 6 – Try using the Windows Performance Toolkit

You can also use the Windows Performance Toolkit in finding the root cause of the problem. Just refer to the following steps to use this toolkit.
  • Search for “cmd” in the Cortana Search box and click on Command Prompt from the search results to open it.
  • Next, type in the command given below or copy and paste it and then hit Enter:
xperf -on latency -stackwalk profile -buffersize 1024 -MaxFile 256 -FileMode Circular && timeout -1 && xperf -d cpuusage.etl
  • After executing the command, wait for at least 60 seconds and then check the logs of the Windows Performance toolkit which is stored in a file named cpuusage.etl in the folder located at C:/Windows/System32. From there, you should see a list of all the causes of the System Resources being hogged.
Read More
Can’t connect to this network Windows issue
Can’t connect to this network Internet connectivity issues present a complex problem with simple solutions for PC and laptop users. First, it is usually recommended that users rule out problems with the internet connection, router, and Wi-Fi settings before proceeding to troubleshoot settings on your PC/laptop. Once the rest are ruled out, we can then proceed with the following troubleshooting steps and guidelines to fix your wifi connection issue: The first step is to update your windows network adapter driver. Connectivity problems may arise if your network driver is not updated or if it is incompatible with the network adapter. To do so, you may resort to any third-party driver scanning and installing programs found online. This solution should have resorted if users don’t want the hassle of perusing through windows settings that users may not be familiar with. However, this solution requires a pre-existing internet connection other than wifi, so it is recommended you have a backup internet connection via ethernet.

The second step is to uninstall the driver for your network adapter. This solution is to be reported if there is an issue with the driver as restarting the PC after the following steps let windows reinstall the driver again:

  • Open the quick access menu on your keyboard by pressing the Windows key and X key at the same time and select “Device Manager” from the menu list.
  • From the list of devices, select “Network Adapters”
  • Usually on the top of the list is the Wireless Network Adapter
  • Right-click the Wireless Network Adapter and select the option to “Uninstall device”
  • You will be given a confirmation in a new separate window to proceed. Click “Uninstall” to proceed.
  • After completing the previous steps, try rebooting your Windows PC and reconnecting to see if it works.

A third step is to disable the 802.1 1n modes of your network adapter by following the next steps:

  • First press the Windows logo key and the X key at the same time to bring up the quick-access menu. And like the previous step, select “Device Manager”
  • From the list of devices, select “Network Adapters”
  • Right-click the Wireless Network Adapter from the drop-down menu and select properties
  • Under properties, select the “Advanced” tab then select the 802.1 1n Mode. To the right drop-down menu change the option to  “Disabled” and click “Ok”
  • After, try to re-establish the connection to see if the steps have worked.
In the event that any of the preceding did not fix your problem, it helps to take a second look at the router and network settings using the interface provided by your ISP. A simple reset to the back of your router often fixes the issue. Also, try to check if you have any other administrative capabilities over the network to determine whether your device, in particular, has been MAC filtered or if the frequency of your wireless adapter is not compatible with the broadcast frequency of your router.
Read More
Chrome browser downloads stuck at 100%
These days, Google Chrome is definitely one of the most used browsers in the browser. Google has almost created a nearly perfect product that rarely experiences problems. However, a lot of users have reported an issue where some files they’re downloading or their downloads in their Google Chrome browsers are stuck at 100%. So if you are one of these users, read on as this post will guide you on what you can do to resolve the problem. This kind of problem could be caused by several factors. It is possible that the file download process could be blocked by a third-party antivirus or it could be that the content-length header could be missing from the server. Aside from that, a Google Chrome extension could also be the culprit or it could be that the current installation of the browser could be corrupted. This kind of problem can get really annoying as the download process has already utilized system resources as well as take up your time. Thus, you need to fix the problem using several suggestions. You can try to clear the browser cache, disable the Chrome virus scan, whitelist the file on the third-party antivirus program, put your browser in Incognito mode and download the file again. On the other hand, you could also try to reset or reinstall the browser. For more details, follow the options provided below.

Option 1 – Try to clear browser cache and try downloading again

There are times when some data in the browser is conflicting with the loading of the website and triggers some problems like download getting stuck at 100%. And so you can try to clear your browser’s data. This might be a very basic solution but oftentimes it works in fixing this kind of error in Google Chrome. Follow the steps below to clear the data in your browser.
  • Open your Google Chrome browser.
  • After that, tap the Ctrl + H keys. Doing so will open a new panel that allows you to delete the browsing history and other data in your browser.
  • Now select every checkbox that you see and click on the Clear data button.
  • Then restart your Chrome browser and check if you can now complete the download again.

Option 2 – Try disabling Chrome virus scan

The next thing you can do to resolve the problem is to disable the Chrome virus scan. It is possible that the virus scan is the one that’s preventing the download to be completed, thus, try to disable it and see if it works.

Option 3 – Whitelist the file you’re downloading in your antivirus program

The download getting stuck might also be caused by your antivirus program which could be interfering it from running. To fix this, you have to whitelist dism.exe. How? Refer to these steps:
  • Open the Windows Defender Security Center from the system tray area.
  • Next, click the “Virus & threat protection” option and then open the “Virus and threat protection settings”.
  • After that, scroll down until you find the “Exclusions” and click on the “Add or remove exclusions” option.
  • Then click the plus button and select the type of exclusion you want to add and from the drop-down list, select Folder.
  • Next, navigate to this path and select the WinSxS folder: C:/Windows/WinSxS
  • When a User Account Control or UAC prompt, just click on Yes to proceed.

Option 4 – Try downloading the file in Incognito mode

There are certain browser extensions, especially those security programs, that prevent any suspicious files from being downloaded. So the easy way to fix the problem is to launch the Chrome browser in Incognito mode and then try to download the file again. Additionally, you might want to consider disabling the problematic extension.

Option 5 – Reset Chrome

Resetting Chrome can also help you fix the problem. This means that you will be restoring its default settings, disabling all the extensions, add-ons, and themes. Aside from that, the content settings will be reset as well and the cookies, cache, and site data will also be deleted. To reset Chrome, here’s what you have to do:
  • Open Google Chrome, then tap the Alt + F keys.
  • After that, click on Settings.
  • Next, scroll down until you see the Advanced option, once you see it, click on it.
  • After clicking the Advanced option, go to the “Restore and clean up option and click on the “Restore settings to their original defaults” option to reset Google Chrome.
  • Now restart Google Chrome.

Option 6 – Try to clean reinstall Chrome

There are instances when programs leave files behind after you’ve uninstalled them and the same thing can happen to Chrome so before you reinstall Chrome, you have to make sure that you have deleted the User Data folder. To do so, refer to the following steps:
  • Hit the Win + R keys to open the Run dialog box.
  • Next, type “%LOCALAPPDATA%GoogleChromeUser Data” in the field and hit Enter to open the User Data folder.
  • From there, rename the default folder and name it something else, e.g. “Default.old”.
  • After that, install Google Chrome again and check if the issue is now fixed.
Read More
A 3 Step DIY Guide to Repairing Error 501

Fix Error 501

Error 501 - What is it?

Error 501 is an error code that sometimes may occur while you are using Internet Explorer on your Windows PC. The error message is displayed as:

'Error 501: Not implemented or not supported.'

Solution

Restoro box imageError Causes

It is difficult to narrow down the ultimate cause of error 501. This is because this error code can be triggered by multiple reasons such as:
  • Third-party confliction or due to an incorrect HTTP 1.1 setting
  • Improper program installation
  • Changes in the “LocalAccountTokenFilterPolicy” registry key
  • Corrupted Registry Database

Further Information and Manual Repair

The occurrence of this error regardless of what the cause is may cause a lot of inconvenience to you. And if not fixed on the time it can lead to system failure too. To repair the error 501, identifying the cause for the error really helps. By identifying the cause, you can easily select the most suitable solution to fix it.

Let us walk you through the solutions to fix error 501 timely:

Cause: Third-party conflicts or due to an incorrect HTTP 1.1 setting

Solution: If the above cause is the reason for error 501, this means the Local Policy Rights Settings have been altered. And because of that, Windows is not running your desired program. To solve this error simply log on to Windows as an administrator. Then run local computer policy snap-in. Open it and click on the computer configuration. Here you will see the Windows settings option. Click on it and then open security settings, local policies, and click on properties. Now in the add users section select the user which you want to add to the policy and save by pressing OK. After you’ve made changes, now try using internet explorer again. If this is the cause for the error pop, the error will not occur. If it still occurs then this means there is some other underlying cause for the error. Read on to find out.

Cause: Improper Program Installation

Solution: Error 501 may also occur due to improper program installation. The best way to resolve it is to uninstall recently installed programs.

Cause: Changes in the “LocalAccountTokenFilterPolicy” registry key

Solution: Sometimes during installation registry keys also get damaged or changed. If changes in the LocalAccountTokenFilterPolicy” registry key is the issue, then you need to alter the registry key ‘LocalAccountTokenFilterPolicy settings and its value. This key inside the registry database allows Windows to control the various access options that you have. However, due to wrong settings, it denies access and shows error 501 when you open Internet Explorer. To alter registry key settings can be tricky and complex if you are not a computer programmer. In such as scenario it is advisable to download Restoro. This is a user-friendly and multi-functional repair tool embedded with a powerful register cleaner. In addition to this, it also functions as anti-virus and a system optimizer.

Restoro Solution

Restoro is simple and easy to use. To operate this tool on your PC and to reset registry settings you don’t need any technical expertise or sound knowledge. Its smooth navigation makes it easy for users to scan and repair errors like 501 due to registry misconfiguration in seconds.  With this helper, you don’t have to modify Windows registry settings manually. It will do it automatically. Furthermore, if Error 501 is triggered by a corrupted registry database, you can run it to repair this issue too. It cleans and wipes out all the unnecessary and obsolete files that could be corrupting your registry. This includes junk files, internet history, and invalid registry entries. It clears up your hard disk space and repairs your corrupted registry. If your PC’s registry is damaged due to malicious software like viruses and malware, then it uses advanced antivirus to remove them from your system. It has a value-adding backup feature that enables you to create a backup of your files for data safety and recovery in case of loss during repair. Restoro is compatible with all Windows versions.

Starting with Restoro

Here are 3 simple steps to get started:
  1. Click here to download Restoro.
  2. Once the installation is complete, run it to scan for errors
  3. After scanning the errors, simply click repair to resolve the issues including the error code 501.
Along with fixing error code 501 triggered by registry damage, it also repairs all other PC-related issues. It helps maintain a stable and error-free system for the longest time.
Read More
Disable Windows print spooler in PowerShell
The third time is charm saying goes but not when we are talking about Microsoft. Print spooler is again in focus, in a bad way. This is the third print spooler vulnerability to emerge in just five weeks. While a critical flaw was originally identified and patched in June, a similar flaw came to light shortly after and was subsequently patched (with mixed success). print spooler
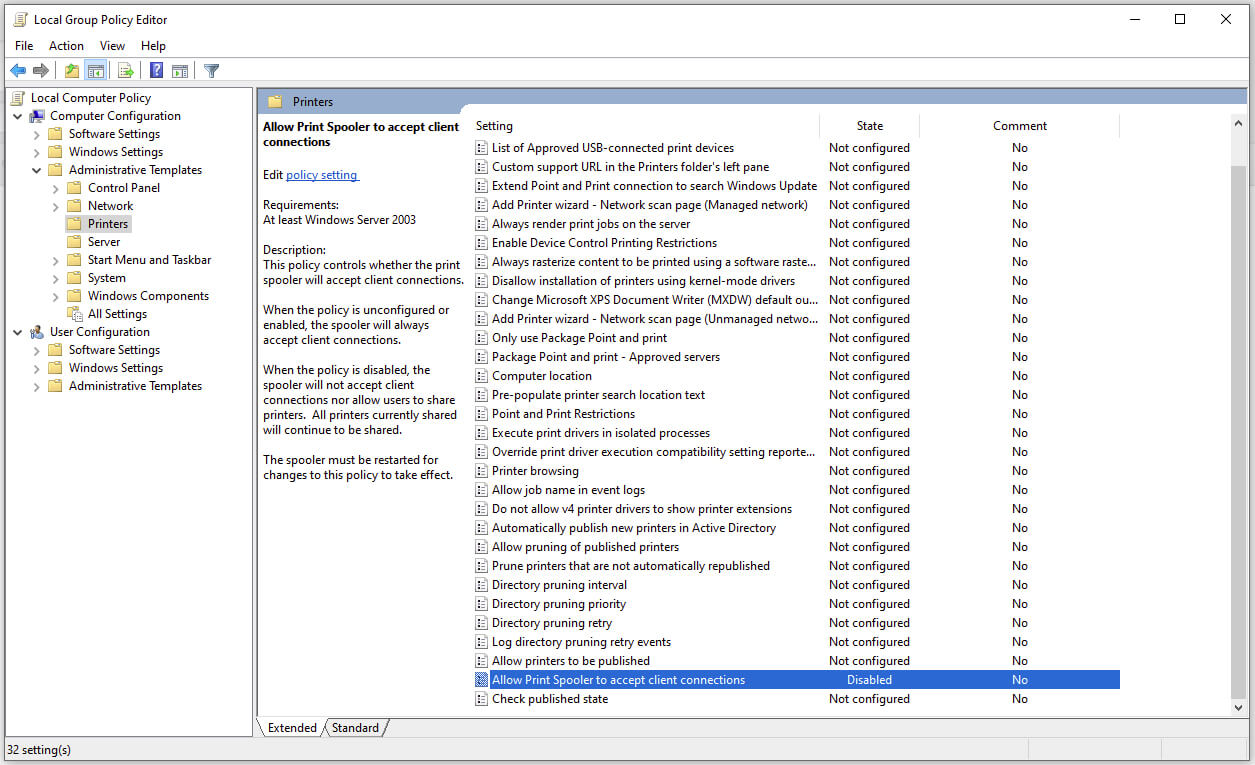
Microsoft is once again advising its customers to disable Windows print spooler after a new vulnerability that allows hackers to execute malicious code on machines has emerged. While a patch fixing the flaw will be released in due course, the most effective workaround currently on the table is to stop and disable the print spooler service entirely.
"An elevation of privilege vulnerability exists when the Windows Print Spooler service improperly performs privileged file operations. An attacker who successfully exploited this vulnerability could run arbitrary code with SYSTEM privileges. An attacker could then install programs; view, change, or delete data; or create new accounts with full user rights."

Stop this service right away or you are risking a potential attack.

  1. Press ⊞ WINDOWS + X to open the hidden menu
  2. Click on Power Shell (admin)
  3. In Power Shell type in the following command to check if spool service is running: Get-Service -Name Spooler followed by ENTER
  4. If spooler service is running type in the next command to stop it: Stop-Service -Name Spooler –Force and press ENTER
  5. Then follow with this command to disable it at startup: Set-Service -Name Spooler -StartupType Disabled followed with ENTER
That’s it, we hope a patch will come soon for all the people that are using network printing and indeed need this service running in order to do work.
Read More
Download and Install Google Fonts on Windows
Google fonts are a free open-source font library made to enrich web content and present end-user with a smooth web experience while surfing. Fonts are completely free for both commercial and personal use and they are not limited to use in WEB only, you can use them also in other projects like business cards, flyers, etc. In order to use google fonts first thing of course you will need to download them. In this guide, we will show you how to download and install google fonts.
  • Go to the Google Fonts page.
  • Select the font family that you wish to use. You can preview each font style to make double-sure it is the right one.
  • When you are ready, click on the Download family button.
Roboto Font
  • A File Explorer window will pop up, asking you where to save the font family.
  • The downloaded file will be compressed in .zip format to save bandwidth, so you will first need to uncompress/unzip it. Right-click on the file and select Extract all.
Extract All
  • You will then be asked where to unzip/extract the file. File Explorer will automatically create a new subfolder, named as the file name, so all you need to do is confirm it by clicking Extract.
Extract Files
  • Click on the Windows icon in the bottom-left corner of your desktop
Settings
  • Select the Personalization category and Fonts.
Available Fonts
  • Split the screen between File Explorer and Settings by dragging the windows to either the left or right edge of the screen. Select all the font files by pressing CTRL + A and drag them into the Add fonts box.
Add Fonts New
Read More
Repairing a corrupt Group Policy in Windows
If you recently made some changes in your Windows 10 computer using the Group Policy Editor but they were not reflected and you got errors instead, it could be that your Windows computer wasn’t able to read the Group Policy file (registry.pol). To resolve this kind of issue, you have to repair the potentially corrupted Group Policy using the options given in this post. .As you know, Group Policy is a feature in the Microsoft Windows Active Directory which allows an admin to make changes in the features on Windows PCs that are on the network. So if the modifications you just made weren’t successfully applied, then there could be something wrong with the registry.pol file on the client or it could also be that the Group Policy folder is missing. To fix this issue in the Group Policy, you need to refer to the given suggestions below and make sure that you have admin privileges as you execute them.

Option 1 – Try to delete or recreate the missing registry.pol file

The entire settings of the Group Policy are stored in the registry.pol file so if it went missing, all the changes you make will not be reflected. The good thing is that you can recreate it but if the file exists and is corrupted, you need to delete it first before you recreate it.
  • First, go to the C:/Windows/System32/GroupPolicy/Machine location.
  • And from there, check if the registry.pol file exists or not. If it’s there, just delete it permanently by tapping the Shift + Delete keys.
  • Now it’s time to recreate the file. Just open Windows PowerShell with admin privileges by tapping Win + X + A keys.
  • After opening PowerShell, type this command: gpupdate /force
  • The command you entered will recreate the registry.pol file and will refresh the Group Policy. Restart your computer.

Option 2 – Try recreating the secedit.sdb file

The security settings of Group Policy are stored in the secedit.sdb file so if you made some changes to security and they weren’t reflected, you can try to delete and recreate the secedit.sdb file instead of deleting the Group Policy file. All you have to do is navigate to the C:/WINDOWS/security/Database folder and look for the secedit.sdb file and rename it or move it to another folder. After that, restart your computer. Once your computer has restarted, the secedit.sdb file will be created again.

Option 3 – Try to reset the Group Policy to default

You can also try to reset the Group Policy back to its default state. There are several ways you can do that. You can either use the gpupdate or the secedit command in the Windows PowerShell to do that. Resetting the Group Policy will resolve any issues that could be caused by its current settings.

Option 4 – Try to perform System Restore

System Restore can also help resolve the Group Policy issue. It could be that prior to the issue, you’ve made some changes in the system that might have affected the Group Policy. To undo these changes, perform System Restore.
  • First, tap the Win + R keys to open the Run dialog box.
  • After that, type in “sysdm.cpl” in the field and tap Enter.
  • Next, go to the System Protection tab then click the System Restore button. This will open a new window where you have to select your preferred System Restore point.
  • After that, follow the on-screen instructions to finish the process and then restart your computer and check if the problem is fixed or not.

Option 5 – Use the DISM tool

You can also try running the Deployment Imaging and Servicing Management or DISM tool. This tool will repair the Windows System Image as well as the Windows Component Store in your Windows 10 computer. So if there are any missing or corrupted folders and files, the DISM tool can restore and repair them. As a result, any system consistencies and corruptions will be fixed. To run this tool, follow these steps:
  • Tap the Win + X keys and click on the “Command Prompt (Admin)” option.
  • After that, input each one of the commands listed below sequentially to execute them:
    • Dism /Online /Cleanup-Image /CheckHealth
    • Dism /Online /Cleanup-Image /ScanHealth
    • Dism /Online /Cleanup-Image /RestoreHealth
  • Once you’ve executed the commands given above, restart your computer.
Read More
Intel’s GPU ARC coming aimed at AMD & Nvidia
intel ARC
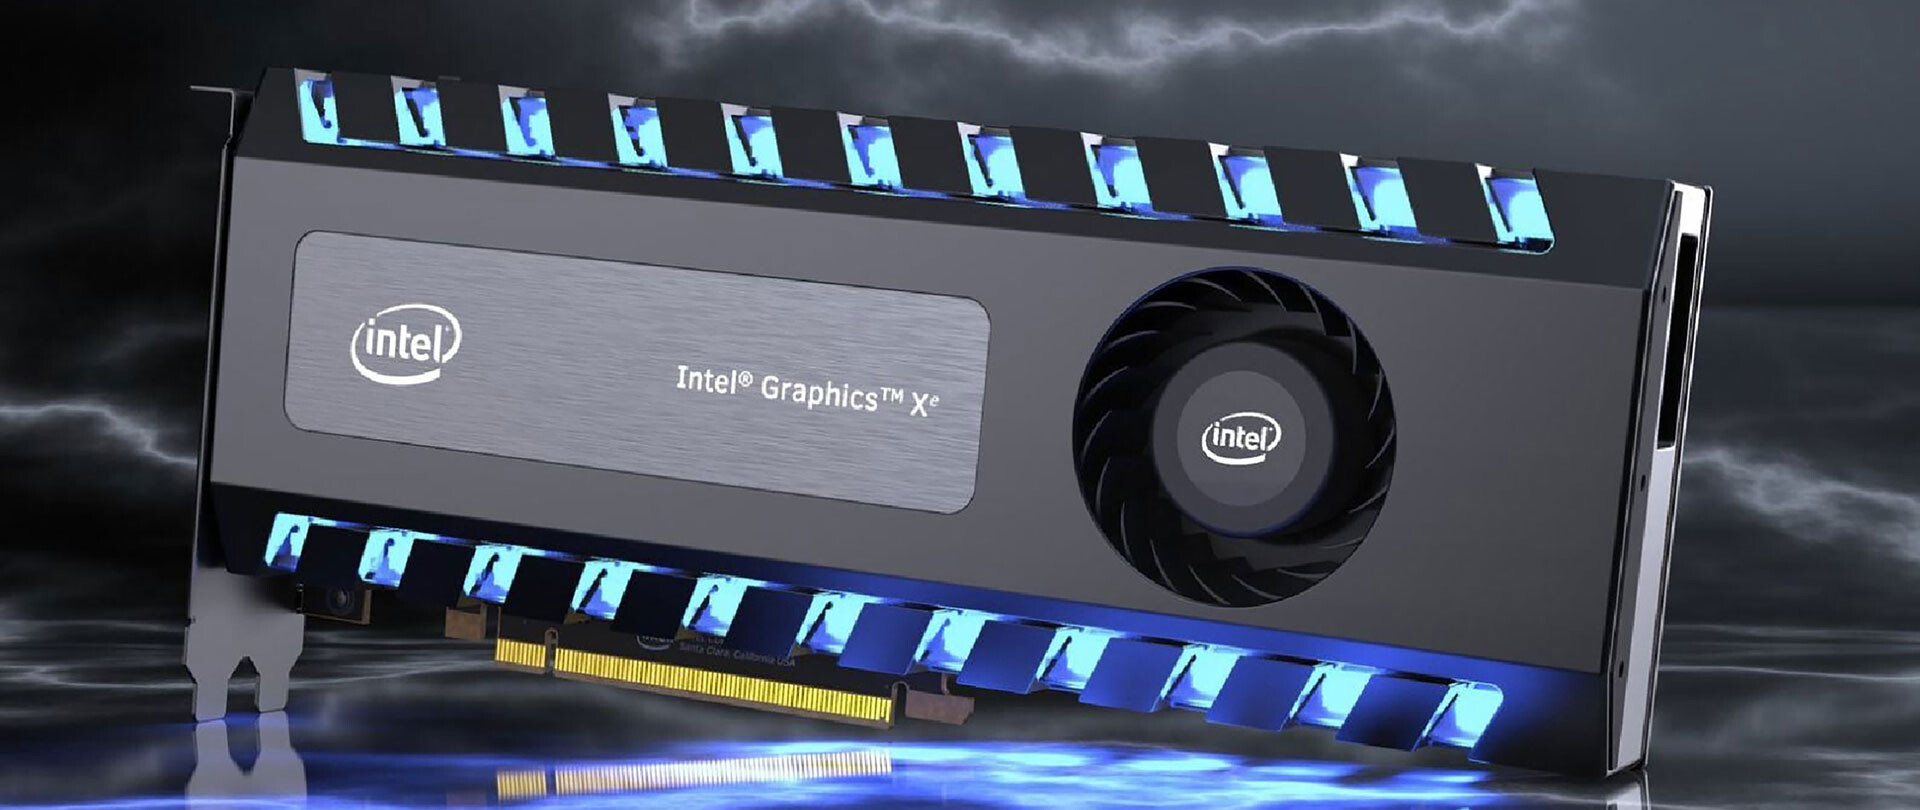
This is not the first time that Intel is trying to enter the GPU field but its adventures so far were, well let us agree not so good. All of that is hoping to be changed with the upcoming ARC GPU. The first generation of Arc graphics, code-named Alchemist and previously known as DG2, will support desktop PCs and laptops and is set to arrive in the first quarter of 2022. Alchemist will have hardware-based Ray tracing and AI-driven supersampling. This indicates that GPU is aimed to compete in the Hi-end spectrum and battle side by side with Nvidia and AMD on the market. Alchemist will also pack full DirectX 12 Ultimate support. Intel also released names for the next upcoming future generations of ARC GPUs: Battlemage, Celestial & Druid. More information about ARC products will be released later this year. “Today marks a key moment in the graphics journey we started just a few years ago. The launch of the Intel Arc brand and the reveal of future hardware generations signifies Intel’s deep and continued commitment to gamers and creators everywhere,” Roger Chandler, Intel vice president, and general manager of client graphics products and solutions.
Read More
1 2 3 162
Logo
Copyright © 2022, ErrorTools. All Rights Reserved
Trademarks: Microsoft Windows logos are registered trademarks of Microsoft. Disclaimer: ErrorTools.com is not affiliated with Microsoft, nor claim direct affiliation.
The information on this page is provided for information purposes only.
DMCA.com Protection Status