How to Fix Error Code 0x80073b01

Repair Error 0x80073b01

Error Code 0x80073b01 - What is it?

The 0x80073b01 is an error message that often pops up on the screen when you run Windows Defender. Windows Defender is an antispyware by Microsoft integrated into Windows Vista and Windows 7. The error code 0x80073b01 is considered to be a critical Windows error which must be fixed immediately.

This error code locks you out of Windows Defender thus putting your computer at risk potential security loopholes in the Windows environment such as notorious software like spyware, adware, and viruses.

This is dangerous especially if you have confidential data saved on your PC as it can be exploited easily if you don’t remove such malicious software the right way. This can lead to data breaches, cybercrime, and the worst-case scenario can be identity theft.

Error code 0x80073b01 symptoms include:

  • Sluggish pc performance,
  • Problems during software installations
  • Beeping sounds
  • Unexpected shutdowns
  • Screen freeze

Solution

Restoro box imageError Causes

The error code 0x80073b01 occurs when Windows Defender gets damaged due to misconfigured files and registry corruption. It is advisable to fix this error right away to avoid serious damages.

How to Resolve the Error Code 0x80073b01?

To repair the error code 0x80073b01 on your PC you don’t necessarily have to call a professional; you can fix it on your own with the help of Restoro.

It’s very easy to use and does not require you to be technically sound. Besides, it can be downloaded for free thus helping you save hundreds of dollars that you are likely to spend on hiring a technician for the error code repair job.

Restoro is the latest and a multi-functional system optimizer and a repair tool. This software is integrated with highly functional features that enable you to resolve almost all types of PC-related errors including the error code 0x80073b01.

It includes powerful and value-adding features like registry cleaner, system stability detector, privacy error finder with anti-virus properties, and Active X and Class issues detector.

With the help of its ‘registry cleaner’, you can easily scan for 0x80073b01 error codes on your PC. It offers in-depth registry cleaning scanning all the underlying causes of registry corruption that triggers 0x80073b01 error.

The underlying cause for registry corruption is the accumulation of unnecessary and malicious files in the registry like junk files, temporary internet files, and invalid entries.

Restoro with the help of its registry cleaning utility clears the clutter in seconds, frees up your disk space, and repairs the registry.

And since the error 0x80073b01 hampered your ability to scan for viruses and spyware with Windows Defender, your computer may be exposed to serious data security threats by such malware. However, with Restoro you can remove malware from your system too.

Restoro also functions as a powerful anti-virus. With the help of its privacy error detector, it scans for malicious viruses, adware and spyware on your PC ensuring that you are safe and protected from data breaches and cybercrime.

This tool resolves the error 0x80073b01 successfully while repairing your registry and simultaneously optimizing the speed of your PC.

It has a user-friendly interface and a simple design. There is absolutely nothing complex about it. All you have to do is download and install Restoro on your system and run it to scan for errors.

After the scanning is complete, you will see a comprehensive and detailed error report specifying the number and the types of errors your PC is inflicted with. Now all you have to do is click on the Repair button to fix the issues on your PC including the error 0x80073b01 right away. Restoro is a safe and efficient tool that helps you resolve PC issues in seconds.

For optimum results, it is advisable to run it on your PC regularly. This will help you keep the registry clean, PC error-free, reduce boot time, and ensure speedy PC performance.

Click here to download Restoro on your PC today!

If you like to learn and find out more about various Windows errors, and how to repair them go to our vast archive or use search to find articles that will explain and help you in solving your issue.
However, if you prefer to do things fast and with automatization then we are proposing to use an automated solution for your issues. The application that we are recommending is Advanced System Repair Pro
Advanced System Repair utilizes multiple tools all in one to give you a quick, simple, reliable, and very thorough diagnosis of your PC. It brings you all the tools you need in one program to clean, fix, protect, optimize and boost your PC!
1-Click Maintenance
All the tools to make it simple and easy! It's like having a professional technician at the click of a mouse.

Junk Cleaner
Keeping your computer free from unnecessary clutter also helps make your computer last longer. Like any other machine, if you keep it clean and take care of it, it will serve you better for longer!

Optimize background apps
Optimize applications background activity with the built-in Application Optimizer feature.

Disk Defrag
With a simple 1-click, Advanced System Repair speeds up your PC by assembling fragmented files on your machine and organizing them more efficiently.

Malware Removal
Finds and removes all types of harmful malware including trojans, worms, bots, adware, spyware, PUPs, and more!

Privacy Cleaner
The all-in-one privacy suite to Clean Your Tracks & Protect Your Privacy! Make your computer safe, secure, and more efficient!

System Tweak/Optimizer
ASR will analyze your complete system and settings to adjust your PC to function at its maximum performance.

Registry Cleaner
Over time, as you install and uninstall applications, the registry can become cluttered with old entries and broken settings which can result in program crashes, and annoying messages and slow the computer down.
Visit our Advanced System Repair Pro Download page to inform yourself about all the benefits of this software and get a free trial copy of it.
advanced system repair pro

Advanced System Repair Pro

One-click automated PC repair solution
ASR logo
With Advanced System Repair Pro you can easily
Replace damaged files
Restore performance
Free disk space
Remove Malware
Protects WEB browser
Remove Viruses
Stop PC freezing
DOWNLOAD
Privacy Policy | Terms of Use | Uinstall
Advanced System Repair Pro is compatible with all versions of Microsoft Windows including Windows 11

Share this article:

You might also like

Finding out which GPU is in your computer
Every computer has to have a graphic card, it is one of the essential components in order for the computer to work. If you have a second-hand computer, got one as a gift, or similar, there is a high chance that you do not really know which components are inside. Luckily finding out which graphic card you have inside is quite easy. Right-click the taskbar and select Task Manager Click the Performance tab at the top of the window, if you don’t see the tabs, click “More Info.” Select “GPU 0” in the sidebar. The GPU’s manufacturer and model names are displayed at the top right corner of the window. You’ll also see other information, such as the amount of dedicated memory on your GPU, in this window. Windows 10’s Task Manager displays your GPU usage here, and you can also view GPU usage by application. If your system has multiple GPUs, you’ll also see “GPU 1” and so on here. Each represents a different physical GPU.
Read More
Edge Content Process has stopped working
A lot of programs in Windows utilize the helper processes to ensure that they can get the job done as early as possible. And one of the programs that use these processes is Microsoft Edge. This built-in browser uses a process called the Edge Content process. The moment you start your computer, these system processes are loaded which makes the Edge browser load faster. To be specific, these are the three processes that are related to Microsoft Edge:
  • MicrosoftEdge.exe
  • MicrosoftEdgeCP.exe
  • MicrosoftEdgeSH.exe
The process that ends with the “CP.exe” is the content process in Edge. However, when this process stopped working, this can affect the Edge browser. In such cases, when you check the Reliability Monitor, you will see that the state of the “Microsoft Edge Content Process” is “Stopped working” which keeps on appearing. To resolve this issue, you can try to clear the browsing data of Microsoft Edge or repair or reset it. You can also try re-registering Edge via Windows PowerShell as well as check your security programs that might be causing interference with the process.

Option 1 – Clear the browsing data of Microsoft Edge

  • Open Microsoft Edge.
  • Then click on the three horizontal dots to open the menu.
  • From there, click on Settings. And under Settings, click the “Choose what to clear” button under the Clear browsing data section.
  • Next, check all the checkboxes and then click the Clear button to clear the browsing data in the Edge browser.
  • Restart Edge.

Option 2 – Try to reset, repair or reinstall Edge via Settings

You can reset, repair or reinstall the Edge browser through Settings. If none of it helped, you can try the following:
  • Open File Explorer and then go to this path – C:/Users/YourUsername/AppData/Local/Packages
Note: Before you type in the path in the Address bar, make sure that you put your user account name in place with the “YourUsername”.
  • Tap Enter to proceed.
  • Next, look for the folder named “MicrosoftEdge_8wekyb3d8bbwe” then right-click on it.
  • Click on Properties and uncheck the option “Read-only” under the General tab in the Properties window.
  • Click on Apply and then OK to save the changes made.
  • After that, look for the MicrosoftEdge_8wekyb3d8bbwe folder again and delete it. And if a prompt stating “Folder Access Denied” appears on your screen, just click on the Continue button to proceed – doing so will delete most of the content inside the folder except for the folder named “AC”.
  • Restart your computer

Option 3 – Re-register Edge via Windows PowerShell

  • In the Start Menu, search “Windows PowerShell”.
  • Right-click on Windows PowerShell from the search results and select the “Run as administrator” option.
  • Type in this command in the PowerShell windows and tap Enter – Cd C:/Users/YourUsername
  • After that, type in this command and tap Enter – Get-AppXPackage -AllUsers -Name Microsoft.MicrosoftEdge | Foreach {Add-AppxPackage -DisableDevelopmentMode -Register "$($_.InstallLocation)AppXManifest.xml" -Verbose}
  • Restart your PC.
Get-AppXPackage -AllUsers -Name Microsoft.MicrosoftEdge | Foreach {Add-AppxPackage -DisableDevelopmentMode -Register “$($_.InstallLocation)AppXManifest.xml” -Verbose}

Option 4 – Try to check your security program

It is possible that a security program installed in your computer is the one that’s causing the problem which is why you have to check it. According to security experts, there are some security programs that could be detecting the Edge’s content process as suspicious, blocking or terminating it as a result. Thus, you need to modify your security program’s settings to fix the problem.
Read More
Fix The driver detected a controller error
One of the worst problems users can encounter on their computers is Blue Screen of Death errors as some of them are quite hard to fix. One of them is the “The driver detected a controller error” Blue Screen error. It could be followed by “DeviceIdeIdeport0 OR”, “on deviceharddisk0dr0”, or “DR3” or the name of the drive or port that’s causing the problem. If you are one of the users who encountered this error, then the suggestions provided in this post would definitely help you in fixing the problem.

Option 1 – Try to disconnect and reconnect all hardware and cables

A lot of users reported that they were able to fix the problem by disconnecting and reconnecting cables and hardware like scanners, printers, cameras can help in fixing the problem. In addition, you can also boot your computer in a Clean Boot State so that you can find the problematic hardware by hit and trial method. Refer to the steps below to do so:
  • Log onto your PC as an administrator.
  • Type in MSConfig in the Start Search to open the System Configuration utility.
  • From there, go to the General tab and click “Selective startup”.
  • Clear the “Load Startup items” check box and make sure that the “Load System Services” and “Use Original boot configuration” options are checked.
  • Next, click the Services tab and select the “Hide All Microsoft Services” check box.
  • Click Disable all.
  • Click on Apply/OK and restart your PC. (This will put your PC into a Clean Boot State. And configure Windows to use the usual startup, just simply undo the changes.)

Option 2 – Update the device drivers

Updating the outdated device drivers in your computer can also help in fixing the problem. To do so, refer to these steps:
  • First, boot your computer into Safe Mode.
  • After that, tap the Win + R keys to launch Run.
  • Type in devmgmt.msc into the box and tap Enter or click OK to open the Device Manager.
  • After that, a list of device drivers will be displayed. From there, look for any outdated device drivers and click on each one of them.
  • After that, right-click on each entry of the device drivers and select the “Uninstall Device” option from the menu.
  • Now restart your computer.
  • After restarting your computer, go to the Settings app and Check for Updates in the Windows Update section.

Option 3 – Try to update the BIOS

Updating the BIOS can help you fix the ATTEMPTED_WRITE_TO_READONLY_MEMORY BSOD error but as you know, BIOS is a sensitive part of a computer. Even though it is a software component, the functioning of the hardware depends on it largely. Thus, you must be careful when modifying something in the BIOS. So if you don’t know much about it, it’s best if you skip on this option and try the other ones instead. However, if you are well-versed in navigating the BIOS, then follow the steps below.
  • Tap the Win + R keys to open the Run dialog box.
  • Next, type “msinfo32” in the field and press Enter to open System Information.
  • From there, you should find a search field on the bottom where you have to search for the BIOS version and then press Enter.
  • After that, you should see the developer and version of the BIOS installed on your PC.
  • Go to your manufacturer’s website and then download the latest version of BIOS on your computer.
  • If you are using a laptop, make sure that you keep it plugged in until you have updated the BIOS.
  • Now double click on the downloaded file and install the new BIOS version on your computer.
  • Now restart your computer to apply the changes made.

Option 4 – Try running the Blue Screen Troubleshooter

You might also want to run the Blue Screen troubleshooter. It is one of the built-in tools in Windows 10 that helps users in fixing system issues including Blue Screen errors. It can be found in the Settings Troubleshooters page. To use it, refer to these steps:
  • Tap the Win + I keys to open the Settings panel.
  • Then go to Update & Security > Troubleshoot.
  • From there, look for the option called “Blue Screen” on your right-hand side and then click the “Run the troubleshooter” button to run the Blue Screen Troubleshooter and then follow the next on-screen options. Note that you might have to boot your PC into Safe Mode.

Option 5 – Try running the Memory Diagnostic Tool

The Memory Diagnostic tool in windows can help resolve the “The driver detected a controller error” Blue Screen error by checking and automatically fixing any memory-based issues. To run it, refer to these steps:
  • Tap the Win + R keys to open Run and type mdsched.exe and hit Enter to open the Windows Memory Diagnostic Tool.
  • After that, it will give two options such as:
    • Restart now and check for problems (Recommended)
    • Check for problems the next time I start my computer
  • Once your computer has restarted, perform a basic scan or you could also go for the “Advanced” options such as “Test mix” or “Pass count”. Simply tap the F10 key to start the test.
Note: After you select your preferred option, your computer will restart and check for memory-based issues. If it finds any issues, it will automatically fix them and if there’s no issue found, then it’s most likely not a memory-based issue so you should try the other options given below.

Option 6 – Replace your motherboard

If your computer is still under warranty, you should consider replacing your computer’s motherboard in case the options given above failed to work in fixing the Blue Screen error.
Read More
Diablo 2 Resurrected facing server issues
It has been some time since the release of Diablo 2 resurrected and overall reception was pretty good. People are enjoying the old classic game in hi-def. resolution and with new and improved visuals. Sadly some server issues are present still until this day and somewhat spoil the experience for players. diablo 2 server status
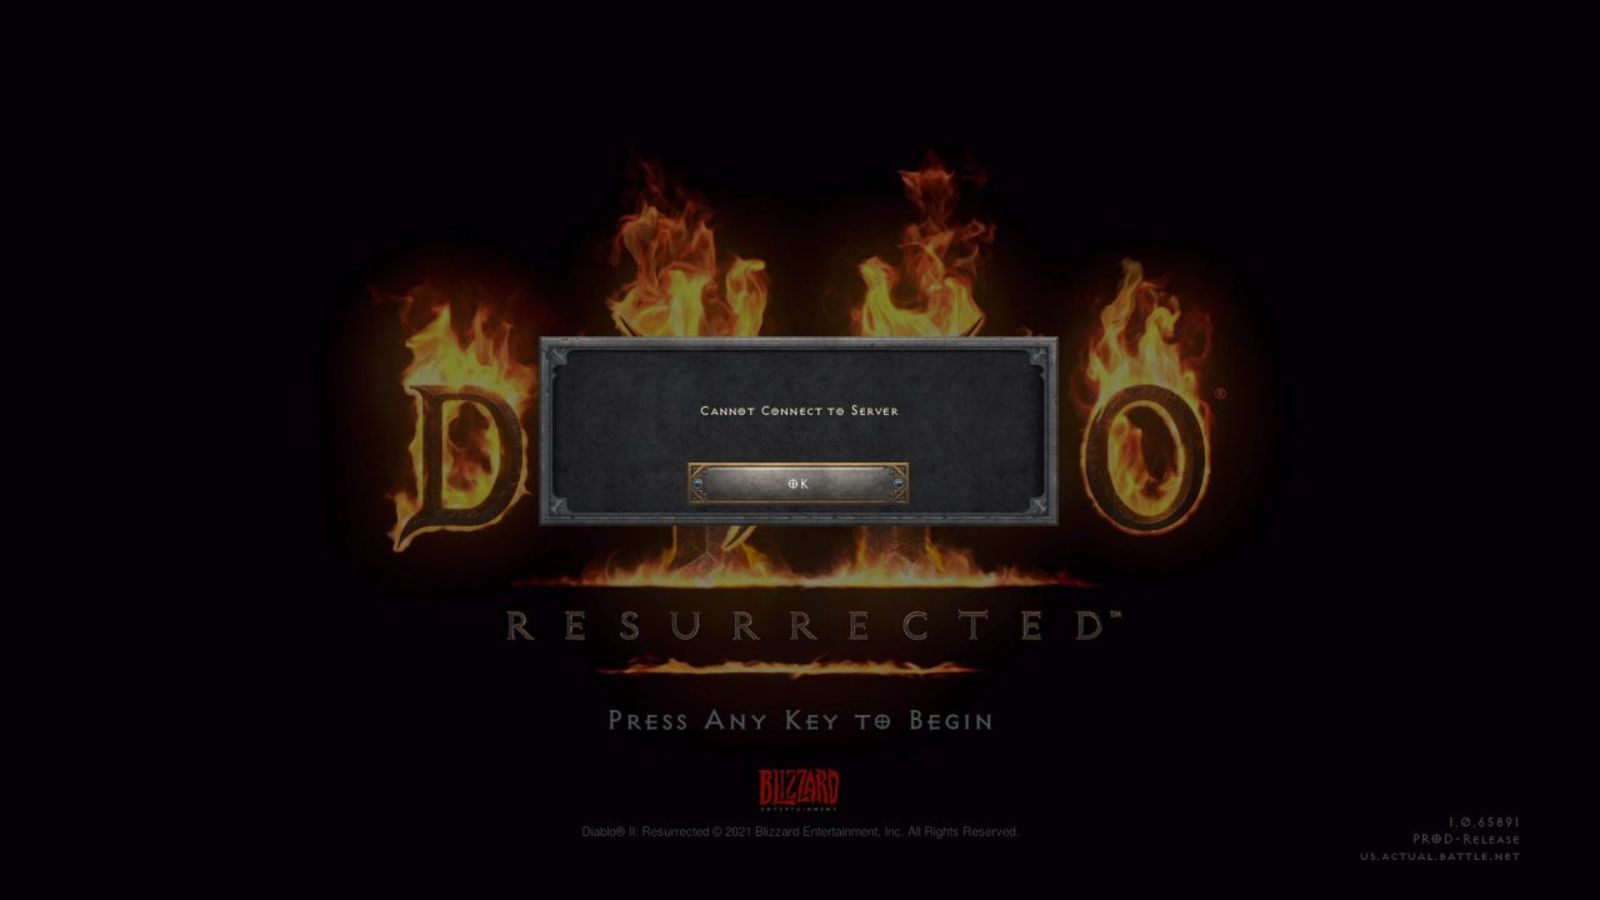
The greatest lag and server crashes are pinpointed to game-creating events. When a player creates a new online game, the server needs to pull a lot of details from the database and make a game, due to some legacy code present this process takes some time and it is demanding a bit on the server-side, and although code was optimized to cater to more modern approach some legacy code still remains. Another thing that was spotted to affect performance itself is player behavior, to be more specific, modern gamer behavior. Where players find good builds and runs on the internet and then go to farm-specific areas or bosses for loot or experience points, which in return boils down to making plenty and short runs that are made by creating games and after run eliminating them. Now pair that with the previous statement about legacy server and database code and you can add 1 and 1 and see how this might be an issue. A lot of short games over legacy code are placing games in a state it was not designed for back in 2001 and therefore we have issues. Sadly solutions without completely rewriting the whole code are not very promising and they include rate limiting, which will prevent players to create many games in succession in a short period of time and maybe even login queues to drop a load on servers. Blizzard reached to people in the whole company, even old diablo 2 developers to ask for advice and they say that they are working on solutions so they could lift limitations and have everything running fine.
Read More
TitleBar, Minimize, Maximize and Close missing
In case you don’t know, the Title bar comes with the Maximize, Minimize, as well as the Close button. However, there are instances when you might notice that the Title bar, Maximize, Minimize and Close buttons are missing in the File Explorer. This kind of problem might be due to some glitch in the computer, or it could also be caused by some built-in tool or an installed program in your computer. Moreover, there are also other factors that you have to consider such as corruption in the system files as well as errors in the user profile which is generated on a domain network, and so on. There are several suggestions you can check out to fix the problem. You can try to boot your computer in a Clean Boot State to see if a third-party program is the root cause of the problem. You can also try to run built-in tools like System File Checker and the DISM tool. You could also get the video buffer emptied, reset or reinstall the program, or recreate the User Profile.

Option 1 – Put your computer in a Clean Boot State

As pointed out, it is possible that some third-party program or service is the one that’s behind the problem. To isolate this possibility and to identify the culprit, you have to put your computer into a Clean Boot State. To do so, follow the steps below.
  • Log onto your PC as administrator.
  • Type in MSConfig in the Start Search to open the System Configuration utility.
  • From there, go to the General tab and click “Selective startup”.
  • Clear the “Load Startup items” check box and make sure that the “Load System Services” and “Use Original boot configuration” options are checked.
  • Next, click the Services tab and select the “Hide All Microsoft Services” check box.
  • Click Disable all.
  • Click on Apply/OK and restart your PC. (This will put your PC into a Clean Boot State. And configure Windows to use the usual startup, just simply undo the changes.)
  • You need to disable one third-party app after the other to really isolate the issue. And once you’ve narrowed down the problem, you can either disable the third-party app that’s causing the problem or remove it.

Option 2 – Run System File Checker scan

You might also try running the System File Checker or SFC scan to fix the issue. System File Checker is a command utility built into your computer that helps restore corrupted files and missing files. Refer to the following steps to run it:
  • Hit the Win + R keys to launch Run.
  • Type in cmd in the field and tap Enter.
  • After opening Command Prompt, type in sfc /scannow
The command will start a system scan which will take a few whiles before it finishes. Once it’s done, you could get the following results:
  1. Windows Resource Protection did not find any integrity violations.
  2. Windows Resource Protection found corrupt files and successfully repaired them.
  3. Windows Resource Protection found corrupt files but was unable to fix some of them.
  • Restart your computer and see if the System32 folder still pops up at startup or not.

Option 3 – Try running the DISM tool

You can try running the Deployment Imaging and Servicing Management or DISM tool to fix the Windows Upgrade problem. Using this built-in tool, you have various options such as the “/ScanHealth”, “/CheckHealth”, and “/RestoreHealth”.
  • Open the Command Prompt with admin privileges.
  • Then type in the following commands and make sure to hit Enter right after you type each one of them:
    • Dism /Online /Cleanup-Image /CheckHealth
    • Dism /Online /Cleanup-Image /ScanHealth
    • exe /Online /Cleanup-image /Restorehealth
  • Do not close the window if the process takes a while as it will probably take a few minutes to finish.

Option 4 – Try to empty the Vide buffer

These kinds of problems could also be due to bad data in the Video Buffer. Thus, you can try to empty the Video buffer to resolve the problem. All you have to do is tap the Shift + Ctrl + Win key + B keys on your keyboard. After that, leave your computer idle for about 10 seconds until you notice it blink once. Now you try using your computer as usual and see if the glitch is now fixed or not.

Option 5 – Try to reset or reinstall the program

Another thing you can do to fix the issue is to reset or reinstall the program where you encounter the problem. Chances are, you are running the application in the Full-screen mode but you can exit it by simply tapping the Esc or F11 key. However, if nothing changed, then consider resetting or reinstalling the program. Just go to the Windows 10 Settings app and navigate to Apps > Apps & Features. From there, look for the entry of the application you’re having problems with and select it and then click on the Advanced options. After that, click on the Reset button under the Reset section.

Option 6 – Try recreating the User Profile

You might also want to try recreating the User Profile on your computer since some errors in the creation of a User Profile can result in problems like this one. Thus, you have to try deleting the User Profile and then recreate it.
Read More
A Quick Guide to Fixing Error Code 7

Troubleshoot Error Code 7

Error Code 7 - What is it?

This is a typical system error that occurs during Windows setup. To be precise, this error may pop on your computer screen during the text mode portion of Windows setup. The setup hangs and stops responding and the error message is displayed in either one of the following formats:
‘The file I386Ntkrnlmp.exe could not be loaded. The error code is 7.’ or ‘The file I386L_intl.nlf could not be loaded. The error code is 7.’

Solution

Restoro box imageError Causes

Error 7 may be triggered due to several reasons but the 2 most common causes for this error code are:
  • Incorrect settings of the BIOS
  • Faulty RAM modules
  • Registry corruption

Further Information and Manual Repair

To resolve this error on your system, here are some easy and effective DIY methods that you can try.

Method 1 - Change Back the BIOS to its Default Settings

If the underlying cause of error code 7 is related to incorrect BIOS settings, then it is recommended to restore default settings to resolve. You can reset your computer’s BIOS (basic input and output system) settings to factory defaults by selecting the restore defaults option within BIOS or by removing CMOS ( Complementary Metal Oxide Semi-Conductor) battery from your unplugged computer for about five minutes. The battery removal method requires opening the computer case, so only attempt it if you are unable to access BIOS. To reset BIOS follow these steps, reboot your PC and then press the key assigned to loading BIOS during your computer boot splash screen. The key assigned to load and access BIOS varies from manufacturer to manufacturer but usually, it's F1, F2, or F12. Once you enter the BIOS, select the ‘Restore Defaults’ option listed in the menu.  I t may be a keyboard shortcut or be under the Advanced settings menu. Confirm settings and then exit BIOS. Hopefully, this will resolve Error 7.

Method 2 - Remove the Faulty RAM

When error code 7 is triggered by faulty RAM modules, then to resolve it simply remove the memory modules that are installed in the computer. If the error code is displayed again after you remove the memory module, remove a different memory module. This procedure requires you to reboot your PC several times to identify the specific memory module that is not working properly.

Method 3 - Repair the Corrupted Registry

Error code 7 is sometimes also linked with registry issues. If the reason for the error occurrence is a damaged or corrupted registry, then simply download Restoro. This is a powerful PC Fixer embedded with a registry cleaner. It is easy to operate and user-friendly. The registry cleaner detects and removes all errors in seconds. It cleans the registry and repairs the damages in no time. Click here to download Restoro.
Read More
What you should not share and post on Facebook
Recent Facebook, Instagram, WhatsApp, Messenger & Oculus fiasco and downtime reminded us that even big IT tech behemoth is vulnerable and can go offline. The situation has been resolve in not so fast manner but not long also, let’s say it was resolved in time that people have not left and switched to another platform. What you should not share and post on FacebookThat being said, now when services are back we stopped and reflected on the platform itself and on its users. If Facebook is vulnerable so are its users, but sometimes users themselves are responsible for being a target. We step back and take a look at posts that manifest on Facebook and have come with some advice on what things you should never post on Facebook and on other social platforms.

Pictures of any kind of ID, bill, vaccine cards or similar document

This should be a no-brainer at all but we see people posting this kind of information. They go on a rant about how the bill is too high and place a picture of it, or they took their vaccine shot and posted a vaccine card as proof. Why this is a bad idea is that any of these documents contain certain things like birthdays, names, and even more like addresses and other information that can be used against users.

Information about where you live

This could be tied to the previous point but it is very crucial that a living address is not something that you wish to share publicly. A lot of burglars are stalking social media for exactly this kind of information so they can then analyze when and how to strike and this time you have done all work for them providing them with the information on where to find your flat.

Daily routines and vacation plans

The most burglary happens to believe it or not during the day, in hours when people are at work. So by providing the world with your daily routines and when you are not at home you are putting your home at risk of being broken into. Posting vacation plans are even worse or posting pictures and status when you are on vacation will send a clear message to anyone that your home is empty and unattended.

Pictures of your home interior

This can also sadly disclosure more information that you wish like maybe some interesting facts like address or birthday on certificates, diplomas, or other documents accidentally caught in the taken picture. Also, these kinds of pictures can show much about your home security, alarm positions if you have some, how is your front door secured, etc.

Content that can get you fired

We hear all the time, famous star or director has some tweets that have resurfaced and now it is fired. I know that many of us are not famous stars but we can also be fired. Sharing some offensive opinions, inappropriate content or just plain pure lies like took sick leave to play this new game can have not so great resolution for your working relationship with your employer. We do not support lies nor do any kind of inappropriate content but posting it online on social media will just make things worse for you personally.

Your login info or sites and services that you are using

It is fairly safe to say hey we are chilling with Netflix or watching the new season of Mandalorian on Disney plus but speaking of things like made a new account on freelancer service of got my new e-banking in this cool new bank, etc. is not very wise. Cyber crooks are always on the lookout for identity theft and will use available information to steal data and money. You are risking also losing provided accounts this way leaving you with tons of work to explain that you got mugged to service providers.

Conclusion

We know that this article seems paranoid and maybe assumes that among your friends there are some crocks and people trying to take advantage of you. As this certainly was not our attention nor goal, we had to point to extremes in order to protect you the most.
Read More
HDMI Port not working properly in a Windows PC
HDMI which stands for High Definition Multimedia Interface is an audio/video interface that can be used to interconnect various multimedia devices. One of the common use for HDMI is when a CPU is connected to a monitor and a projector. Aside from that, it can also be used in connecting Blu-ray players and laptops to televisions as well as monitors. One of the main advantages of using HDMI is that it can transmit both audio and video at high qualities such as 4K using only a single connection. However, you may also experience some issues in using it every now and then and one of them is when you find that after connecting the devices using the HDMI port, the screen appears to be black and there is no audio output. In such cases, there are a variety of hardware malfunctions that could be causing the problem with the HDMI connectivity. Although there a lot of potential causes, there are also potential fixes you can try to fix the problem. Before you troubleshoot the HDMI Port problem, you might want to perform System Restore first as it might help you in fixing the problem. It could be that you’ve made some changes in some of the settings in your computer that triggered the problem. Thus, you can try run System Restore to undo them, refer to these steps:
  • First, press the Win + R keys to open the Run dialog box.
  • After that, type in “sysdm.cpl” in the field and tap Enter.
  • Next, go to the System Protection tab then click the System Restore button. This will open a new window where you have to select your preferred System Restore point.
  • After that, follow the on-screen instructions to finish the process and then restart your computer and check if the Stop error is fixed or not.
If the problem still persists after System Restore, then follow the given options below to further troubleshoot the problem.

Option 1 – Try to physically check the hardware of your computer

The first thing you can do is to check the physical status of the hardware in your computer. You can clean the dust off the hardware components like the Network Card or Graphics Card of the computer. You might want to use a small blower or you could also use a soft cloth and run the components gently. Make sure that you don’t damage any parts with moisture or cause harm to any circuits while you carry out this task.

Option 2 – Run the Video Playback troubleshooter

You might also want to run the Video Playback troubleshooter. To do so, refer to these steps:
  • First, open the Windows settings app.
  • Then navigate to Update & Security > Troubleshoot.
  • From there, scroll down until you see the Video Playback section and click on it.
  • After that, you’ll see the Run the troubleshooter button, click on it to run the Video Playback troubleshooter, and follow the next on-screen instructions.
On other hand, you can also run the Hardware and Device troubleshooter if the Video Playback troubleshooter wasn’t able to fix the problem. You can run it from the same page that you run the Video Playback troubleshooter.

Option 3 – Try to rollback, update, or disable the Graphics card drivers

To fix the problem with the HDMI port, you can either roll back, update or disable them depending on your preference in order to resolve the problem.
  • First, boot your computer into Safe Mode.
  • After that, tap the Win + R keys to launch Run.
  • Type in devmgmt.msc into the box and tap Enter or click OK to open the Device Manager.
  • After that, a list of device drivers will be displayed. From there, look for the Display Adapters and click on them.
  • After that, right-click on each entry under the Display Adapters. Note that the rollback option is only available if the update was recent. So if it isn’t there, just click on the Update Driver option.
  • From there, Windows will automatically check for problems and update the Graphics card drivers.
  • Now restart your computer.
  • After restarting your computer, go to the Settings app and Check for Updates in the Windows Update section.
Note: You also have the option to go directly to the website of your graphics card manufacturers like NVIDIA, Intel, or AMD and go to the section called Drivers then check if there’s a new available update – if there is, download and install it.

Option 4 – Try to reset the Monitor

You could also try resetting the monitor or television using its hardware keys and see if it can resolve the problem. You can just refer to your TV or monitor’s guide for more information on how to reset them.

Option 5 – Try some miscellaneous fixes

Apart from the four given options above, you can also check out some miscellaneous fixes to fix the HDMI connectivity issue and here they are:
  • You can try to plug out the HDMI cord/cable from both source and destination and then plug it back in after a couple of minutes.
  • You can also check if the HDMI cable you are using is still in working condition.
  • You can also try to change the source and the destination of the video and see if either one of them is in a non-workable state.
  • Try checking if your settings are how they should be as intended in the “Project my screen” option by tapping the Win + P key combination on your keyboard.
Read More
Setting default applications in Windows 11
Setting default applications in Windows 11
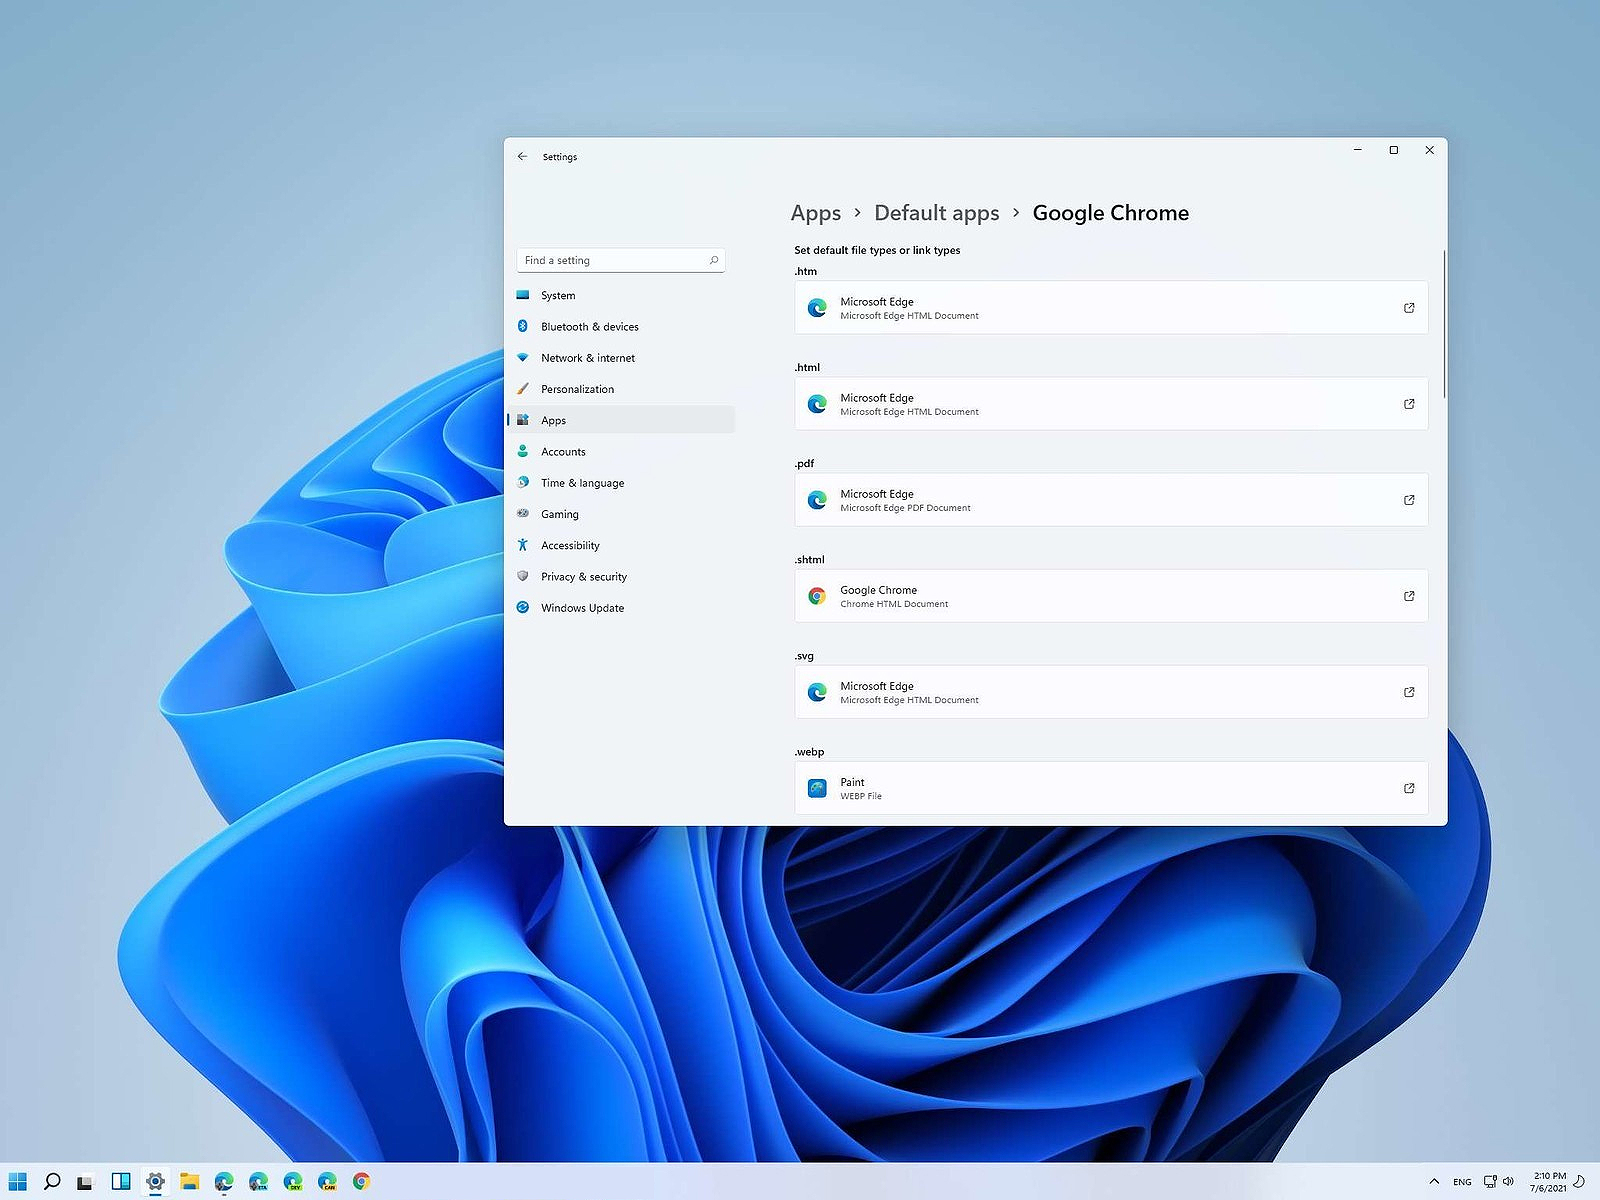
Same as in previous Windows versions, Windows 11 will also use certain applications as default ones for opening certain file types and file extensions. And yes, same as in previous versions it will come preconfigured for certain file types and associated applications like for example photos for pictures. Of course, users usually have their own favorite applications for certain file types and much more prefer to open them inside the application of their choice instead of the default one. We can change the default application like in previous Windows versions but this time there are two ways and overall more control of this process. Windows 11 has settings for choosing default file type applications and default file extension applications giving you more control of this process.

The opening setting for apps

Whatever you wish to change default application or default extension application you will need to open settings for default application. Follow steps to quickly go into it.
  1. Press ⊞ WINDOWS + I to open settings
  2. Select Apps on left
  3. On the right part select Default Apps
Now you are in settings for choosing default applications

Choosing default application by file type extension

This is considering by Microsoft as a typical way to set default applications inside Windows 11. Once you are inside the settings app there is a box labeled Enter a file type or link type. Inside the search box, type in file extension that you wish to associate the application with like .JPG, .TXT, or other. If the file extension is not associated with any application you will be presented with a Choose a Default button, if however, the file extension is already associated with the app, you will need to click on the app box itself. In any case, a pop-up will appear and ask How do you want to open YOUR FILE EXTENSION files from now on? Choose Application from the list of presented ones and click on OK.

Choosing default file type

Another method is to select the default application by file type selecting application for it. In the settings screen, under the search box, you will have a list of installed applications. Choose the application that you would like to associate a file type with and click on it. On the next details screen scroll down and select the file type that you want to associate with the selected application and click on OK.

Other/third method

There is also the third method for choosing the default application for file type but it includes some surfing on your hard drive and it can be more time-consuming for first-time settings. But it is fairly quick when you need to only use it once on some new file type (for example you have a new application installed and want to switch just one file type extension to that application). Locate the file that you want to associate with the application and right-click on it. Select Open With from the menu and then Choose Another App. Pop up will appear, select the application that you would like to use, and check the box beside Always use this app to open CHOOSEN EXTENSION files followed by clicking on the OK button.
Read More
Software review series: HWiNFO
HWiNFO (Hardware Information) is a professional hardware information and diagnostic tool supporting the latest components, industry technologies, and standards. It's targeted to recognize and extract the most possible amount of information about computer hardware which makes it suitable for users searching for driver updates, computer manufactures, system integrators, and technical experts too. Retrieved information is presented in a logical and easily understandable form and can be exported into various types of reports. System health monitoring and basic benchmarking available too. If you would like to read more helpful articles and tips about various software and hardware visit errortools.com daily.
Read More
1 2 3 162
Logo
Copyright © 2022, ErrorTools. All Rights Reserved
Trademarks: Microsoft Windows logos are registered trademarks of Microsoft. Disclaimer: ErrorTools.com is not affiliated with Microsoft, nor claim direct affiliation.
The information on this page is provided for information purposes only.
DMCA.com Protection Status