How to Fix Installation Error 1628

Repair Error 1628

What Is Installation Error 1628?

Installation Error 1628 is, as the name suggests, an installation error. When it occurs, a generic 1628 message is displayed to the user. When this message appears, it is either a problem with the install files or an issue with the InstallShield.

Solution

Restoro box imageError Causes

Installation Error 1628 is caused because every Windows-based program or application has been designed that such that it has to be installed on the computer for use.

This installation process is important because it not only moves files to the appropriate location on one’s hard drive but also because the process creates registry entries in Windows System files.

A vast majority of these programs and applications have a built-in tool that’s responsible for aptly performing this installation. This built-in tool is the InstallShield.

This establishes that when this error occurs, it is either because of some unforeseen issue that occurred during the installation process or because of some problem with the InstallShield.

Further Information and Manual Repair

In order to keep this error from occurring in the future, some recommendations are outlined below.

  • Check the installation disc and determine if there are any smudges, scratches, or fingerprints on it. If the system is unable to read data from the disc, Installation Error 1628 will be generated. In order to ensure that the Installation Disc is clean, use a microfiber cloth. Dampen it lightly with water and clean the disc. Wipe the inside of the disc lightly in an outward direction, making sure that it is not wiped in a circular pattern. Try to reinstall the application or program after cleaning the disc. The issue should be resolved. However, if it persists, some problems may be with the InstallShield.
  • The alternative solution is to repair the InstallShield and the procedure goes as follows.
  1. Stop InstallShield’s running process. It may have been crashed and simply needs to be restarted. Now access task manager. Press Ctrl+Alt+Del and the task manager will open. Now go to the processes tab and disable ‘idriver.exe’ and ‘msiexec.exe’ from here.
  2. Now go to ‘C: Program Files/Common Files’. Here you will find the ‘InstallShield’ folder. Select ‘rename’ and modify the folder name to ‘InstallShield1’. Confirm rename and start the installation process again. Now Windows will try to re-install any InstallShield files one needs.
  3. If the error persists after renaming the InstallShield folder, download the Windows Installer from Microsoft’s website. This file will determine whether or not your version is valid. Old versions often have bugs that cause problems. Your system is now ready to be used.
If you like to learn and find out more about various Windows errors, and how to repair them go to our vast archive or use search to find articles that will explain and help you in solving your issue.
However, if you prefer to do things fast and with automatization then we are proposing to use an automated solution for your issues. The application that we are recommending is Advanced System Repair Pro
Advanced System Repair utilizes multiple tools all in one to give you a quick, simple, reliable, and very thorough diagnosis of your PC. It brings you all the tools you need in one program to clean, fix, protect, optimize and boost your PC!
1-Click Maintenance
All the tools to make it simple and easy! It's like having a professional technician at the click of a mouse.

Junk Cleaner
Keeping your computer free from unnecessary clutter also helps make your computer last longer. Like any other machine, if you keep it clean and take care of it, it will serve you better for longer!

Optimize background apps
Optimize applications background activity with the built-in Application Optimizer feature.

Disk Defrag
With a simple 1-click, Advanced System Repair speeds up your PC by assembling fragmented files on your machine and organizing them more efficiently.

Malware Removal
Finds and removes all types of harmful malware including trojans, worms, bots, adware, spyware, PUPs, and more!

Privacy Cleaner
The all-in-one privacy suite to Clean Your Tracks & Protect Your Privacy! Make your computer safe, secure, and more efficient!

System Tweak/Optimizer
ASR will analyze your complete system and settings to adjust your PC to function at its maximum performance.

Registry Cleaner
Over time, as you install and uninstall applications, the registry can become cluttered with old entries and broken settings which can result in program crashes, and annoying messages and slow the computer down.
Visit our Advanced System Repair Pro Download page to inform yourself about all the benefits of this software and get a free trial copy of it.
advanced system repair pro

Advanced System Repair Pro

One-click automated PC repair solution
ASR logo
With Advanced System Repair Pro you can easily
Replace damaged files
Restore performance
Free disk space
Remove Malware
Protects WEB browser
Remove Viruses
Stop PC freezing
DOWNLOAD
Privacy Policy | Terms of Use | Uinstall
Advanced System Repair Pro is compatible with all versions of Microsoft Windows including Windows 11

Share this article:

You might also like

Runtime Error How to Fix

A runtime error is commonly an error that's created after the PC is operating software and encounters a problem of some form. For instance, a runtime error like run-time error code 7 reveals an "out of memory" dilemma.

Solution

Restoro box imageError Cause

Run-time errors are normally brought on by clashes with TSR (Terminate and Stay Resident) applications or additional operating applications, software problems, storage problems, or pc viruses.

Troubleshooting a Run-time Error

First, enter the run-time error signal into a search engine to see what info you will get about the precise runtime issue you are receiving. Next, end - job all running applications and TSRs to make sure these aren't the origin of the issue. You can certainly do so by obtaining the job manager by striking Control Alt Delete.

In case your issue is regularly occurring with a unique program, go to that system programmer's site and obtain any upgrades and patches. If unavailable, try uninstalling the application involved and reinstalling it.

In the event the issue is occurring with the os, you may consider reinstalling it although it is a huge commitment. A much better idea would be to try a fix for both Windows XP or Windows 2,000. It is possible to fix and scan files by typing : sfc / scannow, heading to the Begin switch, Run, and then pushing enter. Make certain to put an area between sfc and the reduce.

You might have an equipment or storage dilemma if these measures have not resolved your run-time errors. If that is the situation, contact the support of the application under consideration for potential support accompanied by the pc or motherboard manufacturer.

Many run-time problems can be solved by upgrading the application that's creating the problem. This is only because the programmer's frequently releasing patches and improvements for their applications as insects are found and repaired.

Storage problems may frequently be fixed by rebooting the pc. Consider a reboot a short-term repair. Rebooting clears the memory but in case your COMPUTER does not have adequate memory for your applications you're operating, or sufficient hard-drive space you'll immediately run out of memory again. Something less than this sum may cause memory issues since the computer's swap file isn't in a position to expand in dimension as required.

To assess the quantity of free area, available My Computer and right-click on the HDD, generally the D: drive. Select Attributes in the menu and see the disc's ability. Perform the disk clean-up function by following prompts and pressing the Disk Clean-up button, if the room is reduced.

You may be getting run-time errors, in case your storage chip is really failing. Eliminating and changing the awful memory chip will solve the difficulty. If you're encountering other runtime-related errors, like an install runtime issue, try cleaning away the portions of the registry with Total System Care.

Read More
Razer Hazel, an RGB mask for max protection
Razer Hazel
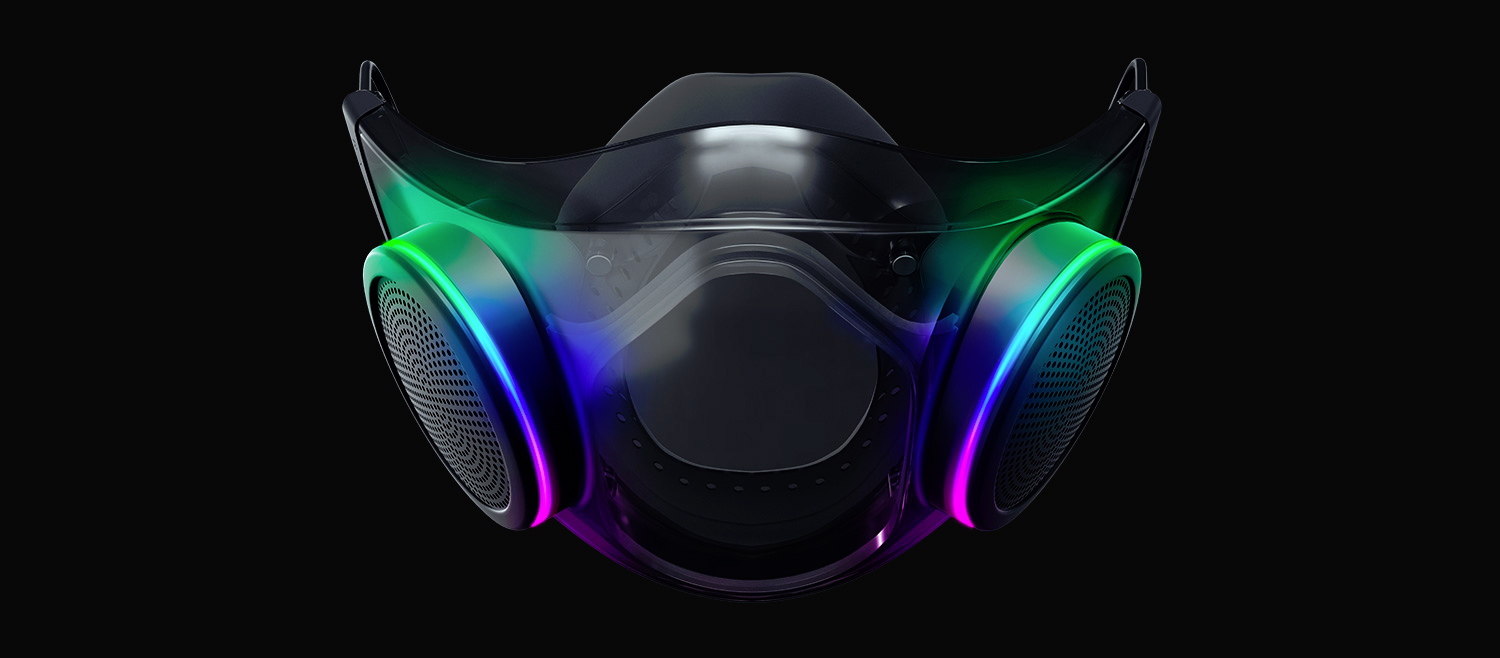
The world today is still sadly under pandemic and by the looks of it, COVID-19 is here to stay, well at least for some time in the near future. Razer seems to think so as well since their upcoming gear is not really what you would expect. Enter Hazel, a new and upcoming Razer smart mask.

Protection

Hazel mask has a high bacterial surgical N95 filter with fluid resistance that will protect you against large droplets and splashes. A detachable active ventilator regulates airflow and is capable of filtering around 95% of airborne particles. Mask comes with a special charging case that has an auto sterilization UV light that will kill bacteria and viruses inside the case interior while it charges. When the mask is recharging it will change color from red to green visually showing the level of the current charge. Mask of course has easy to replace filters inside ventilators and Razer is standing by that fully charged mask will last enough for full-day use. An active ventilation system brings cool air while releasing breathing heat at the same time drastically reducing CO2 inside the mask that could produce dizziness and headache. Silicon guard is on its edge gluing to around your face in order to prevent exterior air sneaking inside the mask and positioning it firmly so it does not rest on your lips in order for easier and clearer communication.

Hazel personalization and technical features

Hazel has a clear and transparent design making it better for social interaction since other people will be able to see your lips and smiles thus making it more natural. A low light mode that turns on automatically when it is dark outside is also aimed for easier communication. Speaking of communication, the mask comes with voice Amp technology that has a built-in mic and amplifier thus making your voice lines clear so you are not muffled when wearing the mask itself. Your friends and other people will be able to hear you like you are not wearing a mask at all. Thicker air loops apply less pressure on ears and can be adjusted for a more secure fit, while the mask itself can be custom-made to fit your face shape. And of course Hazel comes with 16.8 million colors and a suite of effects with Razer Chroma RBG
Read More
New focus sessions in Windows 11
focus session
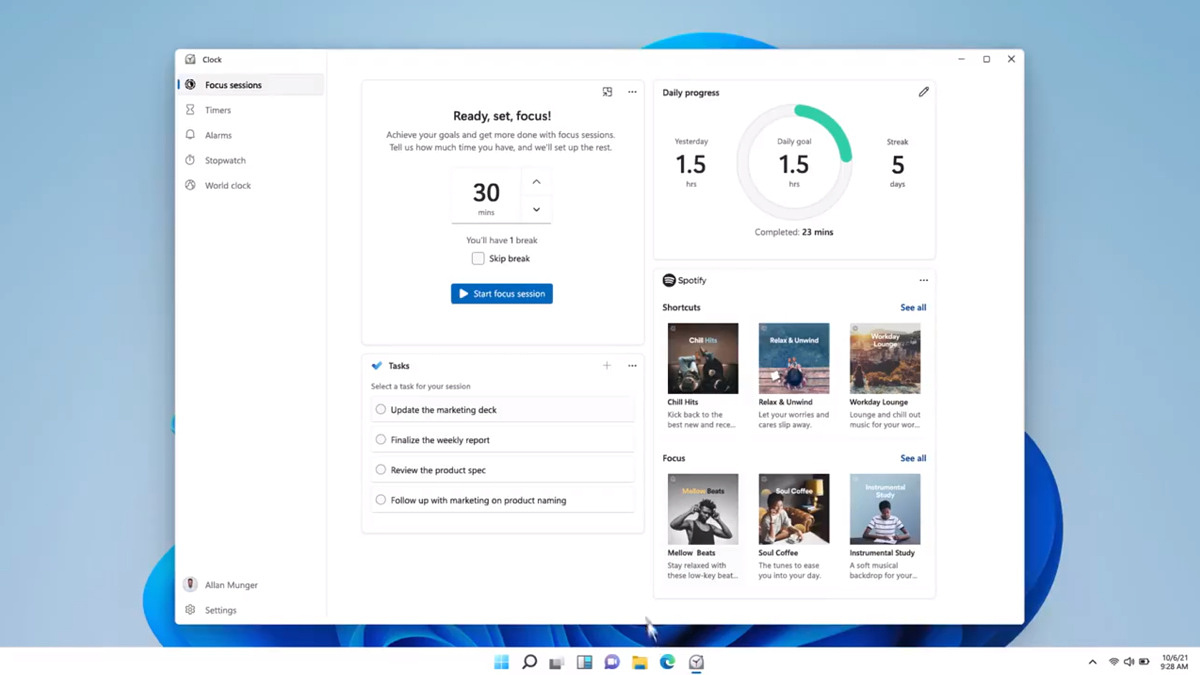
Windows and Devices chief Panos Panay has revealed new focus sessions feature that will be in Windows 11 on his Twitter account today. He himself is referring to it as a game-changer especially with Spotify integration.

So what is a focus session?

From the video clip provided on Twitter, we can see that focus session users will be able to choose a specific task from the previously made task list, choose songs that will play in the background while the task is active, and set a timer for the chosen task with breaks. Maybe the best comparison and explanation would be a desktop google calendar task with music, basically, that’s it. A neat and good organizer inside your Windows 11 operating system. I think that this is generally a good idea and for sure it will find its audience.
Read More
Razer Huntsman V2 mechanical keyboard
Razer huntsman
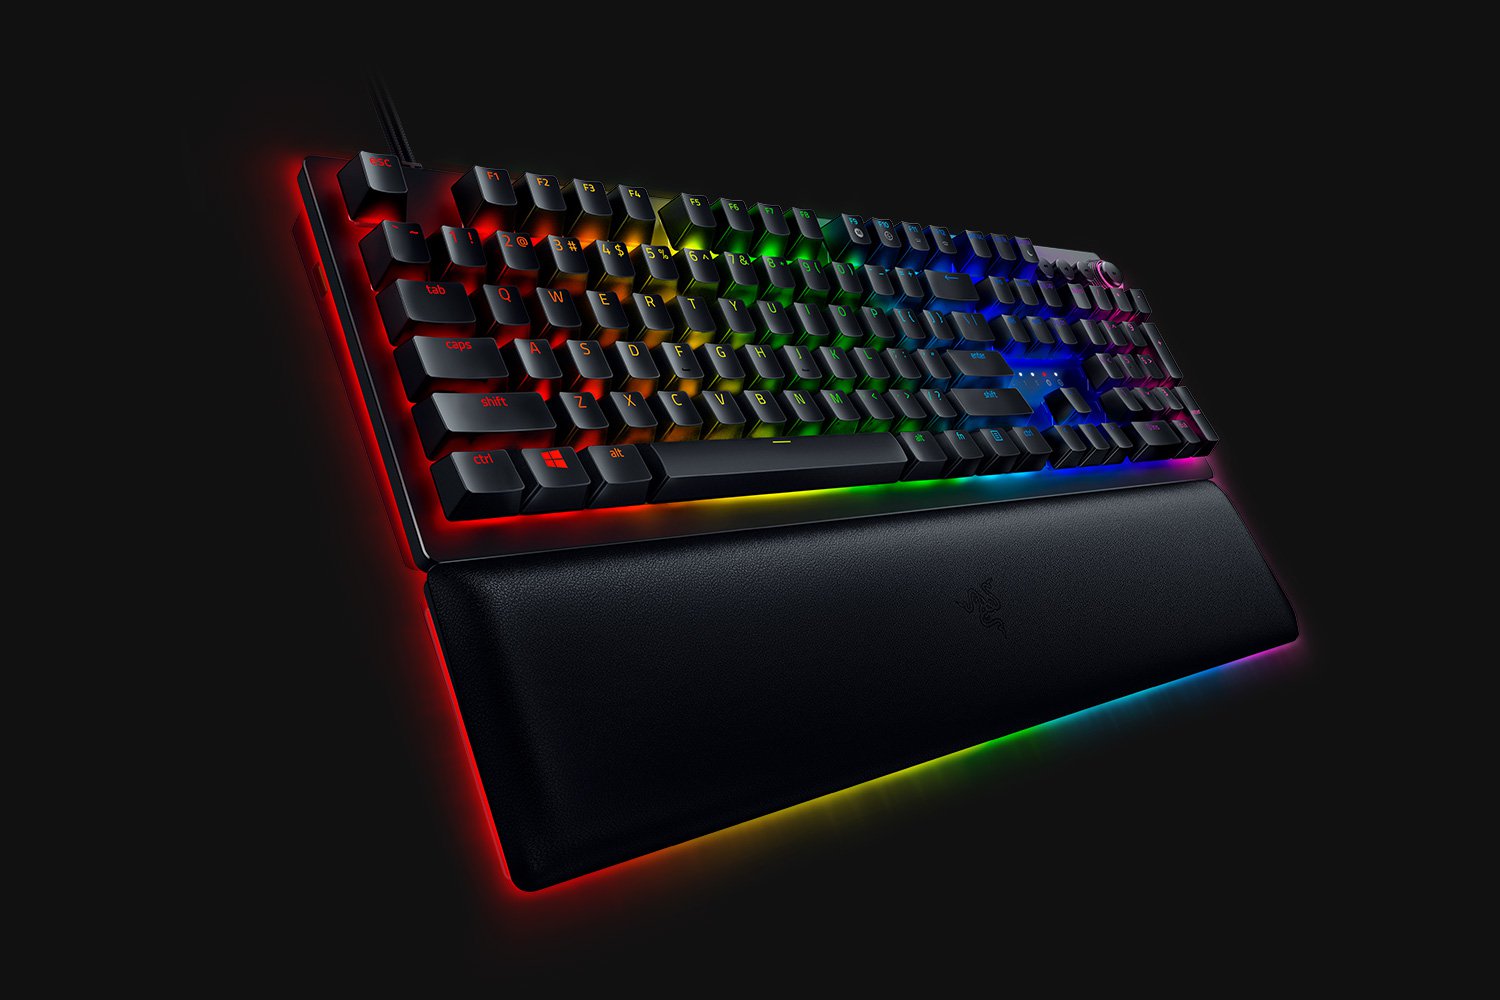
When it comes to computer peripherals first thing that comes to people's minds is probably Mouse and Keyboard. Also when discussing peripherals brands, Razer is not a stranger and over the years it has built its name and cult following. Razer’s mechanical keyboards have been always in the upper field of quality and trust from users and Huntsman is no different.

Tech specifics of Huntsman keyboard

  1. Mechanical optical switches Razer has introduced their new optical technology switch with this keyboard. These switches are faster and more accurate than typical mechanical switches and if tests are to be believed this is the fastest keyboard currently on the market.
  2. Multi-functional digital dial A multi-function digital dial with three tactile media keys gives you instant access to everything from brightness to volume in seconds. All programmable and customizable through Synapse 3, so you can set your preferred configurations right at your fingertips.
  3. 10-key rollover Anti-ghosting technology that enables 10-key simultaneous presses at the same time
  4. 4-side underglow with Razer chroma Go crazy and personalize lighting effects any way you want with a full 4-side underglow and 38 customization zones. Powered by Razer Chroma

Feel and noise

In the department of noise, well it is the mechanical keyboard so naturally, it will be louder than membrane ones but in terms of comparing it to other mechanical keyboards it is within the same noise range, maybe just a tiny bit silenced. The keyboard comes with 2 different types of switches, purple clicky ones that are louder and have that *click* sound for sound feedback, and red ones, that are not equipped with clicky sound but are linear providing slightly faster performance. If you choose the Huntsman elite model of the keyboard it will come with a nice hand resting mat that is very comfortable and feels right. Using a keyboard feels like using a Razer keyboard, it is responsive and gives that superior mechanical feeling.

Conclusion

Razer Huntsman mechanical keyboard is not the cheapest nor the best on the market but it is the fastest one out. It is in the top tier of keyboards and worth the investment.
Read More
Increase or decrease notification display time
As you know, the Windows 10 Action Center has a stack of all the notifications that come from different applications on your computer. So each time an app displays notifications, it will be displayed for about 5 seconds and then it disappears right away. Although the allotted time for the notifications to be displayed is quite enough to catch your attention and help you get a glance at the message, there are times when you might miss it and you hoped it could’ve been displayed a lot longer. So in this post, you will be guided on how you can increase or decrease the display time of the notification in Windows 10. The best way you can view the missed notification is to click on the Action Center. From there, you will see all the notifications that are grouped by the applications. This means that if you have a lot of notifications, it would be hard for you to find what you are looking for. Thus, in such cases, the best way you can do is to increase the display time for which notification to stay on the screen.

To get started, refer to the instructions given below.

Step 1: Tap the Win + I keys to open Settings. Step 2: Next, navigate to Home > Ease of Access > Display. Step 3: After that, scroll down to the end until you see the dropdown to change the notifications where you should see the “Show notifications for”. Step 4: Then you can change the time from the default 5 seconds to 7, 15, 30, and so on. Step 5: Once done, the display time of the notifications should stay longer but keep in mind that you must choose the length wisely so if you have notifications from a lot of apps, then the screen will also be filled with multiple notification cards.
Read More
Fix Folder Redirection Failed in Windows
If you got an error message saying, “Folder Redirection Failed, Failed to build the list of regular subfolders, Access is Denied” after you configured a new Group Policy Object or GPO which redirects User folders to a new network share or when you click on Reset default location under the Windows File Explorer or Folder Options, then you’ve come to the right place as this post will show you how to resolve this kind of error on your Windows 10 computer. Follow the given options below carefully to fix the “Folder Redirection Failed” error.

Option 1 – Take Ownership of the folder

If you are not able to access the folder could be one of the reasons why you’re getting the “Folder Redirection Failed” error and so you need to take ownership of the folder to resolve the problem. Before you proceed, make sure that your account is an admin account.
  • First, locate the concerned folder and right-click on it then select Properties.
  • Next, click on the Edit button in the Properties window and click OK to confirm if you got a User Account Control elevation request.
  • After that, select user/group from the permission windows or click on the Add button to add another user or group. It would be best if you add “Everyone” to give permission.
  • Then check “Full Control” under the “Allow” column to assign full access rights control permissions.
  • Now edit the permission to Full Control for “Everyone”.
  • Click OK to save the changes made and then exit.

Option 2 – Try to add Authenticated Users or Domain Computers

Make sure that the Folder Redirection group policy removal option is set to “Redirect the folder back to the user profile location when the policy is removed” when using the Folder Redirection. After that, you have to add Authenticated Users group with the “Read” permissions on the Group Policy Objects or GPOs. And if the Domain computers are part of the group of “Authenticated Users”. Note that by default, the “Authenticated Users” have these permissions on any new Group Policy Objects or GPOs. Once again, you have to add just “Read” permissions and not “Apply Group Policy” for “Authenticated Users”. Furthermore, to fix the “Failed to build the list of regular subfolders” errors, here are some options that could help.

Option a – Try to clear disk space

You might have to check if your disk is running out of space because if it is, then it will fail to create a list abruptly. And so you need to free up some disk space. You can either check on the files manually especially if you tend to keep your files at random places in your disk drive.

Option b – Find the Target route

You need to find the target route of the folder and then restore it if you are getting the “Failed to build the list of regular subdirectories” when you try to relocate the folder to the original location.

Option c – Try to change Ownership/Reset Defaults for all the User folders

If the “Failed to build the list of regular subdirectories” error pops up when you are trying to move a large number of files from one location to another, then you need to change the ownership of the folders as pointed out earlier.
Read More
Fix fatal error C0000034 applying update
Fatal error C0000034 happens during the installation of the Windows update and if you are one of the unlucky users who sadly run into this, keep reading as we will provide solutions to this error and how to get around it. Start from point 1 to the bottom and hopefully you will have your PC back into working order in no time.
  1. Run Windows Update troubleshooter

    Usually, a built-in Windows troubleshooter can solve issues painlessly and fast, my advice is to try this as the first option, it is a simple and clean solution worth trying and in 90% it solves the issue all by itself.
  2. Do a clean boot

    Using task manager, remove all nonessential applications and services from starting up, reboot your computer, and once it is cleanly booted try re-running the update process again, if the issue was running the application this time everything will work since the problematic application is not running.
  3. Reset Windows update components to the default

    This solution requires you to use the Reset Windows Update Agent Tool to reset Windows Update components to default or use this PowerShell script to reset Windows Update Client. You can also manually reset each Windows Update component to default and then re-run the update.
  4. Disable firewall and antivirus

    Altho not likely it is still a possibility that some firewalls and antivirus can detect windows updates as malicious software and cut them off. If everything else failed, disable the firewall and your PC protection and when it is fully disabled try updating.
  5. Do automatic startup repair

    This should be the last thing to do but if everything else failed, do it. Perform Windows 10 Startup Repair. Once the startup repair completes successfully, you can re-run the update. The update should install without errors.
Read More
Fix The default gateway is not available Error
If you were having some problems with your internet connection and you tried to run the Internet Connections troubleshooter but it displays an error message instead that says, “The default gateway is not available”, read on as this post will show you what you can do to fix this error. The first thing you can do to fix this error is to restart your computer and then try to run the Internet Connections troubleshooter again. However, if you still see the same error message, then you might want to troubleshoot the problem further. You can try to install the Network driver or reinstall the Network adapter drivers. You could also verify the power saving mode or reset TCP/IP as well as disable the Firewall temporarily.

Option 1 – Try installing the Network driver

The very first thing you can do to resolve the error is to install the network driver. It is a common solution to this kind of problem and most users encounter it right after a fresh installation of Windows 10. So if you have done this, then you need to install the network driver so that the network adapters can start working. You can find the network driver in the motherboard CD. On the other hand, if you are using a laptop, you might have to use another computer or mobile to download the network driver from the manufacturer’s website.

Option 2 – Update the Network Adapter drivers

If the first option is not applicable to you since you already have network drivers in your computer, you might want to update the Network Adapter drivers by following these steps:
  • Tap the Win + R keys to launch the Run window and then type in the “msc” command and hit Enter to open the Device Manager window.
  • Under the Device Manager, you will see a list of drivers. From there, look for the Network Adapters and expand them.
  • Then right-click on each one of the Network drivers and update them all.
  • Restart your PC and see if it helped in fixing the BSOD error.
Note: If updating the network drivers didn’t help in fixing the “Windows could not find a driver for your network adapter” error, you can also try to uninstall the very same drivers and restart your Windows 10 PC. After that, the system itself will reinstall the drivers you just uninstalled. Alternatively, you can also download and install the drivers from the manufacturer’s website directly.

You could also try to reinstall the network adapter driver, refer to these steps:

  • Open the Devices Manager from the Win X Menu.
  • Then locate the device drivers and right-click on them to open the Properties.
  • After that, switch to the Driver tab and click on the Uninstall Device button.
  • Follow the screen option to completely uninstall it.
  • Finally, restart your computer. It will just reinstall the device drivers automatically.

Option 3 – Try to verify power-saving mode

If you are using a Windows 10 laptop, then you should know that the Power Options panel plays an important role. So if you’re getting an error in your laptop, you have to check some settings that are related to the Power Saving mode. To do so, follow these steps:
  • Open Control Panel and go to Hardware and Sound and click on Power Options.
  • Next, click on the “Change plan settings” option of your selected plan and then click the “Change advanced power settings” option.
  • After that, you should see the Power Options window, and here, expand the Wireless Adapter Settings and Power Saving Mode.
  • Now make sure that the Maximum Performance option is selected. If it’s not, select it and save the changes you’ve made.

Option 4 – Try to reset the TCP/IP

As you know, the TCP/IP or the Internet Protocol is the most important thing if you want to use the internet on your computer. That’s why if it ends up getting corrupted, you need to reset the TCP/IP to fix the problem. To reset TCP/IP, refer to these steps:
  • In the Windows start the search, type “command prompt” and right-click on Command Prompt from the search results.
  • Then select the “Run as administrator” option to open Command Prompt with admin privileges.
  • After that, execute this command: netsh int ip reset resettcpip.txt
  • Once it’s done, exit Command Prompt and restart your computer and then check if the error is now fixed.

Option 5 – Temporarily disable Firewall

On the other hand, the error could also be due to the Firewall software installed on your computer. Thus, disabling them or any security software installed on your computer is always a good idea you can try when you’re not able to access the shared drive on your computer. There are times when you encounter problems like the error “The default gateway is not available” due to interference of antivirus or security programs. Thus, you have to disable both your antivirus program and Windows Defender Firewall for the meantime and check if it fixes the error or not
Read More
CLR20R3 error while launching an Application
CLR20R3 error is received when you are launching an application in Windows 10. It can happen because of two reasons, a corrupted application file or missing system components. Keep on reading in order to find solutions to fix this error.
  1. Run the program in compatibility mode

    Locate problematic application executable file Right-click on executable Click on properties Go to the compatibility tab and try running the application in the previous version of Windows or as an administrator.
  2. Reset Windows media component

    Right-click on Start, then left-click on command prompt (admin) In command prompt type next command and after each line of command press ENTER regsvr32 atl.dll cd C:\WINDOWS\eHome ehSched /unregServer ehSched /service ehRecvr /unregServer ehRecvr /service ehRec.exe /unregServer ehRec.exe /regserver ehmsas.exe /unregServer ehmsas.exe /regserver
  3. Reinstall Windows media player

    Go to control panel Click on Program and Features > Turn Windows feature on or off. Expand Media Features, uncheck Windows Media Player, and click Ok. Restart your PC, go through the same steps, tick Windows Media Player, and restart your computer once again.
  4. Reinstall .NET framework

    Go to control panel Click on Program and Features > Turn Windows feature on or off. Uncheck “.NET Framework 3.5” and “.NET Framework 4.8”, and click Ok. Restart your computer, go through the same steps, check “.NET Framework 3.5” and “.NET Framework 4.8”, and restart your computer once again.
  5. Update Windows

    Go to settings and check for updates
Read More
Fix Windows Update error 0x80070422
If you were trying to run Windows Update or activate Windows Firewall or download from the Windows Store but encounter the Windows Update Error 0x80070422 instead, read on as this post will show you how you can resolve the problem. This kind of Windows Update error occurs when the Windows Update or WUAUSERVE is not started or when the Background Intelligent Transfer Service or BITS can’t be started. It could be that they are disabled or because they have no enabled devices associated with them. Whichever the case is, you can check out the options given below to fix the Windows Update Error 0x80070422 and make sure that you create a System Restore point first before you start.

Option 1 – Check the status of some Windows Update Services

  • Tap the Win + R keys to open the Run dialog box.
  • Next, type “services.msc” in the field and hit Enter or click OK to open Services.
  • From the list of Services, look for the following services and make sure that their Startup type is as follows:
    • Windows Update – Manual (Triggered)
    • Background Intelligent Transfer Service – Manual
  • After that, check if the Service status of the listed services above is set to Running. If they’re not, click on the Start button to start these services and then check if you can now enable the Windows Update service or not.

Option 2 – Try to disable IPv6 in the Network Center

You might also want to disable IPv6 in the Network Center in order to fix the Windows Update Error 0x80070422. How? Follow these steps:
  • Tap the Win + X key combination on your keyboard and click on Network Connections.
  • This will open the Network Connections section under the Setting app. From there, click on the Network and Sharing Center link located at the right side of the panel which will open a Win32 version of the Windows settings known as Control Panel.
  • In the Control Panel, click on the network your computer is connected to.
  • A mini window will appear and in that window click on Properties which will open another mini window that will provide a list.
  • From this list, uncheck the option that says, “Internet Protocol Version 6 (TCP/IPv6)”.
  • Now click on OK and close all the other windows and see if it fixes the Windows Update error.

Option 3– Run the Windows Update Troubleshooter

If disabling IPv6 didn’t work, you could also try running the Windows Update Troubleshooter as it could also help in fixing any issues related to Windows Update including the Windows Update Error 0x80070422. To run it, go to Settings and then select Troubleshoot from the options. From there, click on Windows Update and then click the “Run the troubleshooter” button. After that, follow the next on-screen instructions and you should be good to go.

Option 4 – Try running the DISM tool

You can also try to run the Deployment Imaging and Servicing Management or DISM tool to fix the Windows Upgrade error. Using this built-in tool, you have various options such as the “/ScanHealth”, “/CheckHealth”, and “/RestoreHealth”.
  • Open the Command Prompt with admin privileges.
  • Then type in the following commands and make sure to hit Enter right after you type each one of them:
    • Dism /Online /Cleanup-Image /CheckHealth
    • Dism /Online /Cleanup-Image /ScanHealth
    • exe /Online /Cleanup-image /Restorehealth
  • Do not close the window if the process takes a while as it will probably take a few minutes to finish.

Option 5 – Run Microsoft’s online troubleshooter

Running Microsoft’s online troubleshooter might also help you fix the Windows Update Error 0x80070422. This online troubleshooter is known to help in fixing Windows Update errors, it scans your computer for issues that might be causing the problem and then fixes them automatically.
Read More
1 2 3 162
Logo
Copyright © 2022, ErrorTools. All Rights Reserved
Trademarks: Microsoft Windows logos are registered trademarks of Microsoft. Disclaimer: ErrorTools.com is not affiliated with Microsoft, nor claim direct affiliation.
The information on this page is provided for information purposes only.
DMCA.com Protection Status