How to Fix Sysdata.xml Error Code on Your PC

How to Fix Sysdata.xml Error Code on Your PC

Sysdata.xml Error Code - What is it?

To develop a good understanding of the Sysdata.xml error code, it is first important to learn what is sysdata.xml file and its function. Sysdata.xml is a type of XML file. The .XML file extension is an Extensible Markup Language file.

XML-based formats have now become the default for many office productivity tools including Microsoft Office and LibreOffice. Furthermore, it has also come into common use for the interchange of data over the internet.

Sysdata.xml error code usually pops up when .XML based applications are unable to run and crash while loading. This is a type of BSoD (Blue Screen of Death) error code.

Common symptoms include:

  • System freeze
  • The screen turns blue
  • Sudden system shut down

Solution

Restoro box imageError Causes

The Sysdata.xml error code is triggered due to multiple reasons such as:

  • Faulty hardware
  • Malware or viral infection
  • Registry issues

No matter what the reason may be, it is advisable to fix this error code right away without any delays. This is a fatal error and can result in a system crash and loss of data. And recovering valuable lost data is the hardest.

Further Information and Manual Repair

Here are some of the effective and easy do it yourself methods to resolve this error on your system:

Method 1: Fix Faulty Hardware

Hardware issues may arise due to many reasons like manufacturing issues or voltage fluctuations. Electrical storms can cause power surges which may affect the hardware causing it to fail.

The best way to resolve this is to download the latest drivers for the problematic devices or alter the device configuration in the BIOS setup program.

  • To reconfigure the BIOS simply restart your PC and before Windows starts, press Del Key to access your BIOS.
  • Now find the factory reset option.
  • Select the option and press the button to load your factory defaults.
  • After that save changes and confirm your selection.
  • Reboot your PC to activate the changes.

Method 2: Scan for Viruses

Sometimes viruses and malware can disguise themselves in the .XML files which can cause them to get corrupted.

To resolve the issue, it is advisable to download a powerful antivirus and scan your entire PC for viruses. Remove the detected viruses to resolve the Sysdata.xml error on your system.

Method 3: Repair the Registry

If the registry is not cleaned frequently, it loads with unnecessary and obsolete files like the junk files and cookies.

These files clutter and damage the registry and eventually corrupt it and the important files like .XML files stored in it. To resolve the issue it is recommended to download Restoro.

It is a user-friendly and powerful PC Fixer embedded with a registry cleaner. It scans your entire PC for registry-related errors and removes them immediately. It cleans the cluttered registry and restores the damaged files thereby repairing the issue right away.

Click here to download Restoro.

If you like to learn and find out more about various Windows errors, and how to repair them go to our vast archive or use search to find articles that will explain and help you in solving your issue.
However, if you prefer to do things fast and with automatization then we are proposing to use an automated solution for your issues. The application that we are recommending is Advanced System Repair Pro
Advanced System Repair utilizes multiple tools all in one to give you a quick, simple, reliable, and very thorough diagnosis of your PC. It brings you all the tools you need in one program to clean, fix, protect, optimize and boost your PC!
1-Click Maintenance
All the tools to make it simple and easy! It's like having a professional technician at the click of a mouse.

Junk Cleaner
Keeping your computer free from unnecessary clutter also helps make your computer last longer. Like any other machine, if you keep it clean and take care of it, it will serve you better for longer!

Optimize background apps
Optimize applications background activity with the built-in Application Optimizer feature.

Disk Defrag
With a simple 1-click, Advanced System Repair speeds up your PC by assembling fragmented files on your machine and organizing them more efficiently.

Malware Removal
Finds and removes all types of harmful malware including trojans, worms, bots, adware, spyware, PUPs, and more!

Privacy Cleaner
The all-in-one privacy suite to Clean Your Tracks & Protect Your Privacy! Make your computer safe, secure, and more efficient!

System Tweak/Optimizer
ASR will analyze your complete system and settings to adjust your PC to function at its maximum performance.

Registry Cleaner
Over time, as you install and uninstall applications, the registry can become cluttered with old entries and broken settings which can result in program crashes, and annoying messages and slow the computer down.
Visit our Advanced System Repair Pro Download page to inform yourself about all the benefits of this software and get a free trial copy of it.
advanced system repair pro

Advanced System Repair Pro

One-click automated PC repair solution
ASR logo
With Advanced System Repair Pro you can easily
Replace damaged files
Restore performance
Free disk space
Remove Malware
Protects WEB browser
Remove Viruses
Stop PC freezing
DOWNLOAD
Privacy Policy | Terms of Use | Uinstall
Advanced System Repair Pro is compatible with all versions of Microsoft Windows including Windows 11

Share this article:

You might also like

Choosing default browser in Windows 11
Default applications in previous Windows versions were a pretty straightforward process. The user went to the settings application and picked for each category which application he would like to choose from the list of installed ones. In Windows 11 things are little changed. In this article, we will show you how to choose the default internet browser inside Windows 11, and sadly it is a more tedious task than in previous versions.

windows 11 default browser
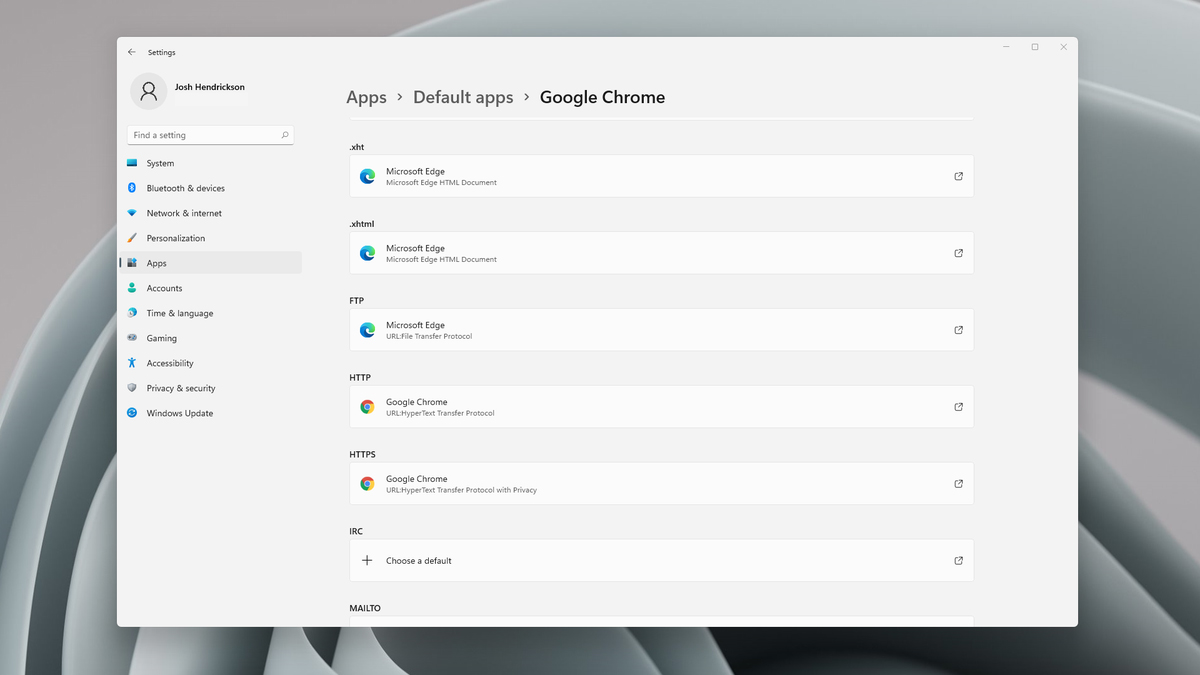
Choosing default browser in settings

As in previous versions of the Windows operating system you will need to use the settings application in order to change your default Internet browser. Previously, in Windows 10, a variety of general categories like email, web browser, and photo viewer were all listed under the Default Apps section of the Settings panel. It was easy to click on one of those categories and click on the option you like best from the small pop-up suggestion window. In the Windows 11 Insider Build, you’ll see a gauche list of an individual file or link types that you’ll need to specify your preferred browser for. The types include: HTM, HTML, PDF, SHTML, SVG, WEBP, SHT, FTP, HTTP, and HTTPS. There are additional optional types you can specify your preferred browser for as well. The issue here is in order to use a single browser which most users do you will have to go through each file type and set your preferred one. I am really not sure why this was introduced or why it has to be this way, all I can do is hope that in the final release of Windows 11 this feature will be rolled back as it used to be and that you could set your default browser in just one simple click.
Read More
Potential issues with DRM and Alder Lake
We are all waiting for the release of Intel’s Alder Lake series of processors and real-world results on its performance. Sadly lately it came to our attention that some games might have issues with the processor. alder lake cpu
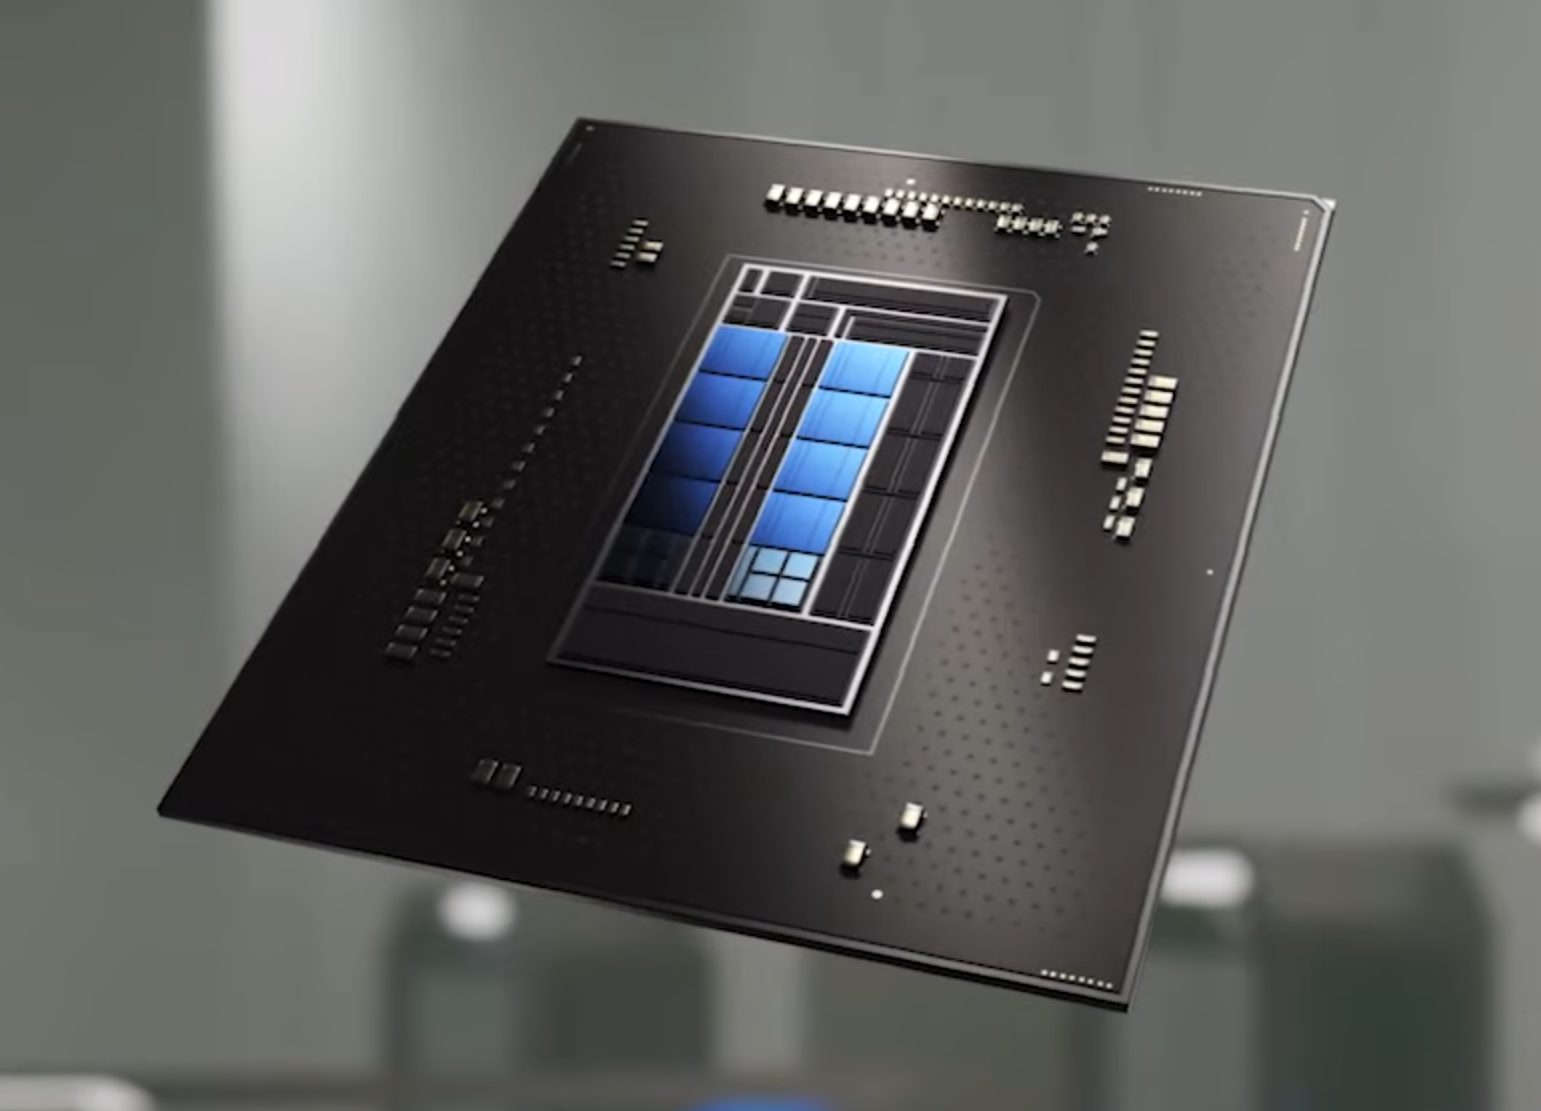
Now before you go on the bandwagon on bashing Intel itself take note that it is not Intel’s fault at all. The issue that arises is mostly due to DRM software and how it works. As you might know or not, Alder Lake has two sets of cores, standard performance cores, and power cores, and with Intel’s Thread Director on-chip right cores will be used for the right tasks, and here lies the issue. DRM software might detect Thread Director as something suspicious and malicious, and then cut access to the game because of this. Intel, of course, has reached DRM manufacturers and places documentation about how software should be developed with this hybrid technology in mind. Of course, newer games will be updated if needed and everything will work fine, also games on GOG will work fine because of GOG’s policy of no DRM store but some older ones might be left in limbo. They could work fine but DRM might be triggered and prevent them from loading, usually, game developer itself removes DRM protection after some time but that is not really always the case and there is a chance that some games might simply just not work on Alder Lake CPU only because of DRM protection.

Conclusion

I will admit that I have not been a great fan of DRM in general, I understand that game developer want to protect themselves from piracy but how it looks they were not really successful with it. Even today single-player games get pirated on the day they are released and legally bought ones always make trouble for people that actually paid for them. I remember times when DRM was awful and you could install a game a limited number of times, luckily this was removed but it seems that many old habits still remain sadly and DRM is present even today in various forms. GOG is proof that people will buy DRM-free games and that they will support this kind of model. Maybe it is time to forget about fighting against piracy, you will not make it go away and people who do not want to buy games will not buy them, on other hand many users that do buy games, if they cannot use them they will rest to pirated version since that one will work. It is sad to see that pirated software can work better than a legal one and offer a more pleasant experience.
Read More
How to Fix the Error Code 3

Repair Error Code 3

Error Code 3 - What is it?

Error code 3 is a type of PC windows error that can occur on any Windows version including Windows XP, Vista, Windows 7, or 8. This error code means that the system cannot find the path specified. The error 3 messages are displayed in the following format: “Error_ Path_Not_Found” or it may sometimes be displayed with the value 3 in this format:  (0x80070003: Error_Path_Not_Found)

Solution

Restoro box imageError Causes

The error code 3 indicates poor PC maintenance. It is a critical sign of an unstable system. The causes of this error code are:
  • Missing or broken system files
  • Registry issues
This error code poses serious system threats and should be resolved immediately before the damage is done. If you don’t address this error timely, your PC may be exposed to risks like system failure and crash. And this may lead to valuable data loss.

Further Information and Manual Repair

To resolve this error on your system, you don’t have to hire a technician or be technically sound yourself. What you simply need to do is clean the registry. Here are 2 ways to clean the registry:

1. Manually by Launching Registry Editor

First, launch the Windows registry editor by clicking the start button and selecting run. In the text box type, 'Regedit' and press enter and click OK. Before you make changes to the registry, make sure you create a backup of your existing registry. This is advisable because if you accidentally lose important data during the cleaning process you can also recover the lost data. Once you create a backup, now get started with the cleaning process. Expand HKEY_CURRENT_USER" key, then click on the software key and look for applications that you think could have corrupted the registry. Now delete them. After that, remove the unwanted start-up items, by accessing this link:  My Computer HKEY_LOCAL_MACHINE SOFTWARE Microsoft Windows Current Version. Now click on the run tab and delete invalid entries/ values. This process may be time-consuming and for some, it may be slightly technical to identify unwanted start-up items.

2. Download Restoro Registry Cleaner

Another way to clean and repair the registry is to download Restoro. This is an innovative and a highly-functional registry cleaner. It is embedded with an intuitive algorithm that detects all the registry issues instantly and removes them right away in just a few simple clicks. It removes all the unnecessary and obsolete files, repairs the registry, and fixes the damaged dll and system files. It has a user-friendly interface and simple navigation which makes it easy for all levels of users to work around it. This software is compatible with all Windows versions. Besides functioning as a registry cleaner, Restoro also functions as an antivirus and a system optimizer. It scans and removes all kinds of malicious software and simultaneously boosts the speed of your PC. Click here to download Restoro and resolve error 3 “Entry_Path_Not_Found” on your PC now!
Read More
Computer makes a beeping noise when you turn it on
Recently, a few users reported that they were unable to turn on their computers for some reason and at the same time their computers Computer makes a beeping noise couple of times or continuously whenever they try to turn them on. The sounds the computers are making can be quite annoying and it also signifies that there is something wrong with them. The problem might have something to do with the hardware inside of the computer system rather than Windows 10 itself. As you know, a computer is designed to deliver audible error sounds every time some part of the hardware is not properly working. For instance, if you hear a single beep, this indicates that your GPU is having some issues and if you’re hearing two beeps, it indicates that your RAM is not working properly, whereas three beeps that repeat after a pause when you turn on your computer means that there is something wrong with the system memory. On the other hand, if your computer is beeping continuously, this means that the problem lies with the processor. To fix this issue, here are some suggestions that might help but before you proceed, make sure that you know how to manage your computer’s hardware, if not, better have some expert do it for you.

Option 1 – Try checking the RAM

One of the basic things you can do in this kind of case is to check the RAM. Prepare some screwdrivers and dig into your PC and then look for the RAM slots and ensure that they are attached firmly. There are times when moving around your computer daily can cause certain components in your computer to become loose. Worst case scenario is that the RAM might be broken so really have to replace it.

Option 2 – Try checking the graphics card

After digging into your computer, check the graphics card and give it some good cleaning. As you know, you have to remove certain components like the graphics card regularly and clean them to help increase their lifespan and avoid errors in a startup. And if it turns out that the graphics card is broken, you have to replace it with a new one to fix the problem.

Option 3 – Try checking the processor

The processor is the brain of every computer so if it ends up not working, everything else is useless. Thus, you need to check it to see if it’s firmly attached and see if it needs some cleaning of dust and other debris. After that, try turning on your computer again. If it doesn’t work, then you might have to take your system to a technician to resolve the problem for you.
Read More
Stop the Hotspot from Turning off
As you know, Windows 10 is equipped with a Mobile Hotspot feature that allows users to share the existing internet connections to other devices over Wi-Fi. However, one of the downsides to this feature is that it does not stay on if there are no devices connected to it for over five minutes. In other words, if there are no devices connected to the mobile hotspot for five minutes, it will turn off automatically. Thus, if you want the mobile hotspot to stay turned on, then you’ve come to the right place as this post will walk you through how to stop the Mobile Hotspot from turning off in Windows 10. There are two scenarios tackled in this post wherein the Mobile Hotspot feature turns off automatically and where the hotspot disables when there is no internet connection. To remedy these scenarios, you can try turning off the power saving feature or use a PowerShell command to change the “PeerlessTimeoutEnabled” settings or increase the Mobile Hotspot idle timeout settings. You could also increase the timeout period when a cellular connection is not available or disable the Wi-Fi and network adapter power management options. For detailed instructions, refer to each one of the given options below.

Option 1 – Try turning off the power saving feature

The first solution you can check out is to turn off the power-saving feature. To do so, follow these steps:
  • Open the Settings app and go to Network & Internet and from there, click on the Mobile Hotspot option.
  • Next, toggle the “Share my Internet connection with other devices” option.
  • After that, toggle the “When no devices are connected, automatically turn off mobile hotspot” option.

Option 2 – Execute a command in PowerShell

The next option you can try to keep the mobile hotspot turned on is through a command in PowerShell. To get started, follow these steps:
  • Tap the Win + X keys and select the “Windows PowerShell (Admin)” option.
  • Next, execute the following command to make sure that the Mobile Hotspot stays on even when no devices are connected to it:
powershell -windowstyle hidden -command "Start-Process cmd -ArgumentList '/s,/c,net stop "icssvc" & REG ADD "HKLMSYSTEMCurrentControlSetServicesicssvcSettings" /V PeerlessTimeoutEnabled /T REG_DWORD /D 0 /F & net start "icssvc"' -Verb runAs"
  • After the command is executed, here is what the script is doing in the background:
    • It stops the Mobile Hotspot service (icssvc).
    • It navigates to this registry path (HKEY_LOCAL_MACHINESYSTEMCurrentControlSetServicesicssvcSettings) and creates a DWORD key named “PeerlessTimeoutEnabled” which has a value of 0.
  • It then restarts the Mobile Hotspot Service (icssvc).

Option 3 – Try increasing the Mobile Hotspot idle timeout settings

Another option you can try is to increase the idle timeout settings of the mobile hotspot. In case you don’t know, the default timeout when there’s no active connection is about five minutes. So if you don’t want to keep it on always but want to keep it on longer than five minutes, then this option is for you. All you have to do is change the same key (PeerlessTimeout) as mentioned above, at a different location. In fact, you can change it to a maximum of 120 minutes. To give this a try, follow these steps:
  • Tap the Win + R keys to open the Run dialog box and type “Regedit” in the field and then tap Enter to open the Registry Editor.
  • Next, navigate to this registry path: HKLMSystemControlSet001ServicesICSSVCSettingsPeerlessTimeout
  • From there, change its value to anywhere between 1 up to 120.
  • Once done, exit the Registry Editor and restart your computer.

Option 4 – Try increasing the timeout period when a cellular connection is not available

There are many times when you want to connect devices so it becomes part of the network. And as pointed out, the Mobile Hotspot turns off automatically when there is no internet or mobile data but when you use a registry setting, you can change any value between 1 and 60 inclusive.
  • Tap the Win + R keys to open the Run dialog box and type “Regedit” in the field and then tap Enter to open the Registry Editor.
  • Next, navigate to this registry path: HKLMSystemControlSet001ServicesICSSVCSettingsPublicConnectionTimeout
  • From there, set the value of the “Timeout” key between 1 and 60.
  • After that, close the Registry Editor and restart your PC.

Option 5 – Try to disable the Wi-Fi and Network adapter in Power Management options

As you know, the Wi-Fi adapter and the network devices have properties that will turn off when on battery and when it’s not used for a long time so you can try to disable these options.
  • Tap the Win + X + M keys to open the Device Manager.
  • Next, expand the list of Network devices and select the Wi-Fi adapter.
  • After that, go to the Power Management tab and make sure that anything related to power saving should be turned off. This will ensure that none of the network devices will turn off the Mobile Hotspot or trigger anything that will do that.
Read More
7 Ways to Fix Error 0x80070020 in Windows 10

Error Code 0x80070020 – What is it?

One of the problems encountered by Windows users when upgrading to Windows 10 from Windows 7 or Windows 8/8.1 is the Error Code 0x80070020. This error code normally occurs when users try to download updates from the Windows Update Website or simply by upgrading to Windows 10. Error Code 0x80070020 also occurs when the device already has a Windows 10 installed.

Once this error is encountered, it will cause malfunction of update installs and display the following message:

An error (-5006 : 0x80070020) has occurred while running the setup. Or The process cannot access the file because it is being used by another process”

Solution

Restoro box imageError Causes

In an attempt to fix Error Code 0x80070020, it is important to pinpoint what the cause is. The most probable cause of this error is due to interference. This error code most likely occurs when there is another automatic update running, for instance, an Antivirus scanning in real-time. If you’re scheduled to have an automatic update during real-time scanning, the Windows 10 update might malfunction.

Get up to 25% off when you download Total System Care and apply our exclusive discount. Only available for a limited time. 

Further Information and Manual Repair

In trying to fix Error Code 0x80070020, you can perform manual repair methods to resolve the issue effectively and efficiently. Most Windows users can easily employ these manual repair methods, even those who do not have technical abilities. However, there are certain instances where a Windows professional’s help is needed. If you don’t want to face any risk in resolving the issue, it would be best to consult a professional Windows technician or you can also make use of a powerful automated tool.

NOTE: It is best to attend immediately to errors encountered since unresolved errors can result in slowing down your computer’s performance. This might also cause other error messages to arise such as Error Code 0x80070057.

Method One: Restart Your Device

Since Error Code 0x80070020 is most likely encountered due to interference during your update, the easiest method you can do is to close all opened programs and restart your device. After restarting, try to start the update process again.

Method Two: Disable Antivirus Temporarily

Another quick and safe way to fix Error Code 0x80070020 is to disable your antivirus. You must take note though that in doing so, your computer will be susceptible to virus attacks. If you want to proceed with this method, follow these steps:

  1. Locate all programs in process in the notifications area, found in the lower right-hand section of your screen. If in case the antivirus icon is not visible on the taskbar, you may have to click an arrow pointing up to show what programs are currently running.
  2. Right-click on the antivirus icon then select the disable option.

Method Three: Run the Update Troubleshooter for Windows

The Windows Update Troubleshooter may resolve many of the errors encountered by Windows users when installing updates from Windows Update. To execute the troubleshooter, follow the steps below:

  1. Access a menu by holding the Windows key and X. Wait for the menu to appear on the bottom left corner of the screen.
  2. Open the Control Panel.
  3. Change the appearance of files by selecting large or small icons in the View by option located on the upper right section of your screen.
  4. Once you change the appearance of the files, choose the troubleshooting
  5. Run the Windows Update Troubleshooter.
  6. Restart your device then check if this resolves the problem.

Method Four: Execute A Clean Boot

Executing a clean boot means starting Windows using only a few resources, including startup programs and drivers. This safeguards minimizing conflicts and prevent software clash when an update is received. In performing a clean boot, you will be able to pinpoint what caused the manifestation of error code 0x80070020. Check Microsoft’s Support website to know how to execute a clean boot.

Method Five: Reset Windows Update Components

Performing this method is a bit risky and should be your last option if all methods were unsuccessful. This process will alter your device’s registry so you must ensure to perform accurately the steps. A single mistake can lead to modifying your registry erroneously, which might result in the occurrence of other error messages. Carefully follow the steps found on Microsoft’s Support website to successfully reset Windows Update components.

Resetting Windows Update components can also be done by implementing the following steps:

  1. Open the Command Prompt by pressing Windows Key + X. Select Command Prompt (Admin) from the menu.
  2. Stop the BITS, MSI Installer, Cryptographic, and the Windows Update Services.
  3. Rename both the SoftwareDistribution and Catroot2 folders to <name of folder> old.
  4. Start now the BITS, MSI Installer, Cryptographic, and the Windows Update Services.
  5. Exit the Command Prompt then restart your device. After restarting, try installing the updates again.

Method Six: Disable Third-Party Antivirus

A third-party antivirus such as BitDefender may recognize the Windows Update as a threat since the new update of Windows 10 is probably not yet registered with this third-party antivirus vendor. To solve this, you must disable temporarily the antivirus before performing the update. Once the third-party antivirus is disabled, you can now proceed with the updating process. Update as well your third-party antivirus.

Method Seven: Use the DISM Tool for Windows 10

The Deployment Image Servicing and Management (DISM) is a command-line utility that is installed by default in Windows 10 system. This program is used to fix images in Windows. In the case of Error Code 0x80070020, the DISM can repair the recovery image in Windows 10 and can perform as a virtual hard disk as well.

  1. Scan and check files for errors.
  2. Open the Command Prompt by pressing Windows Key + X. Select Command Prompt (Admin) from the menu.
  3. Type sfc /scannow
  4. You can also use the following commands to check for corrupted files:

/CheckHealth – to check for corrupted files or components

/ScanHealth – to check for corrupted Windows image. This may take up to 10 minutes to finish

/RestoreHealth – to check for corrupted Windows image and do an automatic repair. This may take up to 20 to 30 minutes to finish

NOTE: In an instance where you cannot locate the good files in your computer, the system image files may be corrupted. If this happens, you need to have a copy of install.wim from a computer with good Windows 10 OS or the Windows 10 ISO file. Make sure that the source of the good files has the same language, version, and edition of your OS.

Cleaning corrupted files using DISM utility:

Enter the following commands one by one to perform the /RestoreHealth switch using the source path location of good files you copied:

  1. DISM /Online /Cleanup-Image /RestoreHealth /Source:repairSource install.wim
  2. DISM /Online /Cleanup-Image /RestoreHealth /Source:repairSource install.wim /LimitAccess
  3. DISM /Online /Cleanup-Image /RestoreHealth /Source:repairSource install.wim:1 /LimitAccess

For example purposes, the “repairSource” is the source of the good files.

Read More
How to Delete your data from the internet
The Internet has come a long way from its infant stages and has become so large and huge that it has gained the status of basic human rights. There are very useful information and a lot of great content on it and among them, there are social media websites and other types of websites where you have, most likely placed some personal pictures or other information. One day you might want to cancel some of the services or you would like to take a break from it all. In this guide we will show you how to do exactly that, to delete and remove your data from the internet.

How to Delete Your Google Account

Google is arguably one of the most visited places on the Web. It stores a huge amount of data for delivering personalized content. It saves personal information, web searches, watched videos, location data, etc. You can view a summary of the data saved by different Google services by visiting your Google Dashboard.
To delete personal data from Google, go to myactivity.google.com. Select the Delete activity by from the left menu to start deleting activities.
Select All time to delete all of your activities from different Google services. You can also delete files saved to Google services, such as Google Photos, Google Drive, and Keep. Just visit the site, select the files, and delete them. Note that Google retains some information even after you delete all data. They do this to meet business needs and legal requirements. These will be deleted when you delete your Google account altogether.

How to Delete Your Facebook Account

Facebook stores a huge amount of data for each user. Some of the personal information stored in Facebook’s databases includes name and email, check-ins, location, images, videos, events, etc. You can view and download all of your personal data using Facebook’s information download tool. However, you will need to delete your account altogether for removing your personal data from Facebook. Follow the below steps to delete your Facebook account.
  1. Log in to your Facebook account and go to Settings & privacy > Setttings.
  2. Select Your Facebook Information.
  3. Select Deactivation and Deletion.
  4. Select Delete Account.
  5. Select Continue to Account Deletion.
  6. Select Delete Account.
  7. Enter your password and click Continue.
It can take up to 90 days for Facebook to delete your personal data from the Internet. You will not be able to access any of the data once the deletion starts. However, you can cancel this within the first 30 days.

How to Delete Your Twitter Account

Twitter has also followed in the footsteps of Facebook when it comes to harvesting your personal data. It utilizes this information for delivering personalized ads and tweets. You can download an archive of all of your personal data from Twitter. It makes it easy to monitor what information is available to the platform. Click the More button from the left menu and head over to Settings and privacy. Follow the below steps to download your personal information.
  1. Select Download an archive of your data from the Your Account section.
  2. Select Request archive from under the Twitter data section. Enter your password when prompted.
  3. It will take some time for Twitter to make the data available to you. You’ll receive an email once the data is ready to be downloaded.
It would be best if you also restrict data sharing and off-site activities. Head over to Privacy and safety and inspect the options under the Data sharing and off-Twitter activity section.
Look in the Interests and Your advertiser list sections from the Ads preferences tab. You can disable Twitter from tracking you in the Off-Twitter activity tab. Uncheck the options from the Data sharing with business partners and Location information tabs.
Finally, you need to deactivate your account for deleting all personal information from Twitter. You’ll have 30 days to reactivate the account. After that, Twitter will begin erasing your information from its systems. Note that they can still retain some information subjected to platform regulations.

How to Delete Your Instagram Account

Instagram has risen to prominence in the last couple of years. The company collects a huge amount of personal information from its users, including media, name, email, and much more. You’ll need to deactivate your account altogether if you want to delete everything Instagram knows about you.
Head over to the Delete your account page and select the reason you want to delete it. Enter your Instagram password to verify your identity, then click on the Delete button. Instagram will hide your account details for the next 30 days and delete all personal data after the given period.

How to Delete Your TikTok Account

TikTok is another emerging platform that has become quite popular among millennials. Users share a lot of personal information through personalized music videos. You need to delete your TikTok account permanently to remove all personal data from TikTok.
To do this, head over to Me, then tap on the icon in the top-right corner of the window. Select Delete account from under the Manage Account section. Follow the instructions provided there to continue deactivating your account. Like Instagram, TikTok also offers a 30-day time period to allow users to change their minds. It will delete your personal data from the Internet after this period.

How to Delete Your Snapchat Account

  1. Go to Snapchat’s Accounts Portal and log in with your name and password.
  2. Select the Delete My Account option.
  3. You’ll be taken to the Delete Account page directly.
  4. Retype your password once more.
  5. Click on the yellow Continue button.
Do keep in mind that Snapchat will hold on to your data for another 30 days, just in case you change your mind and decide to return. If you do decide to come back, all you need to do is visit the Accounts Portal again and log in to your account. This will reactivate your account. While your account is in this deactivated phase, your friends will not be able to contact you or interact with you in any manner on Snapchat. After the 30-day period has elapsed, your account will be permanently deleted.
Read More
Display Stopped Responding and Has Recovered
The screen flickers into black, it comes back and on-screen there is a message Driver stopped responding and has recovered. If you have been through this you are aware that the issue is not serious but it can get pretty annoying fast since you are not aware when will it happen again, and it will happen again. In this guide, we will go through the usual reasons for this error and offer solutions to them. Follow the guide step by step in order to resolve the problem.
  1. Clean your PC Dirt and dust are your enemy no1, dirty graphic card can not be properly called and can cause overheating which can result in this particular error, make sure that your PC is clean and tidy in order to eliminate dust and dirt as a cause for malfunction.
  2. Turn off multiple applications and try running just one at a time Overburdening GPU can cause this error to appear since the graphic card can not handle all requests it gets from multiple active applications. Try to run just one application at a time for some time period to see if the error will appear again.
  3. Update driver Update your GPU driver to the latest version from the manufacturer's website, Display Driver Stopped Responding and Has Recovered Error in Windows 10 can be from outdated drivers not able to handle modern tasks
  4. Get newer GPU As hard as this advice is, sometimes the reason is an old graphic card that simply can not keep up with modern games and applications, upgrade it to a more modern GPU and watch errors go away.
Read More
How to Fix win32kfull.sys BSOD Error in Windows 10
The win32kfull.sys file is one of the kernel-mode device drivers in your Windows 10 operating system. In case you don’t know, there are two kinds of device drivers – the first ones are the normal drivers that communicate between your hardware and the operating system while the second ones are the kernel-mode drivers. The latter is necessary for booting your OS. And there are times when you encounter the win32kfull.sys error while booting your PC. Here’s the full context of the win32kfull.sys error:
“SYSTEM_SERVICE_EXCEPTION (win32kbase.sys) APC_INDEX_MIXMATCH PAGE_FAULT_IN_NONPAGED_AREA”
This error could be caused by corrupted or outdated drivers with incomplete files or it could be caused by some driver or software installed on your computer. To fix this error, here are some troubleshooting options you need to check out.

Option 1 – Try updating all the Drivers

As pointed out, the win32kfull.sys error can be due to outdated or corrupted drivers that are not compatible with your hardware. These drivers include but are not limited to display, network, sound, hard drive, and more. If you are not able to access the internet, you can just manually download the update using another PC. To update your drivers, here’s what you need to do:
  • Tap the Win + R keys to launch Run.
  • Type in devmgmt.msc into the box and tap Enter or click OK to open the Device Manager.
  • After that, a list of device drivers will be displayed. If you see a red or yellow sign that shows up against the driver, right-click on the driver’s name and select “Update Driver Software” or “Uninstall”. And if you find any “Unknown device”, you need to update it as well.
  • Select the “Search automatically for updated driver software” option and then follow the instructions to complete the process.
  • Restart your PC.
Note: You also have the option to go directly to the website of your graphics card manufacturer and check if there’s a new update – if there is, download it. After that, you could also check if there’s a new update of the game you’re getting the issue of the black bar.

Option 2 – Identify and uninstall problematic programs by putting your PC in a Clean Boot State

One of the main causes of BSOD errors like win32kfull.sys is a problematic program that could clash with your existing operating system as well as computer architecture. There are tons of programs that are either incompatible or conflict with the existing drivers or software in your system. To identify such programs, you need to put your PC in a Clean Boot state. How? Follow these steps:
  • Log onto your PC as an administrator.
  • Type in MSConfig in the Start Search to open the System Configuration utility.
  • From there, go to the General tab and click “Selective startup”.
  • Clear the “Load Startup items” checkbox and make sure that the “Load System Services” and “Use Original boot configuration” options are checked.
  • Next, click the Services tab and select the “Hide All Microsoft Services” checkbox.
  • Click Disable all.
  • Click on Apply/OK and restart your PC. (This will put your PC into a Clean Boot State. And configure Windows to use the usual startup, just simply undo the changes.)
After putting your PC in a Clean Boot State, try creating a system restore point and see if the problem still occurs. Clean Boot troubleshooting is designed to help you isolate the problem. For you to execute a clean boot troubleshooting, you must do a couple of actions (the steps are given above) and then restart your PC after every action. You might have to disable one third-party app after the other to really isolate the issue. And once you’ve narrowed down the problem, you can either disable the third-party app that’s causing the problem or remove it. Note that you must switch your PC back into the Normal Startup mode after you’re done troubleshooting the problem. Here’s how you can do it:
  • From the “Start” menu, go to System Configuration.
  • After that, switch to the General tab and click the option for “Normal Startup”.
  • Next, go to the Services tab and clear the checkbox for “Hide all Microsoft services”.
  • Then find and click “Enable all” and if prompted, you have to confirm.
  • Afterward, go to the Task Manager and enable all the Startup programs and confirm the action.
  • Restart your PC when prompted.
Once you have identified the program causing the problem, uninstall it right away from your Control Panel.

Option 3 – Perform an SFC scan

The SFC or System File Checker scan could detect and automatically repair damaged system files that could be causing the win32kfull.sys error. SFC is a built-in command utility that helps in restoring corrupted files as well as missing files. It replaces bad and corrupted system files to good system files. To run the SFC command, follow the steps given below.
  • Tap Win + R to launch Run.
  • Type in cmd in the field and tap Enter.
  • After opening Command Prompt, type in sfc /scannow
The command will start a system scan which will take a few whiles before it finishes. Once it’s done, you could get the following results:
  1. Windows Resource Protection did not find any integrity violations.
  2. Windows Resource Protection found corrupt files and successfully repaired them.
  3. Windows Resource Protection found corrupt files but was unable to fix some of them.
Read More
Personalize Windows 11 Start menu
Windows 11 is released and its adoption goes slower than Microsoft would like but nevertheless, it is slowly getting adopted, especially among new computers. Windows 11 has brought us a new modern look of OS but if you would like to personalize it a little more you can. Follow the guide on various things that you can change inside Windows 11.

windows 11 desktop iconsPersonalize list of recently added apps, opened items, folders

The recommended section that shows recently added apps and recently open items can be turned off and hidden now to be shown. In order to do this follow these steps:
  1. Open Windows Settings by pressing WINDOWS + I
  2. Click on personalization in the sidebar
  3. Click on START and go through the options
  4. Turn OFF switch beside recently accessed files
  5. Additionally, you can also change which folders appear on the Start menu.

Remove apps or change app order on the Start Menu

To remove application not to be shown in the Start menu at all follow this simple guide:
  1. Right-click on app
  2. Choose unpin
  3. To place the application on Start click on All Apps, right-click on the app and choose Pin to Start
  4. To drag and rearrange apps, simply click on them and drag them to the new place.

Change the Start Menu location

When Windows 11 was first released Start Menu could only be located in the middle of the screen but thanks to plenty of backlash from users now it is possible to move it on a more traditional left side.
  1. Press WINDOWS + I to open the settings app
  2. Click on Personalization
  3. Look for taskbar behaviors
  4. Inside taskbar behaviors look for Taskbar alignment
  5. Change alignment to left

Change the Start Menu color

In order to change the color of the Start Menu follow the next steps:
  1. Open Settings app
  2. Go to personalization settings
  3. Go to Colors
  4. Switch to custom
  5. Under accent color pick a color you like or make your custom one.
Read More
1 2 3 162
Logo
Copyright © 2022, ErrorTools. All Rights Reserved
Trademarks: Microsoft Windows logos are registered trademarks of Microsoft. Disclaimer: ErrorTools.com is not affiliated with Microsoft, nor claim direct affiliation.
The information on this page is provided for information purposes only.
DMCA.com Protection Status