Diablo 2 Resurrected facing server issues

It has been some time since the release of Diablo 2 resurrected and overall reception was pretty good. People are enjoying the old classic game in hi-def. resolution and with new and improved visuals. Sadly some server issues are present still until this day and somewhat spoil the experience for players.

diablo 2 server status
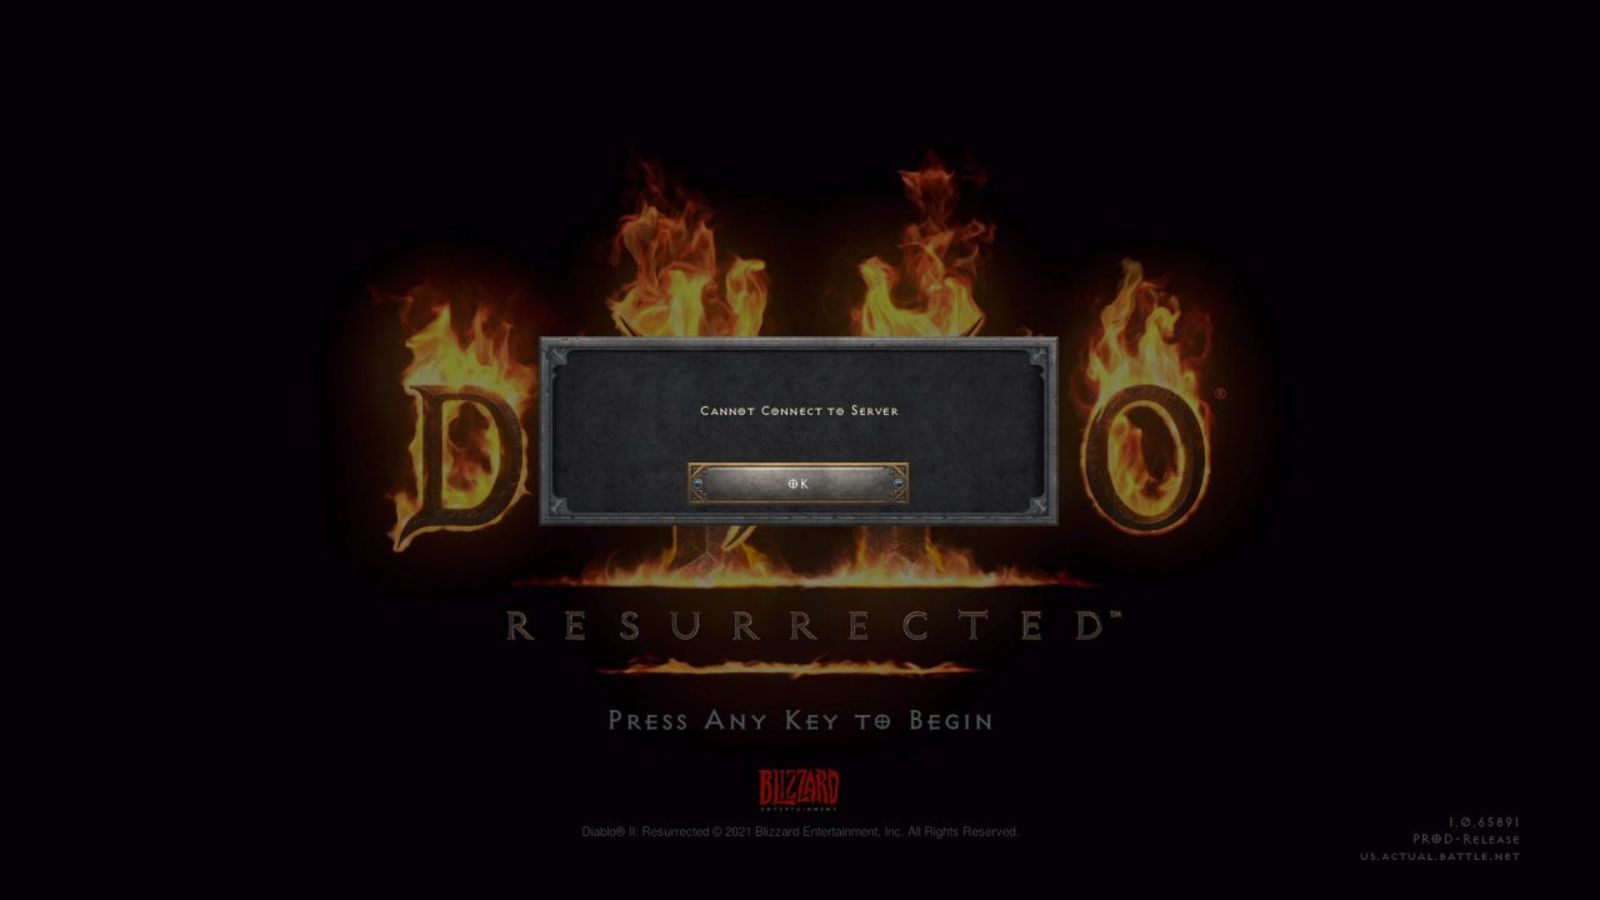
The greatest lag and server crashes are pinpointed to game-creating events. When a player creates a new online game, the server needs to pull a lot of details from the database and make a game, due to some legacy code present this process takes some time and it is demanding a bit on the server-side, and although code was optimized to cater to more modern approach some legacy code still remains.

Another thing that was spotted to affect performance itself is player behavior, to be more specific, modern gamer behavior. Where players find good builds and runs on the internet and then go to farm-specific areas or bosses for loot or experience points, which in return boils down to making plenty and short runs that are made by creating games and after run eliminating them. Now pair that with the previous statement about legacy server and database code and you can add 1 and 1 and see how this might be an issue.

A lot of short games over legacy code are placing games in a state it was not designed for back in 2001 and therefore we have issues. Sadly solutions without completely rewriting the whole code are not very promising and they include rate limiting, which will prevent players to create many games in succession in a short period of time and maybe even login queues to drop a load on servers.

Blizzard reached to people in the whole company, even old diablo 2 developers to ask for advice and they say that they are working on solutions so they could lift limitations and have everything running fine.

If you like to learn and find out more about various Windows errors, and how to repair them go to our vast archive or use search to find articles that will explain and help you in solving your issue.
However, if you prefer to do things fast and with automatization then we are proposing to use an automated solution for your issues. The application that we are recommending is Advanced System Repair Pro
Advanced System Repair utilizes multiple tools all in one to give you a quick, simple, reliable, and very thorough diagnosis of your PC. It brings you all the tools you need in one program to clean, fix, protect, optimize and boost your PC!
1-Click Maintenance
All the tools to make it simple and easy! It's like having a professional technician at the click of a mouse.

Junk Cleaner
Keeping your computer free from unnecessary clutter also helps make your computer last longer. Like any other machine, if you keep it clean and take care of it, it will serve you better for longer!

Optimize background apps
Optimize applications background activity with the built-in Application Optimizer feature.

Disk Defrag
With a simple 1-click, Advanced System Repair speeds up your PC by assembling fragmented files on your machine and organizing them more efficiently.

Malware Removal
Finds and removes all types of harmful malware including trojans, worms, bots, adware, spyware, PUPs, and more!

Privacy Cleaner
The all-in-one privacy suite to Clean Your Tracks & Protect Your Privacy! Make your computer safe, secure, and more efficient!

System Tweak/Optimizer
ASR will analyze your complete system and settings to adjust your PC to function at its maximum performance.

Registry Cleaner
Over time, as you install and uninstall applications, the registry can become cluttered with old entries and broken settings which can result in program crashes, and annoying messages and slow the computer down.
Visit our Advanced System Repair Pro Download page to inform yourself about all the benefits of this software and get a free trial copy of it.
advanced system repair pro

Advanced System Repair Pro

One-click automated PC repair solution
ASR logo
With Advanced System Repair Pro you can easily
Replace damaged files
Restore performance
Free disk space
Remove Malware
Protects WEB browser
Remove Viruses
Stop PC freezing
DOWNLOAD
Privacy Policy | Terms of Use | Uinstall
Advanced System Repair Pro is compatible with all versions of Microsoft Windows including Windows 11

Share this article:

You might also like

How to Fix R6025 Pure Virtual Function Call

Correct R6025 Pure Virtual Function Call

What is R6025 Pure Virtual Function Call Error?

R6025 pure virtual function call’ is a runtime error that occurs suddenly on the screen and disrupts the program being run prior to it. This error display indicates that the program has been corrupted. R6025 runtime error usually occurs with the Visual C++ framework.

Solution

Restoro box imageError Causes

This error occurs when the C++ program crashes which is usually because of the malfunctioning or missing of the device driver or incomplete device driver files. It happens because your application indirectly calls a pure virtual member function in a context where a call to the function is invalid. Most of the time, the compiler detects it and reports it as an error when building the application. R6025 error is usually detected at run time.

Further Information and Manual Repair

To fix the R6025 pure virtual function call error, you need to find the call to the pure virtual function. After you find the call, you need to rewrite the code so that it is not called again. There are 2 ways to do this:

Alternative 1

One way to fix the R6025 pure virtual function call is to replace the function with an implementation that calls the Windows API function DebugBreak. The DebugBreak causes a hard-coded breakpoint. Once the code stops running at this breakpoint, it is easy for you to view the call stack. By viewing the call stack you can identify the place where the function was actually called.

Alternative 2

Another quick way to find a call to a pure virtual function to fix the R6025 error is to set a breakpoint on the _purecall function that is usually found in PureVirt.c. By breaking this function you can trace the problem occurring and rewrite the call to ensure the error does not occur and the program you are trying to develop on the Visual C++ framework is easily developed. If R6025 Error is related to Windows Registry Problem Then here’s how you can fix the problem: To fix the runtime error R6025, run registry cleaner software to scan and fix all errors.  This alternative is suitable if the R6025 error is related to the Windows registry problem and where the error has occurred due to corrupted or malicious registry entries. You can download the registry cleaner repair tool for free. Run it to scan errors and then click the fix error button to repair the problem immediately.
Read More
CHKDSK cannot continue in read-only mode
As you know, the CHKDSK utility is proven to be one of the useful tools to fix any issues that concerns file system, storage, and disk. However, as useful as it may be, it is still not immune to issues as you could encounter errors when running it. One of these errors is the “One such error is the CHKDSK cannot continue in read-only mode” error. If you receive such an error message while running CHKDSK, then you’ve come to the right place as this post will help you sort the problem out. It is possible that the drive is read-only or that the Write Protection is enabled. It could also be that the drive is already being used and scanned by a different program or utility. To get rid of this error, there are a couple of suggestions you need to check out. You can try to run the CHKDSK utility from Recovery or run it on Boot. You could also try to disable Write Protection. For more detailed steps, follow the given instructions below.

Option 1 – Try to run the CHKDSK utility from Recovery

The first thing you can do to resolve the error in CHKDSK is to run the CHKDSK utility from Recovery. How? Follow these steps:
  • First, boot into the installation environment for Windows 10 from a Windows installation media.
  • Next, click on the “Repair your computer” option.
  • After that, select Troubleshoot > Advanced options > Command Prompt.
  • After opening Command Prompt, type this command and tap Enter: chkdsk <Partition Letter>: /r /f
  • Wait until the disk error checking process is completed.
  • Once it’s done, exit the Command Prompt window and restart your computer and then see if the error is fixed.

Option 2 – Try running the CHKDSK utility on Boot

On the other hand, you can also try to run the CHKDSK utility on Boot so you can fix the error and recover any damaged segments of the drive.
  • Open an elevated Command Prompt and enter this command: chkdsk /r
  • After that, you will a message that says, “Chkdsk cannot run because the volume is in use by another process. Would you like to schedule this volume to be checked the next time the system restarts? (Y/N)”
  • Type Y and tap Enter to schedule a CHKDSK scan once your computer reboots next time.

Option 3 – Try to remove the Write Protection from the drive

As mentioned, removing the Write-Protection on the concerned drive could also help you fix the problem and there are two ways to get rid of the write protection – you can either use the Diskpart utility or the Registry Editor. How? Refer to the following steps.

Via Diskpart utility:

  • Open Command Prompt with admin privileges and then type the “diskpart” command and tap Enter to execute it.
  • Next, type “list disk” and tap Enter to get the list of all the Disk connects or all the partitions that are formed on those disks.
  • After that, you need to choose one command depending on the list of commands you entered. Type “select disk #” and tap Enter to select the disk or partition you want to select.
  • Then type “attribute disk clear readonly” and tap Enter to Disable the Write Protection on the selected disk or partition.

Via Registry Editor:

  • Tap the Win + R keys to open the Run utility and type “Regedit” in the field and then tap Enter to open the Registry Editor.
  • Next, navigate to the following registry key:
ComputerHKEY_LOCAL_MACHINESYSTEMCurrentControlSetControlStorageDevicePolicies
  • After that, look for the DWORD named “WriteProtect” and double click on it, and then set its Value Data to “0”.
  • Now restart your computer and see if the problem is now fixed or not.
Read More
How to Download Steam saves
Steam is one of if not the largest online store for the digital distribution of games on the PC platform. The game gets downloaded to your PC when you are planning to play it and its saves are synched in the Steam cloud. They get automatically downloaded when you install the game but you can also get your saves by directly downloading them from Valve's website in your browser. If Steam isn’t automatically downloading your old save games after you install a game, ensure Steam Cloud is enabled for that game within Steam. Locate the game in your Steam library, right-click it, and then select Properties. Click the Updates tab and ensure the Enable Steam Cloud synchronization option is checked for the game. If this option isn’t checked, Steam won’t automatically download your cloud saves. If you don’t see a Steam Cloud option for a game here, that game doesn’t support Steam Cloud. Not all games on Steam do, it’s up to each game developer.

Download the Files in Your Web Browser

Valve lets you download your Steam cloud save files via a web browser, too. You can download just your saved files without re-downloading the entire game. To find your saved files, visit Valve’s View Steam Cloud page in your web browser and sign in with your Steam account. You’ll see a list of games using your Steam Cloud storage. Locate the game in the list and click Show Files to see all the files for a game. Each game has a page showing all the files it’s storing in Steam Cloud, as well as the date they were modified. To download a file, click Download. Download all the save files for your game, and you’ll have a copy of its save games. This feature is especially useful for multi-platform games that don’t automatically synchronize save files between platforms.
Read More
Cannot find a system image on this computer
If you are trying to restore your computer using a System Image that has been created by the Windows Backup and Restore tool but encountered an error message instead that says, “Windows cannot find a system image on this computer”, you’ve come to the right place as this post will walk you through in fixing this error. Here’s the complete context of the error message:
“Windows cannot find a system image on this computer, Attach the backup hard disk or insert the final DVD from a backup set and click Retry. Alternatively, close this dialog for more options.”
In the error message, you are offered two choices – to either Retry or Cancel the operation. You can try to select Retry to try again but you will most likely get the same error if you do so. This kind of error can occur if the name of the WindowsImageBackup folder or any of its sub-folders has been modified. On the other hand, this error can also pop up if this folder or any of its sub-folders have gone missing or have become corrupted. To resolve the error, you can try to move the WindowsImageBackup folder or check its sub-folders. You can also try to isolate the System Image file or rename the System Image folder or remove all the unwanted sub-folders as well as use Command Prompt in Repair mode.

Option 1 – Try to move the WindowsImageBackup folder

The WindowsImageBackup folder must be stored in the root of the volume where it is stored, in line with the functioning of the System Restore utility. For example, if the WindowsImageBackup folder is stored in the “C:/Backups/System Restore Backups/New” location, then you have to move it to the C: drive as well.

Option 2 – Try to check the subfolders of the WindowsImageBackup folder

The classification of folders and files plays an important part to restore in restoring a computer from a System Restore point. Thus, if have modified the names of any files or folders inside the WindowsImageBackup folder, then you need to set the defaults. After that, run System Restore again and check if it fixes the error.

Option 3 – Try to isolate the System Image file

If the System Image file is stored in a USB storage device along with various System Restore images, then it’s no wonder why you’re getting this error. To set things right, you have to make sure that the System Restore image you wish to restore your computer from, is the only one that’s present at the root of the USB storage device.

Option 4 – Try renaming the System Image folder

If you have renamed the System Image folder prior to running System Restore, then it is most likely the reason why you’re getting the “Windows cannot find a system image on this computer” error. This error pops up because the System Restore utility in Windows 10 looks out for the WindowsImageBackup folder so if you have renamed it, you need to change its name back to what it originally was to fix the error.

Option 5 – Try to remove all the sub-folders of the WindowsImageBackup folder

If you have stored some foreign files inside the WindowsImageBackup folder, you need to get rid of them right away and return the folder to its default state as this folder must be left alone and should not be meddled with if you want to run System Restore smoothly.

Option 6 – Try to use Command Prompt in Repair Mode

  • Open Command Prompt while your computer is in the Repair Mode.
  • Next, type and enter this command where you need to replace “<Partition Letter>” with your drive’s letter: dir <Partition Letter>
  • After you’ve found the WindowsImageBackup folder in any of the partitions, type and enter this command: dir <Parition Letter>WindowsImageBackup /s
  • The command you entered will display all the contents of the folder exceeding 10 GB in total size. You can check and confirm the integrity of the folder and if you find that the integrity is violated, then it is the reason why you’re getting the error.
Read More
Five Ways of Fixing Error Code 37

Repair Device Manager Error Code 37

What is Error Code 37?

Error Code 37 is a Device Manager Error Code that you may come across when you are unable to use an installed hardware device on your PC. It will pop up on your screen with the following display:

“Windows cannot initialize the device driver for this hardware. (Code 37)”

If you receive the above message, it means that your operating system was unable to acknowledge the drivers for a particular peripheral device.

Solution

driverfix boxError Causes

Error Code 37 mainly occurs due to device driver corruption. However, there are other factors that can trigger this error code, some of which are the following:

  • Missing device drivers
  • Out-of-date device drivers
  • Presence of malware or spyware in the system
  • The particular device is not compatible with your PC

Device driver corruption or other data corruption is not uncommon and part of everyday PC use.

From an installation gone wrong to an unexpected shutdown, commonly generated data errors are considered the main culprit behind error codes.

Further Information and Manual Repair

Just like most PC error codes, Error Code 37 isn’t that difficult to get rid of. There are many DIY methods you can try to have your PC running smoothly in no time. Here are a few methods to resolve this issue:

Method 1: Restart your PC

It is possible that the display of the error code is merely due to a temporary issue with your peripheral device and not anything serious.

Therefore, the quickest and easiest method to solve the error code 37 is to simply restart your PC.

Method 2: Scan for Viruses

If restarting does not do the trick, a quick scan for viruses and removing them is another simple method you can follow to fix your PC.

Since the error code is due to corruption of data, viruses such as malware or spyware create error in your PC’s registry and eliminating them can help restore some of the corrupt data, which also speeds up your PC.

Method 3: Undo recent changes

A possible explanation for the error code may be the recent changes in your Device Manager or due to the peripheral device installation. You can thus undo the changes by either:

  • Remove or change settings of the installed peripheral device
  • Roll back the version of the driver to the one before the update.
  • Use System Restore to reverse the changes made in the Device Manager

Method 4: Manually uninstall and reinstall the drivers

If the above stated methods do not help in speeding up your PC and is still giving you an error code, you may want to manually uninstall and reinstall the corrupt or missing drivers. Here are the following steps:

  • Double-check if the installed external device is properly connected and working smoothly
  • Open Device Manager and double click on the device that is causing problems
  • When it opens, click on the ‘Driver’ tab and click ‘Update Driver’

Method 5: Use DriverFIX

However, updating the missing or corrupt drivers can be time consuming and may also require having a hardware documentation ready that contains specific details about the driver that you should download.

To avoid this time-consuming process, you can use DriverFIX software.

DriverFIX will help you to download the required driver without you having to waste your precious time and effort looking it up in a user manual. This latest software technology is embedded with its own database that tracks the missing or corrupt driver according to your PC’s motherboard version and specific details.

It is user-friendly, which means that it will relieve you from the frustration of such PC error codes appearing from time to time and enable your PC to work efficiently in no time.

Click here to download DriverFIX to resolve Device Manager error code 37 today!

Read More
Fix Feature Update failed, error 0x8007000e
In every task carried out in the Windows 10 operating system, some of them don’t go smoothly and it could encounter a couple of errors along the way. One of these errors you could encounter is the Windows Update error code 0x8007000e. This particular error was reported to occur a lot when downloading and installing a Feature update via Windows Updates. And recently, it has been reported to occur a couple of times for the Windows 10 1903 May 2019 update. According to security experts, this error could be caused by a lack of memory or disk space as well as issues in the Windows Update mechanism. Whatever the cause is, troubleshooting this problem shouldn’t be hard as this post will give you some potential fixes you can check out. To fix this error, here are some options you need to consider:

Option 1 – Clear up temporary or junk files

The error could be caused by some temporary or junk files in your computer and so you need to clear them up to fix the problem. You can achieve that using the Storage Sense feature.
  • Open Setting > System > Storage from the WinX Menu.
  • From there, you will see a list of all the local and connected storage devices along with the details on the free space. Make sure that Storage Sense is on.
  • Next, find a link that says “Free Up Space” and click it to open.
  • After that, a screen which is the built-in program in Windows 10 will appear and will scan your computer for the following junk files so you can free up disk space:
    • Windows Upgrade Log Files
    • System created Windows Error Reporting Files
    • Thumbnails
    • Temporary Internet Files
    • Previous Windows Installation Files
    • Delivery Optimisation Files
    • DirectX Shader Cache
  • Choose the files you want to get rid of and then click on the remove files option. Note that you’ll have an idea of the total size as you select any of the junk files listed above.
  • Now go to the “Free Up Space Now” section and click the Clear Now button. This will get rid of all the temporary or junk files in your computer and should hopefully fix the Windows Update error 0x8007000e.

Option 2 – Reset the Windows Update components

If by any chance that the second option didn’t work, resetting the Windows Update components could also help you resolve the problem. How? Refer to the following steps:
  • Open Command Prompt with admin privileges.
  • After that, type each one of the following commands and hit Enter after you key in one after the other.
    • net stop wuauserv
    • net stop cryptsvc
    • net stop bits
    • net stop msiserver
Note: The commands you entered will stop the Windows Update components such as Windows Update service, Cryptographic services, BITS and MSI Installer.
  • After disabling WU components, you need to rename both the SoftwareDistribution and Catroot2 folders. To do that, type each one of the following commands below and don’t forget to hit Enter after you type one command after the other.
    • ren C:/Windows/SoftwareDistribution/SoftwareDistribution.old
    • ren C:/Windows/System32/catroot2/Catroot2.old
  • Next, restart the services you’ve stopped by entering another series of commands. Don’t forget to hit Enter after you key in one command after the other.
    • net start wuauserv
    • net start cryptsvc
    • net start bits
    • net start msiserver
  • Close Command Prompt and reboot your PC.

Option 3 – Try configuring the Windows Update-related Services

  • Tap the Win + R keys to open the Run dialog box.
  • Then type “cmd” in the field and tap Enter to open an elevated Command Prompt.
  • Next, execute the following commands. Note that you have to type and enter each the command one after the other.
    • SC config wuauserv start= auto
    • SC config bits start= auto
    • SC config cryptsvc start= auto
    • SC config trustedinstaller start= auto
  • The commands you executed will make sure that the Windows Update-related services are available. Once it’s done, restart your computer and see if the Windows Update error is now fixed.

Option 4 – Try running the Windows Update troubleshooter

Windows 10 have various troubleshooters that can help you resolve many system issues. So if you’re dealing with Windows Update errors like Error 0x8007000e, you can run the Windows Update troubleshooter to resolve it. To run it, go to Settings and then select Troubleshoot from the options. From there, click on Windows Update and then click the “Run the troubleshooter” button. After that, follow the next on-screen instructions and you should be good to go.

Option 5 – Try to use the Media Creation tool

The Media Creation tool in Windows allows you to use the ISO installation file to make a bootable device that you can use to install Windows on your PC. Note that this is kind of different from the usual installation process as it could erase your computer’s current settings and data on the primary drive. Thus, before you proceed, you need to backup all your data into some removable drive and then use the Media Creation tool to make a bootable drive.
  • After making the bootable drive, you need to plug it in your computer and then reboot.
  • Next, tap the F10 or Esc key to open the boot options.
  • Now set the boot priority of the removable drive the highest. Once the setup comes forth, follow the next onscreen instructions and install Windows without any problems.
Read More
How to block websites in Windows
There are a lot of reasons to ban or block different websites in your Windows. From wanting to limit yourself from distraction to block certain sites for sake of kids not going into them. Whatever your reason might be, keep reading in order to find out how you can block any website inside Windows for all browsers. The technique I am going to share with you is universal and not tied to Windows versions, they will work in any Windows from XP onward. Also, the technique will block desired websites on any browser, already installed or even ones that will be installed after doing the trick. And we will also be looking at applications that can help you in this task if you do not wish to do it manually.

Block websites using dedicated software

A small free application called Focal Filter which can be found here: https://www.focalfilter.com/ is a software solution for your needs. It is a pretty straightforward and easy-to-understand application and not really much can be said here about it. You simply download and install it, set your websites, and you are done, the app does rest.

Blocking manually via host file

Another method besides mentioned one using the dedicating application is to manually set site addresses inside the Windows host file. The first thing, of course, is to open the host file, run a notepad with administrator privileges, go to file open, and navigate to c:\windows\system32\drivers\etc\hosts. Once the file is opened go all the way down and add: 127.0.0.1 SITENAME For example: 127.0.0.1 www.youtube.com or 127.0.0.1 www.facebook.com This way each time user on a PC tries to access a listed website computer will reroute it to the given address which is your PC's local address and asked website will not be able to load.
Read More
Restoring accidentally deleted system files
There are times when we delete a system files without meaning to on your Windows 10 computer. This happens a lot for users sometimes mistake a system file for a malware-laden file or junk file when it’s actually a system file from the System32 or SysWOW64 folder. In such cases, it could affect your computer. For instance, you might not be able to reboot your PC or open Settings. If you have removed system files from any of these folders by accident and you desperately want to restore them, read on, as this post will guide you in resolving the problem. Restoring them isn’t actually hard, just make sure that you have system admin access. The good thing is that there exists Windows Resource Protection which protects registry keys and folders and even critical system files. So if there are any detected changes to a protected system file, the modified file is restored from a cached copy located in the Windows folder. However, if the Windows Resource Protection program fails to restore these files, you need to check out the given fixes below.

Option 1 – Run System File Checker scan

To restore the system files you deleted, you can try running System File Checker or SFC scan. System File Checker is a command utility built into your computer that helps restore corrupted files and missing files. Refer to the following steps to run it:
  • Boot your PC into Safe Mode.
  • Hit the Win + R keys to launch Run.
  • Type in cmd in the field and tap Enter.
  • After opening Command Prompt, type in sfc /scannow
The command will start a system scan which will take a few while before it finishes. Once it’s done, you could get the following results:
  1. Windows Resource Protection did not find any integrity violations.
  2. Windows Resource Protection found corrupt files and successfully repaired them.
  3. Windows Resource Protection found corrupt files but was unable to fix some of them.
  • Reboot your computer.

Option 2 – Try to run the DISM tool

Aside from System File Checker, you can also run the DISM or Deployment Imaging and Servicing Management Tool as it could help in restoring the system files on your Windows 10 computer. Using this built-in tool, you have various options such as the “/ScanHealth”, “/CheckHealth”, and “/RestoreHealth” which could help you resolve the problem.
  • Open the Command Prompt with admin privileges.
  • Then type in the following commands and make sure to hit Enter right after you type each one of them:
    • Dism /Online /Cleanup-Image /CheckHealth
    • Dism /Online /Cleanup-Image /ScanHealth
    • exe /Online /Cleanup-image /Restorehealth
  • Do not close the window if the process takes a while as it will probably take a few minutes to finish.

Option 3 – Try performing a System Restore

Running System Restore can also help you bring back the system files. You can do this option either by booting into Safe Mode or in System Restore. If you are already in the Advanced Startup Options, just directly select System Restore and proceed with the next steps. And if you have just booted your PC into Safe Mode, refer to the steps below.
  • Tap the Win + R keys to open the Run dialog box.
  • After that, type in “sysdm.cpl” in the field and tap Enter.
  • Next, go to the System Protection tab then click the System Restore button. This will open a new window where you have to select your preferred System Restore point.
  • After that, follow the on-screen instructions to finish the process and then restart your computer and check if the problem is fixed or not.

Option 4 – Try to run Automatic or Startup Repair

Startup Repair, previously known as Automatic Repair, is an advanced tool in Windows that can help you diagnose various system issues, including this one. This tool will scan system files, configuration settings, registry settings, and so on in order to fix the problem on its own. To run Startup Repair, all you have to do is boot into the Advanced Startup Options and then go to Troubleshoot > Advanced option > Startup Repair and then run it. This will resolve the problem if you have deleted any system file that’s essential to your Windows 10 PC.

Option 5 – Reset your computer

  • Tap the Win key or click on the Start button located in the Taskbar.
  • Then click on the Power button at the bottom right portion of the screen.
  • Next, press and hold the Shift key on your keyboard and then click on Restart. This will restart your Pc into the Advanced Startup options.
Note: Once you have access to the Advanced Startup options, you have to go to the setting which allows you to Reset your Windows 10 PC. All you have to do is select Troubleshoot > Reset this PC to reach the following screen Afterward, select either the “Keep my files” option and then proceed to the next on-screen instructions that follow to reset your Windows 10 computer without losing your files.
Read More
Dangerous GriftHorse Trojan found on Android
There has been recently discovered in the field of malware targeting Android devices. Affecting more than 10 million users of Android phones, the malware GriftHorse is doing its attacks via phishing and premium services scams. A lot of applications have been discovered that are hosts for this malware and many of them are inside the Google store and available for download. GriftHorseAccording to Zimperium zLabs, this malware that was recently detected has been doing its scams and attacks even in November of 2020 and has thus far accumulated hundreds of thousands of dollars in its scam. On the surface it looks very harmless, asking for typical permissions like internet access, calls, and other related needed functions, and then it waits. After few months the real attack happens when users get charged with premium service they never subscribed to in the first place.

List of Infected Applications that Carry GriftHorse Trojan

Zimperium zLabs listed out some of the apps with this malware. Users are advised to avoid installing them.
  •     Amazing Video Editor
  •     Bag X-Ray 100% Scanner
  •     Bus – Metrolis 2021
  •     Call Recoder Pro
  •     Call Blocker-Spam Call Blocker
  •     Cinema Hall: Free HD Movies
  •     Coupons & Gifts: InstaShop
  •     GPS Phone Tracker – Family Locator
  •     Fingerprint Changer
  •     Fitness Point
  •     Free Calls WorldWide
  •     Geospot: GPS Location Tracker
  •     GPS Phone Tracker – Family Locator
  •     Handy Translator Pro
  •     Horoscope : Fortune
  •     iCare – Find Location
  •     iConnected Tracker
  •     Instant Speech Translation
  •     Lifeel – scan and test
  •     My Chat Translator
  •     My Locator Plus
  •     Plant Camera Identifier
  •     Racers Car Driver
  •     Safe Lock
  •     Screen Mirroring TV Cast
  •     Slime Simulator
  •     Smart Spot Locator
These are only some of the many infected apps available on the internet. Zimperium zLabs also warned that GriftHorse Trojan exists in over 70 countries worldwide. The infected app quickly changes the language and displays content depending on the user’s IP address.
Read More
Fix Windows Activation Error Code 0x8007007B in Windows 10
If you recently upgraded your computer or if you’ve just switched to a new Windows 10 PC, the most common errors you might encounter are the Windows Activation errors. This issue boils down to the Windows Activation server which has either failed to validate or recognize the license tied to the digital account. In this post, you will be guided on how to fix an activation error in an organization with an error code 0x8007007B. It contains this exact error message: “We can’t activate Windows on this device as we can’t connect to your organization’s activation server. Make sure that you’re connected to your organization’s network and try again. If you continue having problems with activation, contact your organization’s support person. Error code 0x8007007B.” Various computers are activated via the KMS licensing (Key Management Server) in organizations. Computers that are activated using this process do not get a permanent activation and have to stay connected to the organization instead of for at least 7 months or 180 days. It is common in Pro and Enterprise versions that are deployed in bulk for at least hundreds or thousands of computers. So imagine a user with a personal computer in the office who decided to leave the organization but will still have an activated Windows key. And so to prevent that from happening, organizations use the KMS licensing. Another possible cause of the error is in case some user used an organization key and later on, the PC just got upgraded or downgraded to a version that is not compatible with that copy of Windows. To fix this Windows Activation error, here are some suggestions that might help.

Option 1 – You can try connecting to the organization’s network and activate the computer. But before that, you need to first check if the computer actually belongs to an organization or not.

  • Tap the Win + R keys to open the Run dialog box.
  • Type “cmd” and hit Enter to open an elevated Command Prompt.
  • After that type the vbs /dlv command and hit Enter to execute it.
  • Next, check if the Product Key Channel says “GVLK”. If it does, then it means that your computer was activated using volume licensing.

Option 2 – Change Licence Key

If you’ve recently left an organization then it’s best if you buy another copy of Windows 10 and then change the license key. This time, make sure that the license key is for the same version of Windows. However, if it’s different, you need to format your computer.

Option 3 – You can try activating Windows 10 using a mobile phone

Activating Windows 10 can also be done using your phone. Just note that you have to call Microsoft to do so.
  • In the Start Search box, type in “Slui 4” and tap Enter.
  • Next, select your country and click on Next.
  • Keep the window open and call the toll-free number of the country you’re from.
  • Afterward, a confirmation ID should be given by the automated system which you must take a note of.
  • Finally, in the box on the window, type in the confirmation ID and click on the Activate button. That should do it.

Option 4 – If you think that the issue is caused by some hardware changes, you can try using the Activation Troubleshooter.

There are times when users already have the license keys and were able to activate Windows. However, it doesn’t last long and only works for a while and it’s suddenly throwing up an activation error like this one. To use the Windows Activation Troubleshooter, just go to Settings and to Activation and then run the troubleshooter from there. If you've made some modifications to your hardware, you have to click the “I changed hardware on this device recently” option for further suggestions.
Read More
1 2 3 162
Logo
Copyright © 2022, ErrorTools. All Rights Reserved
Trademarks: Microsoft Windows logos are registered trademarks of Microsoft. Disclaimer: ErrorTools.com is not affiliated with Microsoft, nor claim direct affiliation.
The information on this page is provided for information purposes only.
DMCA.com Protection Status