Configuring Snapping feature in Windows 11

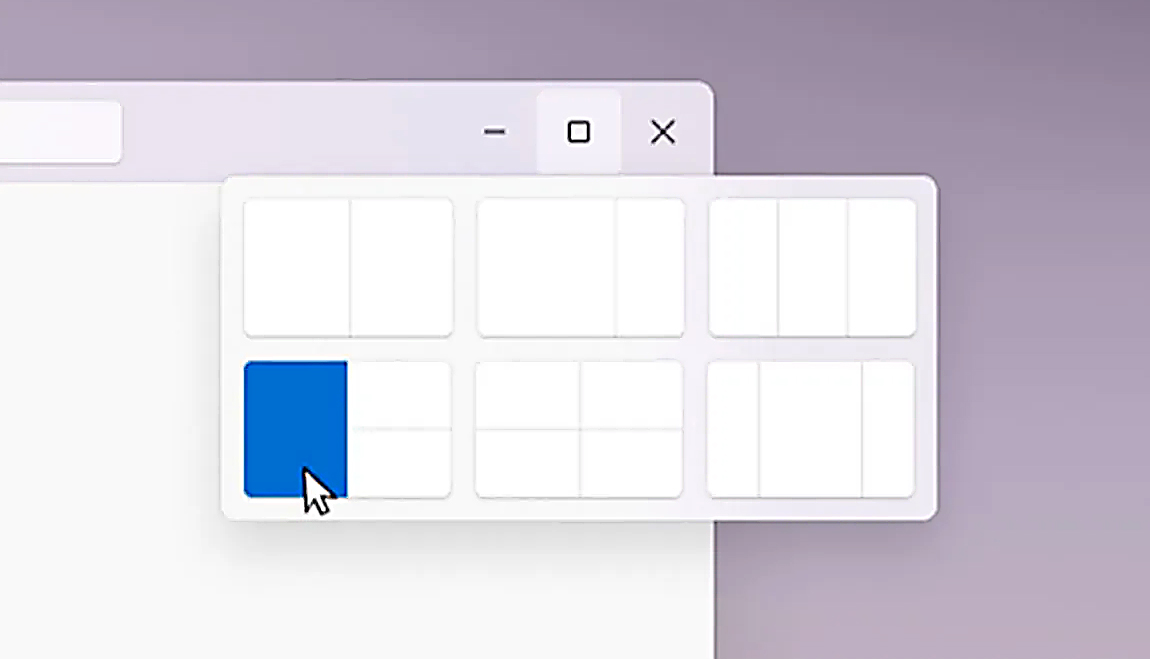
The Snapping feature was introduced as an essential part of Windows 11 and I like it very much, it lets you organize your opened windows much faster and with more control. However, some people do not like the feature, worry not because you can turn it off, or if you prefer you can just remove the showing layout option that is shown when hovering over Minimize/Maximize button.

Snapping feature windows 11Removing options all together

To completely turn off Snap layout in Windows 11 follow these steps

  1. Open Windows 11 settings by pressing ⊞ Windows + I
  2. Select System on the left part of the screen
  3. In System options select Multitasking
  4. At the top of Multitasking Click on the switch next to Snap Windows
  5. Close settings

Changes will be automatically applied and you will no longer have Snap layout functionality.

Removing layout graphic from Snapping feature

If you like the snap Layouts feature but are not very fond of the layout graphic that is popping up each time you hover over Minimize/Maximize button do not worry, there is an option to turn just that off and keep the feature itself.

  1. Open Windows 11 settings by pressing ⊞ Windows + I
  2. Select System on the left part of the screen
  3. In System options select Multitasking
  4. Click on the Snap Windows menu
  5. Deactivate Show Snap Layouts When I Hover over a Window’s Maximize button
  6. Close settings

Now you will be able to use the Snap Layout feature without layout graphics showing. If you want to reverse any of these options and go back to standard-setting, just follow the steps and turn features ON.

If you like to learn and find out more about various Windows errors, and how to repair them go to our vast archive or use search to find articles that will explain and help you in solving your issue.
However, if you prefer to do things fast and with automatization then we are proposing to use an automated solution for your issues. The application that we are recommending is Advanced System Repair Pro
Advanced System Repair utilizes multiple tools all in one to give you a quick, simple, reliable, and very thorough diagnosis of your PC. It brings you all the tools you need in one program to clean, fix, protect, optimize and boost your PC!
1-Click Maintenance
All the tools to make it simple and easy! It's like having a professional technician at the click of a mouse.

Junk Cleaner
Keeping your computer free from unnecessary clutter also helps make your computer last longer. Like any other machine, if you keep it clean and take care of it, it will serve you better for longer!

Optimize background apps
Optimize applications background activity with the built-in Application Optimizer feature.

Disk Defrag
With a simple 1-click, Advanced System Repair speeds up your PC by assembling fragmented files on your machine and organizing them more efficiently.

Malware Removal
Finds and removes all types of harmful malware including trojans, worms, bots, adware, spyware, PUPs, and more!

Privacy Cleaner
The all-in-one privacy suite to Clean Your Tracks & Protect Your Privacy! Make your computer safe, secure, and more efficient!

System Tweak/Optimizer
ASR will analyze your complete system and settings to adjust your PC to function at its maximum performance.

Registry Cleaner
Over time, as you install and uninstall applications, the registry can become cluttered with old entries and broken settings which can result in program crashes, and annoying messages and slow the computer down.
Visit our Advanced System Repair Pro Download page to inform yourself about all the benefits of this software and get a free trial copy of it.
advanced system repair pro

Advanced System Repair Pro

One-click automated PC repair solution
ASR logo
With Advanced System Repair Pro you can easily
Replace damaged files
Restore performance
Free disk space
Remove Malware
Protects WEB browser
Remove Viruses
Stop PC freezing
DOWNLOAD
Privacy Policy | Terms of Use | Uinstall
Advanced System Repair Pro is compatible with all versions of Microsoft Windows including Windows 11

Share this article:

You might also like

WEB sites for cheap game purchases
Gaming can be sometimes a very cheap hobby, sometimes can be really expensive. It really depends on your preferences or gaming habits. So for all of you game spenders, we have compiled a little list of WEB sites where you can find games cheap. Provided sites are checked ones and not scam. You can purchase without concern. Also, note that some of these sites will require you to create an account in order to be able to make a purchase.

List of WEB sites for cheap purchases

is there any deal cheap gamesIs There Any Deal

https://isthereanydeal.com/ Is there any deal really behaves as it sounds, it is basically a search engine tailored to find existing deals on required games. Type in the desired game and see if anywhere you can find a deal on it. The site also features wait for better price options as well as the price history of the game and the trend of its sales.

cheap shark dealsCheap Shark

https://www.cheapshark.com/ On cheap shark by typing game name, you will get its listing on different online retailers, like Steam, EPIC, etc. so you can compare prices among them and pick the best deal. Site packs are also the cheapest ever feature so you can check the lowest price ever on the wished title and you can get alerts and notifications on prices.

humble bundleHumble Bundle

https://www.humblebundle.com/ Humble bundle got famous for its pay what you want approach due to its origins where it was selling games and donate money to charities. Even today they go by this logic once they decide to place great games on sale for charity purposes and you can donate any amount you wish (there is the minimum amount, but it is very cheap). And regular cheap bundles make this site one of the best out there.

fanatical cheap gamesFanatical

https://www.fanatical.com/ Fanatical is a site that will offer you to get titles in a bundle with a discount, the good stuff is that you can create your own bundle and get a discount on bulk purchases. And the site also offers flash deals and holds sales where you can buy stuff cheaper.

sick dealsSlick Deals

https://slickdeals.net/deals/games/ If you are looking for the best deals on daily basis slick deals is the site for you. We could not found a better website that offers cheaper deals on a daily basis and you can subscribe to get notified in email about daily discounts.

green man gamingGreen Man Gaming

https://www.greenmangaming.com/ Green Man Gaming is one of the best stores and game discount sites out there, it might not be the cheapest but one very important thing about it is that keys for Stream and Xbox come directly from the game publisher so you can rest assured that they are all 100% legal and do not come from some third party benefits and resellers. And that's it for now. We hope to see you again on our site for more articles and error fixing tips.
Read More
The best Antivirus software of 2021
We have often talked about the security of your computer, we have been giving you tips and tried to explain how to best protect your computer from various attacks and malicious software. Today we will be talking about antivirus applications. antivirusAntivirus software has become the kind of a must-have in every computer in this day and age. When you think about it, our systems are connected to the internet most of the time if not always, and therefore kind placed in from the line of various cyber-attacks. Here antivirus software comes into focus, especially because it has evolved long from just a simple virus removal tool to full security suites. We will be going through the best of these applications in order to present both their good and bad sides and hope that we will help you in picking the right one for you. Remember, picking either one of the presented solutions is way better than not having one at all. The list is made from best down in our opinion so number one is highly recommended.

List of Best antivirus applications of 2021

  1. BitDefender

    In our opinion the best overall security protection suite for this age and time. Bitdefender has cemented itself as number one a few years back and it holds that status even today. It has top-of-the-game virus protection, an incredible amount of features, safepay banking online protection and it is amazingly cheap. Its downside we could say is that it can be annoying sometimes, especially if you set it to maximum protection and paranoid mode. In this case, it will often ask what to do and how to behave leading to minor annoyances.
  2. Norton antivirus

    Norton antivirus is well known to older computer users, this package has been around a long time and it is our pick for closest one to challenge top place because of its packed features. The number of features it has are really stunning and it comes also with great and maybe best-browsing protection of all candidates. It also has a backup tool bundled with it but the reason why it is in the second place is that it is taxing to the system and can have a real impact on computer performance. Great protection is important, but so it is working on it without slowdowns.
  3. Kaspersky

    Another one of the old antivirus software on the list. Kaspersky Lab was once top tier antivirus software but it dropped down due to its high prices, later they have changed their pricing to be more in trend with other rival companies but many have switched to something else. Today it still packs one of the best antivirus engines with fast and configurable scans. It also has very impressive anti-ransomware features but sadly most of the things it just simply does for you leaving you to fully trust it since you cannot really configure much. It is not in step with new technologies and it is lacking some features like support for the Chrome browser that places it lower in our ranking.
  4. Trend Micro antivirus

    The biggest sell point for this antivirus application is probably its ease of use and user-friendliness. It also packs a great antivirus engine and impressive anti-ransomware performance but sadly it comes with very limited configurability and somewhat lack of features comparing it with the top three entries. Never the less a very user-friendly application that you can configure without knowing any kind of tech talk, everything is laid out in simple English.
  5. Avira

    Perhaps best known for its free version, Avira has a premium one that is well better worth than the free version. Strong suites of this software are mostly aimed at the internet with its great anti-phishing and web protection along with a low price for all of its features. Sadly in the domain of virus protection, there are some reports from independent websites that its antivirus engine is not so great, it will offer you moderate protection but not the best.
  6. Webroot Secure Anywhere

    If you are on the lookout for software that has a great virus database and plenty of features but is also incredibly light weighted and fast then look no further, Webroot Secure Anywhere is an application for you, incredibly fast and incredibly small is a great solution for older machines. It keeps all of its databases up in the cloud and this feature among its great advantages is also its greatest disadvantage since if you are out of the internet you will not be able to have the latest virus definitions available to you making this tool very situational.
  7. Avast

    Avast has many great protection features and it is very highly configurable. The firewall comes also in its premium edition and it offers great virus protection including a file shredder and awesome WI-FI inspector for an extra layer of security. This package would be higher on the list if it was not for its lack of WEB protection and its tool on the system resources.
  8. Sophos home antivirus

    Lack of features and somewhat strange user interface are downsides of this software but on its positive side it has good antivirus engine and its user interface is very friendly. Where it shines though is in its price, for one affordable price you get protection for 10 devices making this option a great choice for anyone wanting to protect more devices or just use a single license for the whole family.
  9. ESET antivirus

    Greatly configurable antivirus software with tons of options and very light on system resources makes ESET one of the best out there. Virus engine and database is also top tier but some testing labs have reported that protection offering is not really what it is advertised and if we talk about its strong suite of a great many options and configurations it is at the same moment its downside since it is not very friendly to novice and beginner users.
  10. McAfee antivirus

    McAfee antivirus comes in its package with unlimited VPN service and if we take look at the top tier pricing plan it is a great investment. Sadly for its entry-level price, it covers only a single device and it was reported that it packs little outdated virus engine if we compare it with its rivals. Nevertheless, it still offers good virus protection and if you take into account the VPN that comes with it, it can find its users.

Conclusion

No matter which antivirus you choose you will not go wrong, after all any protection is way better than none.
Read More
Fix fatal error C0000034 applying update
Fatal error C0000034 happens during the installation of the Windows update and if you are one of the unlucky users who sadly run into this, keep reading as we will provide solutions to this error and how to get around it. Start from point 1 to the bottom and hopefully you will have your PC back into working order in no time.
  1. Run Windows Update troubleshooter

    Usually, a built-in Windows troubleshooter can solve issues painlessly and fast, my advice is to try this as the first option, it is a simple and clean solution worth trying and in 90% it solves the issue all by itself.
  2. Do a clean boot

    Using task manager, remove all nonessential applications and services from starting up, reboot your computer, and once it is cleanly booted try re-running the update process again, if the issue was running the application this time everything will work since the problematic application is not running.
  3. Reset Windows update components to the default

    This solution requires you to use the Reset Windows Update Agent Tool to reset Windows Update components to default or use this PowerShell script to reset Windows Update Client. You can also manually reset each Windows Update component to default and then re-run the update.
  4. Disable firewall and antivirus

    Altho not likely it is still a possibility that some firewalls and antivirus can detect windows updates as malicious software and cut them off. If everything else failed, disable the firewall and your PC protection and when it is fully disabled try updating.
  5. Do automatic startup repair

    This should be the last thing to do but if everything else failed, do it. Perform Windows 10 Startup Repair. Once the startup repair completes successfully, you can re-run the update. The update should install without errors.
Read More
Guide to Fixing the Error 0x800CCC90 Quickly

What is the error code 0x800ccc90?

The 0x800ccc90 is a common Outlook Express error. This error occurs when Outlook Express fails to connect to the mail server that handles incoming and outgoing emails.

The error is usually displayed as:

“There was a problem logging onto your mail server. Your User Name was rejected.”

Though this error does not pose any security threats to your PC if it is not fixed immediately, it may limit your ability to send and receive emails on your Outlook email address.

Error Causes

The error 0x800ccc90 is usually triggered by the following causes:

  1. Authentication problem- This happens when your account details are not authenticated by the server. In this case, you will see a pop up message displaying ‘Server:’pop3.example.com’, or ‘Secure (SSL): No, Server Error: 0x800ccc90’.
  2. Failure of POP3 server

Further Information and Manual Repair

If you come across the error 0x800ccc90, then don’t you worry! You don’t have to hire a professional to resolve this issue. In fact, you can fix it all by yourself. Here are some DIY solutions to repair this problem.

Solution 1:

  • Go to the ‘Tools’ tab and select ‘Accounts’
  • As you click on the accounts tab, an internet accounts box will appear on the screen
  • Now double click on the account property box.
  • After that go to the server tab and click it.
  • Now check on the box that says ‘My Server Requires Authentication.’
  • Once you check on this option now click on apply to accept changes and then close the window.
  • To bring the changes into effect, restart Outlook and then try to send emails again. Hopefully, this will work.

Solution 2:

However, if you are still unable to resolve the problem, then this means the PST files are corrupt and damaged and there is no problem from the server's end. When this happens, then the best way to resolve this problem is to download a PST repair tool.

We suggest downloading the PST repair tool from a trusted website.

After downloading it, run and scan it on your PC to detect errors. You will have to be patient because scanning may take a couple of minutes. Once the scanning is complete, click on repair to resolve the problem.

So, next time when you are unable to send or receive emails on your Outlook Express and you see the 0x800ccc90 error message, then try using the solutions given above to resolve the error right away.

Read More
Setting default applications in Windows 11
Setting default applications in Windows 11
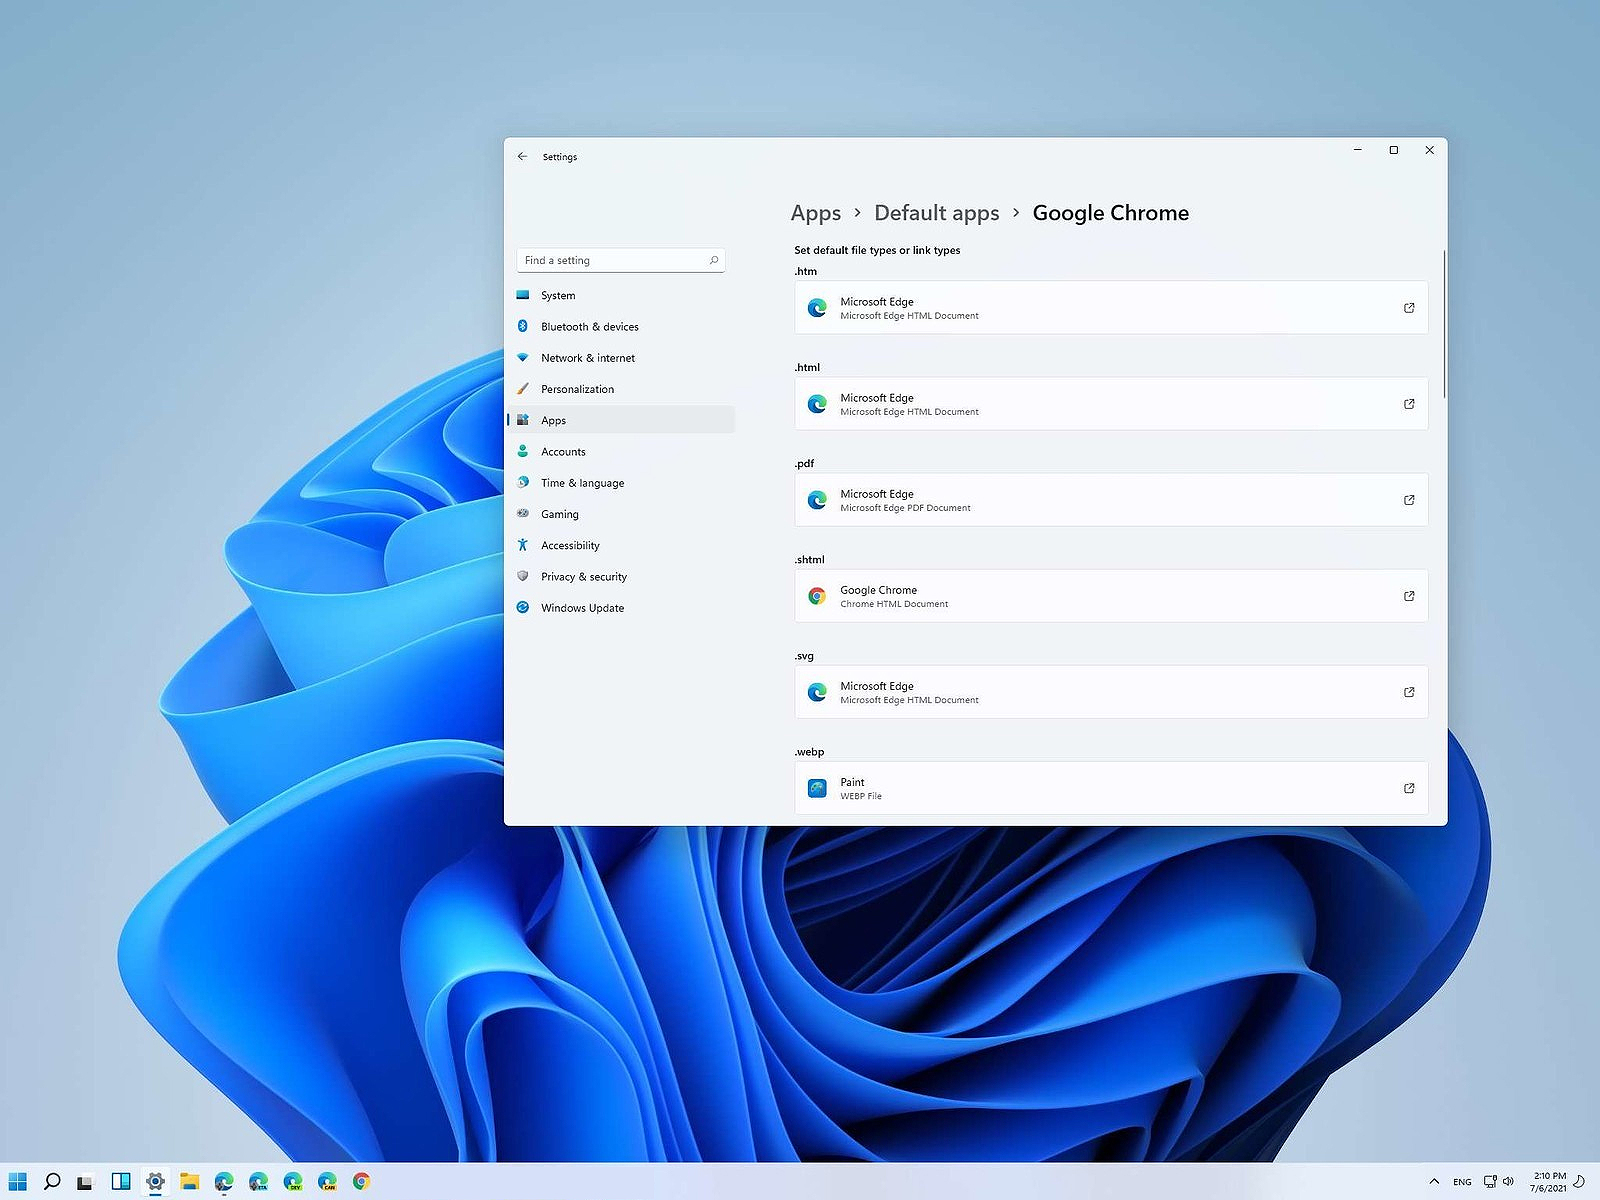
Same as in previous Windows versions, Windows 11 will also use certain applications as default ones for opening certain file types and file extensions. And yes, same as in previous versions it will come preconfigured for certain file types and associated applications like for example photos for pictures. Of course, users usually have their own favorite applications for certain file types and much more prefer to open them inside the application of their choice instead of the default one. We can change the default application like in previous Windows versions but this time there are two ways and overall more control of this process. Windows 11 has settings for choosing default file type applications and default file extension applications giving you more control of this process.

The opening setting for apps

Whatever you wish to change default application or default extension application you will need to open settings for default application. Follow steps to quickly go into it.
  1. Press ⊞ WINDOWS + I to open settings
  2. Select Apps on left
  3. On the right part select Default Apps
Now you are in settings for choosing default applications

Choosing default application by file type extension

This is considering by Microsoft as a typical way to set default applications inside Windows 11. Once you are inside the settings app there is a box labeled Enter a file type or link type. Inside the search box, type in file extension that you wish to associate the application with like .JPG, .TXT, or other. If the file extension is not associated with any application you will be presented with a Choose a Default button, if however, the file extension is already associated with the app, you will need to click on the app box itself. In any case, a pop-up will appear and ask How do you want to open YOUR FILE EXTENSION files from now on? Choose Application from the list of presented ones and click on OK.

Choosing default file type

Another method is to select the default application by file type selecting application for it. In the settings screen, under the search box, you will have a list of installed applications. Choose the application that you would like to associate a file type with and click on it. On the next details screen scroll down and select the file type that you want to associate with the selected application and click on OK.

Other/third method

There is also the third method for choosing the default application for file type but it includes some surfing on your hard drive and it can be more time-consuming for first-time settings. But it is fairly quick when you need to only use it once on some new file type (for example you have a new application installed and want to switch just one file type extension to that application). Locate the file that you want to associate with the application and right-click on it. Select Open With from the menu and then Choose Another App. Pop up will appear, select the application that you would like to use, and check the box beside Always use this app to open CHOOSEN EXTENSION files followed by clicking on the OK button.
Read More
Windows Photo Viewer can’t display picture
There are instances when you open a picture or an image in the Windows Photo Viewer and instead of displaying the image, it displays nothing and you’ll see an error message instead that says, “Windows Photo Viewer can’t display this picture because there might not be enough memory available on your computer”. Although this may look like a clear-cut issue of less storage space or low RAM in your computer, that’s not always the case. Security experts noticed that even when your computer has enough resources and disk space, this kind of problem could still occur. So if you experience the same thing, you need to check the Color Profile of your screen. For more information, refer to the detailed instructions provided below but before you proceed, make sure that you close some processes in the Task Manager or restart your computer and see if it helps in fixing the problem. You can also try using the Disk Cleanup tool. To use it, refer to these steps:
  • Tap the Win + R keys to open the Run dialog box and then type “cleanmgr” in the field and hit Enter to open the Disk Cleanup window.
  • After that, select the drive you want to clean.
  • Now click OK to clean the disk and restart your computer.
If the Disk Cleanup tool didn’t help in resolving the issue, refer to the instructions below. Step 1: In the search box, type “color management” and then select the “Change advanced color management settings for display” option from the search results. Or you could simply go to Settings > System > Display, Advanced display settings, and from there, select display and click on the Display adapter properties of Display. Step 2: Next, switch to the Color Management tab and click on the Color Management button. Step 3: Select the monitor where you’re getting the “Windows Photo Viewer can’t display this picture because there might not be enough memory available on your computer” error in the next window. And if you have two displays, make sure that you select the primary display. You also have an option to identify the monitor. Step 4: Once confirmed, select the “Use my settings for this device” checkbox. Step 5: After that, select the Profile listed under the “Profiles associated with this device” option and then click on Remove. Step 6: Next, go to the Advanced tab and make sure that all settings are set to System default which includes a device profile, perceptual images, rendering intent, Relative Colorimetric, and many more. Step 7: Once you’re done, you have to restart your computer and then try to open the same image you were trying to open earlier and then check if you can now open it instead of seeing the error.
Read More
Fix Error 0x8000704ec in Windows 10
Universal Windows Platform (UWP) applications are the modern application in the windows store that can be used in all the Window devices like Xbox, Hololens, Tablet, PC or Phone. Basically, UWP provides a common platform for every device that runs Windows 10. When attempting to login into these applications and receive this error:
Can’t sign in with a Microsoft account This program is blocked by group policy. For more information, contact your system administrator. 0x8000704ec
Then this post is for you. We will guide you on how to easily resolve issues, please follow the steps provided.
  1. Local group policy editor solution

    • Press ⊞ WINDOWS + R to open the Run dialog.
    • In the Run dialog box type gpedit.msc and press ENTER to open Group Policy Editor.
    • Inside the Local Group Policy Editor, navigate to the path below:
    Computer Configuration > Windows Settings > Security Settings > Local Polices > Security Options
    • On the right pane, double-click on Accounts: Block Microsoft accounts to edit its properties.
    • Under Local Security Setting tab, click on the drop-down and select This policy is disabled.
    • Click Apply > OK to save the changes.
    • Exit Group Policy Editor.
  2. Registry editor solution

    As always, it is highly recommended to make a backup of the registry editor just in case that something goes wrong.
    • Press ⊞ WINDOWS + R to open the Run dialog.
    • In the Run dialog box, type regedit and hit ENTER to open Registry Editor.
    • Navigate to the registry key path below:
    HKEY_LOCAL_MACHINE\SOFTWARE\Microsoft\Windows\CurrentVersion\Policies\System
    • At the location, on the right pane, identify the NoConnectedUser key. The key value might be set to either 1 or 3.
    • Now, double-click the NoConnectedUser entry to edit its properties.
    • Input 0 in the Value data field and hit Enter to save the change.
Read More
Fix Hello Errors 0x801c004d or 0x80070490
As you know, Windows Hello offers you quick access to computers since you can log in to your Windows devices three times faster compared to passwords with the help of the camera via Face recognition and fingerprint reader. This way, Windows Hello will recognize you right away. However, there are also times when you might encounter some problems when using Windows Hello. For one, if you are trying to add the PIN method to Windows Hello on your Windows 10 computer but you suddenly encountered an error code of 0x801c004d or if you are trying to use your existing pin and you encounter an error code of 0x80070490 along with an error message that says, “Not recognized”, then read on as this post will guide you on how you can fix both of these errors. Here is the complete content for both errors:
  • 0x801c004d – Unable to enroll a device to use a PIN for login”
  • 0x80070490 - Not recognized, Pin and fingerprint are no longer options for signing in”
If you got any of these two errors, there are several potential fixes you can check out to resolve them. You can try to check for any Windows Updates or create the PIN again or check the CNG Key Isolation Service. You could also try to reset the TPM or create a new User Account. For more information, follow the instructions provided below.

Option 1 – Try checking for any available Windows Updates

The first thing you can do is to check for any available Windows Updates. It is possible that your computer may be outdated and is the reason why you’re having troubles with Windows Hello. To check for Windows Updates, just go to Settings and from there, head over to the Update and Security section and click on Windows Updates located on the left pane, and then click on the Check for Updates option. Wait until the process of checking updates is completed and if it finds new updates, install it. After you install the new Windows Updates, check if you can now add the PIN on Windows Hello or not.

Option 2 – Try creating the PIN again

The next thing you can do is to create the PIN again by signing out and signing in again and then try creating the PIN once more. If this does not work, you can try restarting your computer and creating the PIN again. You could also try removing the PIN and then change it.
  • Remove the PIN by going to Settings > Accounts > Sign-in options.
  • From there, go to the PIN section and click on the Remove button.
  • You will be asked to verify your account to proceed in removing the PIN, enter your credentials.
  • Restart your computer and then set up a new PIN.
  • Once you’re done, restart your computer and check if the error is gone now.

Option 3 – Try checking the CNG Key Isolation Service

The CNG Key Isolation Service is the one that stores and uses long-lived keys in a secure process complying with the common criteria requirements and it is possible that the error could be related to this service. This service is hosted in the LSA processes and provides key process isolation to private keys and associated cryptographic operations as required by the common criteria. Thus, you need to check this service to see if it’s the one that’s causing the error.
  • Tap the Win + R keys to open the Run dialog box and type “services.msc” in the field and hit Enter to open the Windows Services Manager.
  • Next, locate the “CNG Key Isolation Service” and once you find it, double click on it to open its Properties box.
  • After opening its Properties, check its Startup type and select Manual. This is the default setting and if it is Disabled, then it’s no wonder why you’re getting errors with Windows Hello, thus, you need to enable it.
  • Once done, restart your computer and check if you can now add the PIN to Windows Hello. If you still get the error, then you might want to try setting the CNG Key Isolation Service from Manual to Automatic and then click on the Start button and see if it fixes the error or not.

Option 4 – Try to reset the Trusted Platform Module or TPM

You might also want to try resetting the Trusted Platform Module or TPM to fix the error. You can do this by opening Windows PowerShell and then executing the “Clear-Tpm” command. After that, check if the error is now resolved.

Option 5 – Try to create a new User Account

You could also try to create a new User Account on your Windows 10 computer to fix the Windows Hello error. Once you have created a new local user or administrator account in Windows 10, check if you are now able to add the PIN from this newly created user account.
Read More
Windows 11 slows down some SSD drives
In the latest Windows 11 fiasco, it is reported that the operating system is slowing down some SSD drives. Good thing is that it does not affect all of SSD on the market but the ones which it is affecting can see even a 45% of speed drop. ssd driveMicrosoft has not published a solution to this issue, but users point out two potential problems. The first is a security mechanism based on disk virtualization, which is supposed to slow down the performance of SSDs. The second, in turn, is related to the place of installation of Windows 11 – users indicate that if the performance test is performed on a medium with no files associated with the system, its performance results are similar to the parameters given by the manufacturer. Transfer speeds were to be slightly improved with the latest Windows 11 update 22000.348. However, users are still waiting for a solution to the problem that significantly reduces the efficiency of SSD media.

More information

The details described leading to speculation that the problem could be related to drivers that Microsoft is providing. On further tests, all Nvme drives that use the Microsoft driver have this problem, but Intel 905P, which has its own driver provided by Intel, is working at full power,”.
Read More
Custom widgets in Windows 11 later
windows custom widgetsOriginally Microsoft has imagined its widgets menu as Microsoft-only widgets but it seems that they have changed their mind. Due to the latest leak, it seems that Microsoft will open the widgets menu to 3rd party developers as well but at launch, it will be only official widgets. It was hinted that later widgets menu will be open to developers who want to bring their own stuff into it. Distribution, date, and technology that will need to be used in order to create your widget have not been discussed nor leaked at a given time but in some way, I am very glad that at least some customization will be in Windows 11. It is funny and amusing how some things that were in Windows Vista are getting back like glass design, round corners, and widgets. Let’s just hope Windows 11 will be a better Windows than Vista was.
Read More
1 2 3 162
Logo
Copyright © 2022, ErrorTools. All Rights Reserved
Trademarks: Microsoft Windows logos are registered trademarks of Microsoft. Disclaimer: ErrorTools.com is not affiliated with Microsoft, nor claim direct affiliation.
The information on this page is provided for information purposes only.
DMCA.com Protection Status