Android security: 9 apps stealing your data!

Due to the latest android malware security analyst, there are alarmingly 5.8 million downloads of applications that will steal your Facebook data, your Facebook login credentials!

Russian anti-malware company Dr.Web has found Trojan apps that steal your Facebook login credentials by tricking users into entering their private information in order to eliminate in-app ads.

All of the applications have been removed from the play store and cannot be installed anymore but please do check your phone in order to remove them from your phone as well.

List of malware applications:

If by any chance you have any application from this list, consider uninstalling it from your phone for security reasons.

  • PIP Photo
  • Processing Photo
  • Rubbish Cleaner
  • Inwell Fitness
  • Horoscope Daily
  • App Lock Keep
  • Lockit Master
  • Horoscope Pi
  • App Lock Manager

During the investigation, Dr.Web analysts found an additional Trojan app that had previously made its way onto the Google Play Store. Image editing software app EditorPhotoPip had already been removed but could be downloaded through aggregator websites.

If you like to learn and find out more about various Windows errors, and how to repair them go to our vast archive or use search to find articles that will explain and help you in solving your issue.
However, if you prefer to do things fast and with automatization then we are proposing to use an automated solution for your issues. The application that we are recommending is Advanced System Repair Pro
Advanced System Repair utilizes multiple tools all in one to give you a quick, simple, reliable, and very thorough diagnosis of your PC. It brings you all the tools you need in one program to clean, fix, protect, optimize and boost your PC!
1-Click Maintenance
All the tools to make it simple and easy! It's like having a professional technician at the click of a mouse.

Junk Cleaner
Keeping your computer free from unnecessary clutter also helps make your computer last longer. Like any other machine, if you keep it clean and take care of it, it will serve you better for longer!

Optimize background apps
Optimize applications background activity with the built-in Application Optimizer feature.

Disk Defrag
With a simple 1-click, Advanced System Repair speeds up your PC by assembling fragmented files on your machine and organizing them more efficiently.

Malware Removal
Finds and removes all types of harmful malware including trojans, worms, bots, adware, spyware, PUPs, and more!

Privacy Cleaner
The all-in-one privacy suite to Clean Your Tracks & Protect Your Privacy! Make your computer safe, secure, and more efficient!

System Tweak/Optimizer
ASR will analyze your complete system and settings to adjust your PC to function at its maximum performance.

Registry Cleaner
Over time, as you install and uninstall applications, the registry can become cluttered with old entries and broken settings which can result in program crashes, and annoying messages and slow the computer down.
Visit our Advanced System Repair Pro Download page to inform yourself about all the benefits of this software and get a free trial copy of it.
advanced system repair pro

Advanced System Repair Pro

One-click automated PC repair solution
ASR logo
With Advanced System Repair Pro you can easily
Replace damaged files
Restore performance
Free disk space
Remove Malware
Protects WEB browser
Remove Viruses
Stop PC freezing
DOWNLOAD
Privacy Policy | Terms of Use | Uinstall
Advanced System Repair Pro is compatible with all versions of Microsoft Windows including Windows 11

Share this article:

You might also like

Comparing FAT32, NTFS, exFAT file system
When we get ourselves a new USB stick, new hard drive, or any storage device not including optical drives they are usually preformatted and ready to be used out of the box. However, reformating them has several benefits and while we are reformatting we can choose in which file system format we want the memory to be formatted. In this article, we will compare and explore 3 typical and standard format options you can get while formating a new media in Windows 10.

FAT32

The oldest one on the list, coming all the way from DOS days. Great for devices that need to be plugged in different operating systems and for USB flash drives. Its advantages are compatibility with all major operating systems and little memory usage comparing to other ones. However, the file system is limited to file sizes of the maximum capacity of 4GB and partitions can not exceed more than 32GB.

NTFS

First introduced in Windows NT this file system offered slower performance than FAT32 and somewhat limited usability but the main advantages were more stability and fewer errors. Its main advantages are support for files larger than 4GB and partitions larger than 32GB along with the ability for on the file encryption, main disadvantage would be limited operating system usage, NTFS can not be used on systems that work on FAT32 like MS-DOS for example or older versions of Windows. The best usage for this file system is in internal hard disk drives and system drives.

exFAT

New kid on the block, well at least from the perspective of the previous 2. exFAT offers unlimited file sizes and unlimited partition sizes but at a price that is even more limiting than NTFS. Some Linux distributions will require a driver to be installed in order to see the exFAT partition. The best use is in storage, in external hard drives. That's it, 3 major file systems, we hope that you have managed to learn something new today, and remember to drop by tomorrow for more articles about advice, tips, tricks, and troubleshooting.
Read More
FromDocToPDF Step by Step Removal Guide

FromDocToPDF Toolbar is a browser extension published by Mindspark InteractiveNetwork, that usually comes bundled with other potentially unwanted programs. The toolbar is distributed heavily through advertising networks.

This toolbar automatically sets your default search engine to MyWebSearch, it also sets your new tab to the DocToPDF welcome page. This toolbar ads startup registration tasks that allow it to start automatically with Windows, it gathers website traffic, clicks, data, and personal information and sends it to its ad network. Multiple anti-virus programs have detected FromDocToPDF as a browser hijacker and therefore is potentially unwanted and recommended for optional removal

About Browser Hijackers

Browser hijacking is actually a form of unwanted software, commonly a web browser add-on or extension, which causes modifications in the web browser’s settings. Browser hijacker malware is developed for numerous reasons. Often, hijackers will force hits to internet sites of their preference either to increase traffic producing higher advertisement earnings, or to gain a commission for every user visiting there. While it might seem naive, these tools were created by vicious individuals who always attempt to take full advantage of you, so that they could make money from your naive and distraction. Furthermore, hijackers could make the whole infected system vulnerable – other dangerous malware and viruses will seize these opportunities to get into your computer system very easily.

Key signs that your web browser has been highjacked

There are several signs that could indicate a browser hijacking: home-page is changed; you see new unwanted favorites or bookmarks added, typically directed to ad-filled or porn websites; the default online search engine is changed and your browser security settings have been cut down without your knowledge; unwanted new toolbars are added to your browser; your browser will display constant pop-up ads; your web browser starts running slowly or exhibits frequent errors; You can’t access specific sites, in particular anti-malware websites.

Precisely how browser hijacker infects PCs

A browser hijacker could be installed on your PC when you visit an infected website, click on an email attachment, or download something from a file-sharing website. Many browser hijackings originate from add-on applications, i.e., browser helper objects (BHO), toolbars, or plug-ins added to browsers to give them additional functionality. A browser hijacker could also come bundled up with some free software that you unknowingly download and install, compromising your PC security. Typical examples of browser hijackers include CoolWebSearch, Conduit, OneWebSearch, Coupon Server, RocketTab, Delta Search, Searchult.com, and Snap.do. The presence of any browser hijacker on your system might significantly diminish the browsing experience, track your online activities that lead to serious privacy concerns, degrade overall system efficiency, and lead to software instability also.

Tips on how to get rid of browser hijackers

Certain browser hijacking could be simply stopped by discovering and eliminating the corresponding malware application through your control panel. However, most hijackers will be more difficult to locate or eliminate as they might get themselves connected with some important computer files that enable it to operate as a necessary operating system process. Novice computer users should never try for the manual form of removal, as it demands comprehensive system knowledge to carry out fixes on the system registry and HOSTS file.

How One Can Get rid of a Virus that is Blocking Websites or Preventing Downloads

Malware could cause all kinds of damage if they invade your computer, starting from stealing your private details to deleting data files on your computer. Some malware sits in between your computer and the internet connection and blocks a few or all websites that you would like to check out. It might also prevent you from installing anything on your PC, particularly anti-malware software. If you are reading this now, you may have perhaps recognized that virus infection is the reason behind your blocked net traffic. So what to do if you want to download and install anti-malware software like Safebytes? Although this kind of issue will be harder to circumvent, there are some actions you can take.

Download the antivirus in Safe Mode with Networking

If the malware is set to load at Windows startup, then booting in Safe Mode should prevent it. Since just the minimum programs and services start-up in “Safe Mode”, there are seldom any reasons for conflicts to take place. You will have to do the following to get rid of malware in Safe mode. 1) At power on/start-up, tap the F8 key in 1-second intervals. This should bring up the Advanced Boot Options menu. 2) Select Safe Mode with Networking using arrow keys and press Enter. 3) When you are into this mode, you should have access to the internet once again. Now, make use of your web browser normally and go to https://safebytes.com/products/anti-malware/ to download Safebytes Anti-Malware. 4) After the application is installed, allow the scan run to eliminate trojans and other threats automatically.

Switch to some other internet browser

Some malware only targets particular web browsers. If this is your situation, employ another internet browser as it might circumvent the malware. If you’re not able to download the antivirus software using Internet Explorer, this means the virus is targeting IE’s vulnerabilities. Here, you need to switch over to another web browser such as Chrome or Firefox to download Safebytes software.

Create a portable USB antivirus for removing viruses

Another solution is to create a portable anti-malware program on your USB stick. To run anti-malware using a flash drive, follow these simple steps: 1) Download Safebytes Anti-Malware or MS Windows Defender Offline onto a clean computer system. 2) Plug the USB drive into the uninfected computer. 3) Double-click on the downloaded file to open the installation wizard. 4) Choose a USB drive as the place when the wizard asks you exactly where you intend to install the application. Follow the instructions on the screen to finish off the installation process. 5) Transfer the flash drive from the uninfected computer to the infected computer. 6) Double click the Safebytes Anti-malware icon on the thumb drive to run the program. 7) Click on “Scan Now” to run a scan on the infected computer for viruses.

Ensure the Safety of Your PC by Installing SafeBytes Anti-Malware Software

If you are planning to purchase anti-malware for your laptop or computer, there are lots of brands and packages for you to consider. A few of them do a good job in getting rid of threats while some will harm your PC themselves. You should look for a product that has obtained a good reputation and detects not just computer viruses but other kinds of malware as well. One of the recommended software programs is SafeBytes Anti-Malware. SafeBytes carries a superb track record of top-quality service, and customers are very happy with it. SafeBytes is a powerful, real-time anti-malware application that is designed to assist the everyday computer end user in safeguarding their computer from malicious internet threats. With its cutting-edge technology, this software will let you remove multiples types of malware including viruses, trojans, PUPs, worms, ransomware, adware, and browser hijackers. SafeBytes anti-malware comes with a plethora of enhanced features that sets it apart from all others. Let’s take a look at a few of them below: Live Protection: SafeBytes gives real-time active supervision and protection from all known viruses and malware. It’ll constantly monitor your laptop or computer for hacker activity and also provides users with superior firewall protection. World-class AntiMalware Protection: Built upon a greatly acclaimed antivirus engine, this malware removal application can find and remove many obstinate malware threats like browser hijackers, PUPs, and ransomware that other common antivirus applications will miss. Quick Multithreaded Scanning: SafeBytes’s very fast malware scanning engine reduces scan times and extends battery life. At the same time, it’ll effectively identify and eliminate infected computer files or any online threat. Web Protection: Safebytes allots all sites a unique safety ranking that helps you to get an idea of whether the website you’re about to visit is safe to view or known to be a phishing site. Lightweight: SafeBytes is a lightweight and easy-of-use antivirus and antimalware solution. As it utilizes very low computer resources, this application leaves the computer power exactly where it belongs to: with you. 24/7 Live Expert Support: You can get 24/7 technical support to immediately resolve any issue with your security software.

Technical Details and Manual Removal (Advanced Users)

If you wish to manually remove FromDocToPDF without the use of an automated tool, it may be possible to do so by removing the program from the Windows Add/Remove Programs menu, or in cases of browser extensions, going to the browsers AddOn/Extension manager and removing it. You will likely also want to reset your browser. To ensure the complete removal, manually check your hard drive and registry for all of the following and remove or reset the values accordingly. Please note that this is for advanced users only and may be difficult, with incorrect file removal causing additional PC errors. In addition, some malware is capable of replicating or preventing deletion. Doing this in Safe Mode is advised.

The following files, folders, and registry entries are created or modified by FromDocToPDF

Files: C:Users%USERAppDataLocalGoogleChromeUser DataDefaultLocal Storagehttp_fromdoctopdf.dl.tb.ask.com_0.localstorage C:Users%USERAppDataLocalGoogleChromeUser DataDefaultLocal Storagehttp_fromdoctopdf.dl.tb.ask.com_0.localstorage-journal C:Users%USERAppDataLocalGoogleChromeUser DataDefaultLocal Storagehttp_fromdoctopdf.dl.myway.com_0.localstorage C:Users%USERAppDataLocalGoogleChromeUser DataDefaultLocal Storagehttp_fromdoctopdf.dl.myway.com_0.localstorage-journal Registry: HKEY_CURRENT_USERSoftwareFromDocToPDF..Uninstaller HolidayPhotoEditTooltab Uninstall Internet Explorer
Read More
Fix DISM Error: The scratch directory size ...
One of the most useful and powerful built-in utility in Windows 10 is the DISM tool. This tool can be used with the Command Prompt command line as well as for other purposes. However, it is not without flaws and there are times when you may encounter some issues while using it. One of the problems you can get while using the DISM tool is the following error:
“The scratch directory size might be insufficient to perform this operation”
This kind of error in DISM occurs when the DISM command is executed from the Windows Recovery Environment due to the limited size permissions of a delivery where the operating is being performed. To fix this DISM error, you need to follow the instructions laid out below. Step 1: First, tap the Win + R keys to open the Run utility and then type “cmd” in the field and tap Enter to open Command Prompt. Step 2: Next, you have to specify a scratch directory that contains the Windows folder and to do that, you can either use the DIR command or the BCEDIT command. So in the elevated command prompt type and enter “dir” or “bcedit”. Step 3: After that, you will see a list of folders inside the C: partition. Now you have to create a folder named “scratch” inside the partition. To do so, execute the following command:
mkdir C:Scratch
Note: The command you just entered will create a directory inside the root of the C: partition named Scratch. Step 4: Now that you’ve created the Scratch folder, note that each time you run any of the DISM commands, you have to enter the following code snippet in them:
/ScratchDir:C:Scratch
 Note: For instance, if you are using the DISM tool to repair the offline Windows image, instead of executing the “Dism /Online /Cleanup-Image /RestoreHealth” command, you now have to execute the “DISM /Image:C: /ScratchDir:C: Scratch /Cleanup-Image /Restorehealth” command. And if you want to remove a selected installed update package, you can use the “DISM /image:C: /ScratchDir:C:Scratch /Remove-Package /PackageName:Package_for_RollupFix~31bf3856ad364e75~amd64~~16299.196.4.9” command. Keep in mind that the mentioned package is only an example. And lastly, you also have to replace the drive letter in the new code snippet when you execute the commands given above.
Read More
A Guide to Quick Fixing the Error Mscomctl.ocx
[vc_row][vc_column][vc_column_text]

Repair Error Mscomctl.ocx

What is Mscomctl.ocx?

Mscomctl.ocx is a Microsoft library Windows Common Controls file. The Mscomctl.ocx error occurs when this file is either lost or gets corrupt. The error is displayed on the screen when the user tries to run a program that is dependent on this file. It appears as:

“Component 'MSCOMCTL.OCX' or one of its dependencies not correctly registered: a file is missing or invalid”

Solution

Download Available to Completely Repair the Error Mscomctl.ocx

Restoro box imageError Causes

Installing and then uninstalling a large number of applications on the Windows operating system often corrupts or unregisters the Mscomctl.ocx library. This message will continue to appear on the screen until you re-register the library file again on your system.

Further Information and Manual Repair

You don’t need to have the sound technical knowledge or call a professional to resolve Mscomctl.ocx error on your PC. The Mscomctl.ocx error is easy to repair and can be fixed in a couple of minutes. Here are 2 solutions to repair the Mscomctl ocx error code on your system:

Cause: Error occurs because the Mscomctl ocx file is unregistered

Solution:

  1. Go to the start menu and type ‘Mscomctl.oxc and press enter
  2. Copy the ‘Mscomctl.ocx’ file and paste it in "C:WindowsSystem32" folder
  3. Now click the start menu again and type ‘CMD’ in the search box. This will open your computer's command prompt.
  4. Once this opens, type either of the following commands and then press enter. If you have a 64-bit operating system, then type: Regsvr32 "C:WindowsSysWOW64MSCOMCTL.OCX” and if you have 32-bit operating system, then you should type ‘Regsvr32 "C:WindowsSystem32MSCOMCTL.OCX"
By doing this, you will be able to register the Mscomctl.ocx file on your PC and then you will no longer receive Mscomctl.ocx error code.

Cause: Error code occurs because the Mscomctl.ocx file is missing

Solution:

  1. First search for MScomctl ocx on your local drive to see if it is missing.
  2. If the file is missing, then download the MScomctl.exe file from a reliable website.
  3. Now extract the file to your C:WINDOWSsystem32 directory
  4. Then click start and run.
  5. Now type ‘REGSVR32 MSCOMCTL.OCX’ and press enter
Please note to implement any of the two solutions stated above, you will need administrator rights. If you have the administrator rights then only can you make the above registry changes. Therefore to make the following changes you will have to access the PC using the Administrator account. Simply follow the instructions given above to repair this error code problem right away![/vc_column_text][/vc_column][/vc_row]
Read More
Creating a new Windows 10 user account
When we purchase a computer, usually it is meant to be used by one person. Sometimes we would like to share our computer with other people, with friends and family members but we would also like to keep some privacy for ourselves in the process. Lucky for us Windows 10 will let us create multiple user accounts which then can be used by other persons with their own settings, documents, etc. The only requirement is to already have one user account which is automatically created when Windows is installed. This guide will lead you step by step in the creation of a new user account within Windows 10, so grab your favorite drink, and let's begin.

Creating new account

First thing is to click on the windows icon on the bottom left and open start menu, from start menu click once on settings. Windows 10 Star menu with marked settings iconWhen the settings window opens, choose ACCOUNTS on it. Windows settings accounts section selectedWindows will then go to the accounts settings page. Within that page, click on the Family & other users to open the setting for the chosen section on right. On the right settings, screen navigate to the lower section and click once with the left button on add someone else to this PC When add someone else to this PC is clicked, pop up window will appear which will ask you to provide the persons email address and later on the password of his/her Microsoft account, after the required information is provided you are done, a new user has been added and he can use his Microsoft credentials on the login screen to use this computer.

Setting up a user without Microsoft ID

However, if you do not wish to add a new user via his Microsoft login credentials or the person does not have them, on the pop-up window click on I don't have this person's sign-in information. User account no informationThis will open yet another pop-up giving you the option to create a Microsoft account for this person, to use a phone number instead of a Microsoft account, or to create a new email address for the user. Any of these options will create a new user for this computer with provided credentials but there is the last option at bottom of the pop-up which will allow you to create a local user only without a Microsoft account. This user will be able to use this computer, will not be able to transfer his document through various devices like he/she would if using a valid Microsoft account but it could use the computer and personalize it fully to his/her liking. user account new account without ms idOnce the link is clicked, you will be presented with a floating window requiring you to input needed information in order for the account to be created. You will need to provide username, password, and answers to 3 security questions. user account create an accountOnce all information has been provided, click on next and your new non-Microsoft local user has been created. Now when you click on Family & other users you will see that Windows has added a new user with the provided name to this computer. If you wish, you can add another user in the same manner, following the previous steps. Microsoft Windows does not have a limit for how many users can be on one computer so feel free to create as many as you like.

User account options

Now, clicking on the existing created user will open user options. From there you will have options to remove the user, therefore removing him/her from this computer, note that removing the local user will remove permanently his/her settings and they would not be able to be restored, or you can change the user account type. User account new accountClick on Change account type. User account account typeUnder account type, you will have the option to promote this user to an administrator if you wish or you can leave it as a standard user.
Read More
Windows 10 Power Toys detailed guide
Hello and welcome everyone, today we will be talking about power toys, a great, completely free, open-source, Microsoft-supported Windows project which aims to provide Windows itself with powerful features not found natively in it. We will explore power toys completely here and explain each module and its features. The first thing is of course to download power toys themselves. You can find them here. After you download them, double click on the downloaded file and install. Start power toys, you will find them at the bottom of the taskbar, note that power toys need to be active in order to use their features. power toys
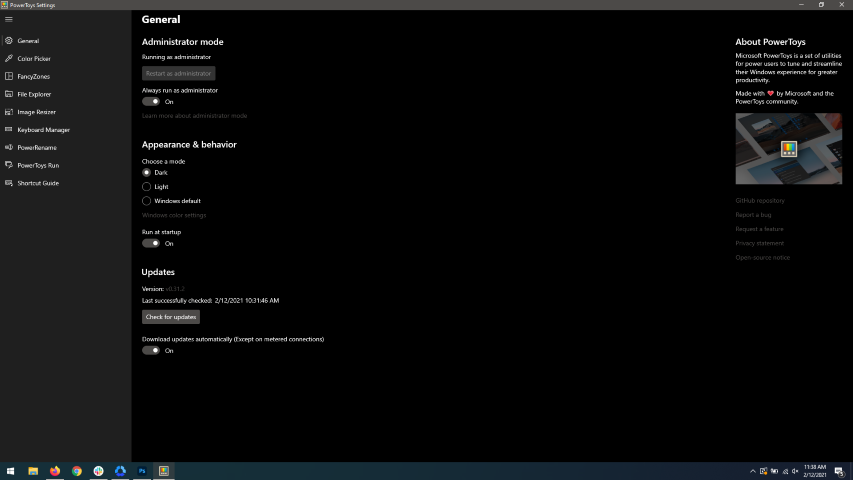
When opened you will be greeted with general settings window. These are settings for power toys themselves, Here you can check for updates, change the looks of power toys, run it on system startup and run them as administrator. Set them up so they best suit your needs.

Color Picker

Moving down next tab we have is Color picker. power toys colorpicker hex editor
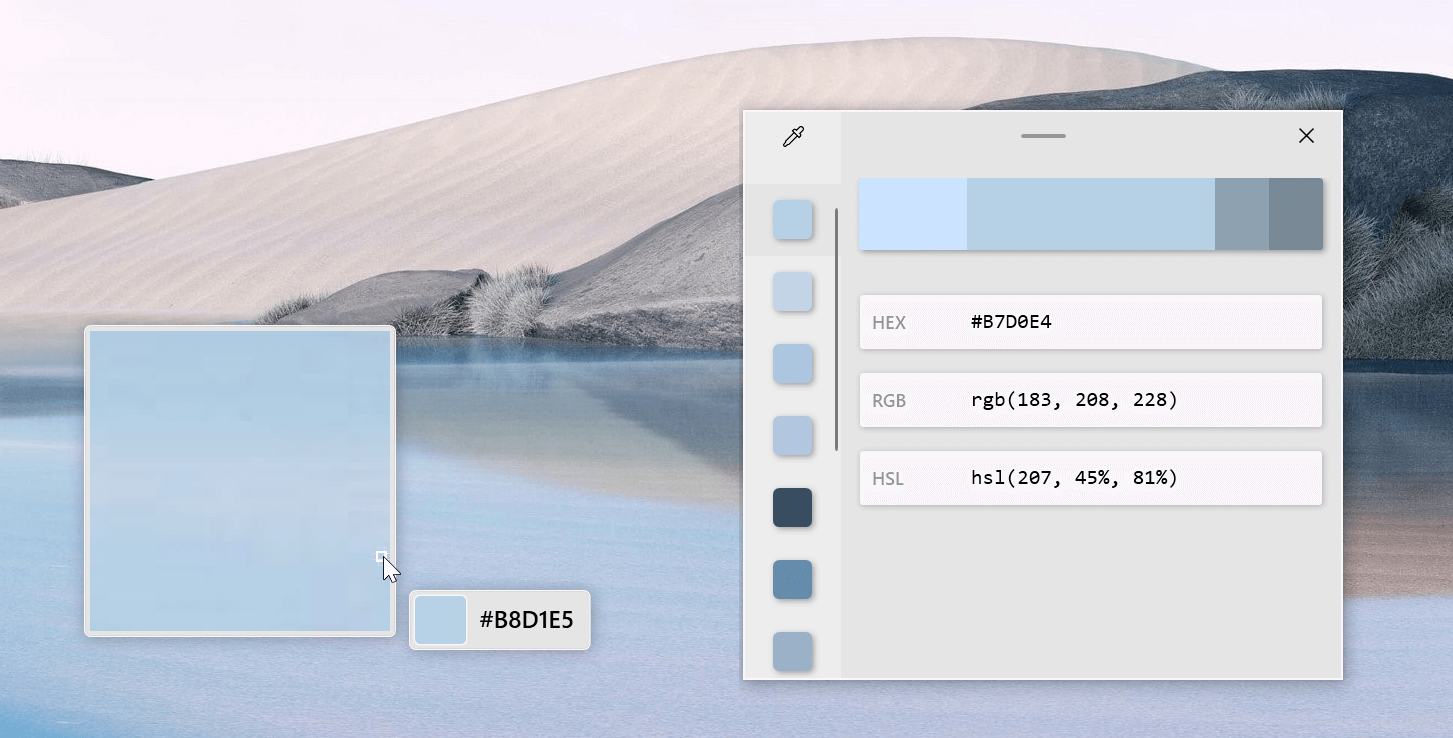
The color picker will let you as the name suggests pick colors, it will sample colors from running applications and windows, snap their values, and place them in the clipboard. A useful application if you are working as a graphic designer, want to create some cool word document, or just want to compare the difference between colors. After the Color Picker is activated, hover your mouse cursor over the color you would like to copy and left-click the mouse button to select a color. If you want to see the area around your cursor in more detail, scroll up to zoom in. The copied color will be stored in your clipboard in the format that is configured in the settings (HEX by default). The editor lets you see the history of picked colors (up to 20) and copy their representation in any predefined string format. You can configure what color formats are visible in the editor, along with the order that they appear. This configuration can be found in PowerToys settings. The editor also allows you to fine-tune any picked color or get a new similar color. Editor previews different shades of currently selected color - 2 lighter and 2 darker ones. Clicking on any of those alternative color shades will add the selection to the history of picked colors (appears on the top of the colors history list). Color in the middle represents your currently selected color from the history of the colors. By clicking on it, the fine-tuning configuration control will appear, which will let you change the HUE or RGB values of the current color. Pressing OK will add newly configured color into the history of the colors.

Fancy Zones

Moving down, we have fancy zones. power toys fancy zonesFancyZones is a window manager utility for arranging and snapping windows into efficient layouts to improve the speed of your workflow and restore layouts quickly. FancyZones allows the user to define a set of window locations for a desktop that are drag targets for windows. When the user drags a window into a zone, the window is resized and repositioned to fill that zone. When first launched, the zones editor presents a list of layouts that can be adjusted by how many windows are on the monitor. Choosing a layout shows a preview of that layout on the monitor. The selected layout is applied automatically.

File Explorer

Next, File Explorer. power toys settings file explorer
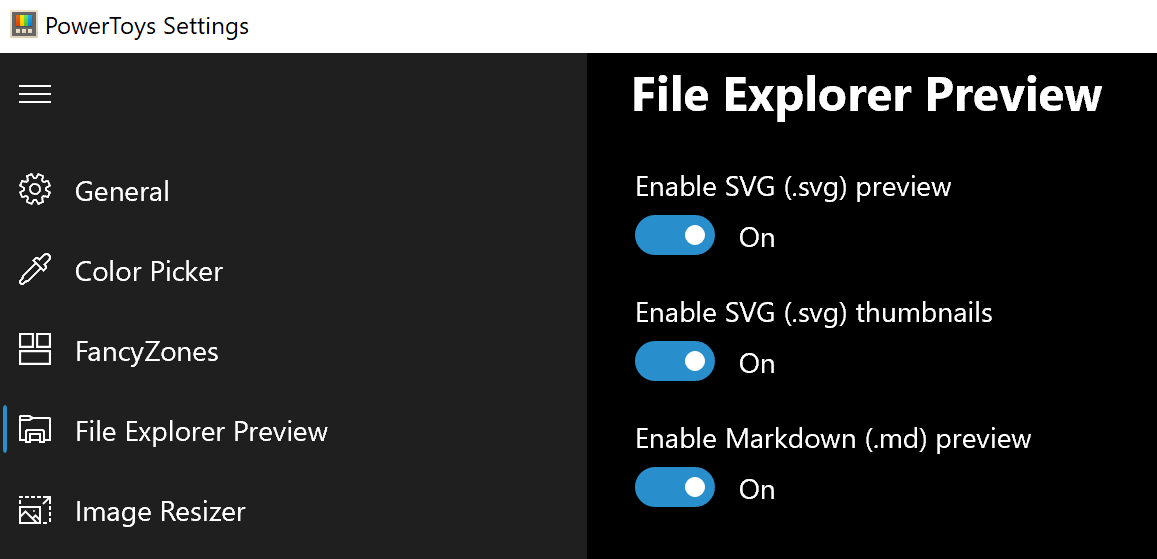
Only 3 options here but maybe some are important to you. This extension lets you enable SVG file preview in File Explorer, enable Markdown preview, and enable SVG thumbnails. Turn on each one you might need.

Image Resize

Next down the line, we have Image resize. power toys image resize
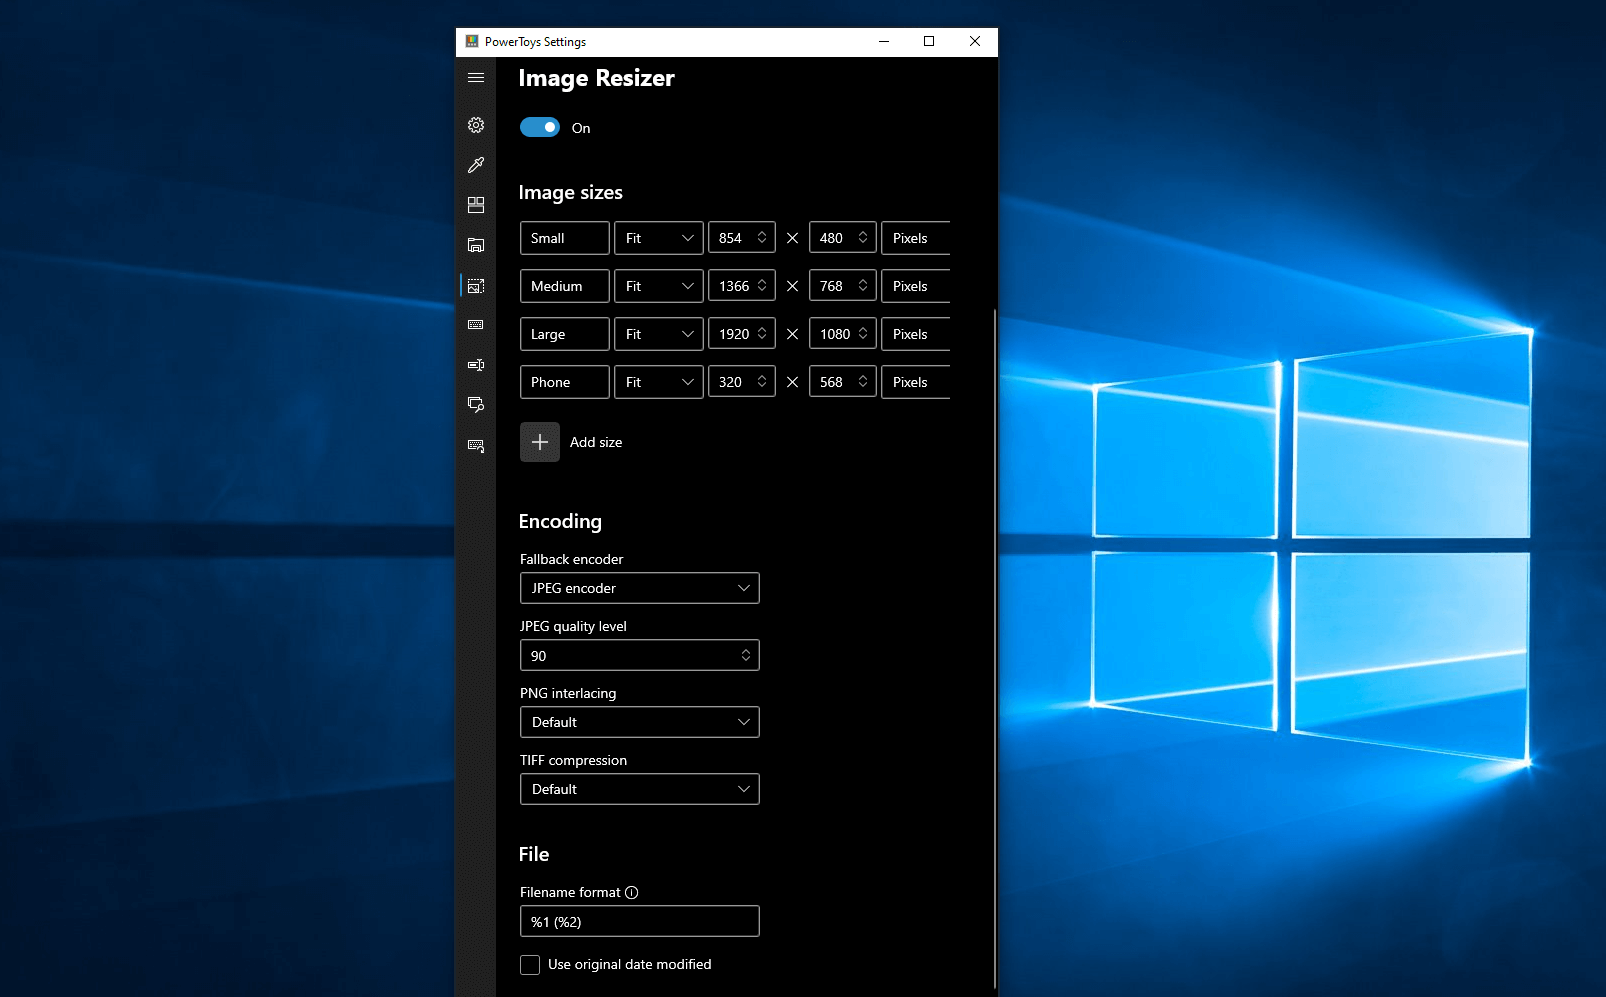
Image Resizer is a Windows shell extension for bulk image-resizing. After installing PowerToys, right-click on one or more selected image files in File Explorer, and then select Resize pictures from the menu. You can specify your own sizes if you want, you can resize when dragging files, you can overwrite files or make new copies of new sizes, and many more options. A very useful tool I am sure plenty of users can use since this eliminates the need for pictures or any other image application for common resizing tasks.

Keyboard Manager

The keyboard manager is the next tab in power toys. power toys keyboard shortcuts
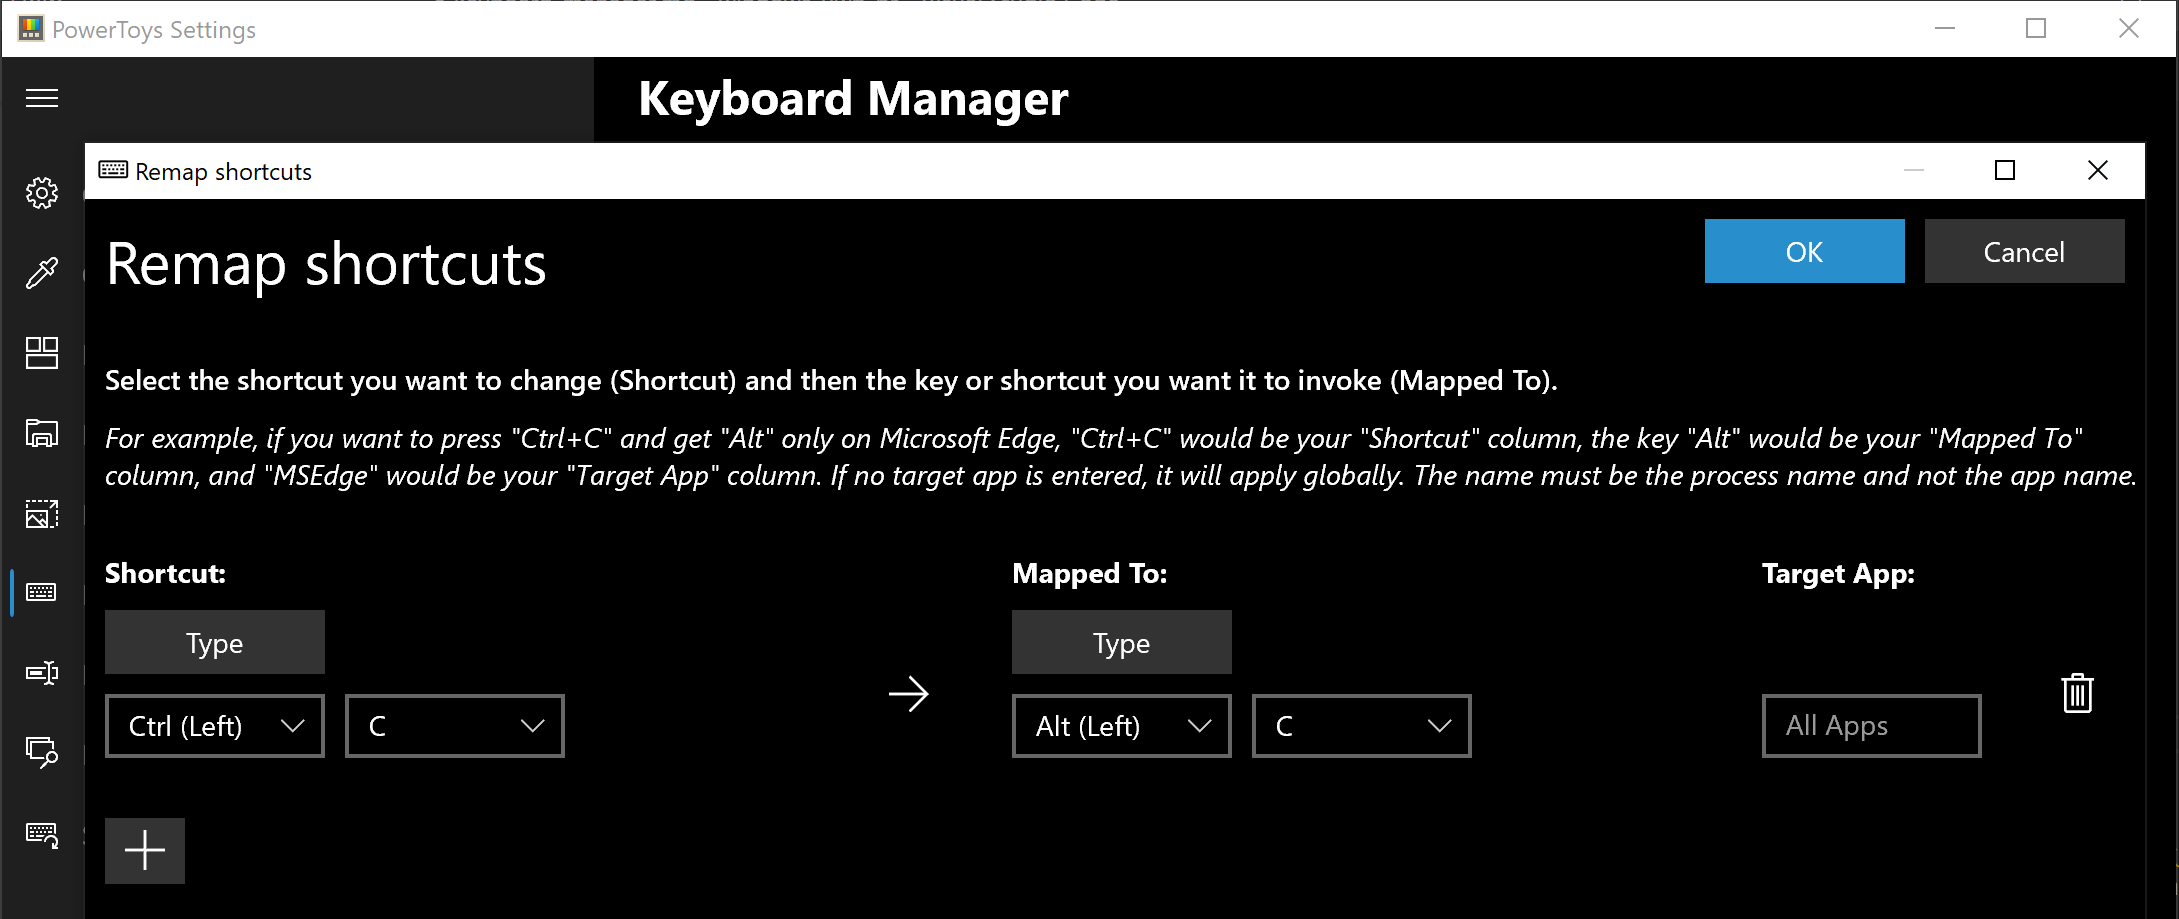
The PowerToys Keyboard Manager enables you to redefine keys on your keyboard. For example, you can exchange the letter A for the letter D on your keyboard. When you select the A key, a D will display. You can also exchange shortcut key combinations. For example, the shortcut key, Ctrl+C, will copy the text in Microsoft Word. With the PowerToys Keyboard Manager utility, you can exchange that shortcut for ⊞ Win+C). Now, ⊞ Win+C) will copy text. If you do not specify a targeted application in PowerToys Keyboard Manager, the shortcut exchange will be applied globally across Windows. PowerToys Keyboard Manager must be enabled (with PowerToys running in the background) for remapped keys and shortcuts to be applied. If PowerToys is not running, key remapping will no longer be applied.

Power Rename

Nex we have a very cool and powerful Power Rename power toys power rename
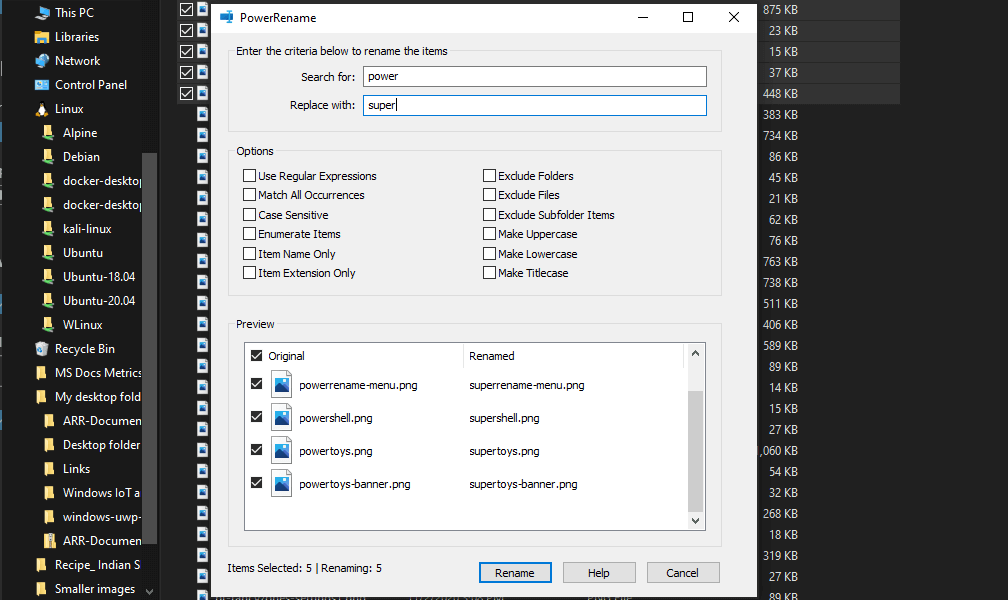
PowerRename is a bulk renaming tool that enables you to:
  • Modify the file names of a large number of files (without renaming all of the files with the same name).
  • Perform a search and replace on a targeted section of file names.
  • Perform a regular expression rename on multiple files.
  • Check expected rename results in a preview window before finalizing a bulk rename.
  • Undo a rename operation after it is completed.

Run Utility

Power Toys Run utility follows next. power toys run warning
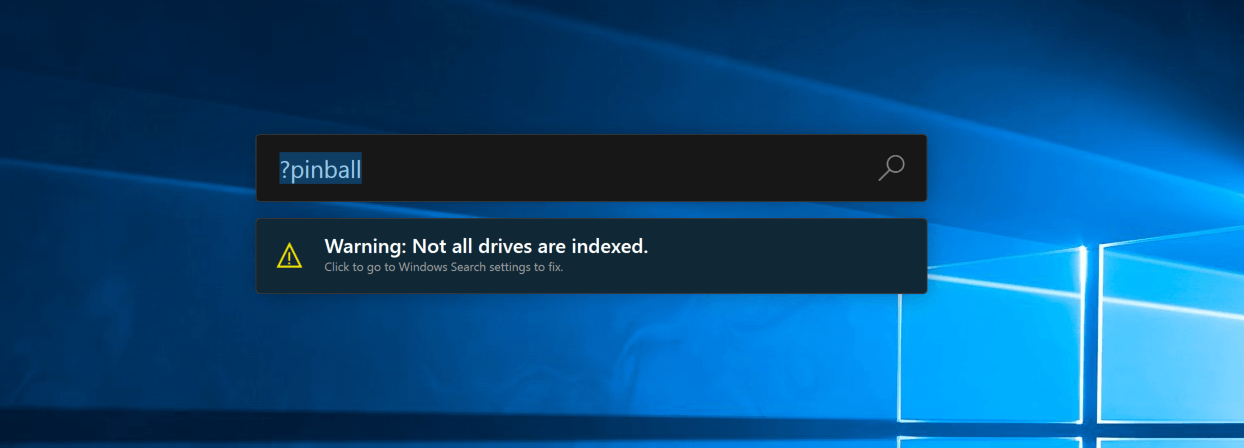
PowerToys Run is a quick launcher for power users that contains some additional features without sacrificing performance. PowerToys Run features include:
  • Search for applications, folders, or files
  • Search for running processes (previously known as WindowWalker)
  • Clickable buttons with keyboard shortcuts (such as Open as the administrator or Open containing folder)
  • Invoke Shell Plugin using > (for example, > Shell:startup will open the Windows startup folder)
  • Do a simple calculation using the calculator

Shortcut Guide

Last but not least we have a Shortcut guide. power toys shortcut guide large
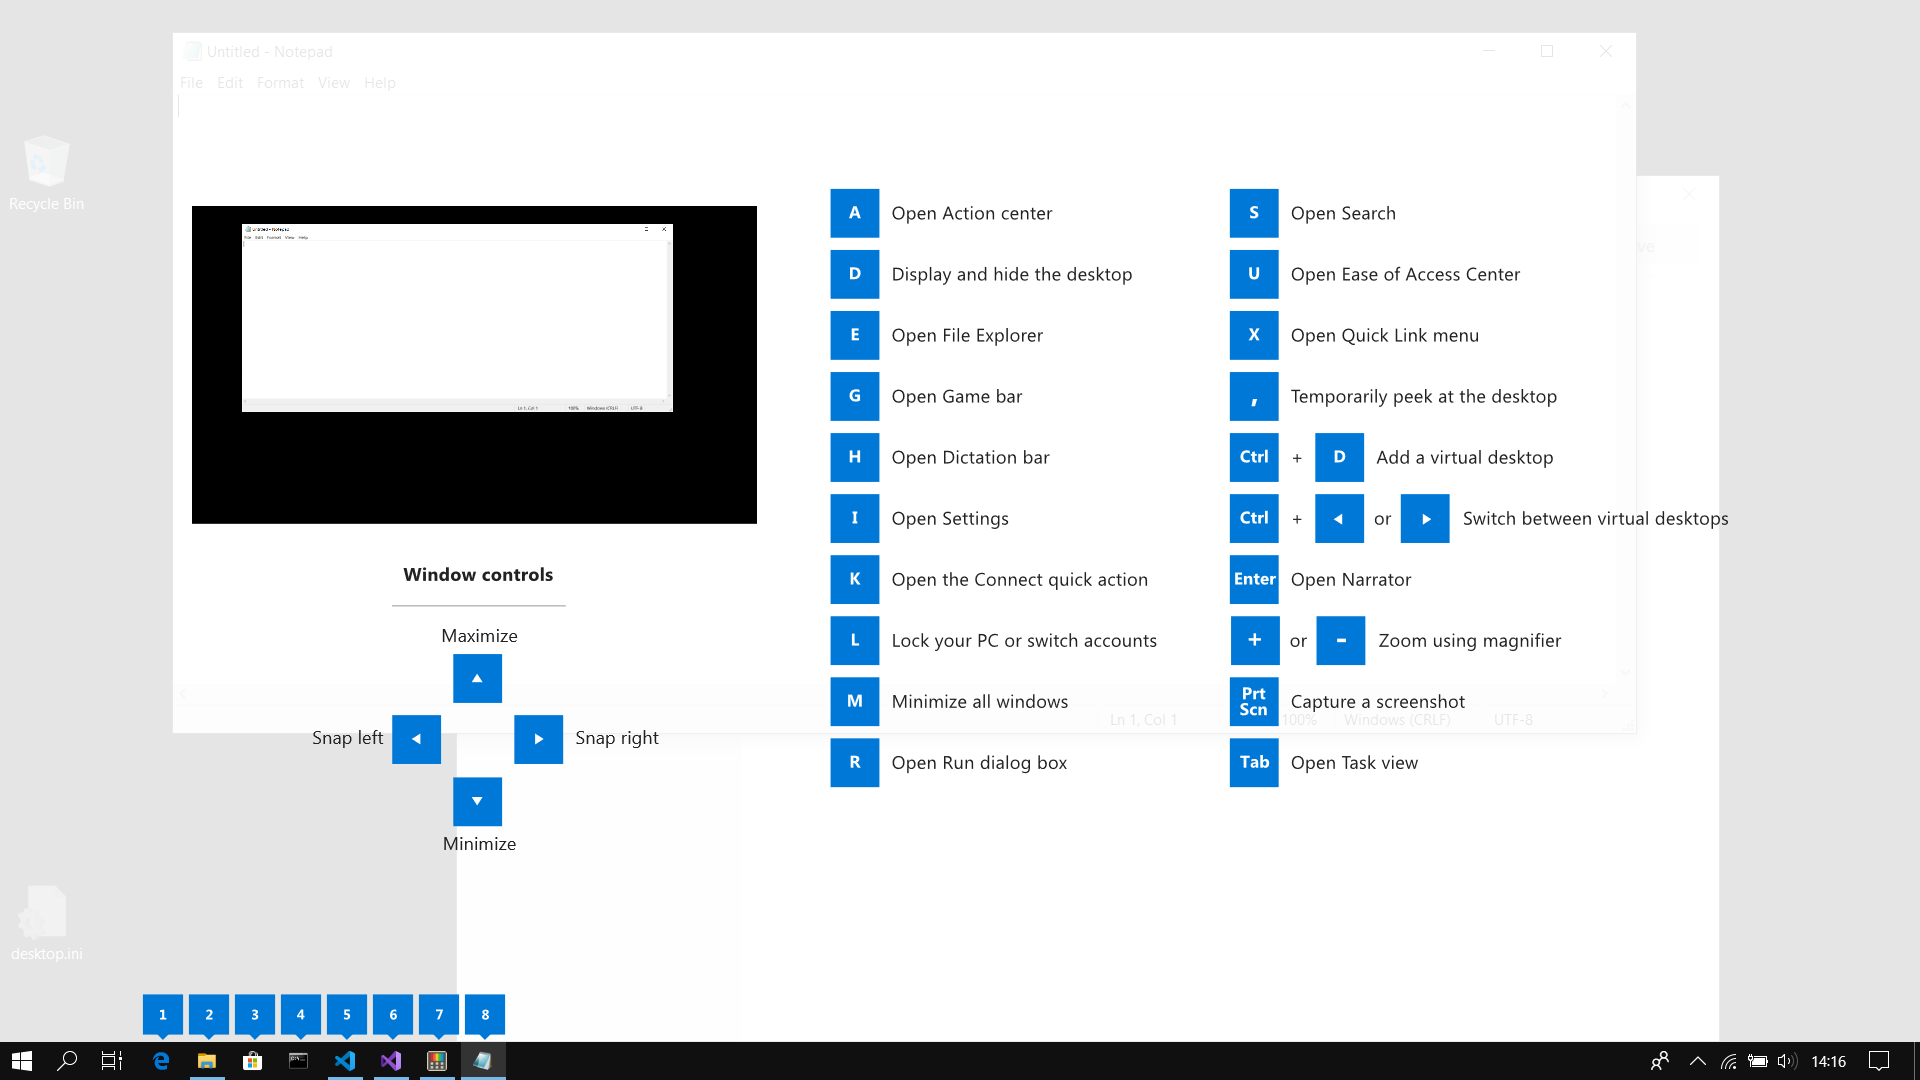
This guide uses PowerToys to display common keyboard shortcuts that use the Windows ⊞ key. Windows key keyboard shortcuts can be used while the guide is being shown and the result of those shortcuts (active window moved, arrow shortcut behavior changes, etc) will be displayed in the guide. Releasing the Windows ⊞ key will make the overlay disappear. Tapping the Windows ⊞ key will display the Windows Start menu. Hey, you made it till the end, thank you for reading and I hope to see you soon.
Read More
How to Manually Fix 0x8004210A Error Code on Your System

Repair 0x8004210A Error Code

Error 0x8004210A - What is it?

0x8004210A is a typical POP3 email error message. This error may sometimes occur when you try to check your Post Office Protocol 3 (POP3) email account. 0x8004210A error code hampers your ability to both send and receive e-mails on your Outlook account. Error 0x8004210A is displayed in any one of the following formats on your PC:
The operation timed out waiting for a response from the receiving (POP) server 0x8004210a Task 'SMTP server name - Sending and Receiving reported error' (0x8004210A): 'The operation timed out waiting for a response from the receiving (POP) server. If you continue to receive this message, contact your server administrator or Internet service provider (ISP).'

Error Causes

Error 0x8004210A occurs due to several reasons. However, some of the most common reasons include:
  • Wrong port number for the POP incoming server
  • Your connection to the mail server is too slow
  • Incoming and outgoing emails are being scanned and stopped by an antivirus installed on your system
  • The Outlook send and receive job is being blocked by Firewall
  • You are sending and receiving large series of emails or large email attachments
  • Registry issues
No matter what the cause of this error is, to resume email communication via Outlook and to ensure your work productivity is not affected, it is recommended that you resolve this 0x8004210A error code on your PC immediately.

Further Information and Manual Repair

To fix error 0x8004210A, here are some of the most efficient and easy manual methods that you can try:

Method 1

If the cause of the error is related to the internet connection then here’s what you need to do. Try freeing up your internet connection by closing any other online activities in progress or downloads being carried on your system.

Method 2

Try to increase your server time-out periods. To do this, go to the Outlook File menu and choose account settings. Now double click on your email account and more settings. Now click advanced and increase your server timeout period to resolve.

Method 3

If you are trying to send or receive large and heavy emails on your Outlook account, the error 0x8004210A may pop up. This happens because when transferring heavy files the email account automatically locks until the task is complete, however, if it takes more time the next Send and Receive job starts while the first one is still not complete. In such an event, the email server then times out and shows you the error. Therefore to resolve, you will have to show patience. Simply wait for the large email to be sent or received before you start sending another email.

Method 4

If the antivirus installed on your system is the reason for the error pop up, then disable it for a while until the operation is complete. Then enable it once the task is performed successfully.

Method 5

Similarly, if the Firewall installed on your system is preventing Outlook from reaching your mail server, then simply disable the Firewall to resolve. Congratulations, you have just fixed 0x8004210A Error Code in Windows 10 all by yourself. If you would like to read more helpful articles and tips about various software and hardware visit errortools.com daily. Now that’s how you fix 0x8004210A Error Code in Windows 10 on a computer. On the other hand, if your computer is going through some system-related issues that have to get fixed, there is a one-click solution known as Restoro you could check out to resolve them. This program is a useful tool that could repair corrupted registries and optimize your PC’s overall performance. Aside from that, it also cleans out your computer for any junk or corrupted files that help you eliminate any unwanted files from your system. This is basically a solution that’s within your grasp with just a click. It’s easy to use as it is user-friendly. For a complete set of instructions in downloading and using it, refer to the steps below Perform a full system scan using Restoro. To do so, follow the instructions below.
      1. Download and install Restoro from the official site.
      2. Once the installation process is completed, run Restoro to perform a full system scan restoro application screen
      3. After the scan is completed click the “Start Repair” button. restoro application screen
Read More
Setting default applications in Windows 11
Setting default applications in Windows 11
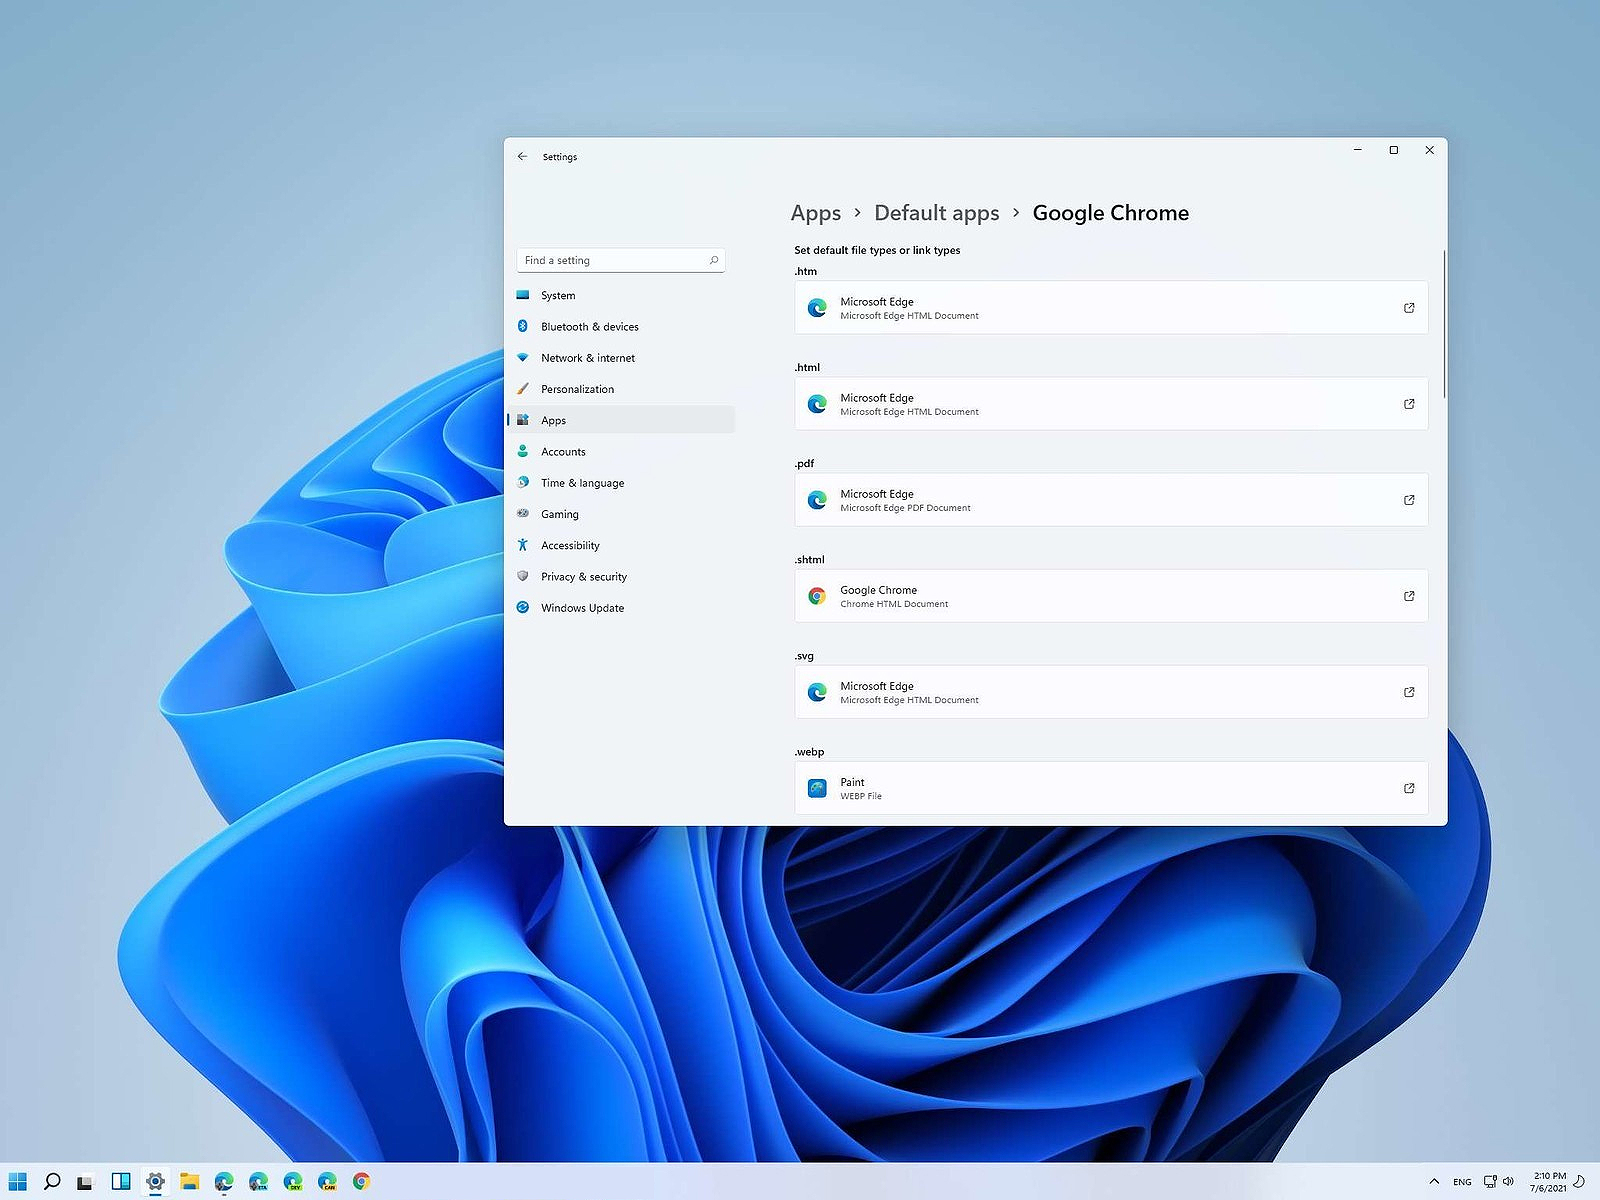
Same as in previous Windows versions, Windows 11 will also use certain applications as default ones for opening certain file types and file extensions. And yes, same as in previous versions it will come preconfigured for certain file types and associated applications like for example photos for pictures. Of course, users usually have their own favorite applications for certain file types and much more prefer to open them inside the application of their choice instead of the default one. We can change the default application like in previous Windows versions but this time there are two ways and overall more control of this process. Windows 11 has settings for choosing default file type applications and default file extension applications giving you more control of this process.

The opening setting for apps

Whatever you wish to change default application or default extension application you will need to open settings for default application. Follow steps to quickly go into it.
  1. Press ⊞ WINDOWS + I to open settings
  2. Select Apps on left
  3. On the right part select Default Apps
Now you are in settings for choosing default applications

Choosing default application by file type extension

This is considering by Microsoft as a typical way to set default applications inside Windows 11. Once you are inside the settings app there is a box labeled Enter a file type or link type. Inside the search box, type in file extension that you wish to associate the application with like .JPG, .TXT, or other. If the file extension is not associated with any application you will be presented with a Choose a Default button, if however, the file extension is already associated with the app, you will need to click on the app box itself. In any case, a pop-up will appear and ask How do you want to open YOUR FILE EXTENSION files from now on? Choose Application from the list of presented ones and click on OK.

Choosing default file type

Another method is to select the default application by file type selecting application for it. In the settings screen, under the search box, you will have a list of installed applications. Choose the application that you would like to associate a file type with and click on it. On the next details screen scroll down and select the file type that you want to associate with the selected application and click on OK.

Other/third method

There is also the third method for choosing the default application for file type but it includes some surfing on your hard drive and it can be more time-consuming for first-time settings. But it is fairly quick when you need to only use it once on some new file type (for example you have a new application installed and want to switch just one file type extension to that application). Locate the file that you want to associate with the application and right-click on it. Select Open With from the menu and then Choose Another App. Pop up will appear, select the application that you would like to use, and check the box beside Always use this app to open CHOOSEN EXTENSION files followed by clicking on the OK button.
Read More
Fix HAL INITIALIZATION FAILED Error 0x0000005C
When your computer boots up or when it just woke up from sleep but it suddenly encounters a Blue Screen of Death error, saying, “HAL INITIALIZATION FAILED error with STOP CODE 0x0000005C”, then read on as this post will give you some fixes that might help in resolving the problem. You will see the following error message on your computer’s screen when this error pops up:
“Your PC ran into a problem and needs to restart. We’re just collecting some error info, and then we’ll restart for you. If you’d like to know more, you can search online later for this error: HAL_INITIALIZATION_FAILED HAL INITIALIZATION FAILED 0x0000005C”
This kind of Blue Screen error indicates that there is a hardware or device driver problem in your PC. Aside from that, it also signifies that the initialization of the Hardware Abstraction Layer or HAL has failed. This happens only during the relatively short period that the Windows operating system is being initialized, specifically during phase 4 of Windows startup. What’s worse about this kind of Stop error is that it does not just go away after a computer reboot. You may have to boot your computer into Safe mode with Networking using the Advanced startup options which you can access by tapping the F2 or F8 key. Once you’ve accessed the Advanced startup options, follow the fixes prepared below.

Option 1 – Run CHKDSK command to repair hard disk errors

Running the Chkdsk utility could help you resolve the HAL INITIALIZATION FAILED error with STOP CODE 0x0000005C. If your hard drive has issues with integrity, the update will really fail as the system will think that it’s not healthy and that’s where the Chkdsk utility comes in. The Chkdsk utility repairs hard drive errors that might be causing the problem.
  • After you access the Advanced Startup options, select Command Prompt by using the arrow keys on your keyboard.
  • After opening Command Prompt, execute the following command and hit Enter:
chkdsk /f /r
  • The command you entered will scan the hard disk for any errors and will automatically fix it if it finds some issues. Wait for the process to be completed and then restart your computer.

Option 2 – Run the DISM tool

If the first option didn’t work, then running the Deployment Imaging and Servicing Management tool can help you resolve the HAL INITIALIZATION FAILED error as it will repair the Windows System Image as well as the Windows Component Store in Windows 10.
  • After you access the Advanced Startup options, select Command Prompt by using the arrow keys on your keyboard.
  • Next, type in this command: DISM /Online /Cleanup-Image /RestoreHealth
  • Do not close the window if the process takes a while as it will probably take a few minutes to finish.

Option 3 – Update the Device drivers

  • Tap the Win + R keys to launch Run.
  • Type in msc into the box and tap Enter or click OK to open the Device Manager.
  • After that, a list of device drivers will be displayed. Look for the device driver you and then select either “Update driver” or “Uninstall device”. And if you find any “Unknown device”, you need to update it as well.
  • Select the “Search automatically for updated driver software” option and then follow the instructions to complete the process.
  • If you have chosen to uninstall the driver, follow the screen options to complete the process and then restart your PC.
  • Connect the device and Scan for hardware changes – you can see this option under Device Manager > Action.

Option 4 – Try removing any external hardware

You might also want to remove any connected devices and external hardware in your computer as it might help in fixing the BSOD error.

Option 5 – Disable Fast Start-up

If you want your computer to boot faster, then you might have enabled Fast Start-up. This feature is ideal for computers that are using a hard disk drive. However, turning on this feature also means that when the computer boots, it might lag some drivers that are loaded when it initially boots up. Thus, it might be the potential cause of the UNEXPECTED STORE EXCEPTION BSOD error. Thus, you need to disable Fast Start-up. To do that, follow these steps:
  • Boot your PC into Safe Mode.
  • Then tap the Win + R keys to open the Run dialog box.
  • Next, type in “control” to open Control Panel.
  • After that, select Hardware and Sound and click on Power Options.
  • Select “Choose what the power buttons do” from the left side menu pane and click on Change settings that are currently unavailable.
  • Afterward, uncheck the “Turn on fast startup (Recommended)” entry and click on Save Changes.
  • Now restart your PC for the changes to take effect and then check if the problem’s fixed afterward.

Option 6 – Disable your antivirus program

There are times when the antivirus program installed in your computer blocks file access and even disk access. Thus, disabling the antivirus program or any security software installed in your computer is always a good idea you can try when the Windows Update process does not go smoothly. So before you try updating your computer again, make sure to disable the antivirus or security program and once the Windows Update is done, don’t forget to enable the antivirus program back again.

Option 7 – Perform a Clean Boot

There are some instances that some conflicting programs installed in your computer might be the one that’s causing the HAL INITIALIZATION FAILED error. To identify which program is causing the problem, you need to put your computer in a Clean Boot State. To do so, follow the steps below.
  • Log onto your PC as an administrator.
  • Type in MSConfig in the Start Search to open the System Configuration utility.
  • From there, go to the General tab and click “Selective startup”.
  • Clear the “Load Startup items” check box and make sure that the “Load System Services” and “Use Original boot configuration” options are checked.
  • Next, click the Services tab and select the “Hide All Microsoft Services” check box.
  • Click Disable all.
  • Click on Apply/OK and restart your PC. (This will put your PC into a Clean Boot State. And configure Windows to use the usual startup, just simply undo the changes.)
  • From there, start to isolate the problem by checking which one of the programs you installed recently is the root cause of the problem.
Read More
Blizzard caught destroying evidence
Blizzard employeesCalifornia's Department of Fair Employment & Housing has widened its anti-discrimination lawsuit against Activision Blizzard and claims the publisher has been shredding vital documents relevant to the ongoing investigation. A recent report from Kotaku described the department as offering poorly paid, highly insecure positions, with a culture of hostility towards LGBTQ+ testers. The DFEH's rewording of "employees" to "workers" now hopes to take these contractors' experiences into account. "As a contract employee, I feel there's a lot of pressure to excel, impress, and move through the ranks as fast as you can before your contract ends and you're forced to go 3 months without income or find another job," Axios reports one worker saying. "I take pride in what I do, but it feels like it's never enough." Activision's contentious hiring of union-busting third-party law firm WilmerHale "directly interferes" with its own investigation, it says. By going to WilmerHale, Activision appears to be claiming that all work related to the investigation is privileged and can't be shared with DFEH. The suit also claims that Activision HR shredded documents related to "investigations and complaints", against its legal obligation to retain them during the investigation. The relevant parts of the updated lawsuit were shared by Axios reporters Stephen Totilo and Megan Farokhmanesh, the former also noting that the DFEH "fixed their misspelling of Bill Cosby's name". "DFEH is also informed and aware that documents and records have not been maintained as required by law or by the DFEH's Document Retention Notice," the complaint reads, "including but not limited to documents related to investigations and complaints were shredded by human resource personnel and emails are deleted thirty days after an employees separation."

Speculation and answer from Activision Blizzard

Blizzard employee Jessica Gonzalez suspects that the costs of fines associated with destroying these documents may have been an easier blow for Blizzard to take than any penalties drawn from their existence in helping the lawsuit go through. In an email to Kotaku, Activision denied the shredding allegations and issued a statement outlining steps it had taken to improve company culture—including the ousting of high-level executives like Blizzard president J. Allen Brack. The full statement reads: "Throughout our engagement with the DFEH, we have complied with every proper request in support of its review even as we had been implementing reforms to ensure our workplaces are welcoming and safe for every employee. Those changes continue today, and include:
  •     Several high-level personnel changes
  •     Revamped hiring and recruiting practices requiring diverse interview panels
  •     Greater transparency on pay equity
  •     Expanded and improved training and investigative capabilities for human resource and compliance staff
  •     Created investigation teams outside of business units to support greater independence
  •     Restructured divisions to support greater accountability
  •     Enhanced review processes to include evaluation of managers by employees
  •     Clear boundaries on workplace behavior with a zero-tolerance approach to harassment and other actions that diminish or marginalize.
"We strive to be a company that recognizes and celebrates the diverse talents and perspectives that lead to the creation of great, globally appealing entertainment. We have provided the DFEH with clear evidence that we do not have gender pay or promotion disparities. Our senior leadership is increasingly diverse, with a growing number of women in key leadership roles across the company. "We share DFEH’s goal of a safe, inclusive workplace that rewards employees equitably and is committed to setting an example that others can follow."

California and RIOT

Beyond Activision Blizzard, California's DFEH has also probed into League of Legends creator Riot Games, accusing the studio of dragging its heels over sexual harassment allegations dating back to 2019. Riot denied the allegations, telling us that it "will never retaliate against anyone for talking to any government agency".
Read More
1 2 3 162
Logo
Copyright © 2022, ErrorTools. All Rights Reserved
Trademarks: Microsoft Windows logos are registered trademarks of Microsoft. Disclaimer: ErrorTools.com is not affiliated with Microsoft, nor claim direct affiliation.
The information on this page is provided for information purposes only.
DMCA.com Protection Status