Windows 11 new features and preview

Microsoft has presented its next version of their flagship product, Windows 11, and feelings are divided among users.

Some users like it very much and eager to upgrade, some do not like the graphic overhaul it went through, but overall I think Microsoft has done a good job with it.

Here in this article, we will discuss some of the new features which Windows brings to the table, well at least ones that were showed, I am sure there are plenty more which we will see once OS has been released.

New Start menu

Winodws 11 start menu
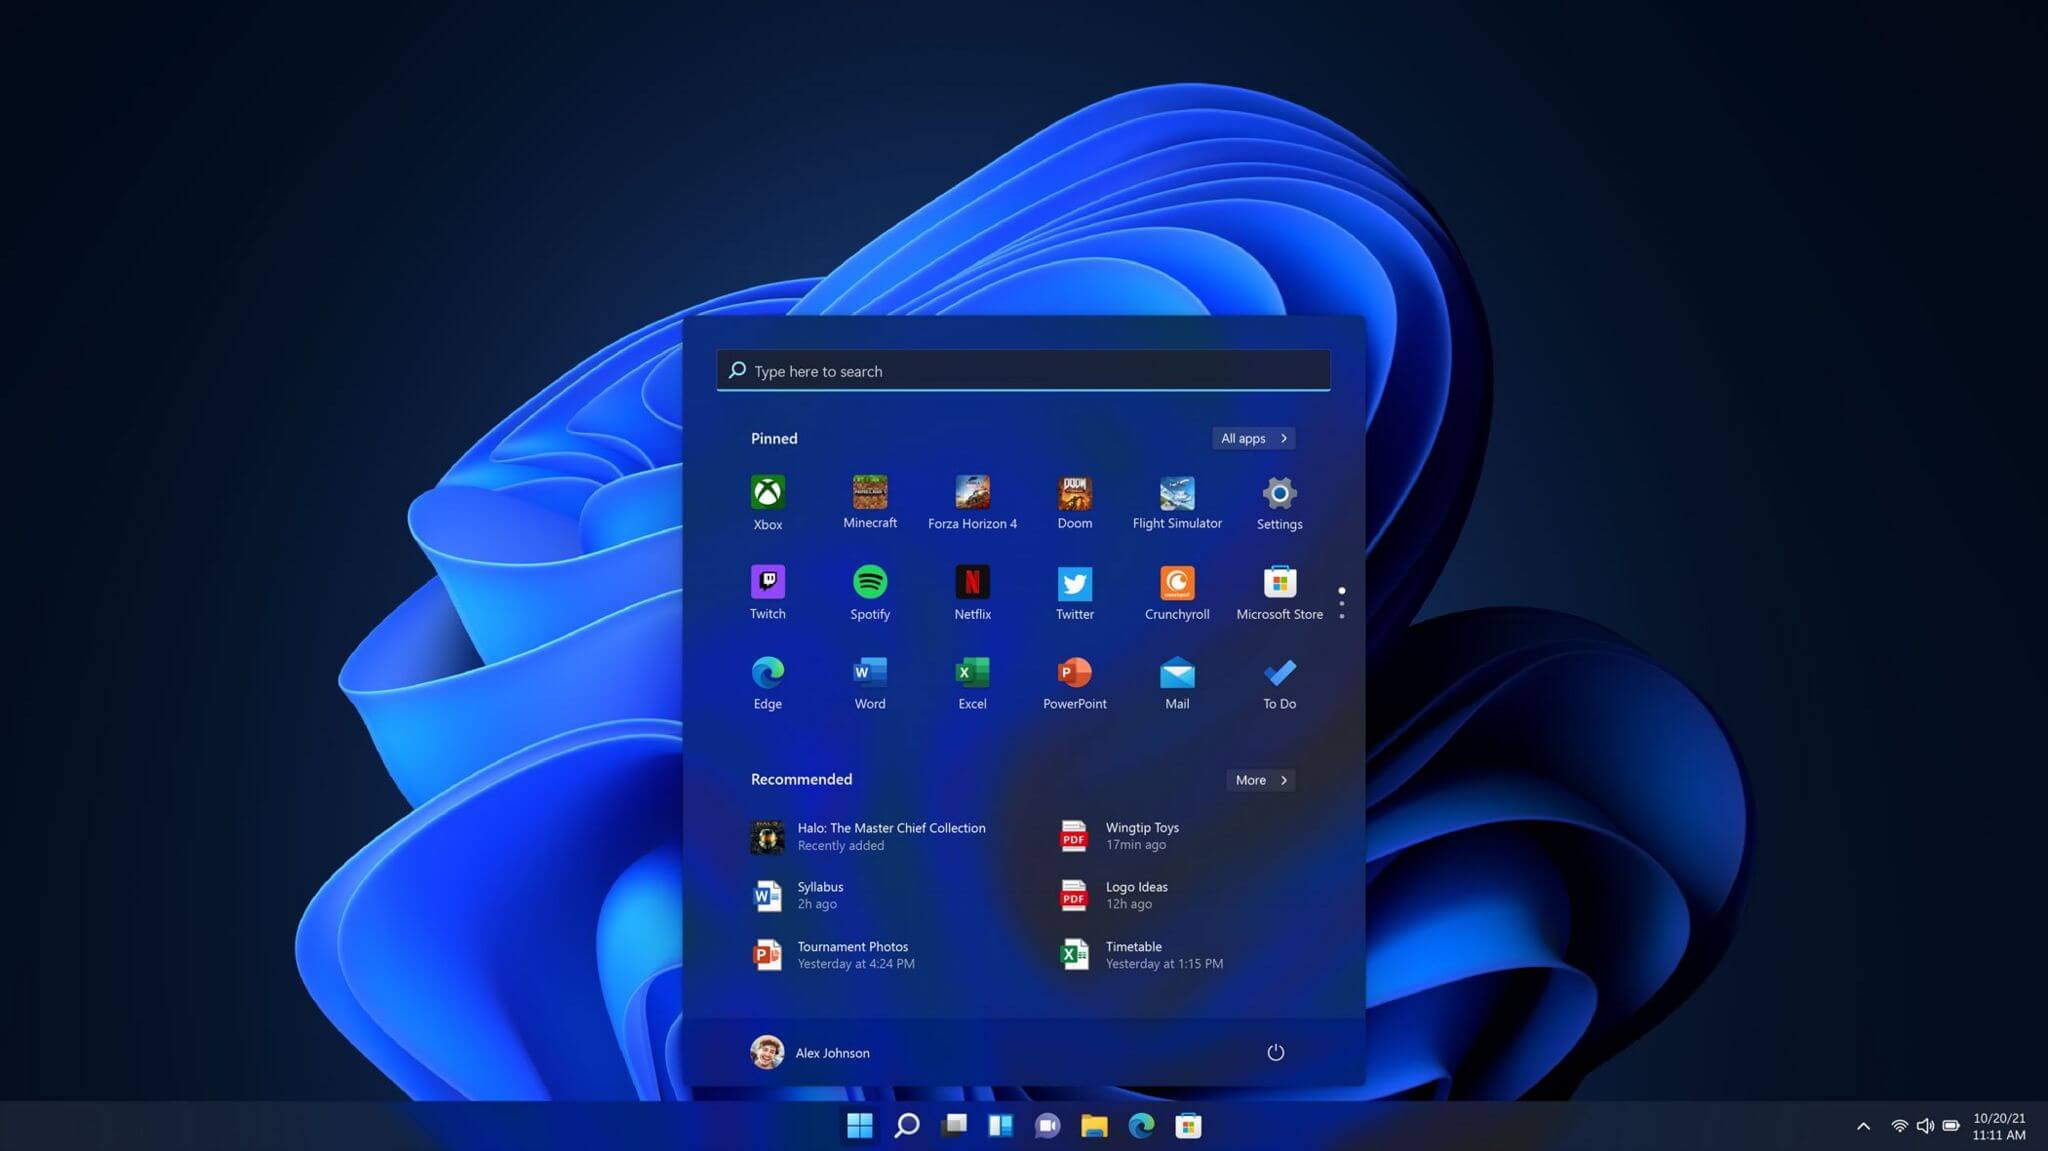
One of the first things that everyone saw when Microsoft has unveiled Windows 11 is its Start menu. Funny enough this is what has caused most of the divide among users, some find it interesting, and some do not like it. Truth is, it is different, and it is centered in the middle instead of the lower left part of the screen.

It has been confirmed however that the Start menu can be moved to any part of the screen so if you want, you could place it on the lower left as it has always been.

Live tiles do not longer exist in the Start menu, instead, we have styled simple icons.

Windows 11 Snap controls are great

Windows 11 snap controls
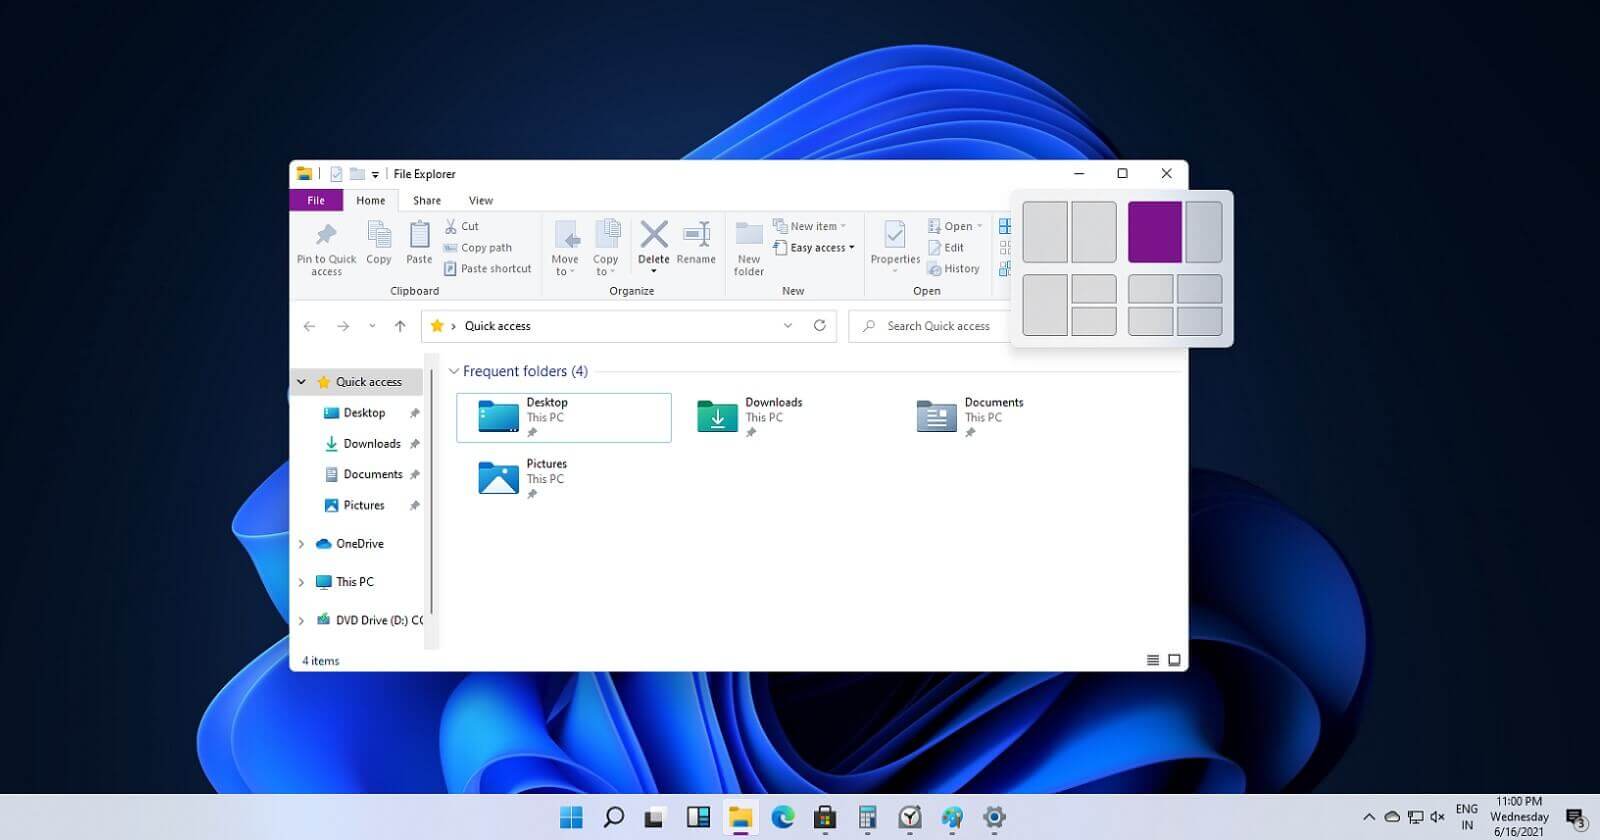
If you have used the cascade option in previous Windows versions then it is most likely that you will like the new Snap controls.

You can quickly snap windows side by side, or arrange them in sections on your desktop just by hovering over maximize button on the title bar.

Windows 11 File Explorer

Windows 11 file explorerFile explorer has gone through some visual and design changes, the ribbon on top has been completely removed and replaced with a header-like feature with a slick and clean design.

The header contains a nice organized and designed single row of icons like cut, paste, copy, rename, delete, and new folder icons.

Settings app ovberhaul

Windows 11 settings app
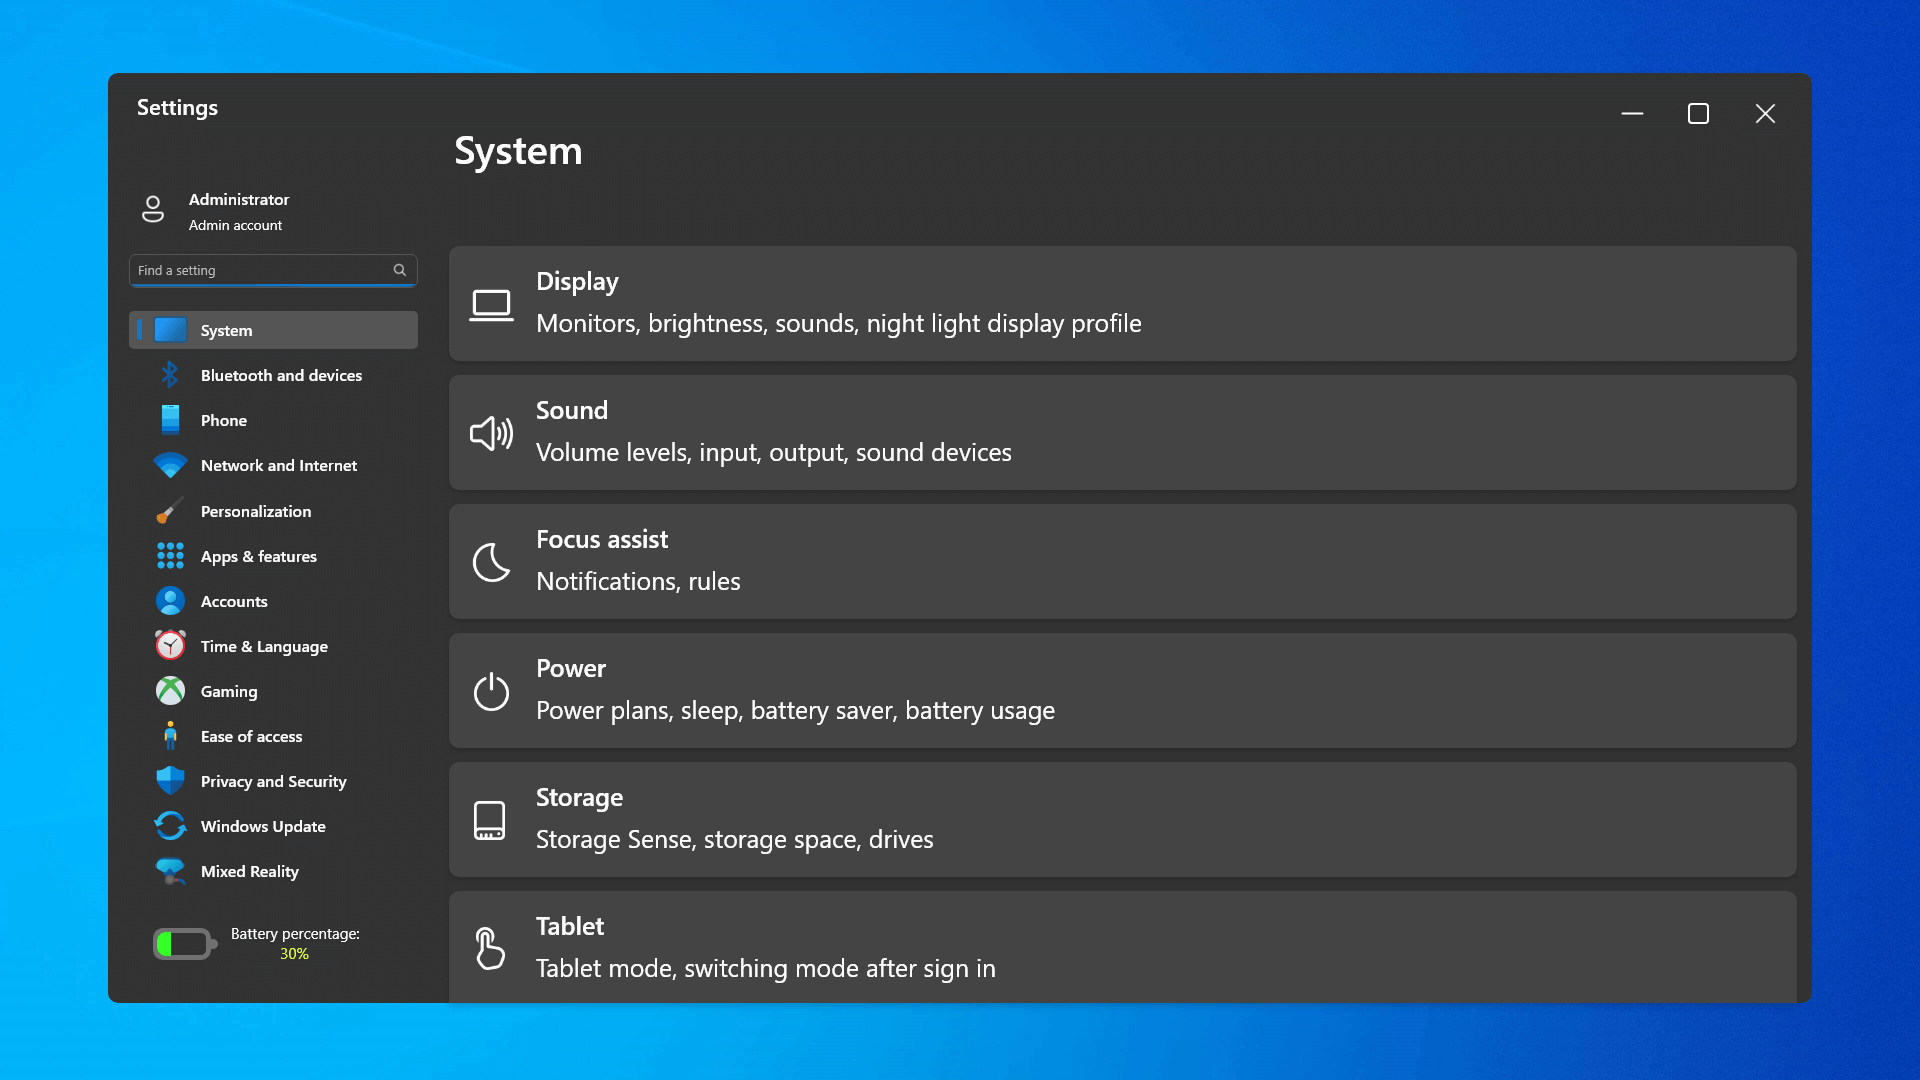
The settings app also has gone through visual and design changes. It has a new design that is very visually appealing and navigation has been simplified and more organized. Finding the right and desired setting is much faster and clearer now.

Widget tab makes comeback in Windows 11

Windows 11 widgets bar
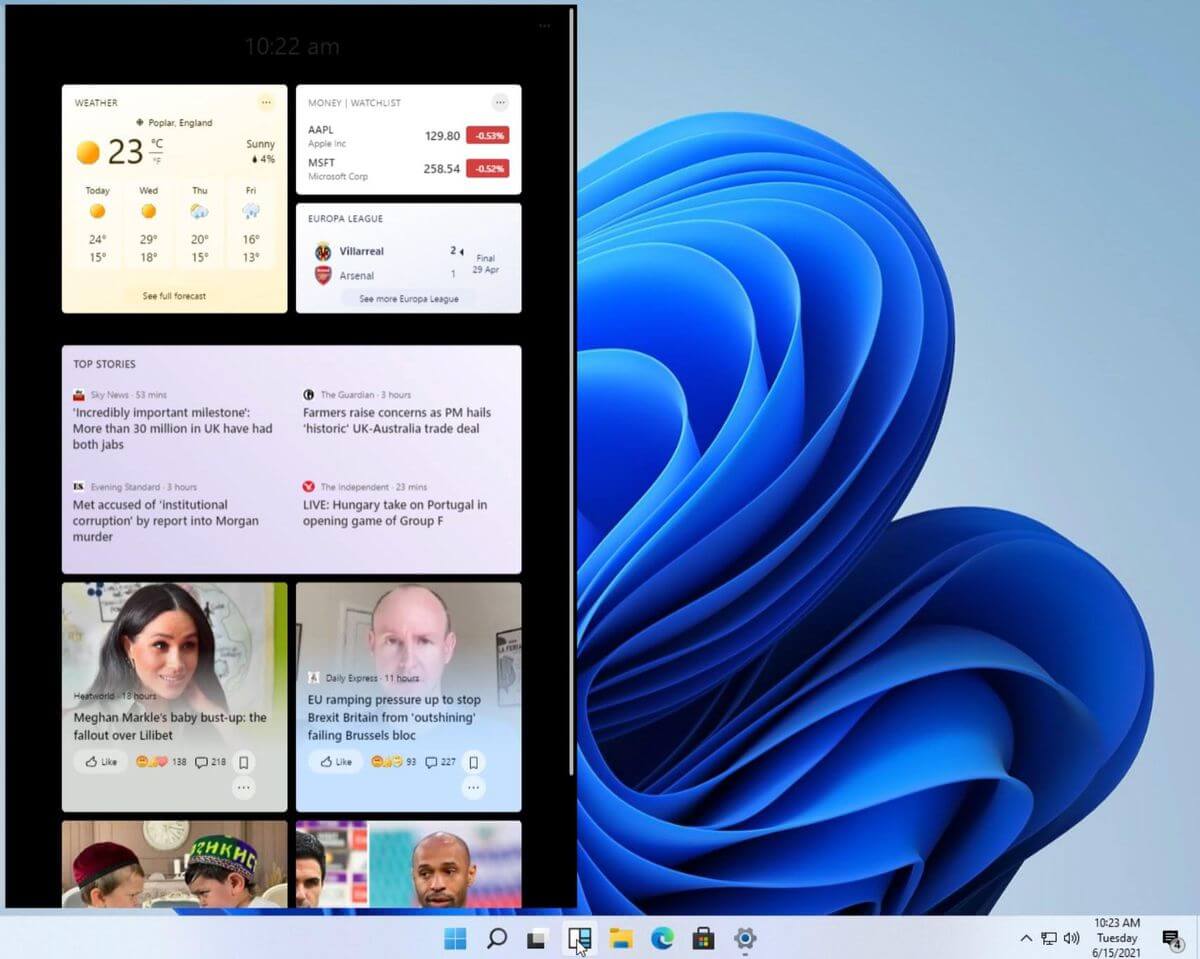
Yes, widgets are back but not like you remember them.

Instead of being all-time present at your desktop like once they used to be, now there is a button on the taskbar which brings the widget bar up that contains desired widgets. This way they are easily accessible and do not clutter desktops.

So far we have weather, news, calendar, and stocks widget but we will see how development on these goes. I expect to have community-made widgets like in old days for all of our needs.

XBOX app

Windows 11 xbox appThe new Xbox app is now integrated into Windows 11, offering quick access to Xbox Game Pass games, the social parts of the Xbox network, and the Xbox store.

Security and TPM 2.0 in Windows 11

Windows 11As widely known by now Windows 11 will require you to have a TPM 2.0 module capable CPU in order to install it.

This system requirement has caused a lot of controversies but essentially it seems that MS's goal is to protect your personal data by using this module.

The upside of course is that your data will be protected much more than in previous Windows versions, the downside, of course, will be that you will need newer hardware to run OS on it.

and that is essentially it, keep on tuned on more Windows 11 information and overall articles tied to PC and technology here at errortools.com

If you like to learn and find out more about various Windows errors, and how to repair them go to our vast archive or use search to find articles that will explain and help you in solving your issue.
However, if you prefer to do things fast and with automatization then we are proposing to use an automated solution for your issues. The application that we are recommending is Advanced System Repair Pro
Advanced System Repair utilizes multiple tools all in one to give you a quick, simple, reliable, and very thorough diagnosis of your PC. It brings you all the tools you need in one program to clean, fix, protect, optimize and boost your PC!
1-Click Maintenance
All the tools to make it simple and easy! It's like having a professional technician at the click of a mouse.

Junk Cleaner
Keeping your computer free from unnecessary clutter also helps make your computer last longer. Like any other machine, if you keep it clean and take care of it, it will serve you better for longer!

Optimize background apps
Optimize applications background activity with the built-in Application Optimizer feature.

Disk Defrag
With a simple 1-click, Advanced System Repair speeds up your PC by assembling fragmented files on your machine and organizing them more efficiently.

Malware Removal
Finds and removes all types of harmful malware including trojans, worms, bots, adware, spyware, PUPs, and more!

Privacy Cleaner
The all-in-one privacy suite to Clean Your Tracks & Protect Your Privacy! Make your computer safe, secure, and more efficient!

System Tweak/Optimizer
ASR will analyze your complete system and settings to adjust your PC to function at its maximum performance.

Registry Cleaner
Over time, as you install and uninstall applications, the registry can become cluttered with old entries and broken settings which can result in program crashes, and annoying messages and slow the computer down.
Visit our Advanced System Repair Pro Download page to inform yourself about all the benefits of this software and get a free trial copy of it.
advanced system repair pro

Advanced System Repair Pro

One-click automated PC repair solution
ASR logo
With Advanced System Repair Pro you can easily
Replace damaged files
Restore performance
Free disk space
Remove Malware
Protects WEB browser
Remove Viruses
Stop PC freezing
DOWNLOAD
Privacy Policy | Terms of Use | Uinstall
Advanced System Repair Pro is compatible with all versions of Microsoft Windows including Windows 11

Share this article:

You might also like

How to Fix the Sysfader iexplore.exe Application Error

Sysfader iexplore.exe Application Error Repair

The Sysfader iexplore.exe Application Error - What is it?

To understand Sysfader iexplore.exe application error, first, it is important to learn what is Sysfade.exe file. Sysfader.exe is basically an IE (Internet Explorer) application file that provides cool animation effects. These animation effects include fading menus in and out, animated windows and etc. It is responsible for the graphical enhancements for animated pages. The Sysfader iexplore.exe application error occurs when this file fails to execute properly and open animated websites on Internet Explorer. The error code is displayed in the following format:

“SysFader: iexplore.exe – Application Error The instruction at “0×00000000″ referenced memory at “0×00000000″. The memory could not be “read”.”

Solution

Restoro box imageError Causes

The Sysfader iexplorer.exe application error may be triggered due to many causes. These include:
  • Sysfader.exe file corrupted by malware and spyware
  • Recently upgraded Internet Explorer which resulted in the Sysfader iexplorer.exe application error due to incompatibility issues with the system program.
  • Issues with IE configuration
  • Damaged registry files
  • Damaged DLL files
  • Obsolete and bad registry entries
Due to Sysfader iexplorer.exe application error, your Internet Explorer browser may crash. Furthermore if the error is not fixed timely, it may result in even more severe PC problems like system slowdown, system crash and failure. This happens especially when Sysfader iexplorer.exe application error is related to the registry. The registry saves all the activities performed on the computer. This also includes junk files, invalid registry entries, bad registry keys, cookies, temporary internet files, and files of the programs uninstalled. If the registry is not cleaned frequently, these obsolete files overload the RAM causing great deal of damage to the registry. When you try to upgrade your browser, the installation fails and results in browser incompatibility issues because of the previous files of the uninstalled program saved in the registry. Furthermore, the error code may also pop up due to the Sysfader.exe file corrupted by malicious software like spyware and adware on your system if you don’t run an antivirus on your system regularly.

Further Information and Manual Repair

To prevent IE web browser and your PC from coming crashing, here are some solutions that you can try to resolve the Sysfader iexplorer.exe application error:
  1. Repair and restore the registry by changing the configuration settings in the Registry Editor Window. This is accessible by typing ‘Regedit’ in the Run window. However, to edit the configuration settings manually and restore the registry, you should be technically sound. If not then making the changes would be slightly complex and time-consuming for you.
  2. However, another alternative to this is to download Restoro. Restoro is a powerful, advanced, and highly functional PC repair tool that includes multiple utilities such as a registry cleaner and a system optimizer. The registry cleaning feature scans your entire PC for registry issues triggering error codes like Sysfader iexplorer.exe.It wipes out all the unnecessary and obsolete files and fixes the damaged dll files thus simultaneously restoring the registry. The antivirus utility scans for and removes viruses and spyware from your PC which as we explained earlier could be the reason for Sysfader error code.
With Restoro, it takes only a few seconds to resolve this error and repair the registry. If you have system slowdown issues, it takes care of that too. It has simple navigations and a user-friendly interface which makes it very easy to operate even if you are not technically sound. It is safe, efficient, and compatible on all Windows versions including Vista, XP, Windows 7, 8, 8.1, and 10. Click here to download Restoro and resolve Sysfader iexplorer.exe application error on your PC today!
Read More
How to Fix Sysdata.xml Error Code on Your PC

How to Fix Sysdata.xml Error Code on Your PC

Sysdata.xml Error Code - What is it?

To develop a good understanding of the Sysdata.xml error code, it is first important to learn what is sysdata.xml file and its function. Sysdata.xml is a type of XML file. The .XML file extension is an Extensible Markup Language file. XML-based formats have now become the default for many office productivity tools including Microsoft Office and LibreOffice. Furthermore, it has also come into common use for the interchange of data over the internet. Sysdata.xml error code usually pops up when .XML based applications are unable to run and crash while loading. This is a type of BSoD (Blue Screen of Death) error code. Common symptoms include:
  • System freeze
  • The screen turns blue
  • Sudden system shut down

Solution

Restoro box imageError Causes

The Sysdata.xml error code is triggered due to multiple reasons such as:
  • Faulty hardware
  • Malware or viral infection
  • Registry issues
No matter what the reason may be, it is advisable to fix this error code right away without any delays. This is a fatal error and can result in a system crash and loss of data. And recovering valuable lost data is the hardest.

Further Information and Manual Repair

Here are some of the effective and easy do it yourself methods to resolve this error on your system:

Method 1: Fix Faulty Hardware

Hardware issues may arise due to many reasons like manufacturing issues or voltage fluctuations. Electrical storms can cause power surges which may affect the hardware causing it to fail. The best way to resolve this is to download the latest drivers for the problematic devices or alter the device configuration in the BIOS setup program.
  • To reconfigure the BIOS simply restart your PC and before Windows starts, press Del Key to access your BIOS.
  • Now find the factory reset option.
  • Select the option and press the button to load your factory defaults.
  • After that save changes and confirm your selection.
  • Reboot your PC to activate the changes.

Method 2: Scan for Viruses

Sometimes viruses and malware can disguise themselves in the .XML files which can cause them to get corrupted. To resolve the issue, it is advisable to download a powerful antivirus and scan your entire PC for viruses. Remove the detected viruses to resolve the Sysdata.xml error on your system.

Method 3: Repair the Registry

If the registry is not cleaned frequently, it loads with unnecessary and obsolete files like the junk files and cookies. These files clutter and damage the registry and eventually corrupt it and the important files like .XML files stored in it. To resolve the issue it is recommended to download Restoro. It is a user-friendly and powerful PC Fixer embedded with a registry cleaner. It scans your entire PC for registry-related errors and removes them immediately. It cleans the cluttered registry and restores the damaged files thereby repairing the issue right away. Click here to download Restoro.
Read More
CHKDSK cannot continue in read-only mode
As you know, the CHKDSK utility is proven to be one of the useful tools to fix any issues that concerns file system, storage, and disk. However, as useful as it may be, it is still not immune to issues as you could encounter errors when running it. One of these errors is the “One such error is the CHKDSK cannot continue in read-only mode” error. If you receive such an error message while running CHKDSK, then you’ve come to the right place as this post will help you sort the problem out. It is possible that the drive is read-only or that the Write Protection is enabled. It could also be that the drive is already being used and scanned by a different program or utility. To get rid of this error, there are a couple of suggestions you need to check out. You can try to run the CHKDSK utility from Recovery or run it on Boot. You could also try to disable Write Protection. For more detailed steps, follow the given instructions below.

Option 1 – Try to run the CHKDSK utility from Recovery

The first thing you can do to resolve the error in CHKDSK is to run the CHKDSK utility from Recovery. How? Follow these steps:
  • First, boot into the installation environment for Windows 10 from a Windows installation media.
  • Next, click on the “Repair your computer” option.
  • After that, select Troubleshoot > Advanced options > Command Prompt.
  • After opening Command Prompt, type this command and tap Enter: chkdsk <Partition Letter>: /r /f
  • Wait until the disk error checking process is completed.
  • Once it’s done, exit the Command Prompt window and restart your computer and then see if the error is fixed.

Option 2 – Try running the CHKDSK utility on Boot

On the other hand, you can also try to run the CHKDSK utility on Boot so you can fix the error and recover any damaged segments of the drive.
  • Open an elevated Command Prompt and enter this command: chkdsk /r
  • After that, you will a message that says, “Chkdsk cannot run because the volume is in use by another process. Would you like to schedule this volume to be checked the next time the system restarts? (Y/N)”
  • Type Y and tap Enter to schedule a CHKDSK scan once your computer reboots next time.

Option 3 – Try to remove the Write Protection from the drive

As mentioned, removing the Write-Protection on the concerned drive could also help you fix the problem and there are two ways to get rid of the write protection – you can either use the Diskpart utility or the Registry Editor. How? Refer to the following steps.

Via Diskpart utility:

  • Open Command Prompt with admin privileges and then type the “diskpart” command and tap Enter to execute it.
  • Next, type “list disk” and tap Enter to get the list of all the Disk connects or all the partitions that are formed on those disks.
  • After that, you need to choose one command depending on the list of commands you entered. Type “select disk #” and tap Enter to select the disk or partition you want to select.
  • Then type “attribute disk clear readonly” and tap Enter to Disable the Write Protection on the selected disk or partition.

Via Registry Editor:

  • Tap the Win + R keys to open the Run utility and type “Regedit” in the field and then tap Enter to open the Registry Editor.
  • Next, navigate to the following registry key:
ComputerHKEY_LOCAL_MACHINESYSTEMCurrentControlSetControlStorageDevicePolicies
  • After that, look for the DWORD named “WriteProtect” and double click on it, and then set its Value Data to “0”.
  • Now restart your computer and see if the problem is now fixed or not.
Read More
How to Fix Error 0199, Security password retry
The errors that are caused by the BIOS of your computer can get annoying as they can be hard to fix for they are really dangerous and won’t be resolved by simple fixes. This is because of the fact that these kinds of errors do not even allow you to load your operating system as it throws the error even before you can access your computer. One of these errors is the “Error 0199: System Security – Security password retry count exceeded”. Fixing this error can be quite tricky but you need not worry for you will be guided in doing so. Simply follow the given instructions below.

Option 1 – Try to update the BIOS

Updating the BIOS can help you fix the “Error 0199, Security password retry count exceeded” error but as you know, BIOS is a sensitive part of a computer. Even though it is a software component, the functioning of the hardware depends on it largely. Thus, you must be careful when modifying something in the BIOS. So if you don’t know much about it, it’s best if you skip on this option and try the other ones instead. However, if you are well-versed in navigating the BIOS, then follow the steps below.
  • Tap the Win + R keys to open the Run dialog box.
  • Next, type “msinfo32” in the field and press Enter to open System Information.
  • From there, you should find a search field on the bottom where you have to search for the BIOS version and then press Enter.
  • After that, you should see the developer and version of the BIOS installed on your PC.
  • Go to your manufacturer’s website and then download the latest version of BIOS on your computer.
  • If you are using a laptop, make sure that you keep it plugged in until you have updated the BIOS.
  • Now double click on the downloaded file and install the new BIOS version on your computer.
  • Now restart your computer to apply the changes made.

Option 2 – Try resetting the BIOS

If updating the BIOS didn’t help in fixing Error 0199, you can try to reset the BIOS instead.
  • Start your computer and tap the F10 key during the booting process to enter the BIOS. If it does not work, you can try tapping the F1 or F2 key as well as the Del key.
  • Once you’re already in the BIOS, tap the F9 key to get the prompt to RestoreLoad default configuration now for the BIOS.
  • Next, click on Yes and then follow the next on-screen instructions that appear to set the BIOS back to its default settings.
  • Once you’re done restoring the default settings of the BIOS, restart your computer and then check if it now boots properly.
Read More
Fix Update Error 0x800705B3 in Windows
Some Windows users are encountering the 0x800705b3 error code after failing to install a pending update on Windows 10. Most commonly this particular issue is reported to occur with Integrated webcam drivers updates and Bluetooth adapter driver updates. Follow the guide below in order to fix the issue and update your Windows successfully

Running the Windows Update Troubleshooter

The majority of users that were dealing with this issue reported that the issue was fixed after they ran the Windows Update Troubleshooter and applied the recommended fix.
  1. Open a Run dialog box by pressing ⊞ WINDOWS + R. Inside the text box, type ‘ms-settings:troubleshoot’ and press ENTER to open up the Troubleshooting menu. Opening the Troubleshooting tab on Windows 10
  2. Once you’re inside the Troubleshooting tab, move over to the right-hand section of the screen and click on Windows Update (under Get up and Running). Next, from the context menu that just appeared, click on Run the Troubleshooter.
  3. Once you’re inside the Windows Update troubleshooter, wait until the initial scan is complete and see if a viable repair strategy is found.
  4. If the scan has identified a strategy with the potential to fix your ongoing issue, click on Apply this fix and wait until the procedure is complete. Applying the fix Note: Depending on the type of fix that was recommended, you might need to follow an additional set of instructions before the fix will be properly imposed.
  5. After you’ve done this, reboot your computer and wait for the next startup to complete.
  6. Open Windows Update once again and see if the installation of this pending update is now successful.

Installing the pending Update Manually

Whether you’re experiencing this issue with an integrated webcam driver or with anything else, chances are you’ll be able to circumvent the apparition of the 0x800705b3 error by using the Microsoft Update Catalog to find, download and install the pending update manually.
  1. Open your default browser and navigate to the root web page of the Microsoft Update Catalog.
  2. Once you’re inside the Microsoft Update Catalog, use the search function (top-right corner of the screen) to search for the update that is failing.
  3. After the search is completed and you get the list of results, look for an updated driver version that is compatible with your Windows version and CPU architecture.
  4. Once you manage to identify the correct Windows Update, click on the hyperlink associated with the update that you want to install, then click the Download button and wait for the process to complete.
  5. After the download is complete, use File Explorer to navigate to the location where you previously downloaded the update.
  6. When you get to the correct location, right-click on the .inf file and choose Install from the context menu that just appeared. Note: If you have multiple failing updates with the same 0x800705b3, repeat the instructions above with every Windows Update that you’re having trouble installing.
  7. At the end of this operation, reboot your computer and see if the problem is fixed at the next computer startup.

Enabling the Windows Installer Service

The Windows installer service is responsible for installing pending updates that get downloaded by the Windows Update component. If this service is disabled on your configuration, none of the updates waiting to get installed will get completed.
  1. Press ⊞ WINDOWS + R to open up a Run dialog box. Inside the text box, type ‘services.msc’ and press ENTER to open up the Services utility.
  2. Once you’re inside the Services screen, move over to the right-hand tab of the screen, scroll down through the list of services and locate the Windows Installer service. When you find it, right-click on it and choose Properties from the context menu that just appeared.
  3. Once you are inside the Properties screen of the Windows Installer services, access the General tab, click on the Start button to force-start the service. Note: If you can, also change the Startup type to Automatic via the associated drop-down menu. However, depending on your administrator settings, this might not be possible.
  4. Restart your computer and wait for the next startup to complete. Once your PC boots back up, attempt to reinstall the driver that was previously triggering the 0x800705b3 error and see if the issue is now fixed.

Performing a Winsock Reset

In case the 0x800705b3 error is related to some kind of network inconsistency (TCP or IP related), you might see Windows Updates failing due to bad data that forces the Windows to abort the installation of new pending updates. In this case, you should proceed by doing a complete Winsock reset procedure to fix the majority of the socket and temporary data-related issues that might cause this behavior. Several affected users have confirmed that this method was the only thing that allowed them to finally fix the Windows Update issue and install pending updates normally. Here are some step-by-step instructions that will walk you through the process of performing Winsock Reset:
  1. Open up a Run dialog box by pressing ⊞ WINDOWS + R. Inside the text box, type ‘cmd’, then press CTRL + SHIFT + ENTER to open up an elevated Command Prompt. Accessing an elevated CMD prompt Note: When prompted by the UAC (User Account Control) prompt, click Yes to grant admin access.
  2. Inside the elevated CMD prompt, type and taste the following commands in order and press ENTER after each one to effectively reset the TCP and IP data that might be responsible for the apparition of the 0x800705b3 error code:
    nbtstat -R
    nbtstat -RR
    netsh int reset all
    netsh int ip reset
    netsh winsock reset
  3. Once every command above is processed successfully, you can go ahead and close the elevated Command Prompt and reboot your computer.
  4. After the next startup is complete, repeat the installation of the Windows Update that was previously failing and see if the issue is now fixed.

Performing SFC and DISM Scans

If none of the ‘superficial’ causes have worked in your case, you should start considering some type of system corruption that might affect your computer’s ability to complete pending updates that are currently waiting to be installed. In case you find yourself in this particular scenario, you should run a couple of built-in utilities capable of fixing corrupted instances that might be currently affecting the Windows Update component. Our recommendation is to start with a simple System File Checker scan. An SFC scan will cross-check every Windows File against a local archive that maintains healthy copies. In case corrupted instances are found, this utility will swap the corrupted instance with the healthy equivalent.

Performing an SFC scan

Once the SFC scan is complete, reboot your computer and wait for the next startup to complete. After your computer boots back up, initiate a DISM scan. This utility works differently in the sense that it relies on a sub-component of Windows Update to download healthy copies for the corrupted Windows files that need to be replaced. Because of this, it’s important to make sure that you have a reliable Internet connection before initiating this operation.

Doing a DISM scan

After the DISM scan is complete, reboot your computer one final time and see if the issue is fixed once the next startup is complete.
Read More
How to Repair Error Code 31

How to Repair Error Code 31

What is Error Code 31?

Device Manager Error Code 31 pops up when Windows prevents the driver for a particular hardware device from loading. The error code 31 is almost always presented in the following format:

“This device is not working properly because Windows cannot load the drivers required for this device.” Code 31

This error can occur with any hardware device; however, in most cases, it occurs with Ethernet cards. The good news is that it belongs in the easy-to-resolve category. So repairing it should not be difficult.

Solution

driverfix boxError Causes

Error code 31 is related to driver problems, and the most common causes include:
  • Outdated drivers
  • Missing drivers
  • Mis-configured drivers
  • Corrupt drivers

Further Information and Manual Repair

To resolve error code 31 on your system, try the methods given below. We have listed down some of the most effective and easy-to-perform DIY methods for fixing Device Manager code 31 on your PC.

Method 1 - Rollback the Driver to its Previous State

This simply means to return the driver back to its previous state - to the version last installed. Try this method to resolve error code 31. This is probably the easiest way to return your PC to its previous working state.

However, by doing so, you will not be able to update your drivers and run new driver versions on your system. In other words, this is a temporary method to fix this issue.

You may still want to try other methods given below to ensure you have the latest drivers installed on your system.

You can roll back the driver to its previous version by accessing the Driver Rollback feature located in the driver settings within the Device Manager. Or another way to perform a rollback is to use the Windows System Restore Utility.

It is a recovery tool built-in the new Windows versions. To access it, simply go to the start menu and type System Restore Utility in the search menu.

Access it and pick a point in the past, also referred to as the restore point, to return your PC to its previous state before the error code 31 occurred.

However, to resolve the problem permanently, try method 2.

Method 2 - Update the Driver

Error code 31, as discussed above, may occur due to outdated, misconfigured, or corrupted drivers. Whatever the reason may be, to ensure the proper functioning of your hardware device, it is important to update the drivers on your system frequently.

To start driver updates, first, it is important to find out and identify problematic drivers. You need to identify the drivers that are corrupt, misconfigured, and outdated. For this, go to the Device Manager and then look for devices with yellow exclamation marks.

The yellow exclamation marks next to the devices show that these device drivers are problematic. Once you’ve identified the problematic drivers, simply update them by finding the latest and compatible versions on the manufacturer’s website.

This process is time-consuming and can be frustrating at times, especially when doing it for the first time.

Also, once you’ve updated the drivers, you need to update them from time to time to ensure they don’t get outdated, or else you will have to encounter Device Manager error codes again.

Method 3 - Download DriverFIX to Update Drivers Automatically

To avoid the hassle and stress involved in updating drivers manually, it is advisable to download and install DriverFIX.

DriverFIX is a smart, innovative, and feature-filled software embedded with an intelligent algorithm that quickly detects problematic drivers, matches them with the latest and compatible versions, and updates them immediately and automatically in just a few seconds and a couple of clicks.

It’s as simple as it can be. Furthermore, with this software installed on your PC, you don’t have to stress and worry about when your drivers need to be updated again.

DriverFIX ensures all drivers are continuously and regularly updated before they become outdated.

Click here to download DriverFIX to repair Device Manager error code 31 and update drivers automatically and regularly.

Read More
Fix Windows Setup Error code 0x80070006
Windows 10 setup is a bit complicated which is why it’s uncommon to encounter errors along the way. One of these errors you can encounter when running Windows Setup is the error code 0x80070006. If you are trying to fix this error, you’ve come to the right place as this post will guide you on how to do so. When you get the error code 0x80070006, you will see the following error message:
“Windows cannot install required files. Network problems may be preventing Windows from accessing the file. Make sure the computer is connected to the network and restart the installation. Error code: 0x80070006.”
As stated in the error message, this kind of error in Windows Setup is due to an unstable or unreliable network connection. Such problems can also be triggered by network hardware which includes the network adapters and the network routers. To fix this error, you need to check your internet connection and router or run the built-in network troubleshooter. You could also try using a different USB port or recreate a bootable USB drive as well as get a new Windows image file.

Option 1 – Try checking your internet connection and router

As mentioned, this Windows 10 setup error could be due to an unstable internet connection. To fix it, the first thing you have to do is to check the status of your internet connection and see if it is stable and has enough speed to run the setup. If it’s slow, then it’s no wonder that the setup process failed. To fix that, you can try to reboot your router from its admin panel or you can just turn it off manually and then turn it back on after a couple of seconds. In addition, you also have to check if it’s plugged in properly.

Option 2 – Try to run the Network Adapter troubleshooter

The next thing you can do is to run the Network Adapter troubleshooter. This built-in troubleshooter can help resolve any network issues. It can reset the adapters, remove cached settings, and many more. To run it, follow these steps:
  • Go to Settings > Update & security and from there select Troubleshoot.
  • Next, scroll down and select the “Network Adapter” option from the right pane.
  • Then click on the Run Troubleshooter” button.
  • After that, your computer will check for any possible errors and will pinpoint the root cause of the problem if possible.

Option 3 – Try to use a different USB port

You might want to check the integrity of the USB port where connected the device if you are using a bootable USB storage device to run the setup for Windows 10. All you have to do is switch the USB port or try to use another bootable USB device and see if it fixes the problem.

Option 4 – Try recreating the Windows 10 installation USB

Recreating the Windows 10 installation USB might help in fixing the problem. You can use a USB drive to do so but make sure that it has a great read-write speed. Follow the steps below to recreate Windows 10 installation USB”
  • Click this link and then click the Download Tool Now button.
  • Next, click the “Use the tool to create installation media (USB flash drive, DVD, or ISO file)…” option and follow the next given instructions on the screen.
  • Now select the ISO file option in step 5.
  • After that, you should now have an ISO file.
  • Next, go to the location where you’ve downloaded the ISO file.
  • Then right-click on the Windows 10 ISO file and select the Open with option and then select File Explorer.
  • Now click on “setup.exe” and follow the next instructions that appear on the screen. When asked, you have to select either Nothing (clean install) or Keep personal files only option. Take note that you must not select the “Keep personal files, apps, and Windows settings since it doesn’t really work.

Option 5 – Try getting a new Windows image file

If none of the four given options above worked, you might want to get a newer installation image using the Windows Media Creation tool. After that, create the bootable USB drive and once completed and then try to run the Windows 10 setup again.
Read More
RAC Manager not working, Error 0xc0000005
If the Diagnostic Data level in your Windows 10 computer is configured manually to the non-default security setting of zero and you’ve encountered an error code of 0xc0000005, read on as this post will guide you in fixing the problem with the Remote Access Connection Manager Service. In relation to error 0xc0000005, you might also encounter an error in the Application section of Windows Logs in the Event Viewer, along with the Event ID 1000 which would most likely have a reference of “svchost.exe_RasMan” and “rasman.dll”. Before you troubleshoot the problem, keep in mind that the Remote Access Connection Manager or RasMan service is the one that manages dial-up and VPN connections from the computer to the internet as well as other remote networks. Each time you connect, the Services dials the connection or sends out a request for a VPN connection. However, the error 0xc0000005, only occurs when a VPN profile is configured as “Always On VPN or “AOVPN” connection with or without a device tunnel. There are several options you can check out to resolve this error, you can try to install the KB Update 4505903 or fix it via Group Policy. You could also try to enable Telemetry from the Settings app or enable it via Registry Editor. For more information, make sure to check out the provided options below.

Option 1 – Try installing the KB Update 4505903

The first thing you can do to fix the problem is to make sure that you’ve already installed the KB Update 4505903 in your computer. If not, then you have to go to Settings > Update & Security > Windows Update and from there select the Check for updates link. You need to get the standalone package if you are using the Microsoft Update Catalog to update your computer and for that, you have to the website of the Microsoft Update Catalog. On the other hand, if you are using the Windows Server Update Services or WSUS, then you can just manually import the KB Update 4505903 into WSUS.

Option 2 – Try to enable Telemetry in the Group Policy and run the RASMAN service

The next thing you can do to fix the problem is to enable Telemetry via Group Policy and then run the RASMAN service. To do that, follow these steps:
  • Tap the Win + R keys to open the Run dialog box and type “gpedit.msc” in the field and hit Enter to open the Group Policy Editor.
  • Next, navigate to Computer Configuration > Administrative Templates > Windows Components > Data Collection and Preview Builds > Allow Telemetry.
  • After that, open the policy and select one of the security levels like Basic, Enhanced, and Full.
  • Then click on the Apply and OK buttons to save the changes made and close the Group Policy Editor.
  • Once one, open the Run dialog box again and type “services.msc” in the field, and hit Enter to open the Windows Services Manager.
  • From there, look for the Remote Access Connection Manager Service and restart it. And then check if it resolved the problem or not...

Option 3 – Try enabling Telemetry via Settings

  • Tap the Win + I keys to open the Settings app.
  • Next, go to Privacy > Diagnostics and Feedback and select Basic or Enhanced under the Diagnostic data.
  • After that, tap the Win + R keys to launch Run and type “services.msc” in the field, and hit Enter to open the Services Manager.
  • From there, look for the Remote Access Connection Manager Service and restart it.

Option 4 – Try to enable Telemetry via Registry Editor

  • Launch the Run utility and type “regedit” in the field and tap Enter to open the Registry Editor.
  • Then navigate to this path: HKEY_LOCAL_MACHINESOFTWAREPoliciesMicrosoftWindowsDataCollection
  • From this path, look for “AllowTelemetry” and double click on it.
  • Now enter the values, 1, 2, 3 for Basic, Enhanced, Full, respectively.
  • If you can’t find AllowTelemetry, then just create a DWORD (32-bit) and name it “AllowTelemetry” and edit its value.
  • Once done, exit the Registry Editor and restart the Remote Access Connection Manager Service from the Services Manager.
Read More
3 ways to bypass TPM and install W11 anywhere
TPM 2.0 requirement for Windows 11 has produced a lot of discussions since it was announced. A lot of somewhat older hardware seems to be left behind with this decision from Microsoft. So naturally, when something like this is announced, especially when it is stated it is the must-have thing, people find a way to break it and to prove it is not the case. In that spirit, I am proud to present you with not one but three-way you can install Windows 11 on hardware that does not has TPM 2.0. Please note that by bypassing this you will not be able to use some Windows 11 features tied to modules like Device encryption, vTPM in Hyper-V, and all TPM-related services. I will cover methods from the most simple and straightforward ones to the more complicated using registry editor.

Windows 11 TPM installation
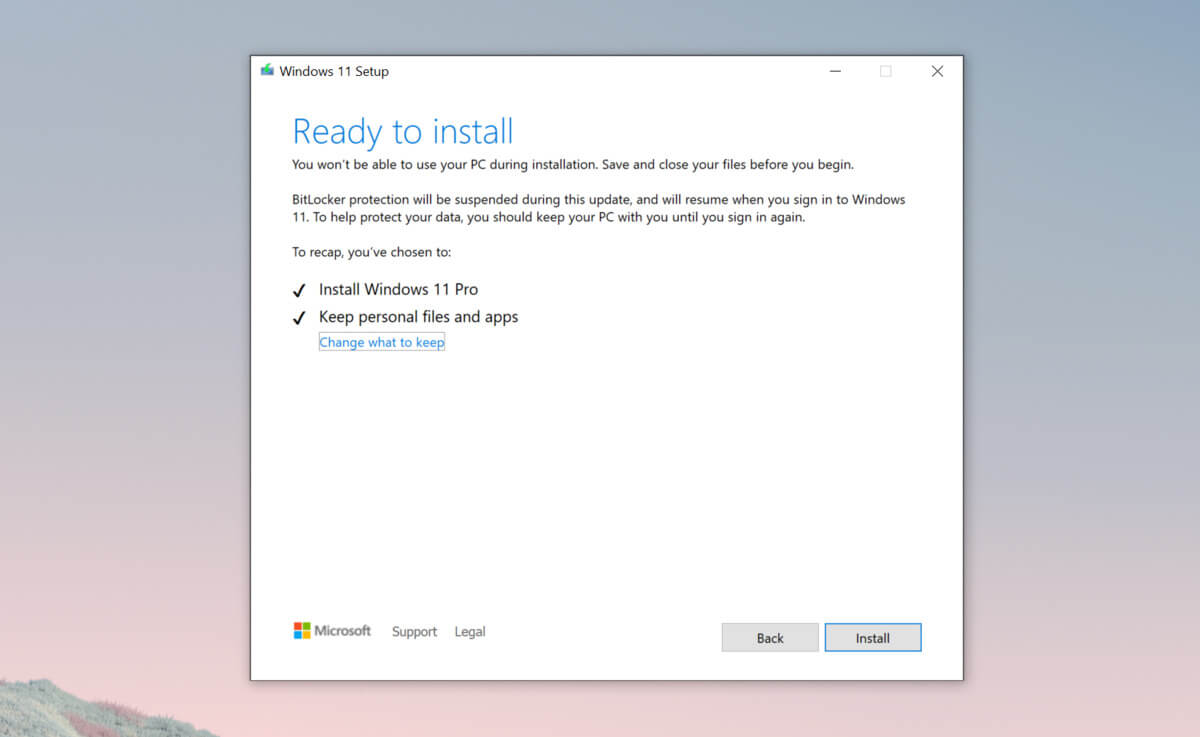
Bypass TPM with changing installation media

For this method to work you will need both Windows 10 ISO and Windows 11 ISO since it will require some file copying between them. You will also need Rufus or another tool to make a new installation media once files are copied All you have to do in this method is to go into your Windows 10 ISO and delete the install.esd, then just copy install.wim from Windows 11 installation media into the same place, and you are done. Make install ISO with Rufus and install Windows 11.

Change DLL on installation media method

For this method, you will need everything like in the previous one and the process is almost the same, but this time instead of migrating the whole installation file, we will just replace the appraiserres.dll file. Copy appraiserres.dll file from your Windows 10 installation media over the same file on Windows 11 installation and you are good to go.

Bypassing TPM via registry editor

If for some reason previous easy solutions have not worked for you do not lose hope just yet, there is one more way you can bypass TPM. In this given method you will not need Windows 10 installation media but the process is a little more complicated than previous ones.
  1. Create Windows 11 media installation
  2. Start the installation process
  3. Click the Next button.
  4. Select region, language, and time when asked. You can change these settings later.
  5. Click the Install now button.
  6. If your device was already activated, click the I don’t have a product key option to continue.
  7. Click the Next button. Select the edition of Windows. When you’re installing the OS on an existing device, Windows won’t activate if you select the incorrect edition.
  8. Click the Next button.
  9. Select the I accept the license terms option and click next.
  10. Select Custom: Install Windows only (Advanced)
  11. During the Windows installation screen, now you will see a message stating that the PC can’t run Windows 11 if you do not have TPM 2.0
  12. On this screen, press SHIFT + F10 to open Command Prompt window.
  13. Launch the registry editor, type regedit.exe in Command Prompt, and press ENTER
  14. Create a new key “LabConfig” by right-clicking on the Setup key and select New > Key under HKEY_LOCAL_MACHINE\SYSTEM\Setup.
  15. Type LabConfig and press ENTER.
  16. Right-click on the LabConfig key.
  17. Select New > DWORD (32-bit) value.
  18. Create two values: BypassTPMCheck and BypassSecureBootCheck.
  19. Set their DWORD32 value to 1.
  20. Press ENTER.
  21. Close the Registry Editor.
  22. Type exit in the Command Prompt and press ENTER or close its window.
  23. Press the back button in the Windows installation setup if it still says “This PC can’t run Windows 11”.
  24. Accept the terms & conditions.
  25. Select Custom: Install Windows only (Advanced) option and configure the partition with the current installation.
  26. Click the Next button.
  27. Finish Windows 11 installation
Read More
Increase or decrease notification display time
As you know, the Windows 10 Action Center has a stack of all the notifications that come from different applications on your computer. So each time an app displays notifications, it will be displayed for about 5 seconds and then it disappears right away. Although the allotted time for the notifications to be displayed is quite enough to catch your attention and help you get a glance at the message, there are times when you might miss it and you hoped it could’ve been displayed a lot longer. So in this post, you will be guided on how you can increase or decrease the display time of the notification in Windows 10. The best way you can view the missed notification is to click on the Action Center. From there, you will see all the notifications that are grouped by the applications. This means that if you have a lot of notifications, it would be hard for you to find what you are looking for. Thus, in such cases, the best way you can do is to increase the display time for which notification to stay on the screen.

To get started, refer to the instructions given below.

Step 1: Tap the Win + I keys to open Settings. Step 2: Next, navigate to Home > Ease of Access > Display. Step 3: After that, scroll down to the end until you see the dropdown to change the notifications where you should see the “Show notifications for”. Step 4: Then you can change the time from the default 5 seconds to 7, 15, 30, and so on. Step 5: Once done, the display time of the notifications should stay longer but keep in mind that you must choose the length wisely so if you have notifications from a lot of apps, then the screen will also be filled with multiple notification cards.
Read More
1 2 3 162
Logo
Copyright © 2022, ErrorTools. All Rights Reserved
Trademarks: Microsoft Windows logos are registered trademarks of Microsoft. Disclaimer: ErrorTools.com is not affiliated with Microsoft, nor claim direct affiliation.
The information on this page is provided for information purposes only.
DMCA.com Protection Status