Fix Microsoft Word Stopped Working in Windows

Microsoft office has set itself as one of the most used and best suites for business use and MS Word as the most widely used word processor. But how even best are not immune to some small bugs and unexpected behaviors so is not Word. Word has stopped working is probably know to a wide audience of its users, I think I could safely say that each Word user has experienced this error at least once, luckily the error is not anything to worry about since it is an easily fixable issue.

Try automated solution

RESTORO is a fully one-click automated solution that could fix all PC issues, you can download it for free. Instructions are at the bottom of this article. If you prefer to do things manually however keep on reading and follow the instructions below.

Manual FIXES:

  1. Update MS Word

    Make sure that you are running the latest build of Word in order to eliminate all bugs and to have a smooth running experience. Go to File > Account > Product Information > Update Options and click Enable Update and then select Update Now.

  2. Check the file

    Corrupted files can cause this crash and this error, try opening another text file inside the Word to eliminate file corruption.

  3. Run Word in safe mode and disable add-ins

    Did you know that MS Word has a safe mode like Windows? In this safe mode, Word will boot up just the application without any add-ins installed and in this environment, you can start one add-in by one to see which one is causing the issue.
    Press ⊞ WINDOWS + R to open the run dialog
    Inside run dialog type in winword /safe followed by ENTER to run Word in safe mode
    If MS Word works fine in Safe mode, disable all COM Add-ins (while being in safe mode) and restart Word. Re-enable the add-ins one at a time to identify the problematic one.
    Click on File and then on Options
    Click on Add-Ins from the options list
    Select COM Add-ins from the drop-down menu and click on Go
    Uncheck all the add-ins and click OK to confirm
    Close the Dialog Box and MS Word. Now try running MS Word normally and see if it works
    Repeat steps to enable the add-ins, one at a time, and check which add-in is causing this error

  4. Repair Word installation

    Press ⊞ WINDOWS + R to open the run dialog
    In run dialog type in control panel and press ENTER
    Inside Control Panel click on Programs and Features
    Locate and click on Microsoft Office to select it
    Once selected click on change located on top of the application list
    Once Office Windows loads click on Repair
    Wait for the process to finish

  5. Reinstall MS office

    If all the previous solutions failed next step would be to completely uninstall MS Office and install it again once the old one has been completely removed from the system.
    Go to the control panel as explained in the previous step and select Office
    Instead of Change this time click on uninstall and follow on-screen instructions
    Once uninstall is finished, install a new copy of MS Office.

If you like to learn and find out more about various Windows errors, and how to repair them go to our vast archive or use search to find articles that will explain and help you in solving your issue.
However, if you prefer to do things fast and with automatization then we are proposing to use an automated solution for your issues. The application that we are recommending is Advanced System Repair Pro
Advanced System Repair utilizes multiple tools all in one to give you a quick, simple, reliable, and very thorough diagnosis of your PC. It brings you all the tools you need in one program to clean, fix, protect, optimize and boost your PC!
1-Click Maintenance
All the tools to make it simple and easy! It's like having a professional technician at the click of a mouse.

Junk Cleaner
Keeping your computer free from unnecessary clutter also helps make your computer last longer. Like any other machine, if you keep it clean and take care of it, it will serve you better for longer!

Optimize background apps
Optimize applications background activity with the built-in Application Optimizer feature.

Disk Defrag
With a simple 1-click, Advanced System Repair speeds up your PC by assembling fragmented files on your machine and organizing them more efficiently.

Malware Removal
Finds and removes all types of harmful malware including trojans, worms, bots, adware, spyware, PUPs, and more!

Privacy Cleaner
The all-in-one privacy suite to Clean Your Tracks & Protect Your Privacy! Make your computer safe, secure, and more efficient!

System Tweak/Optimizer
ASR will analyze your complete system and settings to adjust your PC to function at its maximum performance.

Registry Cleaner
Over time, as you install and uninstall applications, the registry can become cluttered with old entries and broken settings which can result in program crashes, and annoying messages and slow the computer down.
Visit our Advanced System Repair Pro Download page to inform yourself about all the benefits of this software and get a free trial copy of it.
advanced system repair pro

Advanced System Repair Pro

One-click automated PC repair solution
ASR logo
With Advanced System Repair Pro you can easily
Replace damaged files
Restore performance
Free disk space
Remove Malware
Protects WEB browser
Remove Viruses
Stop PC freezing
DOWNLOAD
Privacy Policy | Terms of Use | Uinstall
Advanced System Repair Pro is compatible with all versions of Microsoft Windows including Windows 11

Share this article:

You might also like

Fix Rstrui.exe error in Windows 10

Fix Rstrui.exe error in Windows 10

Rstrui.exe is a service assigned to controlling system restore, it is considered an essential part of the Windows system and without it working you will not be able to perform a system restore operation. Without system restore working you will not be able to "rewind" Windows into a working state if needed which can create in itself many new complications. Luckily we have working solutions for this specific problem, so get ready, and let's start.

SFC scan

Sfc scan is a built-in Windows tool that scans and repairs system corrupted and missing files. To run it open up the command prompt in administrator mode and type in it: SFC /SCANNOW then, let the whole process finish, do not interrupt it, and reboot after it is done.

DISM scan

Similar to SFC scan, DISM is also a built-in tool for fixing files linked to Windows essential working. Start a command prompt in administrator mode and type in: DISM /Online /Cleanup-Image /RestoreHealth Again let the process completely finish and then reboot your system.

Scan for viruses and other malware

Viruses and other malware can seriously damage the system and with it rstrui.exe along with it. Scan your system with Windows defender or even better with some other dedicated security suite to eliminate malicious threats if they exist.

Update Windows

Keeping Windows updated can bring you more good than harm, it is very advisable to keep it up to date all the time so all security leaks and bugs are repaired and that you have your OS in top-notch working order. Updating can also fix corrupted system files or replace them with newer versions so if your Windows is not updated go to update central and do it.

Use automated solution

If you do not wish to go through manual fixing of issues, try an automatic repair solution like RESTORO, where you can fix this and many other issues with just a simple click. Congratulations, you have just Fixed the Rstrui.exe error in Windows 10 all by yourself. If you would like to read more helpful articles and tips about various software and hardware visit errortools.com daily. Now that’s how you fix the Rstrui.exe error in Windows 10 on a computer. On the other hand, if your computer is going through some system-related issues that have to get fixed, there is a one-click solution known as Restoro you could check out to resolve them. This program is a useful tool that could repair corrupted registries and optimize your PC’s overall performance. Aside from that, it also cleans out your computer for any junk or corrupted files that help you eliminate any unwanted files from your system. This is basically a solution that’s within your grasp with just a click. It’s easy to use as it is user-friendly. For a complete set of instructions in downloading and using it, refer to the steps below Perform a full system scan using Restoro. To do so, follow the instructions below.
  1. Download and install Restoro from the official site.
  2. Once the installation process is completed, run Restoro to perform a full system scan. restoro application screen
  3. After the scan is completed click the “Start Repair” button. restoro application screen
Read More
A Guide to Fixing Error Code 39

Easy Guide on how to Fix Error Code 39

Code 39 - What is it?

Code 39 is a device driver error code that pops up when the Windows operating system cannot load the driver for the hardware you want to use.

This hampers your ability to use the hardware properly. The error code is almost always presented in the following format:

“Windows cannot load the device driver for this hardware. The driver may be corrupted or missing.” Code 39

Error Causes

A device driver is a software program that tells the operating system how to control a particular hardware device. Each hardware device has a different driver.

There are separate device drivers for printers, CD-ROM readers, and keyboards, to name a few.

Many device drivers are already built into the operating system. But sometimes you will need to install a new device driver when you want to use a new piece of hardware device that the operating system is not familiar with, or does not anticipate.

Regardless of whether or not the drivers are already integrated into the operating system, you may still experience code 39, typically because of the corrupted or outdated drivers.

Outdated and corrupted drivers cause hardware malfunction and failure, which trigger device driver error codes like code 39. Other causes include incorrect registry values.

Further Information and Manual Repair

Below are some of the easiest and most effective methods to resolve Device Manager error code 39 on your PC.

To follow and implement these methods, you don’t require any technical knowledge or expertise. Simply follow these instructions to fix the error right away.

Method 1 - Fix with a Simple Reboot

There is a possibility that the error code 39 is caused by some fluke within the Device Manager or your BIOS.

If that’s the reason, then a simple PC reboot can resolve the issue immediately. Therefore, before you try anything, it is advisable to restart your system.

If it works, then that is great, but if it doesn’t, then don’t worry, try other methods given below to fix this problem successfully.

Method 2 - Uninstall and Reinstall Drivers

If the error code 39 is generated due to faulty or outdated drivers, then simply uninstall and remove them and then reinstall new driver versions. There are two ways to remove faulty drivers.

Method One

  • One is, to go to the start menu, click on Control Panel, and then Add/Remove Programs.
  • Remove the program and the driver you think is causing problems. This will thoroughly remove all traces of the faulty driver.
  • To reinstall, follow the same steps but this time install the new device driver version.

Method Two

  • The other way is to go to the start menu, type Device Manager in the search bar, and then press enter to continue.
  • In the Device Manager, find and locate the problematic device.
  • After that, double-click the category of device that you wish to uninstall. Let’s say, Windows is unable to load the graphics card driver.
  • This means you will have to click on the Display Adapter category in the Device Manager to uninstall the graphics card.
  • After you have successfully uninstalled, Windows will prompt you to confirm device removal.
  • Simply click OK to confirm and proceed. To activate the changes, restart your PC.
  • To reinstall, go to the Device Manager, click on the Action tab and then select the option ‘Scan for Hardware Changes.’

This method, although effective in resolving error code 39,  can be time-consuming. To avoid the hassle and save time, try method 3.

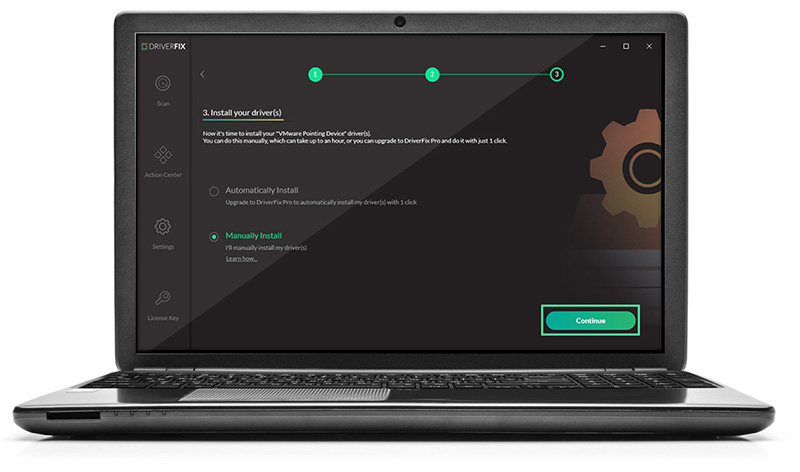
Method 3 - Update Drivers Automatically with DRIVERFIX

If you would like to read more helpful articles and tips about various software and hardware visit errortools.com daily. On the other hand, if your computer is going through some driver-related issues that have to get fixed, there is a one-click solution known as DRIVERFIX you could check out to resolve them. This program is a useful tool that could repair corrupted drivers and optimize your PC’s overall performance. This is basically a solution that’s within your grasp with just a click. It’s easy to use as it is user-friendly. For a complete set of instructions in downloading and using it, refer to the steps below Perform a full system scan using DRIVERFIX. To do so, follow the instructions below.
  1. Download and install DRIVERFIX. from the official site.
  2. Once the installation process is completed, run DRIVERFIX. to perform a full system scan.
  3. After the scan is completed click the “Update All” button.
Read More
How to turn off check boxes in File Explorer
By default inside Windows 11 in File Explorer, once the file is selected, the small check box will appear beside it on left indicating visually that the file is selected. Older users will remember this feature from old Windows Vista and the feature itself is great if you are on some sort of touch device and need to select multiple files. windows 11 File ExplorerHowever, if you are working on a computer with a keyboard and mouse this feature might annoy you and seem like something that is not needed. Like many things inside Windows 11 this feature also can be customized and turned OFF if you do not want it. In this guide, we will see how to turn these boxes off. Microsoft has somewhat hidden this feature but luckily it is not difficult to find it if you know where to look.

Turning check boxes OFF

  1. Open File Explorer (if you do not have an icon on your Taskbar, right-click on the Start button and select File Explorer from the menu)
  2. Click on View on the top toolbar
  3. Select Show
  4. Uncheck Item Check Boxes
That is everything that needs to be done, after the checkbox is unchecked all check boxes from File Explorer will disappear. If you wish to turn boxes back ON, just follow the steps and check the box beside Item Check Boxes.
Read More
How to Fix Windows 10 Error 0x80070070

How to Fix Windows 10 Error 0x80070070

Error Code 0x80070070 - What is it?

Error code 0x80070070 can be presented when there is not enough drive space on the computer to install updates. It is possible to uninstall apps that are not often used, or you may delete or archive files that are no longer needed, you may even add on some removable storage space to free up the internal memory of the computer. The computer needs a significant amount of internal memory in order to be able to update the operating system properly. When the computer fails to have the amount of memory that is needed to perform the update, the error code 0x80070070 will be presented. If this error message is not resolved, your computer might be opened to other error messages, including error code 0x80072EE2.

Common symptoms include:

  • Windows cannot install updates properly.
  • You might not be able to install any additional programs or apps onto the computer.
  • When you check the memory of the computer, it may be very near its full capacity.

Solution

Restoro box imageError Causes

The Windows 10 upgrade error is caused by varying factors including a lack of computer space or resources, malware or virus infestation, or a clogged registry on the computer.  The error code 0x80070070 will present itself when there is not enough free space on the computer to perform the necessary updates on the computer. Too many apps or programs downloaded onto the computer, too many photos, or too much music may also contribute to the lack of storage space on the computer, thus contributing to the error, and the computer not being able to install the updates to the operating system properly.

Further Information and Manual Repair

There is not a lot of information regarding this error code, but there are a few methods to repair it when it does present itself. There are practical and manual steps that can be taken when trying to get the PC up and running. The primary way to solve this problem is to free up disk space and there are several ways to do this. Please do note that if these methods seem confusing or too complicated, do contact a Windows repair technician so that they may properly correct the problem. You will need to know for sure that it is error code 0x80070070 that you are dealing with so that these options are the best bet for fixing it.

Method One: Disk Cleanup

It is important to know how much space there is on the computer to start with prior to trying to free up any space. Use the free program on the computer called the Disk Cleanup tool. This will save time and free up some hard drive space while optimizing the computer to work better.

From the Start menu, browse to the Explore option, and then select This PC. Right-click on the C drive, and then select Properties. Select Disk cleanup. From here, select the options that you would like to clear. Make sure that the recycle bin is emptied of any temporary files or any error logs. Once done, select Okay.

Use this same process to clear the system files after an update from Windows, as they may still have files from the old operating system in place.

Method Two: Remove Unwanted Apps

Go through your computer and remove any unwanted apps that are present. There are sure to be some that you do not use or do not want.

Follow these steps: From the Start menu, select Settings. Then, select System, Apps, and Features. When you have found the program that you would like to uninstall, select it and then select Uninstall. NOTE: some apps that are built into Windows do not have the capability to be uninstalled. Once you have selected Uninstall for the app or program, follow all directions that appear on the screen.

Method Three: Cloud Storage

If there are a lot of media, photos, documents, videos, and the like that are not used on a regular basis, try out cloud storage. These files will still be in your possession and will be able to be accessed from anywhere. There are many applications or websites that cater to this.

Method Four: External Storage Options

If none of the above methods work, add more storage. To acquire more storage, you can incorporate devices such as SD cards, USB flash drives, and even external hard drives.

Method Five: Use An Automated Tool

If you wish to always have at your disposal a utility tool to fix these Windows 10 and other related issues when they do arise, download and install a powerful automated tool.
Read More
Fix Page Fault in Non-Paged Area in Windows 10
Page Fault in Non-Paged Area is a blue screen error usually happening with faulty drivers but it can come from different issues like faulty RAM. In this short article, we will cover usual ways on how to approach and solve this error.

Solving Page fault in Non-Paged Area

Page Fault in Non-Paged AreaRollback using system restore

Simple and easy solution, roll back to the previous system restore point where Windows was stable and working.

Fix Page Fault in Non-Paged Area using device manager

  1. Press ⊞ WINDOWS + X to open the hidden menu
  2. Click on device manager
  3. Find a device with a question mark and right-click on it
  4. Click on the rollback driver button

Fix via command prompt

  1. Press ⊞ WINDOWS + X to open the hidden menu
  2. Click on command prompt (admin)
  3. Inside command prompt type in SFC / scannow and press ENTER
  4. Wait for the process to be finished and then reboot the PC

Fix via DISM tool

  1. Press ⊞ WINDOWS + X to open the hidden menu
  2. Click on command prompt (admin)
  3. Inside command prompt type in DISM /Online /Cleanup-image /Restorehealth and press ENTER
  4. Wait for the process to be finished and then reboot the PC

Page fault in Non-Paged Area via a dedicated tool

Sometimes manual and provided solutions just simply cannot cut it because the issue is triggered also with something else and not just a single issue. Use DRIVERFIX to fix this specific issue with a single click.
Read More
How to remove AudioToAudio (Browser Extension) from your PC

AudioToAudio is a browser extension for Google Chrome developed by Mindspark Inc. This extension allows users easy access to popular audio converting websites.

When installed, it changes the default search engine, home page, and new tab to MyWay.com. While active AudioToAudio gathers user browsing activities such as, but not limited to: visited websites, clicked links, search queries. This data is later used/sold by the Mindspark ad network to better target ads. While browsing the internet with this extension enabled, you will see additional injected ads, sponsored content (such as links to web pages, banner ads, affiliate shop links, etc), and even pop-up ads from time to time if the regular ads are blocked. AudioToAudio has been marked as a Browser Hijacker by several anti-virus applications and is marked for removal by most of them.

About Browser Hijackers

Browser hijacking is a form of unwanted software, commonly a web browser add-on or extension, which causes modifications in web browser’s settings. They are created to interfere with browser functions for various purposes. Typically, hijackers are developed for the benefit of cyber hackers often through revenue generation from forced ad clicks and website visits. However, it isn’t that innocent. Your online safety is compromised and it is also extremely annoying. Some browser hijackers are programmed to make particular modifications beyond the browsers, like changing entries in the computer registry and letting other malware further damage your computer.

How to determine if your browser has been hijacked

When your web browser is hijacked, the following might happen: 1. your web browser’s homepage is suddenly different 2. you get re-directed to sites you never meant to visit 3. The default search page of the web browser is changed 4. discover new toolbars that you simply did not add 5. you see numerous ads pop up on the web browsers or computer screen 6. webpages load slowly and often incomplete 7. Inability to navigate to certain websites, especially antivirus and also other computer security software sites.

How they infect computers

There are many ways your computer or laptop can become infected with a browser hijacker. They usually arrive by way of spam email, via file-sharing networks, or by a drive-by-download. They can also be deployed via the installation of an internet browser toolbar, extension, or add-on. A browser hijacker could also come bundled up with some free software that you unknowingly download and install the browser hijack, compromising your PC security. Some of the most well-known hijackers are AudioToAudio, Babylon Toolbar, Conduit Search, OneWebSearch, Sweet Page, and CoolWebSearch.

Removing browser hijackers

Some hijackers could be removed by just uninstalling the related freeware or add-ons through the Add or Remove Programs in the Microsoft Windows Control Panel. But, the majority of hijackers are quite tenacious and require specialized applications to eliminate them. Novice computer users shouldn’t ever attempt the manual form of removal, as it requires thorough computer knowledge to carry out repairs on the computer registry and HOSTS file. Browser hijackers can be effectively removed by installing and running anti-malware software on the affected PC. Safebytes Anti-Malware has a sophisticated anti-malware engine to help you prevent browser hijacking in the first place, and mop up any existing issues. In addition to anti-malware, a system optimizer tool, similar to Total System Care, could help you resolve Windows registry errors, eliminate unwanted toolbars, secure online privacy, and increase overall computer performance.

How To Get Rid Of Malware That Is Preventing Anti-Malware Installation?

All malware is bad, but certain types of malware do more damage to your computer than others. Some malware types alter internet browser settings by including a proxy server or change the PC’s DNS settings. In these cases, you will be unable to visit some or all internet sites, and thus not able to download or install the required security software to remove the malware. If you are reading this article, you probably have got affected by malware that prevents you from installing a computer security program like Safebytes Anti-Malware. There are a few actions you can take to get around this problem.

Install in Safe Mode

In Safe Mode, you are able to modify Windows settings, un-install or install some applications, and remove hard-to-delete viruses and malware. In the event the malware is blocking access to the internet and affecting your PC, running it in Safe Mode allows you to download anti-malware and run a diagnostic scan whilst limiting possible damage. In order to enter into Safe Mode or Safe Mode with Networking, press the F8 key while the PC is starting up or run MSCONFIG and locate the “Safe Boot” options in the “Boot” tab. Once you are in Safe Mode, you can attempt to download and install your anti-malware software without the hindrance of the malicious software. Now, you can actually run the antivirus scan to remove computer viruses and malware without any interference from another application.

Switch over to a different web browser

Malicious code could exploit vulnerabilities in a particular internet browser and block access to all anti-virus software websites. If you suspect that your Internet Explorer happens to be hijacked by a computer virus or otherwise compromised by cybercriminals, the best plan of action would be to switch to an alternate browser like Chrome, Firefox, or Safari to download your favorite computer security program – Safebytes Anti-Malware.

Install and run antivirus from your Thumb drive

Here’s another solution which is creating a portable USB anti-virus software package that can scan your computer for malicious software without needing installation. Adopt these measures to use a USB drive to fix your infected computer system. 1) Download Safebytes Anti-Malware or MS Windows Defender Offline onto a virus-free computer system. 2) Mount the USB drive on the same computer. 3) Double-click the executable file to run the installation wizard. 4) Choose the USB flash drive as the destination for saving the file. Do as instructed on the screen to finish up the installation process. 5) Transfer the USB drive from the uninfected PC to the infected computer. 6) Double-click the EXE file to open the Safebytes tool from the thumb drive. 7) Run Full System Scan to detect and clean-up up all types of malware.

Protect Your PC and Privacy With SafeBytes Anti-Malware

If you’re looking to install an anti-malware application for your computer, there are several tools in the market to consider but you should not trust blindly anyone, irrespective of whether it is paid or free software. A few of them do a good job in removing malware threats while many will damage your computer by themselves. When searching for an antivirus tool, purchase one that offers reliable, efficient, and complete protection against all known viruses and malware. When considering commercial anti-malware software options, most people choose popular brands, like SafeBytes, and are very happy with them. Safebytes is among the well-established computer solutions companies, which provide this all-inclusive anti-malware application. Through its cutting-edge technology, this software will help you protect your PC against infections brought on by various kinds of malware and other threats, including spyware, adware, computer viruses, worms, trojan horses, keyloggers, potentially unwanted program (PUPs), and ransomware.

SafeBytes anti-malware takes computer protection to a whole new level with its advanced features. Here are a few of the good ones:

Robust, Anti-malware Protection: Safebytes is built on the very best virus engine within the industry. These engines can find and eliminate threats even during the early phases of a malware outbreak. Real-Time Protection: Malware programs trying to enter the computer are identified and stopped as and when detected by the SafeBytes real-time protection shields. This software will constantly monitor your PC for any suspicious activity and updates itself regularly to keep abreast of the constantly changing threat scenarios. Internet Security: Safebytes assigns all websites a unique safety rating that helps you to get an idea of whether the webpage you’re going to visit is safe to browse or known to be a phishing site. Lightweight: SafeBytes is a lightweight application. It uses up a really small amount of processing power as it works in the background so you’re free to use your Windows-based computer the way you want. Premium Support: For any technical problems or product guidance, you may get 24/7 professional assistance via chat and e-mail. Overall, SafeBytes Anti-Malware is a solid program since it has loads of features and could detect and eliminate any potential threats. You now may realize that this tool does more than just scan and eliminate threats from your computer. So when you want advanced forms of protection features & threat detections, purchasing SafeBytes Anti-Malware will be well worth the money!

Technical Details and Manual Removal (Advanced Users)

If you’d like to carry out the removal of AudioToAudio manually rather than utilizing an automated software tool, you can follow these simple steps: Go to the Windows Control Panel, click on the “Add/Remove Programs” and there, select the offending application to uninstall. In case of suspicious versions of web browser plugins, you can easily get rid of them through your browser’s extension manager. You may also want to reset your home page and search engine providers, as well as clear your browser cache and cookies. If you decide to manually delete the system files and registry entries, utilize the following checklist to ensure that you know exactly what files to remove before undertaking any actions. However, this can be a tricky task and only computer professionals could carry it out safely. In addition, some malware is capable of replicating or preventing deletion. It is recommended that you do the removal procedure in Safe Mode. For more information and manual removal instructions visit www.ErrorTools.com Download Safebytes Anti-Malware: https://errortools.com/download/safebytes-anti-malware/ AudioToAudio is a browser extension for Google Chrome developed by Mindspark Inc. This extension allows users easy access to popular audio converting websites. When installed, it changes the default search engine, home page, and new tab to MyWay.com. While active AudioToAudio gathers user browsing activities such as, but not limited to: visited websites, clicked links, search queries. This data is later used/sold by the Mindspark ad network to better target ads. While browsing the internet with this extension enabled, you will see additional injected ads, sponsored content (such as links to web pages, banner ads, affiliate shop links, etc), and even pop-up ads from time to time if the regular ads are blocked. AudioToAudio has been marked as a Browser Hijacker by several anti-virus applications and is marked for removal by most of them.
Read More
How to Resolve the Sqlite3.dll Error Code

Fix the Sqlite3.dll Error

Sqlite3.dll Error - What is it?

Sqlite3.dll error is a typical example of DLL errors. This error message occurs when the system fails to access Sqlite3.dLL (Dynamic Link Library) files shared by certain programs to run on the PC. The error is displayed in the following format:

"Cannot find the file sqlite3.dll (or one of its components)"

Followed by:

"Error starting program.. A required .DLL file sqlite3.dll was not found."

Solution

Restoro box imageError Causes

The sqlite3.dll error message may pop up on your computer screen due to the following reasons:
  • Missing sqlite3.dll files
  • DLL files affected due to viruses and malware on your system
  • Registry overloaded with invalid entries
  • Disk fragmentation
Whether the cause for the sqlite3.dll error code on your PC is malware invasion or registry issues, it is recommended to resolve it immediately before the damage sets in. Such errors can expose your PC to serious threats like privacy errors, data breaches, identity thefts, cybercrime, system failure, crashes, and valuable data loss.

Further Information and Manual Repair

When it comes to fixing sqlite3.dll error code, you don’t always need to hire a professional and spend hundreds of dollars on the repair. Here are some simple and do it yourself solutions that you can try and resolve the error on your system for free.

1. Check inside recycle bin and restore the deleted file

If this error popped on your computer screen after installing a certain program, then you need to check your recycle bin. This is because DLL files are shared by multiple programs, it might be possible that the program you just deleted also used the sqlite3.dll file to run on your system. And so when you uninstalled the program, the sqlite3.dll file also got removed. To resolve this, check your recycle bin for the file. If you find it, restore it. Once the files is restored, try running the application that was generating the sqlite3.dll error message. If the error still persists, then this means the cause of the sqlite3.dll error is deeper. It could be due to malware or the registry.

2. Remove Malware

To remove malware, run an antivirus. This will help scan for such malicious software on your system affecting DLL files and remove them. However, the drawback is that it may slow down the speed of your PC significantly. And when running it, you may have to stop all other activities on your system.

3. Repair and Restore the Registry

If the cause of the sqlite3.dll error is the registry corrupted with invalid entries and disk fragmentation, then you need to repair and restore the registry. The best way to do this is to download Restoro. Restoro is a powerful and highly functional registry cleaner. It scans your entire PC and detects all registry issues in seconds. It wipes out all the unnecessary and obsolete files including the junk files, invalid registry entries, bad registry keys, temporary internet files, cookies, and browser history. It clears up hard disk space and frees it of clutter. Furthermore, this registry cleaner also repairs the damaged DLL files and restores the registry. Restoro is not only a registry cleaner but is also a system optimizer. This means you can also run it to scan and remove malware on your PC and system instability issues. It boosts your PC’s speed and performance. It runs smoothly on all Windows versions. It is safe, efficient and user-friendly. The layout is neat and the interface is easy to use and intuitive. In just a few clicks you can resolve the sqlite3.dll error and resume using your desired programs. Click here to download Total System Care on your PC to resolve sqlite3.dll error pop-ups.
Read More
How to Remove PUP ExpressFiles Tutorial

ExpressFiles is a program developed by Express Solutions. A number of Anti-Virus programs have flagged this program as a Potentially Unwanted Application. In many instances, it is bundled with additional programs on installation.

The program claims it offers users easy to search for various currently popular search terms. During our testing, the software never displays any search results, no matter the search words. Upon installation and setup, it defines an auto-start registry entry which makes this program run on each Windows boot for all user logins. A scheduled task is added to Windows Task Scheduler in order to launch the program at various scheduled times. The program defines an exception rule in Windows Firewall, allowing it to connect to the internet without limitations and auto-update itself.

About Browser Hijackers

Precisely what is a PUP?

If you’ve ever downloaded a free application or shareware, chances are high that the computer can get installed with a bunch of unwanted applications. A PUA / PUP (potentially unwanted application / potentially unwanted program) is a software program that comes bundled with free software and you consent to install it on your PC. These are programs you almost certainly don’t want on your computer simply because it doesn’t give any valuable service. Despite being regarded as very detrimental, PUPs aren’t always viruses or malware One simple difference between PUP and malware is distribution. Malware is normally dropped by silent installation vectors like drive-by downloads while PUP gets installed with the consent of the computer user, who purposefully or unknowingly approves the PUP installation on its PC. Having said that, there is no doubt that PUPs remain bad news for PC users as they can be incredibly damaging to the computer in numerous ways.

Exactly how do unwanted programs look like?

Potentially Unwanted Programs appear in different forms and varieties, however, in the majority of instances, they are adware programs that exhibit irritating pop-up ads and advertisements on websites you explore. In addition, the majority of free programs these days come with some unwanted add-ons; in most cases an internet browser toolbar or browser modification like a homepage hijacker. They’ll keep track of your online routines, redirect your search results to risky websites where viruses can be downloaded and installed, hijack your home page, and slow your browser down to a crawl. Potentially Unwanted Programs occasionally act quite much like computer viruses or spyware. They might carry keyloggers, dialers, browser hijackers, and tracking components that gather system details, or tracks customer habits and relays this information to third-party firms. Even if the PUPs really aren’t basically malicious, these software programs still do absolutely nothing good on your personal computer – they will take valuable system resources, slow down your PC, weaken your computer security, and make your system more susceptible to trojans.

How do you avoid PUPs?

• Read cautiously before accepting the license agreement as it may have a clause about PUPs. • Always opt for the custom if you’re presented an option between “Custom” and “Recommended” Installations – never click Next, Next, Next blindly. • Have a top-notch antivirus program like Safebytes Anti-Malware which can protect your computer from PUPs. As soon as you install this software, protection from malware and PUPs is already switched on. • Think carefully before you download any kind of shareware or freeware. Disable or get rid of toolbars and browser extensions you don’t really need. • Only use official product websites for downloading programs. Stay away from download portals altogether as most websites compel users to download the software using their own download manager, which is often bundled up with some sort of PUPs.

What To Do If You Cannot Install Any Anti-Malware?

All malware is bad, but certain types of malicious software do a lot more damage to your computer than others. Some malware types modify browser settings by adding a proxy server or modify the PC’s DNS settings. In these instances, you will be unable to visit some or all of the websites, and therefore not able to download or install the required security software to remove the infection. If you are reading this right now, you have perhaps recognized that a malware infection is a reason for your blocked web connectivity. So how to proceed when you want to install an anti-malware application like Safebytes? Follow the instructions below to eliminate malware by alternative methods.

Install in Safe Mode

The Windows-based PC comes with a special mode called “Safe Mode” where just the bare minimum required applications and services are loaded. If the malware is set to load immediately when the computer starts, shifting to this mode may well prevent it from doing so. In order to enter into Safe Mode or Safe Mode with Networking, press the F8 key while the PC is starting up or run MSConfig and locate the “Safe Boot” options under the “Boot” tab. As soon as you restart the PC into Safe Mode with Networking, you could download, install, and update anti-malware software from there. Right after installation, run the malware scanner to get rid of standard infections.

Utilize an alternate internet browser to download antivirus software

Web-based malware could be environment-specific, targeting a specific web browser or attacking particular versions of the web browser. If you’re not able to download the anti-virus application using Internet Explorer, this means the virus is targeting IE’s vulnerabilities. Here, you need to switch to a different web browser such as Chrome or Firefox to download the Safebytes Anti-malware program.

Install and run antivirus from a Thumb drive

Here’s yet another solution which is creating a portable USB anti-virus software that can scan your computer for malware without the need for installation. Try these simple actions to clean up your infected computer using portable anti-malware. 1) Download Safebytes Anti-Malware or Microsoft Windows Defender Offline onto a clean PC. 2) Mount the pen drive on the same PC. 3) Run the setup program by double-clicking the executable file of the downloaded software, which has a .exe file extension. 4) Select the drive letter of the USB drive as the location when the wizard asks you exactly where you would like to install the anti-malware. Follow activation instructions. 5) Now, insert the thumb drive into the corrupted PC. 6) Run the Safebytes Anti-malware directly from the pen drive by double-clicking the icon. 7) Click the “Scan” button to run a full computer scan and remove viruses automatically.

Overview of SafeBytes Anti-Malware

If you are looking to download the anti-malware program for your computer, there are lots of tools in the market to consider nonetheless, you just cannot trust blindly anyone, irrespective of whether it is free or paid software. A few of them do a great job in removing threats while some will ruin your PC by themselves. You need to pick a company that develops industry-best antimalware and has achieved a reputation as trustworthy. When considering commercial tool options, most people opt for well-known brands, such as SafeBytes, and they are quite happy with it. SafeBytes anti-malware is really a powerful, very effective protection software made to help users of all levels of computer literacy in detecting and removing malicious threats out of their computer. Using its outstanding protection system, this utility will quickly detect and get rid of the majority of the security threats, which include adware, viruses, browser hijackers, ransomware, PUPs, and trojans. SafeBytes anti-malware takes computer protection to a totally new level with its advanced features. Here are a few typical features present in this software: Live Protection: SafeBytes offers complete and real-time security for your laptop or computer. It’ll regularly monitor your computer for hacker activity and also gives end-users superior firewall protection. Most Reliable AntiMalware Protection: With its enhanced and sophisticated algorithm, this malware elimination tool can find and eliminate the malware threats hiding in your PC effectively. “Fast Scan” Features: SafeBytes’s high-speed malware scanning engine minimizes scanning times and extends battery life. Simultaneously, it will effectively identify and remove infected computer files or any online threat. Web Protection: SafeBytes checks and gives a unique safety ranking to each and every website you visit and block access to webpages considered to be phishing sites, thus safeguarding you from identity theft, or known to contain malicious software. Low CPU/Memory Usage: SafeBytes is well known for its low effect on computer resources and great detection rate of diverse threats. It runs quietly and efficiently in the background so you’re free to use your PC at full power all of the time. 24/7 Premium Support: SafeBytes gives you 24/7 technical support, automatic maintenance, and upgrades for the best user experience.

Technical Details and Manual Removal (Advanced Users)

If you wish to manually remove ExpressFiles without the use of an automated tool, it may be possible to do so by removing the program from the Windows Add/Remove Programs menu, or in cases of browser extensions, going to the browsers AddOn/Extension manager and removing it. You will likely also want to reset your browser. To ensure the complete removal, manually check your hard drive and registry for all of the following and remove or reset the values accordingly. Please note that this is for advanced users only and may be difficult, with incorrect file removal causing additional PC errors. In addition, some malware is capable of replicating or preventing deletion. Doing this in Safe Mode is advised.

The following files, folders, and registry entries are created or modified by ExpressFiles

Files: %APPDATAExpressFilescurrent-cloud.html %COMMONDESKTOPExpressFiles.lnk %COMMONSTARTMENUExpressFilesExpressFiles.lnk %COMMONSTARTMENUExpressFilesUninstall.lnk %PROGRAMFILESExpressFilescurrent-cloud.de.html %PROGRAMFILESExpressFilescurrent-cloud.en.html %PROGRAMFILESExpressFilescurrent-cloud.fr.html %PROGRAMFILESExpressFilescurrent-cloud.ru.html %PROGRAMFILESExpressFilesEFupdater.exe %PROGRAMFILESExpressFilesExpressDL.exe %PROGRAMFILESExpressFilesExpressFiles.exe %PROGRAMFILESExpressFilesuninstall.exe %WINDIRTasksExpress Files Updater.job %APPDATAExpressFiles %COMMONSTARTMENUExpressFiles %PROGRAMFILESExpressFileslanguage %PROGRAMFILESExpressFiles Registry: key ExpressFiles.exe at HKEY_LOCAL_MACHINESOFTWAREConduitAppPaths. key ExpressFiles at HKEY_CURRENT_USERSoftware. key ExpressFiles at HKEY_LOCAL_MACHINESOFTWARE. key ExpressFiles at HKEY_USERS.DEFAULTSoftware. HKEY_CLASSES_ROOTMagnetsshellopencommand value $PROGRAMFILESExpressFilesExpressDL.exe at HKEY_LOCAL_MACHINESYSTEMControlSet001ServicesSharedAccessParametersFirewallPolicyStandardProfileAuthorizedApplicationsList. value $PROGRAMFILESExpressFilesExpressDL.exe at HKEY_LOCAL_MACHINESYSTEMControlSet002ServicesSharedAccessParametersFirewallPolicyStandardProfileAuthorizedApplicationsList. value $PROGRAMFILESExpressFilesExpressDL.exe at HKEY_LOCAL_MACHINESYSTEMControlSet003ServicesSharedAccessParametersFirewallPolicyStandardProfileAuthorizedApplicationsList. value $PROGRAMFILESExpressFilesExpressFiles.exe at HKEY_LOCAL_MACHINESYSTEMControlSet001ServicesSharedAccessParametersFirewallPolicyStandardProfileAuthorizedApplicationsList. value $PROGRAMFILESExpressFilesExpressFiles.exe at HKEY_LOCAL_MACHINESYSTEMControlSet002ServicesSharedAccessParametersFirewallPolicyStandardProfileAuthorizedApplicationsList. value $PROGRAMFILESExpressFilesExpressFiles.exe at HKEY_LOCAL_MACHINESYSTEMControlSet003ServicesSharedAccessParametersFirewallPolicyStandardProfileAuthorizedApplicationsList.
Read More
A Quick Fix Guide to Resolving Xinput1_3.dll Error Code

Fix Xinput1_3.dll Error Code

Xinput1_3.dll - What is it?

Xinput1_3.dll is a type of dynamic link library. It is an essential component of Microsoft DirectX. This is a technology that makes Windows OS compatible with programs rich in multimedia elements It helps your graphic card in creating a detailed virtual and stimulus environment. Games and programs with high graphics and sounds require DirectX to form a consonance with Windows PC to run successfully. The Xinput1_3.dll error occurs when games supported by DirectX are unable to run smoothly. This error is common on Windows 7. The error message is displayed in the following format:
  • "The file xinput1_3.dll is missing"
  • "File xinput1_3.dll not found"
  • "Xinput1_3.dll not found. Reinstalling might help fix this."
  • "Xinput1_3.DLL Not Found"

Solution

Restoro box imageError Causes

The causes of Xinput1_3.dll error include:
  • Damaged and Corrupt Xinput1_3.dll files
  • Missing Microsoft DirectX file
  • Viruses and malware on your system
  • Driver issues
  • Registry overloaded with invalid entries
If you come across this error, make sure you fix it timely. It is recommended to do so because it not only stops you from accessing and playing your desired games and using high graphic applications but also can lead to system failure and crash if the underlying cause of the error is related to the registry.

Further Information and Manual Repair

To resolve this error code, here are some of the best do it yourself methods:

Restart Your PC

Sometimes due to minor concurrence, PC is unable to load the file Xinput1_3.dll from the directory. If this is the cause, then you are lucky. All you have to do to resolve it and restart your computer. Once the computer restarts, re-launch the program.

Install the Latest DirectX Version

Search for the latest versions of the DirectX utility version. Try extracting the Xinput1_3.dll files individually from the DirectX downloadable package on your PC. Once downloading is complete, try running your desired application again and see if the error code pops up or not.

Update the Graphics Card

Being an element of Microsoft DirectX, Xinput1_3.dll is directly related to the video/graphics card assimilated. There can be a possibility of a mismatch between the Xinput1_3.dll file and graphic card drivers. If this is the case, then the best way to resolve the error is to update the graphic drivers by installing the latest version drivers of your video/graphics card. Nonetheless, after trying all the solutions discussed above if the error still persists, then this triggers two things either the error is triggered by a viral infection that you are unaware of or the problem is related to the registry.

Install Restoro

Whichever might be the cause, in such as scenario the best quick fix to it is to download Restoro. This is an advanced, cutting edge, and multi functional PC repair that is deployed with several utilities including a registry cleaner, an antivirus, Active X controls, and class detector, and a system optimizer. The registry cleaner utility removes all the unnecessary files from the registry that could be damaging the dll files and the registry. It clears the disk space, repairs dll files, and restores the registry back to normal. Simultaneously the antivirus module scans your system for all possible malicious software. It removes viruses, Trojans, malware, spyware, and adware thereby resolving the Xinput1_3.dll error right away. Total System Care is safe, bug-free, and has a user-friendly interface with easy navigation. It is compatible with all Windows versions. Click here to download Restoro and resolve the Xinput1_3.dll error right away!
Read More
Keyboard shortcuts and hotkeys are not working
This post will guide you on what to do if your keyboard shortcuts or hotkeys are not working on your Windows 10 computer. A lot of users use hotkeys as they make things easier for them as they use their computer. However, there are instances when these hotkeys suddenly stop working. It’s actually one of the most common problems with keyboards. And so to resolve this problem, you can try out some suggestions prepared on this post.

Option 1 – Clean the keyboard keys physically

Your keyboard might not be working properly due to some dirt or other corrosion. First, you need to shut down your computer and then unplug the keyboard if you are using a desktop computer and then prepare it for cleaning. After that, use a small cotton ear cleaning tool to get between the creases and clean them. You can dip it slightly in alcohol to make it more efficient in cleaning dust and dirt. And if you can, you have the option to pull apart the keyboard completely and then wipe away all the corrosion from the inside. Once you’re done, put the keyboard back together and then plug it back into your PC. Now turn your PC on and check if the hotkeys are now working.

Option 2 – Try running the Hardware and Devices Troubleshooter

The first thing you can do to fix the problem is by running the Hardware Troubleshooter. Although it won’t make much of a difference, there’s still a possibility that it could automatically fix the problem with these function keys. To use it, refer to these steps:
  • The first thing you need to do is click on Start and then on the gear-like icon to pull up the window for Settings.
  • After opening Settings, look for the Update and Security option and select it.
  • From there, go to the Troubleshoot option located on the left-hand side of the list.
  • Next, select Hardware and Devices from the list and open the Troubleshooter and run it. Once it is doing its job, wait for it to complete the process and then restart the system.
  • After the system restarts, check if the problem’s now fixed. If not, refer to the next option given below.

Option 3 – Try connecting the keyboard to a different USB port

The problem might have something to do with the USB port that’s currently in use by your keyboard. It could be that it’s not working so it makes sense to unplug it and attach it to another USB port. You can also clean the USB port on both ends to ensure that they are not affected by corrosion.

Option 4 – Uninstall previously installed keyboard software

If you have been previously using another keyboard, it might be better if you make sure that the software for the old device has been removed since there are instances when multiple software can cause problems due to similarities in actions.

Option 5 – Update the keyboard driver

You can also update the keyboard driver to fix the problem. There are cases when an outdated or corrupted driver can fix the problem. To do so, follow the steps below.
  • Tap the Win + R keys to open the Run dialog box.
  • Then type “devmgmt.msc” in the field and hit Enter to open the Device Manager.
  • From there, look for the keyboard driver and click on it.
  • Next, right-click on the keyboard driver and select the Update driver option.
  • After that, click the “Search automatically for updated driver software” option to proceed.

Option 6 – Reinstall the keyboard driver

If updating the keyboard driver didn’t help, then you might want to reinstall it. How? Follow the steps below.
  • Tap the Win + R keys to launch Run.
  • Type in MSC into the box and tap Enter or click OK to open the Device Manager.
  • After that, a list of device drivers will be displayed. Look for keyboard driver, right-click on it and then select “Uninstall device”.
  • After that, unplug the device and restart your PC.
  • Then plug your device back in. Assuming your device is connected to your PC, open the Device Manager again.
  • Next, click on the Action button and click the Scan for hardware changes button. That should fix the problem.
Note: You could also completely uninstall the driver and go directly to the manufacturer’s website and download the latest driver for your hardware and then install it.

Option 7 – Enable Human Interface Device (HID) Service

Another thing to consider is the Human Interface Device Service. If this service is disabled, then no wonder why your hotkeys are not working. Thus, you need to enable this service. Refer to the following steps to do that:
  • Tap the Win + R key to launch the Run dialog box.
  • Then type “services.msc” in the field and hit Enter to open Services.
  • After opening Services, scroll down until you see the Human Interface Device service.
  • Double click on HID and make sure that its Startup Type is set to “Automatic” and then click OK.
  • Restart your PC and check if the hotkeys are now working or not.

Option 8 – Try resetting the keyboard

You might also want to try resetting the keyboard as it can also help in fixing the problem. Setting it back to its default state will surely help.
Read More
1 2 3 162
Logo
Copyright © 2022, ErrorTools. All Rights Reserved
Trademarks: Microsoft Windows logos are registered trademarks of Microsoft. Disclaimer: ErrorTools.com is not affiliated with Microsoft, nor claim direct affiliation.
The information on this page is provided for information purposes only.
DMCA.com Protection Status