Display driver nvlddmkm stopped responding

Users are reporting that randomly their screen will just go black for a second and come back. When this happens, it usually distorts any video currently on the screen; sometimes, they can resume working on the PC normally. However, when they view the event logs, they see the error message Display driver nvlddmkm stopped responding and has successfully recovered.

In this article, we will address solutions to this issue and how to not have it again.

  1. Remove Aura iCUE plugin (applies to only ASUS motherboards)

    Some PC users discovered that iCue adds an Aura plugin for ASUS MOBOs. That, combined with EVGA Precision X1, was causing the error it seems – this was determined when the screen would turn off and on when opening EVGA x1 software. In this case, the issue was resolved by removing the Aura iCUE plugins.

  2. Change Power Management mode

    Right-click the battery icon on the notification area on the right of the Taskbar.
    Select Power Options.
    In the Power Options window, locate your current Power Plan.
    Select High performance, if that’s not your current power plan.
    Now, click on Change plan settings next to it.
    Now click on Change advanced power settings.
    Expand PCI Express section.
    Expand Link State Power Management.
    Now set power saving to Off for both On battery and Plugged in state. This would fix any issues caused by the low power of the video card.
    Click Apply > OK to save changes.

  3. Update graphics driver

    Go into device manager
    Expand display adapter section
    Right-click on adapter
    Click on update driver
    Reboot

  4. Rollback graphics driver

    Go into device manager
    Expand display adapter section
    Right-click on adapter
    Click on Roll back driver
    Reboot

  5. Uninstall and reinstall graphics card driver

    Go into device manager
    Expand display adapter section
    Right-click on adapter
    Click on Uninstall device
    Reboot

  6. Replace the graphics card

    If everything else failed, replace the graphic card

If you like to learn and find out more about various Windows errors, and how to repair them go to our vast archive or use search to find articles that will explain and help you in solving your issue.
However, if you prefer to do things fast and with automatization then we are proposing to use an automated solution for your issues. The application that we are recommending is Advanced System Repair Pro
Advanced System Repair utilizes multiple tools all in one to give you a quick, simple, reliable, and very thorough diagnosis of your PC. It brings you all the tools you need in one program to clean, fix, protect, optimize and boost your PC!
1-Click Maintenance
All the tools to make it simple and easy! It's like having a professional technician at the click of a mouse.

Junk Cleaner
Keeping your computer free from unnecessary clutter also helps make your computer last longer. Like any other machine, if you keep it clean and take care of it, it will serve you better for longer!

Optimize background apps
Optimize applications background activity with the built-in Application Optimizer feature.

Disk Defrag
With a simple 1-click, Advanced System Repair speeds up your PC by assembling fragmented files on your machine and organizing them more efficiently.

Malware Removal
Finds and removes all types of harmful malware including trojans, worms, bots, adware, spyware, PUPs, and more!

Privacy Cleaner
The all-in-one privacy suite to Clean Your Tracks & Protect Your Privacy! Make your computer safe, secure, and more efficient!

System Tweak/Optimizer
ASR will analyze your complete system and settings to adjust your PC to function at its maximum performance.

Registry Cleaner
Over time, as you install and uninstall applications, the registry can become cluttered with old entries and broken settings which can result in program crashes, and annoying messages and slow the computer down.
Visit our Advanced System Repair Pro Download page to inform yourself about all the benefits of this software and get a free trial copy of it.
advanced system repair pro

Advanced System Repair Pro

One-click automated PC repair solution
ASR logo
With Advanced System Repair Pro you can easily
Replace damaged files
Restore performance
Free disk space
Remove Malware
Protects WEB browser
Remove Viruses
Stop PC freezing
DOWNLOAD
Privacy Policy | Terms of Use | Uinstall
Advanced System Repair Pro is compatible with all versions of Microsoft Windows including Windows 11

Share this article:

You might also like

Comparing FAT32, NTFS, exFAT file system
When we get ourselves a new USB stick, new hard drive, or any storage device not including optical drives they are usually preformatted and ready to be used out of the box. However, reformating them has several benefits and while we are reformatting we can choose in which file system format we want the memory to be formatted. In this article, we will compare and explore 3 typical and standard format options you can get while formating a new media in Windows 10.

FAT32

The oldest one on the list, coming all the way from DOS days. Great for devices that need to be plugged in different operating systems and for USB flash drives. Its advantages are compatibility with all major operating systems and little memory usage comparing to other ones. However, the file system is limited to file sizes of the maximum capacity of 4GB and partitions can not exceed more than 32GB.

NTFS

First introduced in Windows NT this file system offered slower performance than FAT32 and somewhat limited usability but the main advantages were more stability and fewer errors. Its main advantages are support for files larger than 4GB and partitions larger than 32GB along with the ability for on the file encryption, main disadvantage would be limited operating system usage, NTFS can not be used on systems that work on FAT32 like MS-DOS for example or older versions of Windows. The best usage for this file system is in internal hard disk drives and system drives.

exFAT

New kid on the block, well at least from the perspective of the previous 2. exFAT offers unlimited file sizes and unlimited partition sizes but at a price that is even more limiting than NTFS. Some Linux distributions will require a driver to be installed in order to see the exFAT partition. The best use is in storage, in external hard drives. That's it, 3 major file systems, we hope that you have managed to learn something new today, and remember to drop by tomorrow for more articles about advice, tips, tricks, and troubleshooting.
Read More
Fix An unspecified error 0x800700b7
If you receive an error that says, “An unspecified error occurred during System Restore (0x800700b7)” when you tried to restore your Windows 10 PC, worry not, for this post will help you resolve the problem. This kind of error typically occurs when System Restore was not completed successfully and fails instead with this error. Before you start, you must not abruptly shut down your computer and wait for the error to occur. You may receive this error due to many possible reasons. It could be caused by your antivirus program that’s not letting the process complete or corrupted system files which causes the failure or it could also be caused by an unsuccessful installation of a Windows Update. Here are some fixes you can check out if you can still boot into your computer:

Option 1 – Try to disable your antivirus program

Disabling the antivirus program or any security software installed in your computer is always a good idea you can try when the System Restore process does not go smoothly. So before you try updating your computer again, make sure to disable the antivirus or security program and then run System Restore again, don’t forget to enable the antivirus program back again.

Option 2 – Run the DISM tool

The next thing you can do is run the DISM tool. This tool is known to repair potentially corrupted files in your system as having them could also system issues like the blank dialog boxes. To repair these corrupted system files, you can run the DISM commands:
  • Tap the Win + X keys and click on the “Command Prompt (Admin)” option.
  • After that, input each one of the commands listed below sequentially to execute them:
    • Dism /Online /Cleanup-Image /CheckHealth
    • Dism /Online /Cleanup-Image /ScanHealth
    • Dism /Online /Cleanup-Image /RestoreHealth
  • Once you’ve executed the commands given above, restart your computer and check if the problem is now fixed.

Option 3 – Run the System File Checker

System File Checker or SFC is a built-in command utility that helps in restoring corrupted files as well as missing files. It replaces bad and corrupted system files to good system files that might be the cause why you’re getting the errors 0x8024a11a and 0x8024a112. To run the SFC command, follow the steps given below.
  • Type “cmd” in the Start search and then right-click on the appropriate search result.
  • Next, select “Run as administrator” to open Command Prompt with admin privileges.
  • After opening Command Prompt, type in sfc /scannow
The command will start a system scan which will take a few whiles before it finishes. Once it’s done, you could get the following results:
  1. Windows Resource Protection did not find any integrity violations.
  2. Windows Resource Protection found corrupt files and successfully repaired them.
  3. Windows Resource Protection found corrupt files but was unable to fix some of them.
  • Now restart your computer and see if the problem is fixed or not.

Option 4 – Try to run the System Restore in a Clean Boot State

If the first three given options didn’t work and the service still keeps on failing even though the service is running, you can try putting your computer in a Clean Boot State and then try to run System Restore again.
  • Log onto your PC as an administrator.
  • Type in MSConfig in the Start Search to open the System Configuration utility.
  • From there, go to the General tab and click “Selective startup”.
  • Clear the “Load Startup items” check box and make sure that the “Load System Services” and “Use Original boot configuration” options are checked.
  • Next, click the Services tab and select the “Hide All Microsoft Services” check box.
  • Click Disable all.
  • Click on Apply/OK and restart your PC. (This will put your PC into a Clean Boot State. And configure Windows to use the usual startup, just simply undo the changes.)
  • Now try to run System Restore again and see if the process goes smoothly.

Option 5 – Run the Windows Update Troubleshooter

You might also want to run the Windows Update Troubleshooter as it could also help in fixing the problem with System Restore. To run it, go to Settings and then select Troubleshoot from the options. From there, click on Windows Update and then click the “Run the troubleshooter” button. After that, follow the next on-screen instructions and you should be good to go. On the other hand, if you can’t boot into your Windows 10 computer, here are some fixes you can try instead:

Option 6 – Try running System Restore in Advanced Startup Options

If you cannot boot into your Windows 10 computer, you can try to run System Restore again in the Advanced Startup Options.
  • Boot your computer into the Advanced Startup Options screen.
  • From there, you will see some options to troubleshoot when you can’t log in to Windows in the usual way.
  • Now select Troubleshoot > Advanced Options > Command Prompt.
  • After that, type “rstrui” and hit Enter to execute the command which will start the System Restore process.

Option 7 – Run the SFC scan and DISM via Advanced Startup Options

Like what you did in the first given option, you can use the Advanced Startup Options to run both System File Checker and DISM. All you have to do is boot into the Advanced Startup Options and from there select Troubleshoot > Advanced Options > Command Prompt. After accessing Command Prompt, you can run the System File Checker scan first by entering the “sfc /scannow”. As for DISM, you can run the “Dism /Online /Cleanup-Image /RestoreHealth” command.

Option 8 – Try to run the Automatic Repair Utility

You might also want to use Automatic Repair in fixing the error. To do so, follow the steps below.
  • You can start by creating and booting from a bootable Windows 10 USB Stick.
  • After that, click on Repair your computer located in the bottom left corner when you are on the initial Windows Startup screen.
  • Next, click on Troubleshoot, and then on the other screen, click the Startup Repair option.
  • Now select the operating system you want to repair. Once you do that, it will start to repair your operating system. Wait until the process is completed and then check if the problem’s now fixed.
Read More
Windows 11 slows down some SSD drives
In the latest Windows 11 fiasco, it is reported that the operating system is slowing down some SSD drives. Good thing is that it does not affect all of SSD on the market but the ones which it is affecting can see even a 45% of speed drop. ssd drive
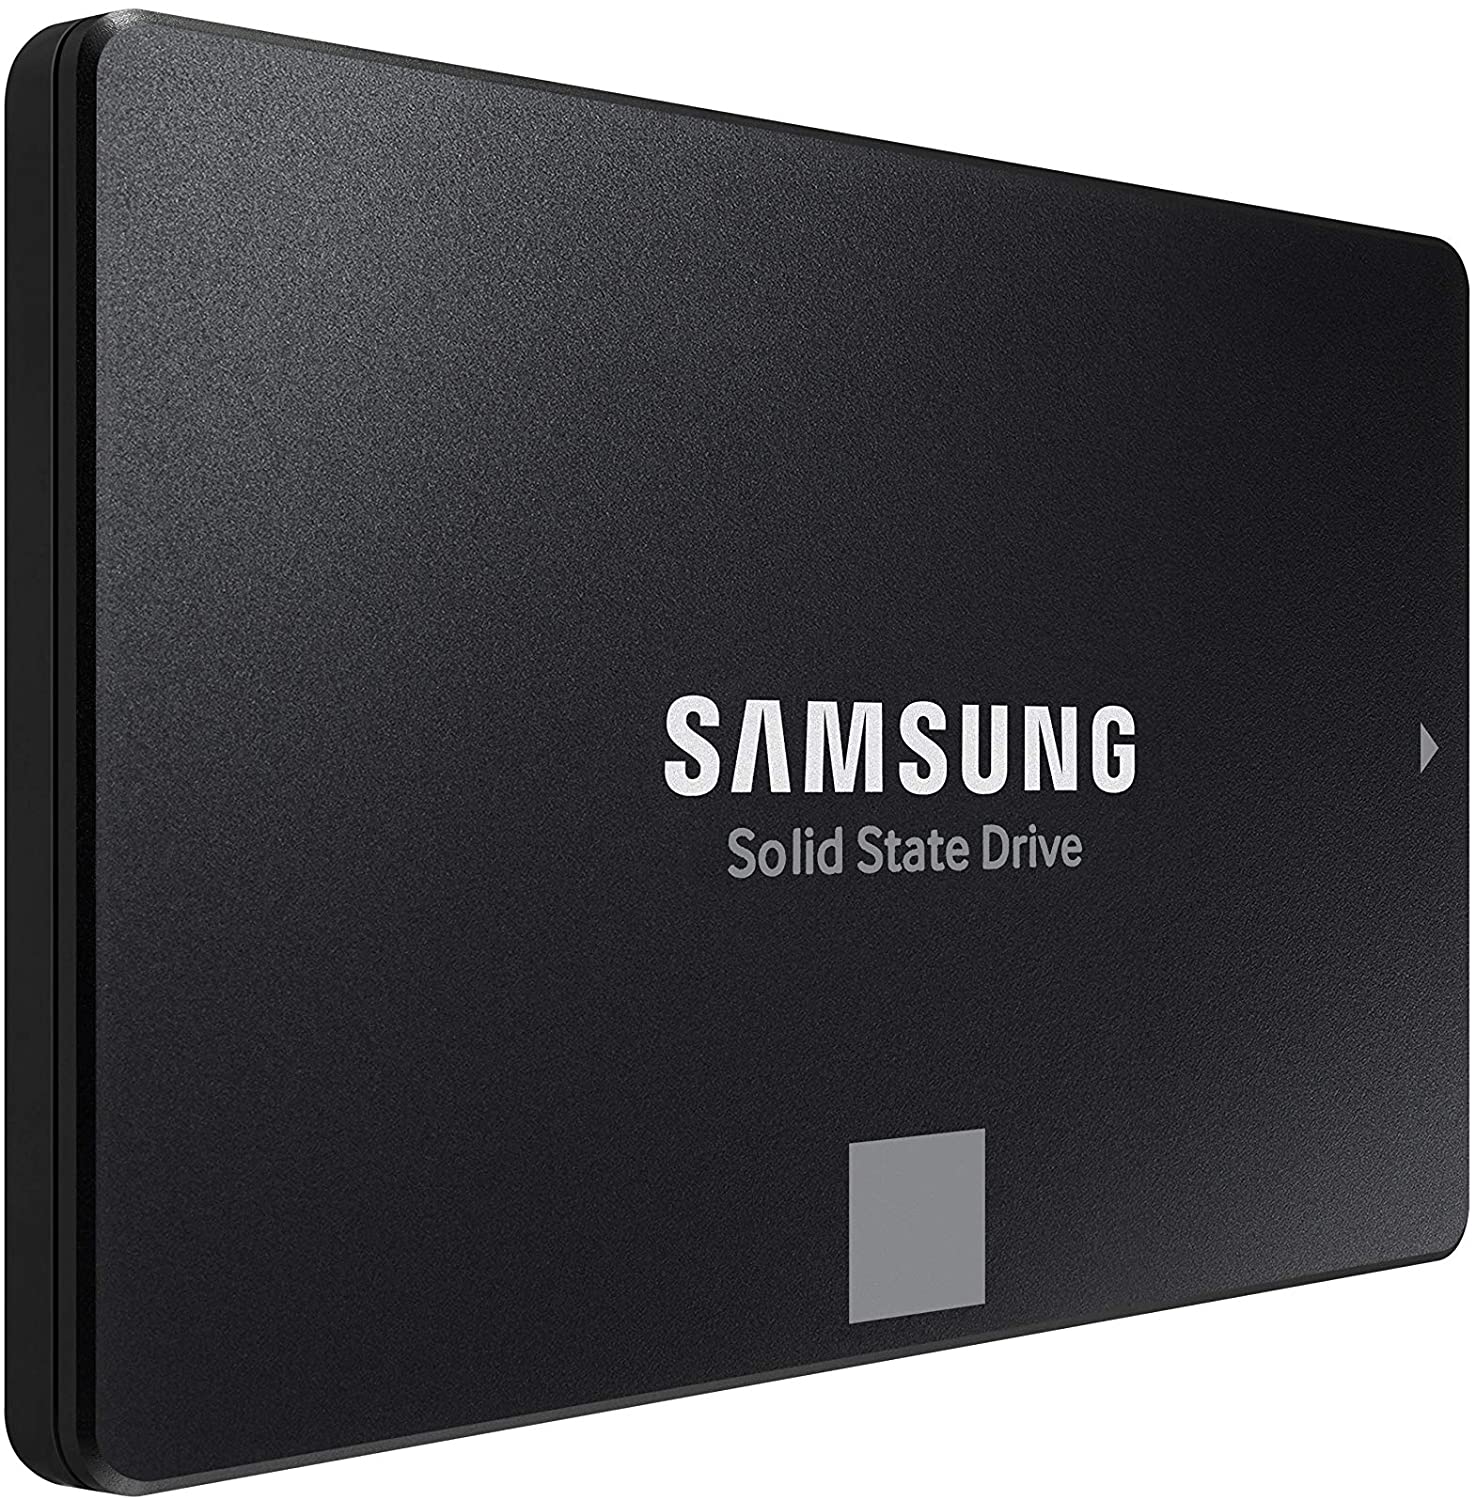
Microsoft has not published a solution to this issue, but users point out two potential problems. The first is a security mechanism based on disk virtualization, which is supposed to slow down the performance of SSDs. The second, in turn, is related to the place of installation of Windows 11 – users indicate that if the performance test is performed on a medium with no files associated with the system, its performance results are similar to the parameters given by the manufacturer. Transfer speeds were to be slightly improved with the latest Windows 11 update 22000.348. However, users are still waiting for a solution to the problem that significantly reduces the efficiency of SSD media.

More information

The details described leading to speculation that the problem could be related to drivers that Microsoft is providing. On further tests, all Nvme drives that use the Microsoft driver have this problem, but Intel 905P, which has its own driver provided by Intel, is working at full power,”.
Read More
Internet disconnected when VPN is connected
If your VPN software blocks and disconnects the Internet or Wi-Fi connection as soon as it is connected, read on as this post will give you fixes to resolve the problem. This kind of issue is odd but not unheard of. Many users use VPN for privacy and security but if it causes internet connection problems, you have to pin down the root cause of the problem and fix it in order to continue browsing the internet with privacy and security. Here are some suggestions you need to check out to resolve the issue between your VPN software and network.

Option 1 – Try installing the latest version of the TAP adapter

Since all VPN software uses a TAP adapter which is mostly from OpenVPN, you might want to download and install the TAP adapter driver to resolve the problem.

Option 2 – Run the Network Adapter Troubleshooter

  • Open the Search bar on your computer and type in “troubleshoot” to open the Troubleshoot settings.
  • Next, scroll down and select the “Network Adapter” option from the right pane.
  • Then click on the Run Troubleshooter” button.
  • After that, your computer will check for any possible errors and will pinpoint the root cause of the problem if possible.

Option 3 – Configure the client computer to use the default gateway

This kind of connection problem can occur when you configure the VPN connection as the default gateway on the remote network. In such a case, the VPN settings override the default gateway settings (TCP/IP settings). Thus, you have to configure the client computers in order to use the default gateway setting on your local network for internet traffic as well as a static route on the remote network for VPN-based traffic.

Option 4 – Try to use the Google Public DNS

You might want to change your DNS to Google Public DNS as it could help you resolve the internet connection problem caused by your VPN. To do so, follow the steps below.
  • The first thing you have to do is right-click on the network icon in the Taskbar and select Network and Sharing Center.
  • Next, click on the “Change Adapter Settings” option.
  • After that, search for the network connection that you are using to connect to the internet. Note that the option might be “Wireless Connection” or “Local Area Connection”.
  • Right-click on your network connection and click on Properties.
  • Then select the new window to choose the “Internet Protocol 4 (TCP/IPv4)” option.
  • After that, click on the Properties button and click the checkbox in the new window for the option “Use the following DNS server addresses”.
  • Type in “8.8.8.8” and “8.8.4.4” and click OK and exit.

Option 5 – Try checking the settings of your VPN software

If your VPN software has a built-in “kill switch” it prevents any internet usage every time there is a problem in connecting with the VPN server which explains why your internet connection is disconnected when your VPN software is connected. In addition, you could also try to change your VPN software’s protocol since all VPNs support multiple protocols. It could be that the protocol your VPN uses is blocked so try changing to another protocol and see if it fixes the problem.

Option 6 – Update the Network Adapter drivers

You might also want to update the Network Adapter drivers by following these steps:

  • Tap the Win + R keys to launch the Run window and then type in the “devmgmt.msc” command and hit Enter to open the Device Manager window.
  • Under the Device Manager, you will see a list of drivers. From there, look for the Network Adapters and expand it.
  • Then right-click on each one of the Network drivers and update them all.
  • Restart your PC and see if it helped in fixing the BSOD error.
Note: If updating the network drivers didn’t help in fixing the “Windows could not find a driver for your network adapter” error, you can also try to uninstall the very same drivers and restart your Windows 10 PC. After that, the system itself will reinstall the drivers you just uninstalled. Alternatively, you can also download and install the drivers from the manufacturer’s website directly.

To reinstall the network adapter driver, refer to these steps:

  • Open the Devices Manager from the Win X Menu.
  • Then locate the device drivers and right-click on them to open the Properties.
  • After that, switch to the Driver tab and click on the Uninstall Device button.
  • Follow the screen option to completely uninstall it.
  • Finally, restart your computer. It will just reinstall the device drivers automatically.
Read More
Disable widgets menu inside Windows 11
windows 11 widgets menu
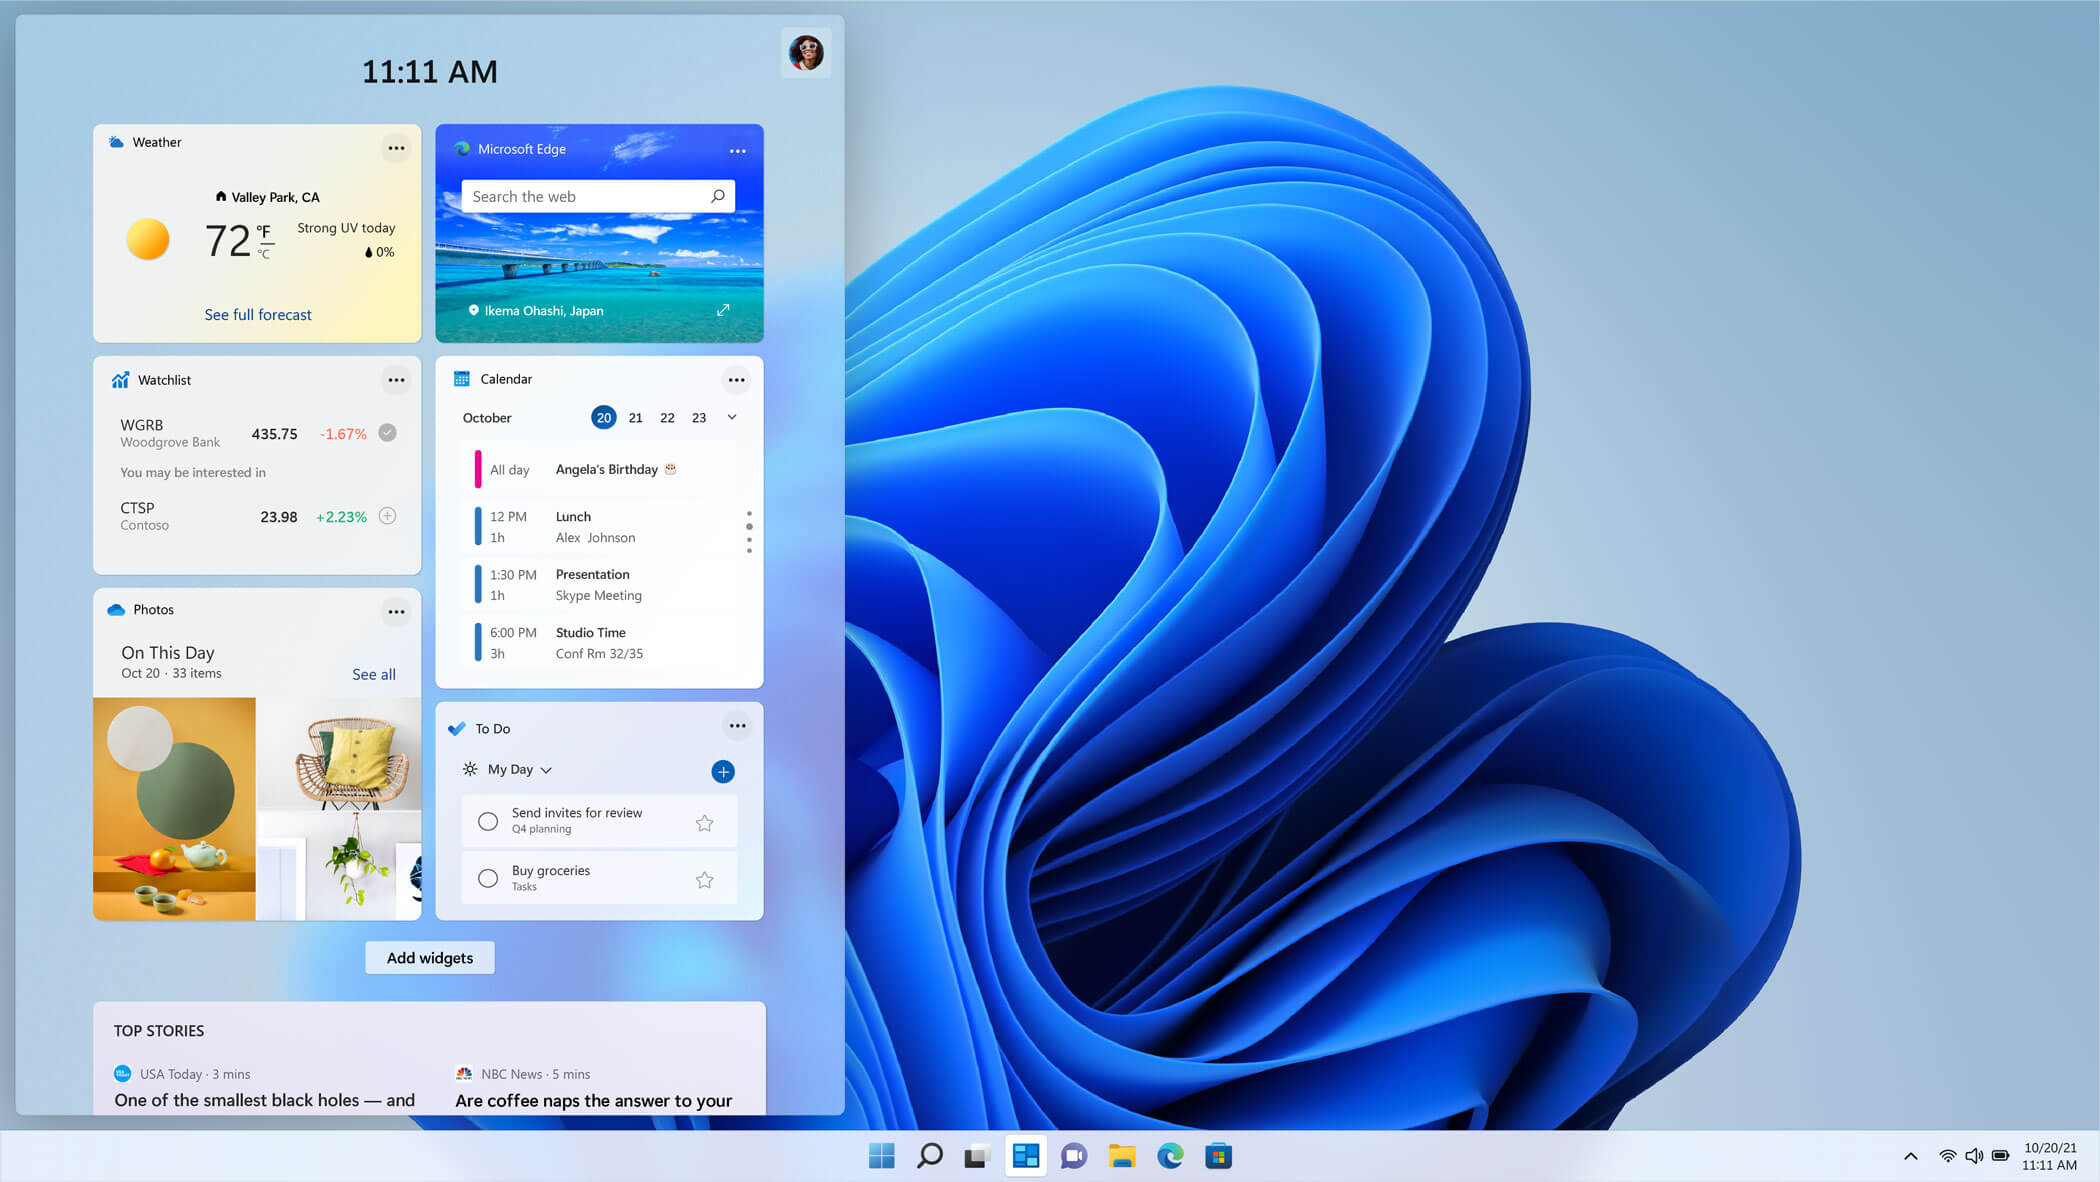
The new widget's menu inside Windows 11 is generally met with a positive attitude but there are still users which prefer not to have it. Luckily for them, Microsoft included a very easy way to turn the widgets menu on or off. Follow this easy guide to see how. Right-click on the widget button in the taskbar and click on Hide from Taskbar and that’s it Alternatively, you can also turn it off via the setting app. Go to the settings app and navigate to Personalization > Taskbar > Taskbar Items and flipping the switch beside Widgets to Off. Please note that both methods will only hide the button to toggle widgets menu, at the current state there is no really a way to actually turn it off, only hide it and make it not available to bring it up.
Read More
Assigning Multiple IP Addresses to Adapter
There are times when an IT admin has to set up multiple IP addresses to the same network adapter. Setting up multiple IP addresses in scenarios like hosting various SSL sites, speed up traffic exchanges can help in avoiding being blacklisted in the SPAM filters, and so on. So in this post, you will be guided on how exactly you can assign multiple IP addresses to the network adapter in your Windows 10 computer. There are several ways to assign multiple IP addresses in a network adapter. You can do it using the Network Adapter settings or using the Netsh utility, as well as the Windows PowerShell utility. To get started, refer to each one of the options provided below.

Option 1 – Assign multiple IP addresses via Network Adapter settings

  • Go to Settings first and from there, select Network & Internet, and then click on the Change adapter options. This will show you a list of both the physical and virtual network adapters in your computer.
  • Next, double click on the Ethernet adapter where you want to assign the multiple IP addresses and then click on the Properties button.
  • After that, you should see the Ethernet properties where you have to select the “TCP/IPv4” or “TCP/IPv6”.
  • Once done, click on the Properties button and then select the “Use the following IP address” option under the General tab.
  • Now you have to add an IP address, subnet, and default gateway to the network adapter and then click on the Advanced button.
  • This will open the Advanced TCP/IP settings where you have to click on the Add button so you can add an IP address. From here, you can keep adding multiple IP addresses to the network adapter. You also have the option to add multiple gateways or DNS IP addresses.
  • Once done, if you execute the “ipconfig” command, you should see all the secondary IP addresses listed.

Option 2 – Assign multiple IP addresses using the Netsh command

Another way to assign multiple IP addresses to your network adapter is via the Netsh command.
  • In the Start Search, type “command prompt” and from the search results that appear, right-click on Command Prompt and then select the “Run as administrator” to open it with admin privileges.
  • If a User Account Control or UAC prompt pops up, just click on Yes.
  • After that, run this command: Netsh int ipv4 add address name="Local Area Connection" 192.168.100.100 255.255.255.0 SkipAsSource=True
Note: You have the option to set “SkepAsSource” since it depends on your needs using the Netsh command. When it is configured as true, the IP address won’t be used by the OS for outbound connections.

Option 3 – Assign multiple IP addresses via Windows PowerShell

  • Tap the Win + X key combination and click on the “Windows PowerShell (Admin)” option.
  • After opening Windows PowerShell as admin, use the NetIPAddress command so you can add more IP addresses. Execute this command: Get-NetIPAddress | ft IPAddress, InterfaceAlias, SkipAsSource
  • Next, assign an IP address to a network adapter by executing this command: New-NetIPAddress –IPAddress 192.168.100.100 –PrefixLength 24 –InterfaceAlias “vEthernet” –SkipAsSource $True
  • Now to modify the “SkipAsSource” parameter, use this command: Get-NetIPAddress 192.168.100.100 | Set-NetIPAddress -SkipAsSource $False
Read More
How to clear cache inside Windows 11
Cache files are temporary files that have been created by various applications and services when used.  As temporary files, they are safe to be removed and deleted from the system since the application or service will create new ones when needed but sadly will not remove old ones, this task is left to OS itself. windows 11 cacheAutomatic Windows cleanups can mostly take care of these things but for top-notch performance clearing cache manually is a far better option. We will here explore various cache temporary files, where they are, and how to clean them. Sit back and let’s do some cleaning!

Clear cache using Disk Cleanup

  1. Open Start menu and search Disk Cleanup
  2. Click on it in search results
  3. Click on the drives drop-down menu and select the drive where is Windows 11 installed
  4. In the Files to Delete section enable all boxes and click on OK
  5. Click on delete Files to confirm

Clear Microsoft store cache

  1. Press ⊞ WINDOWS + R to open the run dialog
  2. Type in WSReset.exe and press ENTER
  3. Black blank windows will appear, wait for the window to close itself and you are done

Clearing location cache

  1. Press ⊞ WINDOWS + I to open location history
  2. Select Privacy & Security
  3. In the App Permissions section click on Location
  4. On-Location page click on Clear

Clear and flush DNS

  1. Press Start and search for Windows Terminal
  2. Click on Terminal in search results
  3. Type in: ipconfig /flushdns and press ENTER
And that is that!
Read More
MS Edge, autoplay video blocking coming
Microsoft Edge may be about to win a lot of fans by introducing a new feature that it says could prevent one of the most annoying things about being online. A new update to the browser suggests it is looking at a way to block auto-playing videos by default when a user navigates to a website. People spotted a new entry to the Microsoft Edge Canary browser where the company tries out its in-progress updates, that suggests auto-playing videos may have had their day at last. The new addition, for Mac, Windows, and Linux systems, is called “Autoplay Limit Default Setting”, with the description suggesting that Microsoft Edge would set the media autoplay setting to "Limit" as a default - stopping videos from starting up when a user lands on a website. Currently, Edge offers two options for users to control media autoplay - "Allow" (the current default setting), where all videos on a website will play automatically with sound, and "Limit", where media won’t be autoplayed on sites that a user has previously visited. It appears that Microsoft is looking to test the feature in Canary before rolling it out to a wider user base - as blocking autoplaying videos can cause issues for some websites. The same Canary entry also hints at a future "Block" option, which would presumably stop any videos or media from playing when a user lands on a website. However, this feature, which is also listed as being available for Mac, Windows, and Linux systems, doesn't appear to be enabled as yet. If you would like to read more helpful articles and tips about various software and hardware visit errortools.com daily.
Read More
Error 0x80004001 Quick Fix Guide

What Is 0x80004001 Error Code?

0x80004001 is an error code that Windows users encounter quite commonly.

This error usually occurs when users try to update an old Windows application or attempt to run a certain application. When this error appears on the screen, the system automatically restarts to stop further processing. The error results in a blue screen after the system boots.

This blue screen is known as the Blue Screen of Death.

Error Causes

There are different files in the Windows operating system responsible for its smooth functioning. Sometimes problems like viruses or incorrect register entries corrupt or damage these files. This is when this 0x80004001 error appears.

Simply put, some of the most common causes that trigger 0x80004001 error are listed below as follows.

  • Corrupt or damaged EXE, VXD, DLL files of Windows
  • Incorrect entry of registry files
  • Presence of viruses or malware in the system
  • Corrupt or damaged system files
  • Unfinished application installation

Irrespective of what causes this error, it is of utmost importance to troubleshoot it as soon as possible.

Further Information and Manual Repair

While there are several ways of troubleshooting this error, the two most useful approaches have been listed below as follows.

  • This solution is for advanced users. Start your system and log on to it as the administrator. Click on the Start button. Now select All Programs->Accessories->System Tools. Finally, click on System Restore. In a new window, select the option “Restore My Computer to an Earlier Time”. Now click on Next. A list of restore points will be displayed. Choose the most recent restore point from this list and click “Next”. Now click next on the confirmation Window again. Once the restoration is finished, the computer will restart itself and you will observe that the error no longer appears.
  • This solution is for beginner or novice users. Download a 0x80004001 error repair utility available online. Install this program on your computer and use it to scan for the error in your system. When the scan completes, find if any feature allows you to fix errors. If yes, click on it. Now restart your computer again. You will notice that the virus has disappeared. It is a good idea to use error repair utilities because they scan the system, diagnose the error and then perform the repair.

Use any of the methods listed above to get rid of the 0x80004001 error once and for all.

Read More
What to do if Mouse Pointer lags or freezes in Windows 10
Although there are several Windows 10 devices that are touchscreen-based, the mouse still remains to be an important part of usage for many users especially the ones who do some hardcore work on their Windows 10 computers or laptops. If you’re one of the users who often edit images or videos either for fun or work, using Touch is difficult as it’s a bit hard to drag on the screen so nothing really beats the mouse. However, as awesome as the mouse is, there are times when you encounter issues while using it. One of these issues is when your mouse pointer lags or freezes so in this post, you can try out a few tips that can help you resolve the issue.

Option 1 – Clean both the mouse and the mousepad

It might sound silly but it is a fact that either the mouse or the mouse pad themselves is the problem. Even though mouse balls are long gone, the laser lights that replaced them are not immune to some dirt which is why you need to clean the bottom of the mouse and then clean the mouse pad afterward.

Option 2 – Try changing the USB port

This is another basic thing you can do to resolve the problem since there are instances when USB ports where either your mouse is connected have gone rogue so you need to try switching to a different port and then see if the problem’s fixed or not.

Option 3 – Switch back to the default settings of the mouse

Switching your mouse back to its default setting is always a good idea since you are dealing with a pointer issue. To go back to the default settings of the mouse, here’s what you have to do:
  • Click on Mouse and Touchpad.
  • Next, click on Additional Mouse Settings located in the right pane.
  • After that, click on the “Use Default” option under the Pointer tab.
  • Then click on Apply and OK to save the changes made.

Option 4 – Try disabling Smooth Scrolling

You have to slow down both the horizontal and the vertical scrolling of the mouse in the settings which are called “Smooth scrolling”. This will help if you think that the websites you are visiting scroll up and down way too fast.

Option 5 – Try to update or rollback mouse drivers

If the first few options didn’t work for you, then it’s time to either update or roll back the mouse drivers. It is most likely that after you updated your Windows computer that your driver also needs a refresh. On the other hand, if you have just updated the mouse driver then you need to roll back the driver. Whichever applies to you, refer to the steps below. The problem may be caused by a corrupted or outdated driver. So you have to update or reinstall the mouse driver. How? Follow these steps:
  • Open the Devices Manager from the Win X Menu.
  • Then locate the Mouse and other pointing devices and right-click on the mouse driver to open the Properties.
  • After that, switch to the Driver tab and click on the Uninstall Device button.
  • Follow the screen option to completely uninstall it.
  • Finally, disconnect the mouse and plug it back in to reinstall the mouse driver.
Note: You can install a dedicated driver on your computer in case you have it or you could also look for it directly from the website of the manufacturer.

Option 6 – Try to check if your laptop is turning off the mouse

In case you don’t know, the power management can turn off the devices that are not in use to save battery power if you use a laptop. And this can also happen on USB-based devices like the mouse. Thus, you need to verify if your laptop is turning off the mouse.
  • Go to Device Manager > Universal serial bus controllers > USB Root Hub > Power Management.
  • After opening Power Management, uncheck the “Allow the computer to turn off this device to save power” option.
  • If you have lots of USB Root hubs, you can try changing each one of them and see if it works or not.

Option 7 – Try updating the Graphics Drivers

  • Tap the Win + R keys to launch Run.
  • Type in devmgmt.msc into the box and tap Enter or click OK to open the Device Manager.
  • After that, a list of device drivers will be displayed. If you see a red or yellow sign that shows up against the driver, right-click on the driver’s name and select “Update Driver Software” or “Uninstall”. And if you find any “Unknown device”, you need to update it as well.
  • Select the “Search automatically for updated driver software” option and then follow the instructions to complete the process.
  • Restart your PC.
Note: You also have the option to go directly to the website of your graphics card manufacturer and check if there’s a new update – if there is, download it.

Option 8 – Try setting the No Delay option for Touchpad

If you are using a laptop that’s touchscreen-based, you can try setting the delay to zero in the settings. To do so, simply go to Settings > Devices > Mouse and Touchpad. From there, you can set the delay before clicks to “No Delay”.
Read More
1 2 3 162
Logo
Copyright © 2022, ErrorTools. All Rights Reserved
Trademarks: Microsoft Windows logos are registered trademarks of Microsoft. Disclaimer: ErrorTools.com is not affiliated with Microsoft, nor claim direct affiliation.
The information on this page is provided for information purposes only.
DMCA.com Protection Status