Disable Windows insider in Windows 10

In their search for making Windows, a better operating system Microsoft has come up with an insider program that will collect telemetry and send it to Microsoft in order to provide enough information to make a better OS. Being in an insider program is per choice basis and it is not forced to anyone.

This guide will cover how to turn off the insider program since its constant updates and telemetry can slow down the internet. So if you decided that you no longer want to be part of this program here is how to turn it off.

  • Press ⊞ WINDOWS + R to open the run dialog
    keyboard with windows and r marked
  • Type in dialog gpedit.msc and press ENTER
  • You will find yourself in the Local Group Policy Editor Window. Inside windows find:
    Computer Configuration > Administrative Templates > Windows Component > Windows Update > Windows Update for Business
  • Move to the right pane and double-click on the Manage Preview Builds option
  • Inside the Manage Preview Builds window, check the Enabled radio button
  • Go to the Options section, and using the drop-down menu, set the preferred release channel
  • Select Apply and then OK
If you like to learn and find out more about various Windows errors, and how to repair them go to our vast archive or use search to find articles that will explain and help you in solving your issue.
However, if you prefer to do things fast and with automatization then we are proposing to use an automated solution for your issues. The application that we are recommending is Advanced System Repair Pro
Advanced System Repair utilizes multiple tools all in one to give you a quick, simple, reliable, and very thorough diagnosis of your PC. It brings you all the tools you need in one program to clean, fix, protect, optimize and boost your PC!
1-Click Maintenance
All the tools to make it simple and easy! It's like having a professional technician at the click of a mouse.

Junk Cleaner
Keeping your computer free from unnecessary clutter also helps make your computer last longer. Like any other machine, if you keep it clean and take care of it, it will serve you better for longer!

Optimize background apps
Optimize applications background activity with the built-in Application Optimizer feature.

Disk Defrag
With a simple 1-click, Advanced System Repair speeds up your PC by assembling fragmented files on your machine and organizing them more efficiently.

Malware Removal
Finds and removes all types of harmful malware including trojans, worms, bots, adware, spyware, PUPs, and more!

Privacy Cleaner
The all-in-one privacy suite to Clean Your Tracks & Protect Your Privacy! Make your computer safe, secure, and more efficient!

System Tweak/Optimizer
ASR will analyze your complete system and settings to adjust your PC to function at its maximum performance.

Registry Cleaner
Over time, as you install and uninstall applications, the registry can become cluttered with old entries and broken settings which can result in program crashes, and annoying messages and slow the computer down.
Visit our Advanced System Repair Pro Download page to inform yourself about all the benefits of this software and get a free trial copy of it.
advanced system repair pro

Advanced System Repair Pro

One-click automated PC repair solution
ASR logo
With Advanced System Repair Pro you can easily
Replace damaged files
Restore performance
Free disk space
Remove Malware
Protects WEB browser
Remove Viruses
Stop PC freezing
DOWNLOAD
Privacy Policy | Terms of Use | Uinstall
Advanced System Repair Pro is compatible with all versions of Microsoft Windows including Windows 11

Share this article:

You might also like

How to share games on Steam with someone
Sharing is caring, an old saying says. I completely agree and that is reason enough for this article filled with sharing goodness. Holidays are coming and I hope that the holiday spirit is strong with you, that you will spend them in peace and with loved ones. All that being said wouldn’t it be great if you can spend some joy with close ones and share some of your games on their account so they can enjoy them as well? steam libraryWell, you can and it is not complicated as well. Follow this easy guide to see how can you get someone’s account up and running with some of your games.

The steam Family sharing feature

The family Sharing feature inside Steam will let you share your games to another account so owners of that account can play games that you have purchased without the need to buy themselves. You can allow up to 5 accounts and 10 devices to play your library games, and owners of these accounts will have their own achievements. Be aware that enabling this option will place your entire library on the share, you will not be able to choose which games you would like to share and therefore any kind of parental controls are not applying here. Also know that once the game is running on one device, others will have to wait for one playing to finish before they can get a spin on it. Only the owner of the game can play whenever he wants as a priority but others will have to wait for the game to be not run by someone else.

How to Share Your Game Library

In order to share your game library have a person, you wish to share games with at his device on ready to go and enable steam guard on your account. To enable steam guard login into your account and on the top left corner click on Steam and then on Settings. Inside settings click on the Manage Steam Guard Account Security button. Choose the way of authentication either by mail or steam guard mobile app. Check Get Steam guard codes by email radio button and re-login into account.

Sharing Games on another Steam account

Now that Steam Guard is enabled on the primary account let’s share some games!!! Inside client again, in the top left click on Steam and again on settings. In the left panel choose and click on Family. Inside Family section check box beside Authorize Library Sharing on This Computer. Log out of your account and login into the client user account credentials you wish to share your library with (this is your friend or cousin account, they need to log in to Steam client on your computer but with their credentials). After they have successfully logged in, log them out and re-log with your account again. Now go again into Steam > Family and now you should see an account in the box at the bottom with the user name or your friend or relative. Confirm that this is an account that you wish to share the library with by clicking on the checkbox next to the name. Now let users login into the desired device with their credentials and they will have access to your entire library. Happy gaming!
Read More
How to Fix the Blue Screen Locale ID 1033 Error Code

Troubleshoot Locale ID 1033 Error Code

What is the Blue Screen Locale ID 1033 Error?

Blue screen locale id 1033 error as the name suggests, is a type of BSoD error. This error may occur during Windows startup, program load, or while the program is running. The error indicates poor PC maintenance and occurs without any warning. The error message is prompted in the following format:
Problem signature: Problem Event Name: BlueScreen OS Version: 6.0.6002.2.2.0.16.7 Locale ID: 1033
When the error occurs, the computer screen turns blue and the user is unable to view or access the program. It is advisable to fix the error right away, virtually because BSoD is a critical PC error, it can pose serious threats to your system.

Error Causes

The two most common causes of the occurrence of the Blue Screen Locale ID1033 error code are:
  • Registry issues
  • Viral infection

Further Information and Manual Repair

You don’t need to hire a technician or be a computer whiz to resolve Blue Screen Locale ID1033 error code. Here are some methods that you can try to resolve this error on your PC. These methods are easy to perform and result-driven.

Method 1: Perform a PC Scan by Downloading an Anti-Virus

Since this error is indicative of a viral infection, it is suggested you perform a PC scan by installing an antivirus on your system. Make sure you download an antivirus that is powerful and has the ability to scan all kinds of viruses.

Method 2: Clean and Repair the Registry

Another alternative method is to clean and repair the registry. The Registry is a component of the PC that stores all information and activities performed on the PC. This includes both important and unnecessary files like junk files, cookies, internet history, temporary files, invalid entries, bad registry keys, and more. These files not only accumulate in the registry but also damage and corrupt it thereby generating error codes like the Blue Screen Locale ID1033 error code. Congratulations, you have just fixed Blue Screen Locale ID 1033 Error Code in Windows 10 all by yourself. If you would like to read more helpful articles and tips about various software and hardware visit errortools.com daily. Now that’s how you fix Blue Screen Locale ID 1033 Error Code in Windows 10 on a computer. On the other hand, if your computer is going through some system-related issues that have to get fixed, there is a one-click solution known as Restoro you could check out to resolve them. This program is a useful tool that could repair corrupted registries and optimize your PC’s overall performance. Aside from that, it also cleans out your computer for any junk or corrupted files that help you eliminate any unwanted files from your system. This is basically a solution that’s within your grasp with just a click. It’s easy to use as it is user-friendly. For a complete set of instructions in downloading and using it, refer to the steps below Perform a full system scan using Restoro. To do so, follow the instructions below.
      1. Download and install Restoro from the official site.
      2. Once the installation process is completed, run Restoro to perform a full system scan. restoro application screen
      3. After the scan is completed click the “Start Repair” button. restoro application screen
Read More
Fix error 0x00000709 when connecting a Printer
One of the most common and bothersome issues with a printer is when it refuses to get configured or set up on your computer. Thus when your printer has some configuration issues, you will most likely encounter the error 0x00000709. This occurs if there is already a default printer set and configured or Windows does not want to configure the new printer at all. The operation could not be completed (error 0x00000709), Double check the printer name and make sure that the printer is connected to the network. Today, we will try two fixes that may help you get rid of this error.

Option 1 – Run the Printer Troubleshooter

One of the first basic troubleshooting you can perform to resolve the printer issue is running the Printer Troubleshooter. This built-in troubleshooter can detect and automatically fix the problem for you. To use it, follow these steps:
  • Tap the Win + R keys to open the Run dialog box.
  • Next, type “exe /id PrinterDiagnostic” in the field and click OK or hit Enter to open the Printer Troubleshooter.
  • Then click the Next button and follow the next on-screen instructions to fix the issue with the printer.

Option 2 – Try to use some Registry tweaks to add the Printer

You might want to use some tweaks to add the Printer but before you proceed, make sure to create a System Restore Point so that if anything goes out of hand, you can always undo the changes you’ve made.
  • Tap the Win + R keys to open the Run dialog box.
  • Next, type “Regedit” in the field and hit Enter to open the Registry Editor.
  • When a UAC or User Account Control prompt appears, click Yes.
  • Once you’ve opened the Registry Editor, go to the following key location:
HKEY_CURRENT_USERSoftwareMicrosoftWindows NTCurrentVersionWindows
  • From there, double click on the file named “Device on the right side pane under the Windows folder.
  • Now add the name of your printer in the Value Data field as you can see below and then click the OK button.
Note: As you can see on the image above, you must not change the “.winspool.Ne02:” part and only the first one which is the name of your printer.
  • After that, you will get a message that says, “Cannot edit Device: Error writing the value’s new contents, simply click on OK again. You have to take note of the existing permissions before you proceed to the next step. Once you’ve added the Printer, make sure to reverse the changes you’ve made to the Permissions.
  • Now right click on the Windows folder located on the left pane and click on Permission.
  • Select Restricted under the Group or user names section.
  • Then check the checkboxes for “Full Control”, “Read” and “Special Permissions” under the Permissions for RESTRICTED section.
  • After that click the Apply button and then OK to save the changes made.
  • Next, right-click on the file named “UserSelectdDefault” and select Rename to rename it to your printer’s name.
  • Now restart your computer to successfully apply the changes made.
  • After the printer is added, don’t forget to reverse the Permission changes you’ve made early on.

Option 3 – Try updating the Printer drivers

You might also want to try updating your printer drivers. All you have to do is locate the USB Composite Device. For complete details, follow the steps below.
  • First, click the Start button and type “device manager”.
  • Then click on the “Device Manager” from the search results to open it.
  • From there, look for the USB Composite Device option and right-click on it, and select the Update Driver from the options.
  • Restart your PC and then click the “Search automatically for updated driver software” option.
Note: You also have the option to download the latest version of your Printer from the manufacturer’s website.
Read More
Windows 365, what it is, and how you can get it
Windows 365
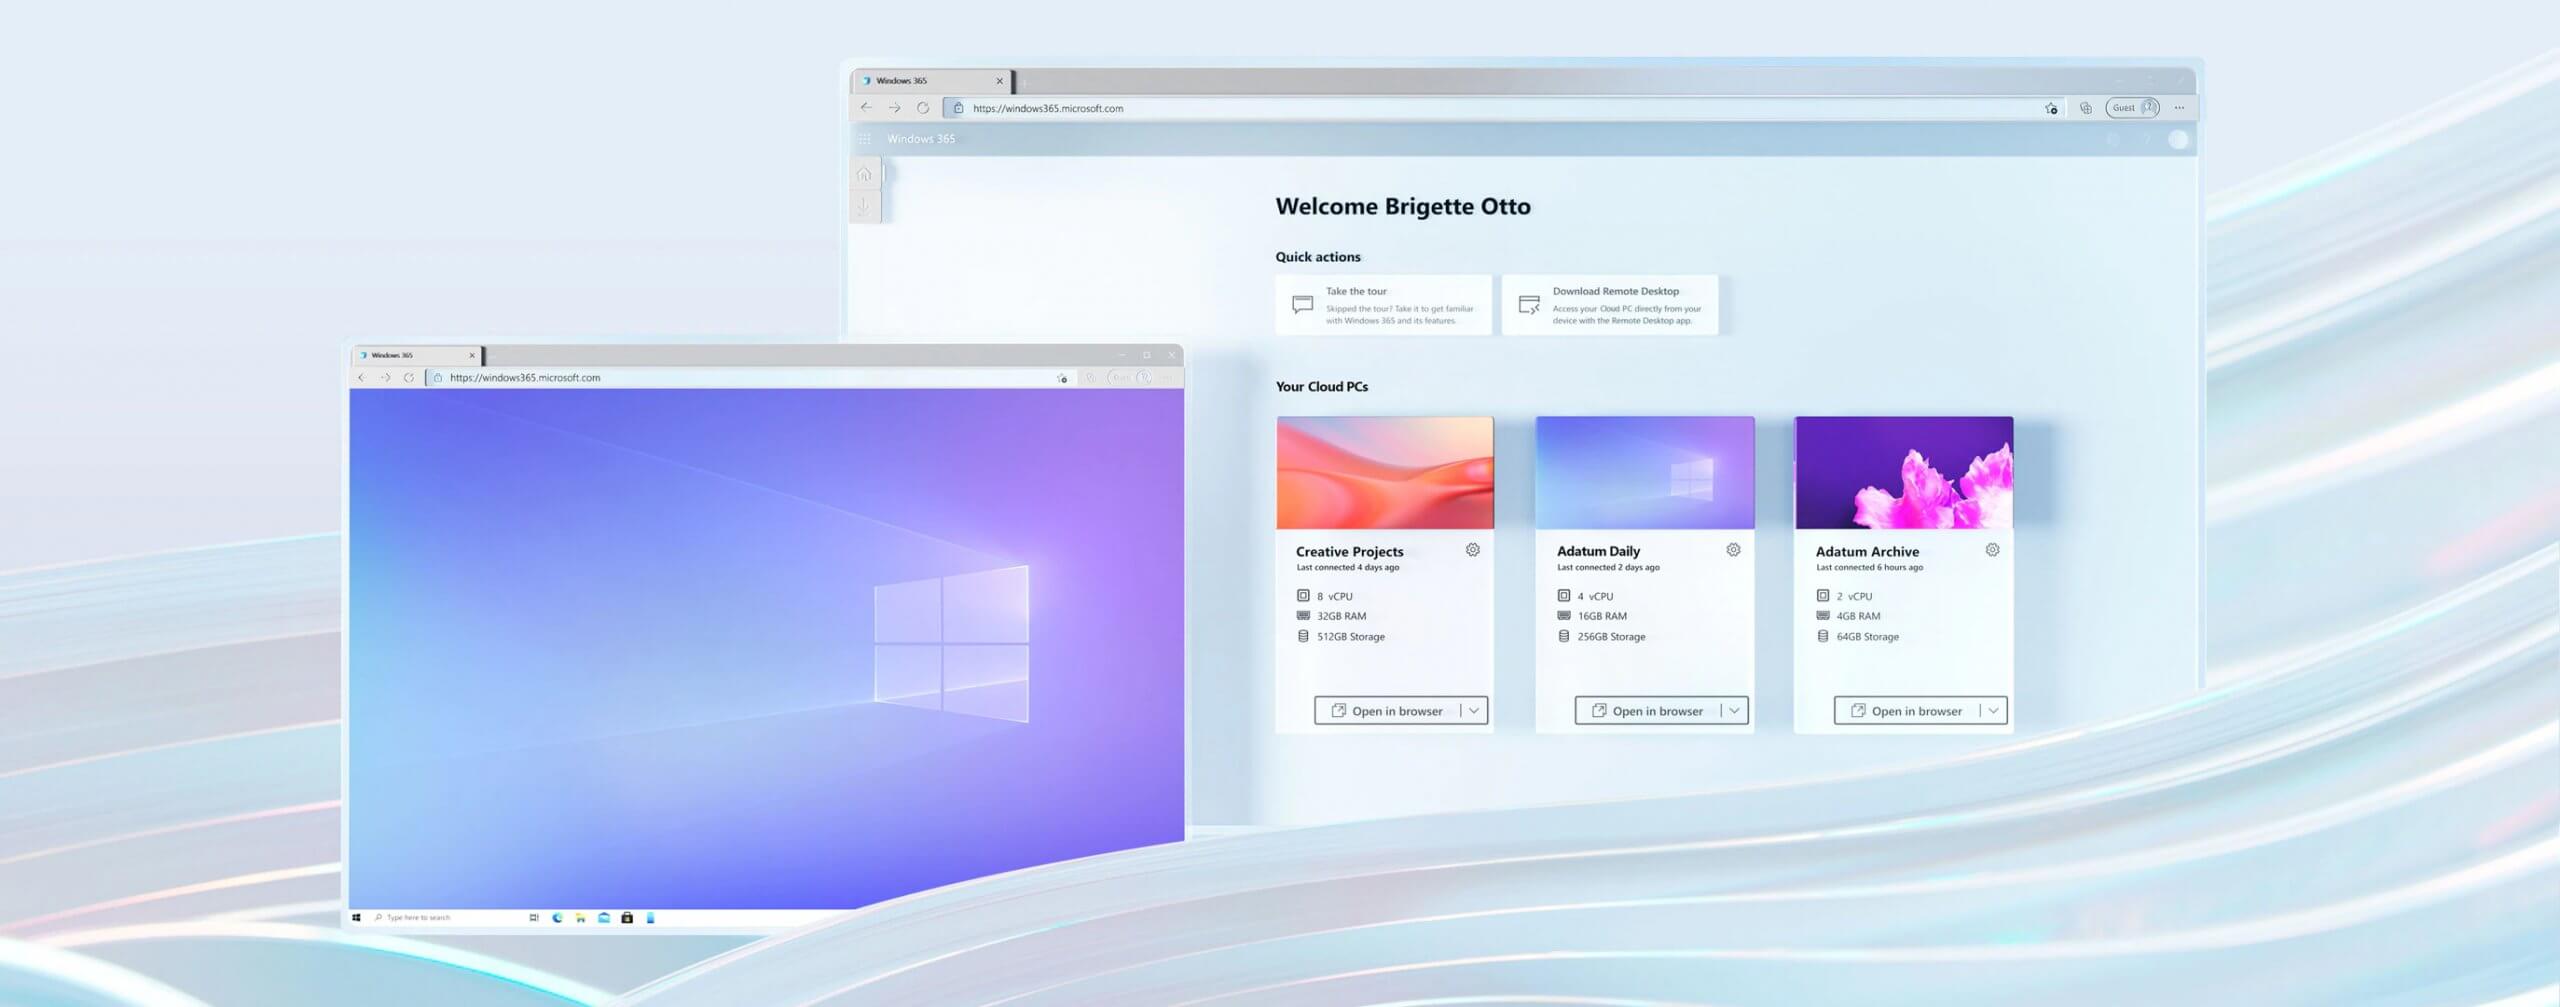
Microsoft has announced Windows 365, a new cloud-based operating system aimed mainly at businesses of all sizes. Just after Windows 11 announcement and presentation, we are seeing another Windows announcement from Microsoft. Dive into the following text in order to find out what exactly is new Windows 365, its role in today's IT world, and do you need it?

What is Windows 365 and when it is coming out?

Windows 365 is planned to be released this year (2021) on August 2nd. It is the first Microsoft cloud-based operating system meaning that OS itself will be installed on the cloud server and it will be accessed by the user via a web browser. Essentially you are accessing a remote PC with Windows on it, you can install whatever Windows application you want and use it as it was on your computer. When you disconnect from the cloud computing and reconnect again from the same or another device you will continue exactly where you left off. Cloud PC will remember the state it was left off and will greet you in that same state once it is awakened again. This of course offers some great benefits like moving from laptop to desktop and continuing exactly where you left off.

How can I access Windows 365?

Any device which has a web browser will be able to access Windows 365 making it a really great solution for business on the move or for anyone who switches devices during the day. That being said it is clear to see that Windows 365 can be accessed via Linux, macOS, iOS, Android, or any other operating system on any computer, tablet or phone.

Who is this OS made for?

Microsoft’s general idea is that Windows 365 is primarily made for business which in their minds can benefit most out of it. So far it is not made for a single user although there is a possibility that even a one-man business can subscribe and create accounts for it.

Price and technical characteristic

Microsoft will bill Windows 365 on a per-user, per-month basis. In other words, businesses will pay a fixed amount per employee every month. There will be two tiers: Windows 365 Business and Windows 365 Enterprise. Microsoft also said it will offer different performance tiers. Businesses can choose to pay for more CPU, RAM, and storage resources for certain cloud PCs depending on their needs. Microsoft told me the smallest configuration would be one CPU, 2GB of RAM, and 64GB of storage. The largest will be eight CPUs, 32GB of RAM, and 512GB of storage. After a business has chosen its plan tier and performance options, that business will pay a fixed amount every month. This is unlike Azure Virtual Desktop, which Windows 365 is built on. With Azure Virtual Desktop, companies pay on a usage model, depending on how much the remote system is used every month.

Conclusion

Windows 365 is around the corner and if you are a business no matter small or large with the need for software on the go, Windows 365 might be a worthwhile investment and a great asset to your business.
Read More
A Guide to Fix Error Code 0x80070004 on Windows 10

Error Code 0x80070004 on Windows 10 – What Is It?

Some users trying to upgrade from Windows 7 or Windows 8/8.1 reported experiencing installation rollback with error code 0x80070004. This error normally appears when the Computer Name is set to names that can’t be used for the computer. It’s also possible this error occurs if users or program files folder were redirected to a different partition.

Solution

Restoro box imageError Causes

The Error code 0x80070004 on Windows 10 is normally caused if any of the following were used as the Computer Name and the user tried to upgrade to Windows 10:

  • System (or SYSTEM)
  • SELF
  • LOCAL
  • Network
Failure to fix this error message might result in others, including error code  0xc0000001

Further Information and Manual Repair

If you don’t solve this error, you won’t be able to upgrade from Windows 7 or Windows 8/8.1 to Windows 10. Note that this error will continuously bring you back to the original OS unless fixed.

Please note that if you’re not confident in doing these steps, you might want to consider seeking the help of an expert or using an automated tool that will help fix this.

Here are a few methods to try.

Method 1: Check and Change the Computer Name

The most common cause of this error is if your computer uses any of the following reserved names:

  • LOCAL
  • System (or SYSTEM)
  • Network
  • SELF

These reserved names are not meant to be used as computer names. If this is what your computer uses and you try to upgrade to Windows 10, you will surely get this error. Check your computer name and if you see any of the reserved names, change it right away.

Changing Computer Name in Windows 8.1

If you’re trying to upgrade from Windows 8.1, you can change the name of the computer by following these steps:

  • Step 1: Open the Start menu then simply type “rename computer”. After that, choose “Rename this computer”
  • Step 2: A dialog box will open. Just click the “Change” button
  • Step 3: A new dialog box will open. Type the new name. Click Apply then Ok.

Changing Computer Name in Windows 7

If you’re trying to upgrade from Windows, you can follow the steps below to change the name of your computer.

  • Step 1: Go to the Start menu then on the Computer section, right-click the mouse and choose “Properties”.
  • Step 2: A new dialog box will appear. Go to “Computer name, domain, and workgroup settings” then click “Change settings”. In case you’re asked for administrative access, make sure to grant it.
  • Step 3: Find the “Computer Name” tab then click “Change”
  • Step 4: Change the computer name and click Ok.

Method 2: Fix the “Users” directory issue

If the first method doesn't work, it probably means the computer name isn’t the cause of this error. Another reason why users experience Error code 0x80070004 when upgrading to Windows 10 is if the “Users” directory was relocated. So, when you try upgrading to Windows 10, the installer wasn’t able to find the user profiles on the “%systemdrive%”, where the current operating system is installed.

If you changed or moved any of the Users, Program Data, or Program Files folders, this will cause the error. Before you upgrade to Windows 10, you might be required to reset or reinstall your current operating system (Windows 7 or Windows 8.1).

If you haven’t made any changes or haven’t moved any of the mentioned folders, there’s a great chance that your users' profiles are corrupted. You can also reinstall your current operating system. However, you might want to check for the corrupter user profile first. To do this, follow the steps below:

  • Step 1: Go to the Start menu and type System
  • Step 2: Click System  then go to the Advanced tab
  • Step 3: Go to Settings, which you’ll find under User Profiles

On the Users Profiles, make a copy of all the accounts somewhere. Sign out from the current user account then try logging in back using the accounts you’ve copied. For each account, you get an error, delete it. However, make sure that you don’t delete the UpdateUser and Administrator account ever.

After this is done, try upgrading your operating system to windows 10 again.

Method 3: Try a trusted and secured Automated Tool

If the above methods still not useful, you might want to rely on an automated tool. Find a secured and trusted tool. It will help fix this issue.

Read More
Office 2021 release date set for October 5th
Microsoft-Office-2021-1024x425Microsoft office has two major packages, an online one, and an offline version. The online version of the course is Office 365 that requires a monthly subscription and it is always regularly updated and maintained. Another version is more of a typical old school application, install it and use it, no constant internet connection is required and no monthly subscription is required, buy once and use it. The last version of buying it once and use it was Office 2019 and after two years we are going to receive a new version soon. Microsoft has set its release date for October 5th of this year and as always it will feature the current latest version of office applications and one-time purchase. The new office will support dark mode and other improvements tied to the new Windows 11 and some specific features tied to Office itself.
Read More
0x80070780, The file cannot be accessed
Error 0x80070780 is a particularly nasty error since it means we can not access files on our hard drive. This might be an important file from work or anything similar and it can be frustrating when we can access it. In this article, we will address solutions to this error so you can continue with your activities where you have left off. Follow the guide step by step in the given order to minimize file damage and find the solution quickly.
  1. Run File and Folder built-in troubleshooter

    The simple and clean solution, try first by running Windows built-in tools. Leave troubleshooter to scan and attempt repairs and try to access a file after that.
  2. Run disk checker

    Maybe the file is corrupted or slightly damaged but repairable, run a built-in Windows disk checker and let it scan and repair any error found. Try accessing your file after the scan.
  3. Try copying file

    If the file is under a bad sector or cluster on a disk drive that could be a reason why you can not access it, try copying the file to another location and then opening it, if the operation fails, boot Windows in safe mode and try to copy or move file then. If you are successful with copying files in safe mode, reboot your computer and try to open the file.
  4. Reinstall the driver for the hard drive

    Like when the driver for USB is not working and you can not access files same can happen on your hard drive. Go to the device manager and reinstall the driver for your hard drive.
Read More
Fix Error Code 0x80072EE7 in Windows
Installing or updating Google Chrome does not always go smoothly as there are times when it also encounters some errors like the error code 0x80072EE7. This kind of error in Chrome is most likely caused by the Windows Firewall or third-party Firewall (if you’re using one) that blocks the installation or update process. Aside from this known culprit, there are also other factors to consider such as corrupted or incompatible installation files or it could also be caused by some issue with your internet connection. If you face this kind of problem when installing or updating Chrome, you will see the following error message on your screen:
“An error occurred while checking for updates: Unable to connect to the Internet. If you use a firewall, please whitelist GoogleUpdate.exe. (error code 7: 0x80072EE7 — system level).”
Whatever the cause of this error is, you need to use the options prepared below to fix it.

Option 1 – Whitelist the “googleupdate.exe” in Firewall

If the issue is really caused by the Firewall, you need to whitelist the googleupdate.exe program to fix the error. To do that, follow these steps:
  • Tap the Win + E keys to open the File Explorer.
  • Next, copy and paste the following location in the address bar and tap Enter to go there.
Control Panel/All Control Panel Items/Windows Defender Firewall/Allowed apps
  • After that, click on the Change Settings button, and from the given list, look for Google Chrome.
  • Now check both Private and Public connections for it and then click on OK and see if it fixes the error or not.

Option 2 – Disable the proxy server for LAN

If the problem has something to do with your internet connection, then you can try disabling the proxy server for LAN and see if that helps.
  • Tap the Win + R keys to open the Run dialog box.
  • Then type “inetcpl.cpl” in the field and hit Enter to pull up the Internet Properties.
  • After that, go to the Connections tab and select the LAN settings.
  • From there. Uncheck the “Use a Proxy Server” option for your LAN and then make sure that the “Automatically detect settings” option is checked.
  • Now click the OK and the Apply buttons.
  • Restart your PC.
Note: If you are using a third-party proxy service, you have to disable it.

Option 3 – Check your VPN

If you are using a VPN application, then this option should apply to you, if not, skip this option and proceed to the next one. There are times when VPN software causes some issues like this error. If that’s the case, you can try to disable your VPN temporarily and see if the error is resolved or not and if turns out that your VPN is the culprit, you have to uninstall it and install a new one or its latest version. To uninstall it, follow the steps below.
  • Tap the Win + R keys to open the Run dialog box
  • Then type “appwiz.cpl” in the field and hit Enter to open the Programs and Features in Control Panel.
  • From there, look for the VPN service you are using, select it and then click on Uninstall to remove it.
  • After that, restart your computer and try to install the latest version of the program again. It should work now. If not, proceed to the next available option below.

Option 4 – Try to run the Chrome Cleanup tool

You might want to run Google Chrome’s built-in Malware Scanner & Cleanup tool as it could also help in getting rid of any unwanted ads, pop-ups, and even malware, as well as unusual startup pages, toolbars, and anything else that might overtake the network and could affect the performance of the browser.

Option 5 – Reset Google Chrome

Before you proceed, make sure that the Chrome browser is not running anywhere in the background via Task Manager. Once you’ve made sure that it’s no longer running, refer to these steps:
  • Tap the Win + R keys to open the Run dialog box.
  • Then type “%USERPROFILE%AppDataLocalGoogleChromeUser Data” in the field and tap Enter to open this location.
  • From there, look for the Default folder and then tap the Shift + Delete button and if a confirmation prompt appears, click on Yes.
  • After deleting the Default folder, open Google Chrome and click on the three vertical dots icon located in the top-right corner to open the menu.
  • Next, click on Settings and scroll down and then click on Advanced to open the Advanced Settings.
  • Then scroll down until you see the “Reset and clean up” section and click the “Restore Settings to their original defaults” option.
  • After that, you will see a confirmation box and from there, click on the Reset settings button to reset your Google Chrome browser.
Read More
What to do if USB tethering is not working
This post will guide you in what to do if you are trying to share the internet connection from your Android smartphone to your Windows 10 computer but USB tethering is not working. Although you can always connect your Android phone to your computer using a USB cable, you still won’t be able to access the internet. However, if you’ve already enabled the USB tethering option in your smartphone, you should be able to access the internet but if you still can’t then you can fix this issue by reading this post. There are several potential fixes you can check out to fix the USB tethering issue. You can try running both the Internet Connections and Network Adapter troubleshooters or try installing the USB RNDIS adapter or disable any unnecessary network adapters.

Option 1 – Try to run the Internet Connections and Network Adapter troubleshooter

There are various built-in troubleshooters in Windows 10 that can help fix system issues. Since you are dealing with an internet connection problem, you can try running both the Internet Connections and the Network Adapter troubleshooters. To run them, follow these steps:
  • Go to Settings > Update & security > Troubleshoot.
  • From there, you can select the Internet Connections troubleshooter.
  • Click on the Run troubleshooter button to troubleshoot the problem.
  • Wait until the troubleshooter is done identifying and fixing the problem automatically.
  • Then follow the next on-screen instructions that may appear.
  • Once it’s done, check if the USB tethering issue is now fixed.
Note: You can also try to run the Network Adapter troubleshooter. It is also located under the Troubleshoot section. Just scroll down until you see it and then run it.

Option 2 – Try installing or updating the USB RNDIS adapter

RNDIS or Remote Network Driver Interface Specification can also help you resolve the USB tethering problem. If the pre-installed driver does not help you in connecting to the internet, then you can try installing the USB RNDIS driver that is, if it’s not installed yet. If it is already installed, you can try to update it instead.
  • Tap the Win + R keys to open Run and type “devmgmt.msc” in the field and hit Enter to open the Device Manager.
  • Next, expand the Network adapters section and look for the Remote NDIS based Internet Sharing Device. But if you are using a Samsung smartphone, you might see “Samsung” instead of under Network adapters.
  • Right-click on it and then select the “Update driver” option.
  • Then select the “Browse my computer for driver software” option.
  • After that, select the “Let me pick from a list of available drivers on my computer” option.
  • Now uncheck the checkbox for “Show compatible hardware”.
  • From the given list on your left-hand side, look for Microsoft and then select the Remote NDIS based Internet Sharing Device on your right-hand side.
  • Click on Next. A new popup will appear where you have to click on Yes. This will install the driver.
  • Now click on the Close button and restart your computer.

Option 3 – Try disabling any unnecessary network adapters/connections

Assuming that your Ethernet connection is showing ping loss which indicates that the internet is not stable. In such time, if you use the USB tethering functionality, you won’t be able to access the internet connection from your smartphone. The internet connection will be frequently disconnected since your computer gives priority to the Ethernet connection. Thus, you have to disable the Ethernet connection temporarily.
  • Right-click the network icon on your Taskbar and select the option “Network and Sharing Center”.
  • After that, click the network connection. And then click the Disable button from the status box that opens.
  • After that, check if you can now connect to the internet or not.
Read More
How to Fix Windows 10 Error 0x80072ee7

How to Fix Windows 10 Error 0x80072ee7

Error Code 0x80072ee7 - What is it?

Error Code 0x80072ee7 is an error code that is most commonly associated with Windows 10 and the use of the Windows Store. Several things can cause this error, which has been present as an error message in Windows 10 and all the way back through Windows 8.

Common symptoms include:

  • An error message when you attempt to connect to the Windows Store.
  • Inability to download or install purchases from the Windows Store.

Fortunately, there are several simple methods that can be used to attempt to resolve Error Code 0x80072ee7 on your Windows machine. These methods don’t require advanced computer knowledge or familiarity with high-level tools, so the average user should be able to complete them without help. However, if you feel like you need assistance in resolving Error Code 0x80072ee7, always contact a qualified Windows repair technician who can assist you.

Solution

Restoro box imageError Causes

There are four basic things that can cause Error Code 0x80072ee7 to appear on a Windows device. The first is that the connection to the Internet is limited in some manner, either due to a system or equipment error. Secondly, some parts of the update components could be missing. Next, an error within the DNS can be a cause. Finally, having any kind of compatibility errors on the machine (for example, between the antivirus software that you run and the Windows Update tool) can lead to the appearance of Error Code 0x80072ee7.

Further Information and Manual Repair

There are a few different methods that you can try in order to resolve the appearance of Error Code 0x80072ee7 on your Windows machine. These are fairly simple to complete, but if you do not feel confident in your ability to carry them out successfully, you may want to get in touch with a qualified computer repair technician to help you.

Here are the best methods to employ as you seek to resolve Error Code 0x80072ee7 on your Windows device:

Method One: Check Your Connection

Make sure that you are able to connect to the Internet by visiting several common sites like Google in order to ensure that your issue is not related to your Internet service provider or the equipment that you are using to access the Internet.

Method Two: Use an Alternative DNS

If you believe that your DNS connection may be the problem, you can change the specific DNS that you are using to one that is provided by Google. This can resolve any conflicts that may occur because of the IP address detected on your device. In order to do this, simply follow these steps:

  • Step One: Go into your control panel and click on the option for “Network and Internet,” then select “Network and Sharing Center.” You’ll want to find the option to “change adapter settings,” which is normally located on the left bar of the navigation panel.
  • Step Two: Find the connection method that you are employing (i.e. Wi-Fi network).
  • Step Three: Right-click and find the connection properties menu. Under the TCP/IPV4 menu, click on the option to change your DNS numbers to manual entry and set your preferred DNS server to “8.8.8.8” and your alternate server to “8.8.4.4”.

Once these steps are complete, you can reattempt to connect to the Windows Store. You may need to restart your computer before connecting.

Method Three: Run the Fix It Tool from Windows

Microsoft has created a great tool that can automatically scan your computer for a number of common errors and attempt to fix them as they are encountered. This can be downloaded directly from the Windows site and can be used to try to fix not only Error Code 0x80072ee7 but also many other error messages that may pop up on your computer.

After you have run the Fix It tool, it is always a good idea to restart your computer to allow any changes that have been made to fully take effect.

Method Four: Use An Automated Tool

If you wish to always have at your disposal a utility tool to fix these Windows 10 and other related issues when they do arise, download and install a powerful automated tool.

Read More
1 2 3 162
Logo
Copyright © 2022, ErrorTools. All Rights Reserved
Trademarks: Microsoft Windows logos are registered trademarks of Microsoft. Disclaimer: ErrorTools.com is not affiliated with Microsoft, nor claim direct affiliation.
The information on this page is provided for information purposes only.
DMCA.com Protection Status