Each time we turn ON our computer or wake it from hibernation we are greeted with a Windows login screen where we need to provide login credentials in order to get into Windows itself and start working. This method of preserving data and privacy is perfectly fine and as a matter of fact, it is recommended for mobile computers but if you have a home computer in a safe environment where no one will try to look at your data or rummage through your personal stuff then removing login screen is safe enough action and can cause you a lot piece, from time-saving to less frustration on every restart or sleep action.
In previous Windows versions, it was much easier to turn off this feature but it seems Microsoft has determined that our privacy and security are important and somewhat removed the ability to turn OFF the lock screen. In this guide, we will show you how you can still remove the lock screen and automatically log in with your account like in the good old days.
The first thing you need to do is to press ⊞ WINDOWS + R to bring up the Run dialog
 In the dialog, type in netplwiz and press ENTER.
 You will find yourself in the User Accounts window, inside deselect Users must enter a user name and password to use this computer. Press OK
 Sign in the window will pop up where you will have to type in your password and confirm it in order to start the feature.
 After typing in your password and confirming it, press OK. That's it, next time you wake your computer from hibernation or turn it ON, you will automatically be greeted with a desktop instead of a Windows login screen.

"Error 1723- There is a problem with this Windows Installer package. A DLL required for this install could not be run. Contact your support personnel or package vendor...”You are most likely to come across the error code 1723 if the Java installation is not completed successfully. In other words, the error indicates that the installation process has failed.
 Error Causes
“The application failed to initialize properly (0xc0000005). Click on OK to close the application.”This kind of application error can occur due to several reasons which include damaged installation of the application or system files may have gotten corrupted or damaged. It could also be caused by a malware infection. There are a couple of suggestions provided in this post to help you resolve the error. You can try to run both a System File Checker scan and the DISM tool or reinstall the problematic application or repair-install Windows 10 as well as run a malware scan. Note that the options provided below do not have to be followed in sequence.
Code 39 is a device driver error code that pops up when the Windows operating system cannot load the driver for the hardware you want to use.
This hampers your ability to use the hardware properly. The error code is almost always presented in the following format:
“Windows cannot load the device driver for this hardware. The driver may be corrupted or missing.” Code 39
A device driver is a software program that tells the operating system how to control a particular hardware device. Each hardware device has a different driver.
There are separate device drivers for printers, CD-ROM readers, and keyboards, to name a few.
Many device drivers are already built into the operating system. But sometimes you will need to install a new device driver when you want to use a new piece of hardware device that the operating system is not familiar with, or does not anticipate.
Regardless of whether or not the drivers are already integrated into the operating system, you may still experience code 39, typically because of the corrupted or outdated drivers.
Outdated and corrupted drivers cause hardware malfunction and failure, which trigger device driver error codes like code 39. Other causes include incorrect registry values.
Below are some of the easiest and most effective methods to resolve Device Manager error code 39 on your PC.
To follow and implement these methods, you don’t require any technical knowledge or expertise. Simply follow these instructions to fix the error right away.
There is a possibility that the error code 39 is caused by some fluke within the Device Manager or your BIOS.
If that’s the reason, then a simple PC reboot can resolve the issue immediately. Therefore, before you try anything, it is advisable to restart your system.
If it works, then that is great, but if it doesn’t, then don’t worry, try other methods given below to fix this problem successfully.
If the error code 39 is generated due to faulty or outdated drivers, then simply uninstall and remove them and then reinstall new driver versions. There are two ways to remove faulty drivers.
This method, although effective in resolving error code 39, can be time-consuming. To avoid the hassle and save time, try method 3.
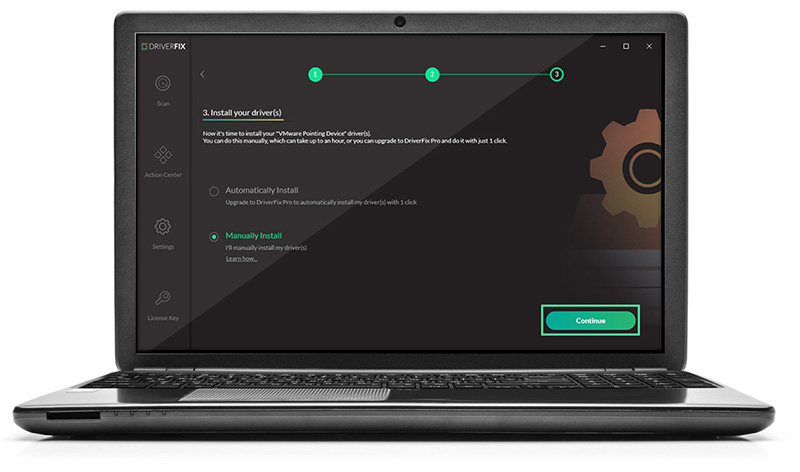
Method 3 - Update Drivers Automatically with DRIVERFIX
If you would like to read more helpful articles and tips about various software and hardware visit errortools.com daily. On the other hand, if your computer is going through some driver-related issues that have to get fixed, there is a one-click solution known as DRIVERFIX you could check out to resolve them. This program is a useful tool that could repair corrupted drivers and optimize your PC’s overall performance. This is basically a solution that’s within your grasp with just a click. It’s easy to use as it is user-friendly. For a complete set of instructions in downloading and using it, refer to the steps below Perform a full system scan using DRIVERFIX. To do so, follow the instructions below.
 Once it opens, click on Device Manager to open it,
If you have a driver device error inside Windows, you should see it immediately when entering the Device Manager, it will have a yellow exclamation mark beside it. Right-click on it and choose update driver.
Once it opens, click on Device Manager to open it,
If you have a driver device error inside Windows, you should see it immediately when entering the Device Manager, it will have a yellow exclamation mark beside it. Right-click on it and choose update driver.powershell -ExecutionPolicy Unrestricted Add-AppxPackage -DisableDevelopmentMode -Register $Env:SystemRootWinStoreAppxManifest.xml
c md.exe /c takeown /f "C:System Volume Information*" /R /D Y && icacls "C:System Volume Information*" /grant:R SYSTEM:F /T /C /L