Fix Printer driver issue in Windows

The printer can stop working for many various reasons, some of them are however tied to the printer driver itself. In this guide, we will address issues and provide you with advice on how to get your printer back in working order in no time.

All of that being said let us fix your Printer driver issue.

  1. Check to see if the printer is plugged and that it has toner or colors and paper in the tray

    The simplest solutions are the best ones, and most of the time simplest issues are overlooked. To eliminate any basic issues check the printer cable does it has paper in the tray and check the status of toner or colors in it.

  2. Check if Windows troubleshooter will resolve the issue

    Bring up settings and choose devices, under devices click on printers and scanners. On the far right top, you have a link to start the troubleshooter, click on it. Windows built-in tools could resolve issues and fix them for you. If by any chance Windows is not able to find or resolve issues move to the next step.

  3. Check if the Device Manager is reporting an error and update the driver

    If the hardware is functioning properly then the issue might be in Windows not detecting device or driver malfunction. In any case, the Device Manager will be the one who will report this problem. In order to check to see if the driver is properly working press ⊞ WINDOWS + X to open the hidden start menu.
    keyboard with windows and x marked
    Once it opens, click on Device Manager to open it,
    If you have a driver device error inside Windows, you should see it immediately when entering the Device Manager, it will have a yellow exclamation mark beside it. Right-click on it and choose update driver.

  4. Reinstall driver

    If driver update failed or you already have the latest drivers, reinstalling them could fix the issue since drivers might have corrupted during installation of some update or application. Follow steps from point 3 to get to the driver in Device Manager, then right-click on it but instead of update choose to uninstall. Reboot Windows once the driver is uninstalled and Windows will install a new one automatically. If you do not want to update drivers automatically install the latest driver for your device, then reboot.

  5. Check Windows update

    Check to see if the latest Windows update is installed, update your Windows if needed

  6. Fix driver issue with DRIVERFIX

    If everything else fails, get DRIVERFIX, a premium solution for your PC issues, and fix driver errors.

If you like to learn and find out more about various Windows errors, and how to repair them go to our vast archive or use search to find articles that will explain and help you in solving your issue.
However, if you prefer to do things fast and with automatization then we are proposing to use an automated solution for your issues. The application that we are recommending is Advanced System Repair Pro
Advanced System Repair utilizes multiple tools all in one to give you a quick, simple, reliable, and very thorough diagnosis of your PC. It brings you all the tools you need in one program to clean, fix, protect, optimize and boost your PC!
1-Click Maintenance
All the tools to make it simple and easy! It's like having a professional technician at the click of a mouse.

Junk Cleaner
Keeping your computer free from unnecessary clutter also helps make your computer last longer. Like any other machine, if you keep it clean and take care of it, it will serve you better for longer!

Optimize background apps
Optimize applications background activity with the built-in Application Optimizer feature.

Disk Defrag
With a simple 1-click, Advanced System Repair speeds up your PC by assembling fragmented files on your machine and organizing them more efficiently.

Malware Removal
Finds and removes all types of harmful malware including trojans, worms, bots, adware, spyware, PUPs, and more!

Privacy Cleaner
The all-in-one privacy suite to Clean Your Tracks & Protect Your Privacy! Make your computer safe, secure, and more efficient!

System Tweak/Optimizer
ASR will analyze your complete system and settings to adjust your PC to function at its maximum performance.

Registry Cleaner
Over time, as you install and uninstall applications, the registry can become cluttered with old entries and broken settings which can result in program crashes, and annoying messages and slow the computer down.
Visit our Advanced System Repair Pro Download page to inform yourself about all the benefits of this software and get a free trial copy of it.
advanced system repair pro

Advanced System Repair Pro

One-click automated PC repair solution
ASR logo
With Advanced System Repair Pro you can easily
Replace damaged files
Restore performance
Free disk space
Remove Malware
Protects WEB browser
Remove Viruses
Stop PC freezing
DOWNLOAD
Privacy Policy | Terms of Use | Uinstall
Advanced System Repair Pro is compatible with all versions of Microsoft Windows including Windows 11

Share this article:

You might also like

MS releases ISO for Windows 10 build 21354
On April 7th Microsoft has released Windows build 21354 for their flagship OS and updates are rolling. Alongside the new update builds Microsoft has decided to create and release Windows 21354 build as an installable ISO image for anyone who wishes to do a clean installation of Windows without the need to update it after the installation. We have not seen this move by Microsoft in a long time and honestly, we are welcoming it, it is always great to have updated ISO Windows build than to install the old version and sit through an hour or more of updates. If you are interested in getting this ISO image and you are part of the insider program you can download it from here. If you would like to read more helpful articles and tips about various software and hardware visit errortools.com daily.
Read More
Fix missing files in Recycle bin
Have you ever deleted a file by mistake? Do not feel bad, we all have, but what if you deleted the file by mistake and then you went to Recycle bin to restore it only to find out that the bin is empty? If you experienced this kind of issue then you know how unpleasant and frustrating it is but do not worry, we are here to help and provide you with solutions to this problem and hopefully get your file back. Follow the next steps from first to last since they are organized in a way to minimalize the permanent deletion of lost files.
  1. Refresh Recycle bin view

    If you spend any amount of time on this site reading through articles, you know I am a big fan of simple and effective solutions and there is nothing simpler than a single press of a button. Open your recycle bin and press F5 to refresh view or right-click anywhere inside and choose refresh. If your file does not appear with this method go to the next step.
  2. Set Windows to show hidden system files

    In order for this to work first, you will need to open File Explorer by pressing ⊞ WINDOWS + E Keyboard with windows and e markedWhen File Explorer opens go to VIEW > OPTIONS. Inside options select “Show hidden files, folders, and drives”, uncheck “Hide protected operating system files (Recommended)”, and click APPLY > OK Go to the recycle bin and check to see if files have managed to show up.
  3. Check if Don't move the file to the recycle bin is enabled

    Right-click on recycle bin and choose properties, under properties, there is the option that says Don’t move files to the Recycle Bin, Remove files immediately when deleted. This option is not selected by default, but it could be turned on by someone else or by mistake. If you see that this option is enabled sadly your file is gone and you will have to get the file back by using some third-party undelete application, uncheck this option to prevent future deletion of files by mistake.
  4. Increase recycle bin size

    This will not help you to get your file back sadly but it will help you in storing more files in recycle bin. This is helpful since if you reach your recycle bin limit all further files will be permanently deleted and not been able to get them back. So by increasing bin size you will have more space for deleted files to be saved. To do that, right-click on Recycle Bin, select Properties. Now, increase the Maximum size from the Custom size option, and click Apply and OK.
  5. Reset recycle bin

    To reset and fix corrupted recycle bin do the following: Press ⊞ WINDOWS + X to open the secret Windows menu and click on command prompt (admin) keyboard with windows and x markedIn the command prompt type in the following: rd /s /q C:\$Recycle.bin Reboot your system
Read More
Quick Solution Guide to Error Code 40

Quick Solution to Error Code 40

Error Code 40 – What is it?

Error Code 40 is a device driver error that users encounter on any Windows 2000 and later operating systems. It occurs when the peripheral device that you connect to your PC cannot be accessed due to a change in the system registry.

This is due to the presence of invalid sub-keys of the device driver in the system registry. It is a common error that users come across and appears on your PC with either of the following messages:

“Information in the registry entry for this driver is invalid”

OR

"Windows cannot access this hardware because its service key information in the registry is missing or recorded incorrectly. (Code 40)"

Solution

driverfix boxError Causes

As mentioned above, the error code is triggered when the device driver’s invalid sub-keys appear in the registry, effectively changing it. This happens when the windows system files get damaged due to the following factors:

  • An incomplete program uninstallation
  • An incomplete program installation
  • Hardware is not removed properly
  • System recovery from viruses
  • An improper system shut down

Factors such as incomplete installations or uninstallations or an improper system shut down can cause files to become damaged that threaten the health of your computer.

Removing viruses from the computer is also another factor as it removes the entries in the Windows system files which contain the viruses including spyware or malware

Further Information and Manual Repair

Fixing Error Code 40 is similar to fixing other device manager error codes. Here are a few methods you can try.

Method 1 – Use System Restore

You can use system restore to eliminate the problem. Here is how you can use it:

  • Log in using an Administrator account
  • Click ‘Start’ button and select All Programs > Accessories > System Tools > System Restore
  • Click ‘Restore my computer to an earlier time’ and click ‘Next’
  • Select the last Windows restore point from the ‘On this list, click a restore point’ list, and click ‘Next’
  • Click ‘Next’ on the confirmation window to proceed
  • Restart your PC after restoration is complete
By restoring the system via a last saved system checkpoint, you can obtain undamaged Windows system registry files that can help avert the error code.

Method 2 – Manually uninstall then reinstall the device driver

If using system restore also does not work in removing the error code, you may have to resort to manually uninstalling and then reinstalling the device driver causing the problem.

This would be necessary since the remaining incomplete files due to a partial removal or installation of programs is what contributes to the error code. By uninstall and reinstalling the device driver program, it would lead to the completion of the files.

You can do this by firstly logging in as Administrator and open Device Manager. Select the device that is causing the problem and double click it and make sure that the peripheral is connected properly to the PC. Upon opening, click on the ‘Driver’ tab and then select ‘Update Driver’.

Make sure to refer to the system documentation that you received with your PC or computer to check for the motherboard details and driver specifics.

Method 3 – Use software to automatically download the driver

Manually uninstalling and reinstalling the driver will do the trick, however, it may be time-consuming especially when you would have to resort to your hardware user manual.

Therefore, using a program such as DriverFIX can save you a lot of time and frustration in having your device work properly on your computer.

DriverFIX, with its user-friendly approach to help you fix your PC issues, comes with an integrated database that detects which drivers you need to reconfigure within just a few seconds and downloads it automatically.

It further ensures that your drivers are installed in their entirety leaving no room for any incomplete files to remain that create Error Code 40.

It also has the added advantage of being able to backup and restores your files should there be the slightest possibility of system file damage.

Thus, registry damage can be averted by letting the software roll back the system files to an earlier healthy checkpoint. Driver Assist is the answer to fixing your PC error codes accurately and quickly.

Click here to download DriverFIX to fix Error Code 40 quickly and effectively!
Read More
How to Fix Windows 10 Error Code 0x800705b4

How to Fix Windows 10 Error Code 0x800705b4

Error Code 0x800705b4 - What is it?

Error Code 0x800705b4 is an error that will appear when the computer is not stable, and very critical system files will fail to respond or they will start going missing. This will happen when the computer is not being maintained properly. The problem should be solved immediately to avoid any further damage or loss of data. This error code may be regarded as one of the most severe computer problems that can present itself.

Common symptoms include:

  • There will be a failure to install updates and a display of the error message.
  • The Error Code 0x800705b4 will display itself.
  • After a system update, the computer will not be able to install new drivers.

Solution

Restoro box imageError Causes

Windows 10 update error 0x800705b4 can be caused when the user wants to update their windows system when important dll registries or files are missing or are corrupt. This will also happen when the user is trying to install or uninstall programs in a way that is wrong, or it may be infected with a Trojan virus. Additionally, this error code will be displayed when a PC's drivers are either outdated or installed the wrong way. There could be a registry error, a failure to update by the operating system, or even a device failure to update automatically.

Further Information and Manual Repair

There are several ways to resolve the appearance of error code 0x800705b4 on Windows devices. If you are not familiar with fixing error codes on a computer or are having trouble fixing this one, consider contacting a Windows technician to help with fixing the error. The computer must be run on administrator mode no matter which steps you are taking or which methods you are using. Depending on which version of Windows you are using, the steps for each method may differ slightly, but the basic process will remain the same.

Method One: Fixing it with updates

Start the computer in safe mode to begin troubleshooting for error code 0x800705b4. When the computer is starting up, press F8—this will enter the computer into safe mode.

You will now need to manually update your computer's outdated drivers. To do this, click on Start. Then, type in Device Manager into the search box to see if there are any outdated or corrupt issues with the drivers.

Method Two: Run an SFC scan

This will allow users to find files in Windows that are corrupt, damaged, or lost.

  • Start the Command Prompt. To do this, click Start and then type in cmd inside of the search box to see the icon.  Right-click and choose to Run as administrator. If asked, enter the password for the administrator.
  • When viewing the command prompt, type in “sfc/scannnow” and then press enter. This will be scanning all of the protected system files and will fix the corrupt files. Do not close the command prompt before it is done.

Method Three: System Restore

This is the most efficient way to fix any problem or system status. System backup is vital when performing this.

Click on the Start button, and then type in “system restore” inside of the search box. Right click on System Restore, and then choose Run as Administrator. This could also be found in the Control Panel. Now you will choose the time point in which to restore the system. You will be able to choose the recommended or specific restore based on the situation. Now you can review the restore point and then click Finish.

Method Four: For Windows 10

  • You may need to update the Windows Defender in the security center. To locate this, click Start, Settings, Update and Security, Windows Defender.
  • Go to the Windows Updates and click on Advanced Options. Click on the option that will get updates for more Microsoft products.
  • Restart the computer, and then check for updates again. This update process will be able to be done without a problem. When a message comes up that says “Your device is up to date” you will need to click Advanced Options once again and check for update options.
  • Check for updates one more time and now the proper updates should be able to be downloaded and installed properly.

Method Five: Use An Automated Tool

If you wish to always have at your disposal a utility tool to fix these Windows 10 and other related issues when they do arise, download and install a powerful automated tool.

Read More
New Snipping tool redesigned in Windows 11
Windows 11 Snipping tool
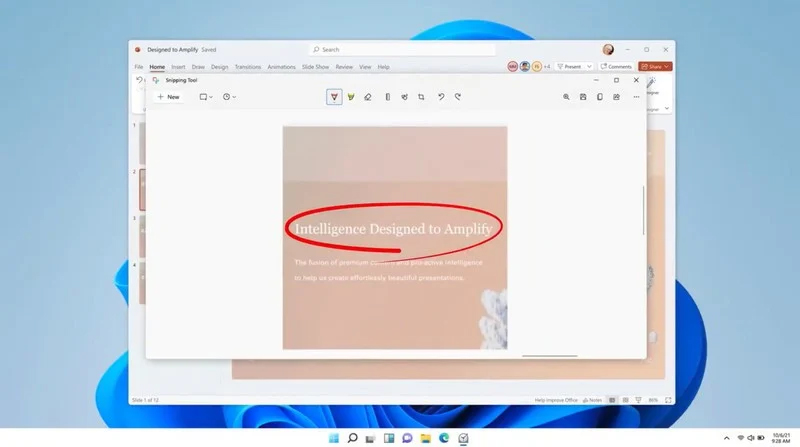
The latest update from Panos Panay on Twitter is including New and redesigned Snipping tool inside Windows 11. From the shared video, we can see that it includes modern Windows 11 UI redesign and it looks and feels like a part of Windows 11. More things that can be seen from the shared video is that it looks like the new snipping tool is a merged version of the old with snip & sketch. It is good to see that it is still possible to capture screen with easier way natively inside Windows 11 but some more functionality would be more welcome I guess. Users were asking for added functions for a long time like adding simple text for example but from shared video, no new features were presented so for some users 3rd party solutions will still be the way to go. The new and redesigned Snipping tool will roll out with the next update and we will see then about all new features inside it firsthand. Until then, take care.
Read More
Easy Remove SpeedItUp Tutorial

SpeedItUp is a potentially unwanted application made by MicroSmarts LLC. The program claims to optimize RAM, clean the registry, and boost internet connection speed. It is designed to speed up your computer by removing some background processes. While not malicious itself, SpeedItUp Free and its variations are often installed via third-party installer bundles, causing many users to unwittingly install the program. Aliases of the program include CheckMeUp, SpeedCheck, SpeedChecker, SpeedItUp Free, Speeditup-Checkup, and Speeditup-Nova. While intended to speed up the performance, its background processes and startup tasks may actually slow PCs down in some cases. Some versions of SpeedItUp also include a browser extension.

About Browser Hijackers

Browser hijacking is a type of unwanted software program, usually a web browser add-on or extension, which causes modifications in the browser’s settings. Browser hijacker malware is designed for a number of reasons. Typically, browser hijacking is used for earning advertising revenue that comes from forced advert mouse clicks and website visits. Though it might seem naive, these tools are designed by vicious individuals who always attempt to take full advantage of you, so that hackers can make money from your naive and distraction. On top of that, hijackers can make the whole infected system vulnerable – other destructive malware and viruses would grab these opportunities to get into your computer effortlessly.

Symptoms of browser hijack

There are many symptoms that could indicate a browser hijacking: your web browser’s homepage is suddenly different; your web browser is constantly being redirected to adult sites; the default online search engine has been changed and your browser security settings have been brought down without your knowledge; discover new toolbars which you did not add; your internet browser displays endless pop-up windows; your internet browser has become unstable or starts running slowly; Inability to navigate to certain websites, particularly anti-malware as well as other security software sites.

How they infect computer systems

A browser hijacker can be installed on your computer or laptop if you check out an infected site, click an email attachment, or download something from a file-sharing site. They may also originate from any BHO, browser extension, add-on, toolbar, or plug-in with the malicious objective. A browser hijacker can also come bundled up with some freeware that you inadvertently download to your PC, compromising your internet security. An example of some notorious browser hijacker includes Babylon, Anyprotect, Conduit, DefaultTab, SweetPage, Delta Search, and RocketTab, but the names are regularly changing.

The best ways to remove a browser hijacker

Certain kinds of browser hijackers can be removed from the computer by deleting malicious applications or any other recently added shareware. Often, it can be a challenging task to discover and get rid of the malicious piece because the associated file could be running as part of the operating system process. Moreover, manual removals demand deep system knowledge and thus can be quite a difficult job for novice computer users. Experts always recommend users remove any malware including browser hijackers by using an automatic malware removal tool, which is better, safer, and quicker than the manual removal method. One of the greatest tools for repairing browser hijacker malware is Safebytes Anti-Malware. It will help you remove any pre-existing malicious software in your system and provides you real-time monitoring and protection from the latest threats. Together with the anti-virus tool, a PC optimizer, like SafeBytes Restoro, will help you in deleting all associated files and modifications in the computer registry automatically.

Virus Blocking Internet And All Antivirus Software? Do This!

Every malware is detrimental and the effects of the damage will vary based on the specific type of malicious software. Some malware goes to great lengths to stop you from installing anything on your computer, particularly anti-virus software programs. If you are reading this article, you probably have got affected by a virus that prevents you from installing a computer security program such as Safebytes Anti-Malware. Refer to the instructions below to remove malware through alternative ways.

Install antivirus in Safe Mode with Networking

If the virus is set to load immediately when Microsoft Windows starts, getting into safe mode could block this attempt. Since only the minimum applications and services launch in Safe Mode, there are seldom any reasons for conflicts to occur. Listed here are the steps you have to follow to start into the Safe Mode of your Windows XP, Vista, or 7 computers (go to Microsoft site for instructions on Windows 8 and 10 computers). 1) At power on/start-up, tap the F8 key in 1-second intervals. This would conjure up the “Advanced Boot Options” menu. 2) Use the arrow keys to select Safe Mode with Networking and hit ENTER. 3) As soon as this mode loads, you should have an internet connection. Now, make use of your internet browser normally and navigate to https://safebytes.com/products/anti-malware/ to download Safebytes Anti-Malware. 4) After the software is installed, allow the diagnostic scan run to remove trojans and other malware automatically.

Obtain the anti-malware software in a different internet browser

Some malware mainly targets particular web browsers. If this is your situation, utilize another internet browser as it could circumvent the virus. When you suspect that your Internet Explorer happens to be hijacked by a trojan or otherwise compromised by cybercriminals, the most effective plan of action would be to switch to a different web browser such as Chrome, Firefox, or Safari to download your favorite computer security program – Safebytes Anti-Malware.

Run antivirus from a pen drive

To successfully eliminate the malware, you might want to approach the issue of running an antivirus software program on the affected computer from a different angle. Adopt these measures to employ a flash drive to clean your corrupted computer. 1) Download Safebytes Anti-Malware or MS Windows Defender Offline onto a clean PC. 2) Insert the USB drive onto the same system. 3) Double click on the exe file to open the installation wizard. 4) Select the USB stick as the destination for saving the software file. Follow the on-screen instructions to complete the installation process. 5) Unplug the pen drive. You may now use this portable antivirus on the infected computer system. 6) Run the Safebytes Anti-malware directly from the USB drive by double-clicking the icon. 7) Press the “Scan” button to run a full computer scan and remove viruses automatically.

Protect Your PC & Privacy With SafeBytes Anti-Malware

Do you want to install the very best anti-malware application for your computer system? There are several applications available that come in paid and free versions for Microsoft Windows computers. Some of them do a good job in eliminating malware threats while many will damage your computer themselves. You must opt for a company that builds industry-best anti-malware and has gained a reputation as reliable. When considering the reliable software programs, Safebytes Anti-Malware is certainly the highly recommended one. SafeBytes can be described as a powerful, real-time antivirus application that is designed to assist everyday computer users in protecting their computer from malicious threats. With its outstanding protection system, this tool will automatically detect and get rid of most of the security threats, which include viruses, adware, browser hijackers, ransomware, PUPs, and trojans. SafeBytes anti-malware takes PC protection to a whole new level with its advanced features. Let’s have a look at some of them below: Active Protection: SafeBytes provides 100 % hands-free real-time protection which is set to monitor, prevent and get rid of all computer threats at its very first encounter. They are very effective in screening and getting rid of numerous threats because they are continuously revised with the latest updates and alerts. Antimalware Protection: This deep-cleaning anti-malware software goes much deeper than most anti-virus tools to clean out your PC. Its critically acclaimed virus engine locates and disables hard to remove malware that hides deep inside your PC. SuperSpeed Scanning: SafeBytes’s very fast malware scanning engine lessens scanning times and extends battery life. At the same time, it will effectively identify and eliminate infected files or any online threat. Web Security: SafeBytes provides an instant safety rating about the web pages you are about to visit, automatically blocking dangerous sites and make sure that you’re certain of your online safety while browsing the net. Lightweight Utility: This program is not “heavy” on the computer’s resources, so you’ll not notice any performance difficulties when SafeBytes is operating in the background. Premium Support: Support service is readily available for 24 x 7 x 365 days through chat and email to answer your questions.

Technical Details and Manual Removal (Advanced Users)

If you wish to manually remove SpeedItUp without the use of an automated tool, it may be possible to do so by removing the program from the Windows Add/Remove Programs menu, or in cases of browser extensions, going to the browsers AddOn/Extension manager and removing it. You will likely also want to reset your browser. To ensure the complete removal, manually check your hard drive and registry for all of the following and remove or reset the values accordingly. Please note that this is for advanced users only and may be difficult, with incorrect file removal causing additional PC errors. In addition, some malware is capable of replicating or preventing deletion. Doing this in Safe Mode is advised.

The following files, folders, and registry entries are created or modified by SpeedItUp

Files: C:DOCUME1USER1LOCALS1Tempinproc.temp C:DOCUME1USER1LOCALS1Temptmp1.tmp C:DOCUME1USER1LOCALS1Temptmp2.tmp C:DOCUME1USER1LOCALS1Temptmp3.tmp C:DOCUME1USER1LOCALS1Temptmp4.tmp C:DOCUME1USER1LOCALS1Temptmp5.tmp C:DOCUME1USER1LOCALS1Temptmp6.tmp c:autoexec.bat C:DOCUME1USER1LOCALS1Temptmp1.tmp C:DOCUME1USER1LOCALS1Temptmp2.tmp C:DOCUME1USER1LOCALS1Temptmp4.tmp C:DOCUME1USER1LOCALS1TemptmpA.tmp C:DOCUME1USER1LOCALS1TemptmpE.tmp C:DOCUME1USER1LOCALS1TemptmpF.tmp C:DOCUME1USER1LOCALS1Tempsearchprotect_w_prechecker.exe C:WINDOWSsystem32rsaenh.dll C:WINDOWSRegistrationR000000000007.clb C:DOCUME1USER1LOCALS1Tempinproc.temp C:DOCUME1USER1LOCALS1Temptmp1.tmp C:DOCUME1USER1LOCALS1Temptmp2.tmp C:DOCUME1USER1LOCALS1Temptmp3.tmp C:DOCUME1USER1LOCALS1Temptmp4.tmp C:DOCUME1USER1LOCALS1Temptmp5.tmp C:DOCUME1USER1LOCALS1Temptmp6.tmp C:DOCUME1USER1LOCALS1Temptmp7.tmp C:DOCUME1USER1LOCALS1Tempsearchprotect_w_prechecker.exe C:DOCUME1USER1LOCALS1Tempwajam_validate.exe C:DOCUME1USER1LOCALS1Temptmp1.tmp C:DOCUME1USER1LOCALS1Temptmp2.tmp C:DOCUME1USER1LOCALS1Temptmp3.tmp C:DOCUME1USER1LOCALS1Temptmp4.tmp C:DOCUME1USER1LOCALS1Temptmp5.tmp C:DOCUME1USER1LOCALS1Temptmp6.tmp C:DOCUME1USER1LOCALS1Temptmp7.tmp C:DOCUME1USER1LOCALS1TemptmpA.tmp C:DOCUME1USER1LOCALS1Tempsearchprotect_w_prechecker.exe C:DOCUME1USER1LOCALS1Tempwajam_validate.exe File %COMMONDESKTOPSpeedItup Free.lnk. File %COMMONPROGRAMSSpeedItup Free.lnk. File %COMMONPROGRAMSSpeedItup FreeSpeedItup Free.lnk. File %COMMONPROGRAMSSpeedItup FreeUninstall SpeedItup Free.lnk. File %COMMONSTARTMENUSpeedItup Free.lnk. File %LOCALSETTINGSTempspuad0.exe. File %LOCALSETTINGSTempspuad1.exe. File %PROGRAMFILESDisplay Offerdelayexec.exe. File %PROGRAMFILESDisplay Offerwait.exe. File %PROGRAMFILESSpeedItup Freedelayexec.exe. File %PROGRAMFILESSpeedItup Freespdfrmon.exe. File %PROGRAMFILESSpeedItup Freespeeditupfree.exe. File %SYSDRIVEProgram Files (x86)SpeedItup Freeupgradepath.ini. File %WINDIRSpeedItup Freeuninstall.exe. Directory %COMMONPROGRAMSSpeedItup Free. Directory %PROGRAMFILESDisplay Offer. Directory %PROGRAMFILESSpeedItup Free. Directory %SYSDRIVEProgram Files (x86)SpeedItup Free. Directory %WINDIRSpeedItup Free. Registry: Key HKEY_CLASSES_ROOT named spdfrmon.Gate.1, plus associated values. Key HKEY_CLASSES_ROOT named spdfrmon.Gate, plus associated values. Key 0142D788-C4FC-4ED8-2222-D654E27AF7F8 at HKEY_CLASSES_ROOTInterface. Key A1011E88-B997-11CF-2222-0080C7B2D6BB at HKEY_CLASSES_ROOTTypeLib. Key A1843388-EFC2-49C9-2222-FC0C403B0EBB at HKEY_CLASSES_ROOTInterface. Key A19F8F88-F91E-4E49-2222-BD21AB39D1BB at HKEY_CLASSES_ROOTAppID. Key A19F8F88-F91E-4E49-2222-BD21AB39D1BB at HKEY_CLASSES_ROOTCLSID. Key A1D87888-DEAA-4971-2222-5D5046F2B3BB at HKEY_CLASSES_ROOTInterface. Key A245B088-41FA-478E-8DEA-86177F1394BB at HKEY_CLASSES_ROOTAppID. Key spdfrmon.exe at HKEY_CLASSES_ROOTAppID. Key spdfrmon at HKEY_LOCAL_MACHINESYSTEMControlSet001Services. Key spdfrmon at HKEY_LOCAL_MACHINESYSTEMControlSet002Services. Key spdfrmon at HKEY_LOCAL_MACHINESYSTEMControlSet003Services. Key SpeeditupFree at HKEY_LOCAL_MACHINESoftwareMicrosoftWindowsCurrentVersionUninstall.
Read More
Fix NMI_HARDWARE_FAILURE in Windows
If you encounter the NMI_HARDWARE_FAILURE Blue Screen error while using your Windows 10 computer, then read on as this post will guide you in resolving this kind of Blue Screen of Death error. NMI HARDWARE FAILURE or “Non-Maskable Interrupt” Blue Screen error occurs when there is some hardware malfunction in your computer. When you encounter this Blue Screen error, you may get a stop code of 0x00000080 which can randomly occur while you use your computer. However, a lot of users reported encountering this error while they were trying to update or install their Graphics Card drivers. The stop code that you may get for this BSOD error is 0x00000080. The error can occur randomly during your usage of the computer – but a large number of users have reported this error while they are updating or installing their Graphics Card drivers. In this post, we will be covering all the possible fixes for this error. NMI_HARDWARE_FAILURE error on Windows The NMI_HARDWARE_FAILURE bug check has a value of 0x00000080. This bug check indicates that a hardware malfunction has occurred. There are various hardware malfunctions that can cause this kind of Blue Screen error. However, pinpointing the exact cause is quite difficult. Worry no more for the following fixes provided below can help you resolve the NMI_HARDWARE_FAILURE Blue Screen error no matter what the cause of the problem is.

Option 1 – Try removing hardware or drivers that you’ve installed recently

If you have recently installed some hardware or drivers, you might want to disable or remove them since external devices are proven to be one of the factors that trigger Blue Screen errors like NMI_HARDWARE_FAILURE. All you have to do is physically disconnect any external devices that are connected to your computer and then check if it fixes the BSOD error or not.

Option 2 – Try to rollback, update, or disable the Graphics card drivers

Since the NMI_HARDWARE_FAILURE Blue Screen error has something to do with Graphics card drivers, you can either roll back, update or disable them depending on your preference in order to resolve the error.
  • First, boot your computer into Safe Mode.
  • After that, tap the Win + R keys to launch Run.
  • Type in devmgmt.msc into the box and tap Enter or click OK to open the Device Manager.
  • After that, a list of device drivers will be displayed. From there, look for the Display Adapters and click on them.
  • After that, right-click on each entry under the Display Adapters and select the “Uninstall Device” option from the menu.
  • Now restart your computer.
  • After restarting your computer, go to the Settings app and Check for Updates in the Windows Update section.
Note: You also have the option to go directly to the website of your graphics card manufacturers like NVIDIA, Intel, or AMD and go to the section called Drivers then check if there’s a new available update – if there is, download and install it.

Option 3 – Make sure that all memory modules have the same type

This third option is quite technical and tricky. If you often use multiple physical RAMS on your Windows 10 computer, then you have to check first if they are of the same frequency. After that, the first thing you should verify is if the chip is properly compatible or not. And if the sockets are attached using some kind of adapter or non-recommended device, it could cause some issues while giving a performance hit to your computer.  If you were able to find such a setup, you have to undo it or install the proper and recommended as well as compatible hardware.

Option 4 – Try to run the Blue Screen Troubleshooter

As you know, the Blue Screen troubleshooter is a built-in tool in Windows 10 that helps users in fixing BSOD errors like the NMI_HARDWARE_FAILURE error. It can be found on the Settings Troubleshooters page. To use it, refer to these steps:
  • Tap the Win + I keys to open the Settings panel.
  • Then go to Update & Security > Troubleshoot.
  • From there, look for the option called “Blue Screen” on your right-hand side and then click the “Run the troubleshooter” button to run the Blue Screen Troubleshooter and then follow the next on-screen options. Note that you might have to boot your PC into Safe Mode.
Read More
Windows got stuck on Preparing Windows screen
You might have experienced a situation when you restarted your Windows 10 PC after an upgrade and you tried logging into your account but only a screen with a message saying, “Preparing Windows”. If the screen only stays that way, this indicates that Windows 10 is trying to complete the upgrade or waiting for some files to load up so that you can use your account. Some users also reported that when they tried logging into their accounts, they also get the same message on their screens. To resolve this issue, read on as this post will show you what you can do if your Windows 10 PC is stuck on the “Preparing Windows” screen. A lot of users have tried logging back into their account once more but to no avail as the same screen still greets them. And even when they tried the Ctrl + Alt + Del combo, it still didn’t work. This only goes to show that your account might somehow be corrupted.

Option 1 – Try booting your PC into Safe Mode

The first thing you can do to resolve the issue is to try booting your computer into Safe Mode and then log in using an Admin account. If it seems like your admin account has caused the problem, you need to create an admin account first and then log in after you reboot into the account and then log off. After that, restart your PC normally and check if the problem’s resolved or not. If not, refer to the next given option below.

Option 2 – Try to repair your corrupted profile via Registry

In this second option, you can try to repair the corrupted profile using the Registry but before you proceed, make sure to create a System Restore Point and then follow the steps below.
  • Tap the Win + R keys to open the Run dialog box.
  • Then type “regedit” in the field and hit Enter or click OK to open the Registry Editor.
  • Next, go to this registry key: ComputerHKEY_LOCAL_MACHINESOFTWAREMicrosoftWindows NTCurrentVersionProfileList
  • Once you’ve opened the registry key, you should see a list of all the user profiles on your computer. Now click on each S-1-5 folder and look for the “ProfileImagePath” entry and double-click on it to check which user account it is related to. You will see a path like “CUsersACK” where “ACK” is the username.
  • You should know which among the user account is corrupted. Just look for a key named “RefCount” and change its Value data to “0” and click OK. And if it isn’t available, simply right-click on the right pane and create it.
  • After that, double click on the key named “State” and make sure that the Value data is “0” and click OK.
  • Exit the Registry Editor and restart your computer to apply the changes made.

Option 3 – Try running the System File Checker

System File Checker or SFC is a built-in command utility that helps in restoring corrupted files as well as missing files. It replaces bad and corrupted system files with good system files that might be the cause why your screen is stuck at “Preparing Windows”. To run the SFC command, follow the steps given below.
  • Tap Win + R to launch Run.
  • Type in cmd in the field and tap Enter.
  • After opening Command Prompt, type in sfc /scannow
The command will start a system scan which will take a few whiles before it finishes. Once it’s done, you could get the following results:
  1. Windows Resource Protection did not find any integrity violations.
  2. Windows Resource Protection found corrupt files and successfully repaired them.
  3. Windows Resource Protection found corrupt files but was unable to fix some of them.

Option 4 – Try to repair hard disk errors using the Chkdsk utility

You can also run the Chkdsk utility to resolve the problem. If your hard drive has issues with integrity, the update will really fail as the system will think that it’s not healthy and that’s where the Chkdsk utility comes in. The Chkdsk utility repairs hard drive errors that might be causing the problem.
  • Open Command Prompt with admin privileges.
  • After opening Command Prompt, execute the commands listed below, and don’t forget to hit Enter right after you type in each one of them.
  • chkntfs /t
  • chkntfs /t:10
Read More
How To Speed Up PC Startup
[vc_row][vc_column][vc_column_text]

Boost PC Bootup

Hello and welcome to How To Speed Up PC Startup where we will explore how to make your PC boot-up system faster. When your computer gets older, you'll see a decrease in your PC's load time. This can be very annoying and frustrating, especially if you're not accustomed to exercising patience. Your computer's boot time does not need to be sluggish, even if it's old. While there are reasons why your computer is acting up and giving you the 'slow' sign, there are ways that you can optimize how fast your PC starts up at the beginning. Once you start speeding things up, you’ll never look back!

Start With your BIOS

You may need to tweak your PC’s start-up menu. Since the majority of issues encountered on your PC might not be related to the software running in the back end, you can focus on your computer's hardware. The ideal way to speed up your PC startup is to access your computer's BIOS when booting up. This can be accessed by holding the DEL key or whichever button is used to tap into your BIOS. You can change where your computer boots from. You can opt to put your hard disk right at the top which would elude searching for CDs and other storage media devices when your PC starts up.

Tweak Startup Programs

There are many programs that execute when your computer starts up. These programs normally run in the back end. Most times back-end programs are unnecessary and do not contribute to the productivity or performance of your computer when in use. Instead of allowing these programs to execute when your PC boots up, why not disable them?  By deactivating these programs, you'll be reducing the amount of CPU usage which will accelerate your PC performance. Additionally, there are some installed programs that you never use. Instead of leaving these programs to occupy needed space on your computer system, you can uninstall these to create more room on your computer. This actually increases your PC startup speed.

Put Malware on a Leash

Malware and spyware can cause problems for your start-up. A slow computer is an indication that your computer is plagued by malware. This affects your computer's boot time and whether or not it'll startup as quickly as you intend it to. If your computer gives you the 'virus alert', you need to download an antivirus program that will be able to eradicate all virus threats. Be mindful of where you download antivirus programs since many of them are viruses or have viruses attached to them. Some viruses are tough on your computer. This means that if an antivirus works for your best friend, it may not work for you. Since malware differs in functions and the havoc they cause, it's best to know what you're up against by doing research.

Clean Your Registry

You should also clean out your registry. The fewer unused registry keys you have lying around on your computer, the faster your computer will go. Getting a good registry cleaner from a clean source can help tremendously, but be careful; registry cleaners have the potential to be very dangerous so make sure you backup everything on your computer and only download registry cleaners from a reliable source. By implementing the above tips, you'll see quick improvements when using your computer. On the other hand, if your computer is going through some system-related issues that have to get fixed, there is a one-click solution known as Restoro you could check out to resolve them. This program is a useful tool that could repair corrupted registries and optimize your PC’s overall performance. Aside from that, it also cleans out your computer for any junk or corrupted files that help you eliminate any unwanted files from your system. This is basically a solution that’s within your grasp with just a click. It’s easy to use as it is user-friendly. For a complete set of instructions in downloading and using it, refer to the steps below Perform a full system scan using Restoro. To do so, follow the instructions below.
  1. Download and install Restoro from the official site.
  2. Once the installation process is completed, run Restoro to perform a full system scan. restoro application screen
  3. After the scan is completed click the “Start Repair” button. restoro application screen
[/vc_column_text][/vc_column][/vc_row]
Read More
Fix ERR_CACHE_MISS error in Google Chrome
One of the most popular and most used web browsers commonly used by Windows users is Google Chrome. This well-known web browser has been introducing various features recently in order to stay at the top. However, it makes the web browser a lot more complex and thus prone to errors. Although this may not be a big deal, it can be quite annoying as it can interrupt your web browsing. There are various errors that can come up with this level of complexity of the web browser. One of these errors is the “This site can’t be loaded from the cache, ERR_CACHE_MISS” error message that can suddenly appear while you browse the web using your Google Chrome browser on your Windows 10 PC. Take note that when you encounter this particular error, there really is no direct fault in the Chrome browser as there are also issues with caching the website data locally in the computer. Moreover, this error can also occur when a website is coded in an incorrect manner or if there are some browser extensions or toolbars that are in conflict with the proper functioning of the website. To fix the ERR_CACHE_MISS error in Google Chrome, refer to the possible solutions laid out below.

Option 1 – Try clearing browser data

There are times when some data in the browser is conflicting with the loading of the website and triggers errors like ERR_CACHE_MISS. And so you can try to clear your browser’s data. This might be a very basic solution but oftentimes it works in fixing this kind of error in Google Chrome. Follow the steps below to clear the data in your browser.
  • Open your Google Chrome browser.
  • After that, tap the Ctrl + H keys. Doing so will open a new panel that allows you to delete the browsing history and other data in your browser.
  • Now select every checkbox that you see and click on the Clear browsing data button.
  • Then restart your Chrome browser and check if you can now open any website or not.

Option 2 – Try using the Developer Tools

You can also try using the Developer tools in Google Chrome to help you fix the ERR_CACHE_MISS error. Refer to the steps below to do so.
  • Open Google Chrome.
  • Tap the Ctrl + Shift + I keys on your keyboard and then tap the F1 key to open the Settings tab inside the Chrome Developer Tools.
  • Next, select the Disable cache option while DevTools is open and apply those settings.
  • After that, refresh your browser and check if the entries you’ve seen previously in the Network tab are gone.
  • Now try to load the same webpage again and see if the problem is resolved.

Option 3 – Reset Winsock, TCP/IP & Flush DNS

Resetting Winsock, TCP/IP, and flushing DNS might help you resolve the ERR_CACHE_MISS error. To do so, follow these steps:
  • Right-click on the Start button and click on Command Prompt (administrator) so you can pull up an elevated Command Prompt.
  • After that, execute each one of the commands listed below. And after you typed in one after the other, you have to hit Enter.
  1. netsh winsock reset – type in this command to reset Winsock
  2. netsh int ip reset resettcpip.txt – type in this command to reset TCP/IP
  3. ipconfig /flushdns – type in this command to flush the DNS cache
  • Next, restart your PC and check if the problem’s fixed.

Option 4 – Get rid of any conflicting browser extensions

  • Open Chrome and press Alt + F keys.
  • Go to More tools and click Extensions to look for any suspicious browser extensions or toolbars.
  • Click the Recycle bin and select Remove.
  • Restart Chrome and press Alt + F keys again.
  • Proceed to On Startup and mark Open a specific page or set of pages.
  • To check if the browser hijacker is still active, click Set pages, if it is active, overwrite the URL.
Note: If removing the browser extensions or toolbars didn’t work, you can also try to reset your Google Chrome browser.
  • Open Google Chrome, then tap the Alt + F keys.
  • After that, click on Settings.
  • Next, scroll down until you see the Advanced option, once you see it, click on it.
  • After clicking the Advanced option, go to the “Restore and clean up option and click on the “Restore settings to their original defaults” option to reset Google Chrome.
  • Now restart Google Chrome.
Read More
1 2 3 162
Logo
Copyright © 2022, ErrorTools. All Rights Reserved
Trademarks: Microsoft Windows logos are registered trademarks of Microsoft. Disclaimer: ErrorTools.com is not affiliated with Microsoft, nor claim direct affiliation.
The information on this page is provided for information purposes only.
DMCA.com Protection Status