How to Fix Installer Error 1603

Correct Installer Error 1603

Installer Error 1603 - What is it?

Installer Error 1603 message occurs during the installation of the Microsoft Windows installer Package. The error message is often displayed as the following:

'Error 1603: A fatal error occurred during installation.'

It indicates a problem occurred during the installation process and unsuccessful installation.

Solution

Restoro box imageError Causes

The installer error 1603 may occur if:

  • The folder you are trying to install the Windows Installer package to is encrypted
  • The system account does not have full control permissions
  • Incorrect installation
  • Registry issues

Further Information and Manual Repair

To resolve this error on your system, try the solutions listed below:

Solution 1: Install-Package in an Un-Encrypted Folder

Try installing the package to a folder that is not encrypted. However, if the error still persists, try other solutions listed below.

Solution 2: Enable Full System Control Permissions

Sometimes the error may occur when you don’t have system full control permissions. To enjoy full control permissions here’s what you need to do, go to my computer and right-click the drive that you wish to install the Windows Installer Package to.

After that click properties and the security tab. If you can’t locate the security tab, this means your Simple File Sharing feature is turned on.

You need to turn it off to continue. For that go to my computer, tools, and then click folder options. Now here press the view tab and check the Simple File Sharing box to turn it off.

Press OK to save changes. Now you will be able to locate the security tab.

Click on the Security tab and verify the name box that contains the system user account. If the system user account is empty then insert the account name. To insert, click Add, and then select user's dialog box, add a name, and close.

Now go to the permissions section and check the box ‘Allow’ under full control. After that go to the ‘Advanced’ tab and do the following: If you are an XP user, select ‘Replace permission entries on all child objects with entries shown here that apply to child objects’ and then press OK to confirm.

If you are not an XP user, then follow the same instructions but select the check box that says ‘Reset permissions on all child objects and enable propagation of inheritable permissions’ for the system account. Now click OK to confirm.

To activate changes you will have to wait for a while. Once the changes are activated, try installing the Windows Installer package again.

Solution 3: Clean and Repair Registry

The Installer error 1630 can occur due to registry problems as well. To resolve registry-related issues download Restoro.

This is a cutting-edge and advanced registry cleaner that scans your entire PC for registry-related errors in seconds and resolves them spontaneously. It removes all the unnecessary junk files, bad keys, invalid registry entries, cookies, and internet history cluttering and corrupting the registry.

It repairs the damaged system files and repairs the registry right away thereby resolving Installer Error 1630 on your PC.

It is safe and efficient. It is embedded with an intuitive algorithm and a sophisticated user-friendly interface. It is easy to use and operate. You can download it on any Windows version.

Besides functioning as a registry cleaner, it also functions as an antivirus and a system optimizer.

Click here to download Restoro on your PC to resolve all registry issues generating the installer error 1603 on your system.

If you like to learn and find out more about various Windows errors, and how to repair them go to our vast archive or use search to find articles that will explain and help you in solving your issue.
However, if you prefer to do things fast and with automatization then we are proposing to use an automated solution for your issues. The application that we are recommending is Advanced System Repair Pro
Advanced System Repair utilizes multiple tools all in one to give you a quick, simple, reliable, and very thorough diagnosis of your PC. It brings you all the tools you need in one program to clean, fix, protect, optimize and boost your PC!
1-Click Maintenance
All the tools to make it simple and easy! It's like having a professional technician at the click of a mouse.

Junk Cleaner
Keeping your computer free from unnecessary clutter also helps make your computer last longer. Like any other machine, if you keep it clean and take care of it, it will serve you better for longer!

Optimize background apps
Optimize applications background activity with the built-in Application Optimizer feature.

Disk Defrag
With a simple 1-click, Advanced System Repair speeds up your PC by assembling fragmented files on your machine and organizing them more efficiently.

Malware Removal
Finds and removes all types of harmful malware including trojans, worms, bots, adware, spyware, PUPs, and more!

Privacy Cleaner
The all-in-one privacy suite to Clean Your Tracks & Protect Your Privacy! Make your computer safe, secure, and more efficient!

System Tweak/Optimizer
ASR will analyze your complete system and settings to adjust your PC to function at its maximum performance.

Registry Cleaner
Over time, as you install and uninstall applications, the registry can become cluttered with old entries and broken settings which can result in program crashes, and annoying messages and slow the computer down.
Visit our Advanced System Repair Pro Download page to inform yourself about all the benefits of this software and get a free trial copy of it.
advanced system repair pro

Advanced System Repair Pro

One-click automated PC repair solution
ASR logo
With Advanced System Repair Pro you can easily
Replace damaged files
Restore performance
Free disk space
Remove Malware
Protects WEB browser
Remove Viruses
Stop PC freezing
DOWNLOAD
Privacy Policy | Terms of Use | Uinstall
Advanced System Repair Pro is compatible with all versions of Microsoft Windows including Windows 11

Share this article:

You might also like

Assigning Multiple IP Addresses to Adapter
There are times when an IT admin has to set up multiple IP addresses to the same network adapter. Setting up multiple IP addresses in scenarios like hosting various SSL sites, speed up traffic exchanges can help in avoiding being blacklisted in the SPAM filters, and so on. So in this post, you will be guided on how exactly you can assign multiple IP addresses to the network adapter in your Windows 10 computer. There are several ways to assign multiple IP addresses in a network adapter. You can do it using the Network Adapter settings or using the Netsh utility, as well as the Windows PowerShell utility. To get started, refer to each one of the options provided below.

Option 1 – Assign multiple IP addresses via Network Adapter settings

  • Go to Settings first and from there, select Network & Internet, and then click on the Change adapter options. This will show you a list of both the physical and virtual network adapters in your computer.
  • Next, double click on the Ethernet adapter where you want to assign the multiple IP addresses and then click on the Properties button.
  • After that, you should see the Ethernet properties where you have to select the “TCP/IPv4” or “TCP/IPv6”.
  • Once done, click on the Properties button and then select the “Use the following IP address” option under the General tab.
  • Now you have to add an IP address, subnet, and default gateway to the network adapter and then click on the Advanced button.
  • This will open the Advanced TCP/IP settings where you have to click on the Add button so you can add an IP address. From here, you can keep adding multiple IP addresses to the network adapter. You also have the option to add multiple gateways or DNS IP addresses.
  • Once done, if you execute the “ipconfig” command, you should see all the secondary IP addresses listed.

Option 2 – Assign multiple IP addresses using the Netsh command

Another way to assign multiple IP addresses to your network adapter is via the Netsh command.
  • In the Start Search, type “command prompt” and from the search results that appear, right-click on Command Prompt and then select the “Run as administrator” to open it with admin privileges.
  • If a User Account Control or UAC prompt pops up, just click on Yes.
  • After that, run this command: Netsh int ipv4 add address name="Local Area Connection" 192.168.100.100 255.255.255.0 SkipAsSource=True
Note: You have the option to set “SkepAsSource” since it depends on your needs using the Netsh command. When it is configured as true, the IP address won’t be used by the OS for outbound connections.

Option 3 – Assign multiple IP addresses via Windows PowerShell

  • Tap the Win + X key combination and click on the “Windows PowerShell (Admin)” option.
  • After opening Windows PowerShell as admin, use the NetIPAddress command so you can add more IP addresses. Execute this command: Get-NetIPAddress | ft IPAddress, InterfaceAlias, SkipAsSource
  • Next, assign an IP address to a network adapter by executing this command: New-NetIPAddress –IPAddress 192.168.100.100 –PrefixLength 24 –InterfaceAlias “vEthernet” –SkipAsSource $True
  • Now to modify the “SkipAsSource” parameter, use this command: Get-NetIPAddress 192.168.100.100 | Set-NetIPAddress -SkipAsSource $False
Read More
Fix Windows Update Error 0x80070BC9
As you know, every Windows Update is essential for every Windows operating system. They have to be regularly installed, especially since they include various security updates that are important to the system. However, there are times when Windows Update fails to execute properly and you get errors like the error code 0x80070BC9. When you encounter this particular Windows Update error, you will get the following error message on your screen:
“0x80070BC9 – ERROR_FAIL_REBOOT_REQUIRED. The requested operation failed. A system reboot is required to roll back changes made.”
This kind of Windows Update error is most likely caused by a newly installed problematic software, corrupted Windows Update files, or policies that restrict the behavior of the Windows Module Installer. The Windows Module Installer, also known as “WMIW” or “TiWorker.exe”, is the one that checks for new updates from the Windows server and installs them on your computer. This is why you need to make sure that you do not have any policies that control the start behavior of the Windows Module Installer since this service must not be hardened to any start value and should be managed by the operating system. To resolve the Windows Update error code 0x80070BC9, you can check out the options provided below.

Option 1 – Try checking the status of the Windows Modules Installer Worker Service

Since the Windows Update error code 0x80070BC9 has something to do with the Windows Module Installer Worker service, you need to check its status in the Service Manager. Refer to the following steps to do so.
  • In the Cortana search box, type “services” and click on the Services icon to open the Services Manager. Alternatively, you can also tap the Win + R keys to launch the Run prompt and then type “MSC” in the field and hit Enter to open the Services Manager.
  • After opening the Services Manager, look for the Windows Modules Installer Worker Service.
  • Once you found it, check its status and make sure that its Startup type is set to Manual.
  • Now click on the Start button and see if it fixes the Windows Update error.

Option 2 – Run the Windows Update Troubleshooter

You might want to run a built-in Windows Update troubleshooter to resolve the Windows Update error. It is one of the things you can check out as it is known to automatically resolve any Windows Update errors like error code 0x80072EE2. To run this troubleshooter, go to Settings and then select Troubleshoot from the options. From there, click on Windows Update and then click the “Run the troubleshooter” button. After that, follow the next on-screen instructions and you should be good to go.

Option 3 – Try contacting the IT administrator to modify the group policies

You could also try to contact the IT administrator to have the group policies modified. This option is applicable for company-managed systems. As mentioned, one of the possible causes of the Windows Update error 0x80072EE2 is the policies that control the start behavior of the Windows Module Installer. Thus, you need to have them removed so that the Windows Module Installer Worker service is managed by the operating system itself. And since there could be many policies, it is highly advised that you contact your company’s IT administrator to get the job done for you.

Option 4 – Try to install the Windows Updates in a Clean Boot State

There are some instances that some conflicting programs installed in your computer might be the one that’s causing Windows Update error code 0x80070BC9. To identify which program is causing the problem, you need to put your computer in a Clean Boot State. To do so, follow the steps below.
  • Log onto your PC as an administrator.
  • Type in MSConfig in the Start Search to open the System Configuration utility.
  • From there, go to the General tab and click “Selective startup”.
  • Clear the “Load Startup items” check box and make sure that the “Load System Services” and “Use Original boot configuration” options are checked.
  • Next, click the Services tab and select the “Hide All Microsoft Services” check box.
  • Click Disable all.
  • Click on Apply/OK and restart your PC. (This will put your PC into a Clean Boot State. And configure Windows to use the usual startup, just simply undo the changes.)
  • From there, start to isolate the problem by checking which one of the programs you installed recently is the root cause of the problem.
Read More
REvil vanishes over night without trace
REvilREevil is one of the most active and successful hacking groups connected to Russia and operating all over the world. The group recently demanded a huge bitcoin ransom for an attack targeting IT firm Kaseya in the USA. Since Tuesday blog and payment site run by REvil group cannot be longer reached without any kind of explanation or why. The reason behind the disappearance is unknown but has sparked speculation that the group may have been targeted deliberately by authorities. US President Joe Biden said he raised the issue with Vladimir Putin during a phone call on Friday, after discussing the subject during a summit with the Russian president in Geneva last month. Mr. Biden told reporters that he had "made it very clear to him...we expect them to act" on information and also hinted the US could take direct digital retaliation on servers used for intrusions. The timing of Tuesday's outage has sparked speculation that either the US or Russian officials may have taken action against REvil - though officials have so far declined to comment and cyber experts say sudden disappearances of groups are not necessarily uncommon. The development comes after a series of high-profile ransomware attacks which have hit major US businesses this year. The FBI accused REvil - also known as Sodinokibi - of being behind a ransomware attack on the world's largest meat processing company JBS last month.
Read More
Fix PAGE_FAULT_IN_NONPAGED_AREA 0x00000050
If you suddenly encounter the PAGE_FAULT_IN_NONPAGED_AREA Blue Screen error then it means that your computer is under a heavy load. And if you look closely, you’ll see that it has a bug check value of 0x00000050. This kind of Blue Screen error also indicates that invalid system memory has been referenced. It could be that the memory address is wrong, or that it is pointing at freed memory. The PAGE_FAULT_IN_NONPAGED_AREA Blue Screen error occurs when the requested data is not found in the memory. As a result, the system generates a fault which normally indicates that the system is looking for data in the paging file. However, in this case, the missing data is identified as being located within an area of memory that cannot be paged out to the disk. This Stop error might be caused by a buggy system service, antivirus program, a corrupted NTFS volume, or faulty hardware. So if you’ve recently added hardware, you can try removing it and then check. If the problem still persists, refer to the suggestions given below to fix the problem.

Option 1 – Run Memory Check to test your memory

  • Tap the Win + R keys to open Run and type exe and hit Enter to open the Windows Memory Diagnostic Tool.
  • After that, it will give two options such as:
    • Restart now and check for problems (Recommended)
    • Check for problems the next time I start my computer
  • Select the option you prefer and afterward, check if the Blue Screen error is now fixed.

Option 2 – Run a System File Checker scan

You can also try to run a System File Checker or SFC scan in order to scan your computer for corrupted files that might be the cause behind the PAGE_FAULT_IN_NONPAGED_AREA Blue Screen error. Once it finds any corrupted system files, it will automatically fix them. To run System File Checker, here’s what you have to do:
  • Tap Win + R to launch Run.
  • Type in cmd in the field and tap Enter.
  • After opening Command Prompt, type in sfc /scannow
The command will start a system scan which will take a few whiles before it finishes. Once it’s done, you could get the following results:
  1. Windows Resource Protection did not find any integrity violations.
  2. Windows Resource Protection found corrupt files and successfully repaired them.
  3. Windows Resource Protection found corrupt files but was unable to fix some of them.
  • Restart your computer after the scan is completed.

Option 3 – Disable Automatic Paging File Size Management

  • Right-click on This PC located on your desktop.
  • Next, click on Properties and then click on the Advanced System Settings.
  • Go to the Advanced tab and then click on the Settings button under the Performance section.
  • Afterward, a new mini window will appear and from there, go to the Advanced tab.
  • Then click the Change button under the Virtual Memory section. Once you do, another mini window will appear.
  • Now uncheck the “Automatically manage paging file size for all drives” option.
  • After that, you have to increase the Page File size by doubling the amount of memory allocated by default in the text field. For instance, the paging size given is a minimum of 16MB and so you have to change it to 32MB. And since the recommended value is 1907MB, you can make its maximum size around 4000MB. By doing so, it will allocate more space for paging into individual drivers.
  • Now click OK, close all the open windows and then restart your PC.

Option 4 – Update the Device Drivers

Updating the Device drivers can also help you fix the PAGE_FAULT_IN_NONPAGED_AREA Blue Screen error. To do so, follow the steps below.
  • Tap the Win + R keys to launch Run.
  • Type in devmgmt.msc into the box and tap Enter or click OK to open the Device Manager.
  • After that, a list of device drivers will be displayed. If you see a red or yellow sign that shows up against the driver, right-click on the driver and select “Update Driver Software”.
  • Select the “Search automatically for updated driver software” option and then follow the instructions to complete the process.
  • Restart your PC and then check if the Blue Screen error is now fixed or not.

Option 5 – Perform a System Restore

Performing System Restore might help you in fixing the PAGE_FAULT_IN_NONPAGED_AREA error. You can do this option either by booting into Safe Mode or in System Restore. If you are already in the Advanced Startup Options, just directly select System Restore and proceed with the next steps. And if you have just booted your PC into Safe Mode, refer to the steps below.
  • Tap the Win + R keys to open the Run dialog box.
  • After that, type in “sysdm.cpl” in the field and tap Enter.
  • Next, go to the System Protection tab then click the System Restore button. This will open a new window where you have to select your preferred System Restore point.
  • After that, follow the on-screen instructions to finish the process and then restart your computer and check if the problem is fixed or not.

Option 6 – Try disabling your antivirus programs

There are instances when antivirus programs trigger Stop errors like PAGE_FAULT_IN_NONPAGED_AREA. Thus, you can try disabling your antivirus programs like Windows Defender or other third-party programs if you’re using one.

Option 7 – Use the Blue Screen Troubleshooter

The Blue Screen troubleshooter is a built-in tool in Windows 10 that helps users in fixing BSOD errors like PAGE_FAULT_IN_NONPAGED_AREA error. It can be found on the Settings Troubleshooters page. To use it, refer to these steps:
  • Tap the Win + I keys to open the Settings panel.
  • Then go to Update & Security > Troubleshoot.
  • From there, look for the option called “Blue Screen” on your right-hand side and then click the “Run the troubleshooter” button to run the Blue Screen Troubleshooter and then follow the next on-screen options. Note that you might have to boot your PC into Safe Mode.

Option 8 – Disable Memory caching in the BIOS

You can also disable memory caching in the BIOS to fix the PAGE_FAULT_IN_NONPAGED_AREA error.
  • Open the BIOS Setup screen.
  • Next, go to Advanced > Cache Memory and then disable it.
  • Tap the F10 key to save the changes made and restart your computer.
Read More
Perform Voice Activation Troubleshooting
One of the smoother things that Microsoft did with the Windows 10 operating system is to separate Cortana from Search. This means that Cortana is strictly now a voice assistant and many users have seen it coming since not everyone uses Cortana. In addition, it also paved the way for other virtual assistants like Alexa to get on board with Windows 10. And now in the newly released Windows 10 v1903, Windows has brought the Voice Activation under Privacy. In this post, you will be guided on how to perform the Voice Activation troubleshooting on your Windows 10 computer. To use Voice Activation in Windows 10, follow, in the Start Search, type “voice activation” and click on “Voice activation privacy settings” listed in the search results. And from there, you can choose to allow apps to use Microphone, like listen in the background as well as select which app can access it. Each time enabled voice assistants continue to listen via microphone for the voice keyword, the app will activate itself for the keyword and will react depending on what you ask it. So if you are using a voice assistant and it didn’t respond when you speak the keyword, just go to Settings > Privacy > Voice Activation and follow these steps:

Option 1: Check the App permission to use the voice activation feature.

You have to make sure that the toggle button for the Voice activation feature is turned on globally. It can be found under the “Allow apps to use voice activation” section. You also have to ensure that the microphone is available for apps that use this feature.

Option 2: Voice activation is not working under the lock screen.

If you tend to use the voice assistant even when your computer is locked, Microsoft has a specific setting that you have to turn on. You need to make sure that the toggle button for the “Allow apps to use voice activation when this device is locked” option is turned on. However, keep in mind that the voice assistants are not locked to only recognize your voice as they also answer to anyone who will use the voice keyword.

Option 3: Check the individual permissions of apps.

If the voice assistant is not working, you have to check each one of the apps’ permissions for voice keyword, and the option to work under locked condition works.

Option 4: Run the Microphone troubleshooter.

If you’ve verified that the settings are in place, then you have to run the Microphone troubleshooter by simply going to Settings > Privacy > Microphone. From there, make sure that the toggle button for the following options is turned on:
  • Allow apps to access your microphone
  • Enable microphone access for the voice assistant
And if it’s a desktop app, you have to enable the toggle on at the end.
Read More
Stopping automatic redirects in Browsers
As you know, the internet has changed the world immensely. Nowadays, JavaScript is pushing the modern web ahead. One of the things that make these experiences with the internet seamless and with less clutter is redirection. It is often used on web pages and there are times when a user is prompted about them and most of the time, we barely notice them. However, there are also instances when things can go wrong with redirects as they could become a loop that could mess things up. And since the browser takes a lot of system resources, redirection can result in a poor user experience. That’s why in this post, you will be guided on how you can stop these automatic redirects on browsers such as Microsoft Edge, Google Chrome, and Mozilla Firefox, on your Windows 10 computer. To get started, refer to each one of the options provided below to stop automatic redirects in Microsoft Edge, Google Chrome, and Mozilla Firefox.

Option 1 – Configure the browsers to stop pop-ups and deceptive contents

There are a lot of browsers with built-in settings that allow users to stop pop-ups and deceptive content. To configure these settings, refer to these steps:
  • Microsoft Edge:

    • Click on the three horizontal dots icon or the menu button.
    • Next, click on Settings and select Privacy & Security from the left side navigation.
    • After that, scroll down on the right-side panel and look for Block pop-ups and Windows Defender SmartScreen and then turn their toggle buttons to On.
  • Google Chrome:

    • Open Google Chrome and click on the three vertical dots icon for the menu located in the top right corner of the browser.
    • Next, click on Settings and scroll down until you see the Advanced option. Click on it to open the Advanced Settings.
    • Now scroll down until you reach the Privacy and Security section and look for the Safe browsing option and turn its toggle button to On.
  • Mozilla Firefox

    • Open Mozilla and click on the three horizontal lines icon for the menu button located in the top right corner of the browser and click on Options.
    • Next, go to the Settings section and click the Privacy & Security tab and scroll down and then click on Permissions.
    • From there, make sure that the Block pop-up windows checkbox is checked.
    • Finally, scroll down until you reach the Security section and make sure that the checkbox for the Block dangerous and deceptive content is checked.

Option 2 – Try to reset Winsock, TCP/IP & Flush DNS

To stop redirects, you can also reset Winsock and the TCP/IP as well as flush the DNS cache. To do so, follow these steps:
  • Right-click on the Start button and click on Command Prompt (administrator) so you can pull up an elevated Command Prompt.
  • After that, execute each one of the commands listed below. And after you typed in one after the other, you have to hit Enter.
  1. netsh winsock reset – type in this command to reset Winsock
  2. netsh int ip reset resettcpip.txt – type in this command to reset TCP/IP
  3. ipconfig /flushdns – type in this command to flush the DNS cache
  • Next, restart your PC and check if the problem’s fixed.

Option 3 – Edit your Hosts File

  • Tap the Win + R keys to open then type in %WinDir% and then click OK.
  • Go to System32/drivers/etc.
  • Open the host file using Notepad.
  • Delete all the suspicious entries.
  • After that, save the changes you’ve made and close the file.
Read More
Malware Guide: How to Remove Webguard

Malware Guide: How to Remove Webguard

What is Webguard?

Developed by Interesting Solutions, Webguard is a tool supposedly used for tracking those online who’ve developed a habit of tracking you. The application would provide logical analysis into a user’s website history, providing insight on what websites you’ve visited and also how persons are able to track your every move while browsing. While Webguard is unable to dispose of who specifically is tracking your computer usage, they’re able to determine what computer installed tracking codes or cookies on your computer system. In this case, it’s then left up to the user’s discretion to determine who they want to allow or block from tracking their online use.  Overall, this application allows the user some measure of freedom and control over their online experience. Like any other application, however, which has landed themselves a spot on Virus Total, Web guard has hidden agendas. At a distance, Webguard installs a service for Windows but later distributes advertisements. Technical details about Webguard include:
Product Version: 1.0.0.0 Original File Name: crss.exe Entry Point:  0x000C5AAE

Assessment of Webguard Potentially Unwanted Program

While Webguard claims to track your computer usage, information reported by the application isn’t sufficient for the common computer user. This brings us back to the ulterior motive or principal objective of developing Webguard – to advertise and generate revenue from clicks made by users on Ads displayed on Internet Browsers – namely Chrome, Internet Explorer and Firefox. Why should a computer user remove Webguard? Simply, it compromises one's Internet privacy and security and it keeps abreast of your Internet history. If you’re online for an extended period, you’ll see what Webguard does. While the publishers behind the application did not alert users to the use of web beacons, cookies for tracking, and other related tracking technology, that’s not why Webguard is considered unwanted. The program is potentially unwanted because of the unpredictable advertisements it displays. Not all sites are trusted and so it’s difficult to determine, in some cases, what websites are legit for business.

Remove Webguard with Spyhunter

In most cases, at least from what I’ve seen, Webguard is installed as a single application. After it was installed for this assessment, it could be found in ‘All Programs”. This meant that one could manually delete the application from their computer system (see manual steps below). However, is that really sufficient to completely rid your PC of Webguard’s blueprints? While you might opt to remove Webguard manually – maybe because it’s more economical – an automated process is able to completely eradicate hidden threats from Webguard. In comparison to manually removing Webguard, Spyhunter penetrates your computer system for all infections. In most cases, nasty threats are unable to be removed manually. Additionally, Spyhunter not only removes installed threats, but it detects incoming ones – hence, acting as a preventative tool. Furthermore, Spyhunter detects cookies placed on your computer by Webguard. These are all undetectable threats and so an automated tool, as Spyhunter, should be used to remove Spyhunter effectively from your computer.

Manual Steps for Removal of Webguard

I found this removal pretty simple. Depending on your Operating System, there will be slight discrepancies in the manual removal steps. Using the Windows 8 (8.1) OS on your computer:
  • Step 1: Locate the CONTROL PANEL on your computer using the SEARCH option.
  • Step 2: Once the search box appears , input 'CONTROL PANEL'.
  • Step 3: The Control Panel option will then appear. From the menu, choose the "Programs" option.
  • Step 4: Another menu will appear. Select "All Programs and Features".
  • Step 5: From the 'Programs list', search for the Webguard application.
  • Step 6: Right-click on Webguard when it's found.
  • Step 7:  Choose the "Uninstall" option.
  • Step 8:  Follow the uninstall wizard instructions until the Webguard application is fully removed.
To completely remove Bandoo from your computer, click here to download and install Spyhunter
Read More
Razer new table concept looks futuristic
The new razer modular table looks like something that came out from Star Trek. Project Sophia is a desk but, it is a special kind of desk. It comes with modules that attach themselves underneath the table itself for customization purposes so each user can somewhat create a layout on the table itself as he or she desires. The table itself comes packed with intel CPU and Nvidia GPU but it is said that this component and PC parts will overall be easily upgraded to different ones as users desires. razer sophia
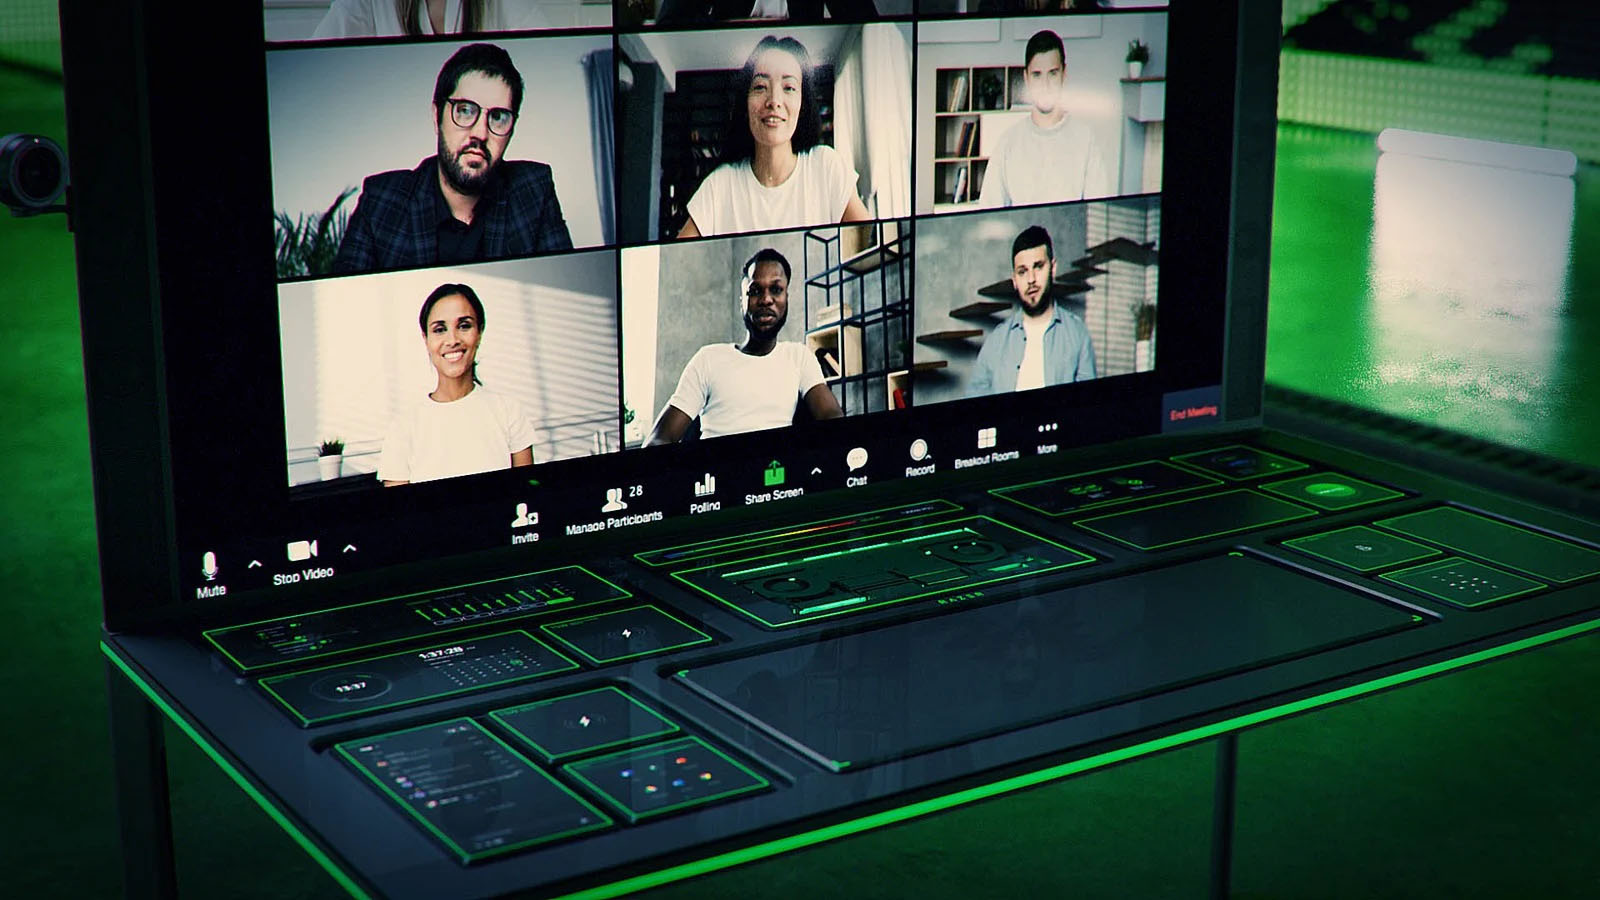
The table itself looks very basic and it comes with a very large OLED screen between two different sizes depending on your table choice. You can choose between 65” or 77” screen sizes and OLED is mounted on the table itself so you cannot move it or adjust the angle of it that I somewhat find annoying but that comes from th4e fact I am used to adjusting my screens, but for this large screen maybe you do not need to adjust its rotation in order to get best viewing angle. Modules themselves will offer some on-the-fly information and quick settings for the PC itself while being modular in a sense they could be mounted in different positions on the table itself providing some customization and order to suit users needs. Modules, for now, are: THX Spatial Surround Sound Controls, system monitoring, programmable hotkey module, Thunderbolt™ Powered eGPU, RAID Controller, Network Performance Module, 15W Wireless Charger, Thunderbolt™ 4 Hub, Media Controls. Of course table, itself will have Razer chroma RGB on its surface and Razer says it will have a total of 13 different modules available on launch for a true level of personalization.

Conclusion

Is this Razer table something that you really need or just another expensive toy? Personally, I would not mind this table at all but I would choose modules for work, not gaming. Having some things like media controls or RAID controllers all the time at your fingertips is a great time saver and productivity asset. Razer also advertises some modules and setup already for streamers, creators, or team members and has some according modules like touch screen digitizer with stylus and similar.
Read More
Fix PNP_DETECTED_FATAL_ERROR in Windows
If you suddenly encounter a PNP_DETECTED_FATAL_ERROR Blue Screen error, then this post can help you out. The PNP_DETECTED_FATAL_ERROR BSOD usually occurs when any new hardware that is mostly the Plug and Play type is attached. In such cases, when the device is plugged, and the driver for that device crashes or isn’t found or is not compatible, you will most likely encounter this particular BSOD error. There are several error codes that come under this category, some of them are 0x000000CA (0x01681690, 0xEA96A7BE, 0x938A81AD, 0xF8362881. This BSOD error can also occur at any time. However, the only constant thing here is when you plug a PNP device like earphones, microphones, USB drives, and many more. The PNP_DETECTED_FATAL_ERROR bug check has a value of 0x000000CA which indicates that the Plug and Play Manager encountered some severe error which is most likely have something to do with a problematic Plug and Play driver. To fix this error, here are some possible solutions that could help.

Option 1 – Run the Blue Screen Troubleshooter

The Blue Screen troubleshooter is a built-in tool in Windows 10 that helps users in fixing BSOD errors like PNP_DETECTED_FATAL_ERROR Blue Screen error. It can be found on the Settings Troubleshooters page. To use it, refer to these steps:
  • Tap the Win + I keys to open the Settings panel.
  • Then go to Update & Security > Troubleshoot.
  • From there, look for the option called “Blue Screen” on your right-hand side and then click the “Run the troubleshooter” button to run the Blue Screen Troubleshooter and then follow the next on-screen options. Note that you might have to boot your PC into Safe Mode.

Option 2 – Try disabling or removing newly installed hardware

In this option, you will have to disable or remove the hardware you’ve just installed recently since external devices could be the one that’s causing the Blue Screen of Death error to appear. To do that, just disconnect any external device that’s connected to your computer physically and then check if it fixes the PNP_DETECTED_FATAL_ERROR Blue Screen error.

Option 3 – Try disabling BIOS Memory options namely Caching Shadowing

Disabling the BIOS Memory options such as Caching and Shadowing can help you in fixing the PNP_DETECTED_FATAL_ERROR Blue Screen error. All you have to do is enter the BIOS first and then use the Arrow and Enter keys to select your choices. And if you can’t seem to find it, look for specific instructions from your OEM or you could also look out for instructions from the manufacturer of your motherboard.

Option 4 – Try to run the CHKDSK utility

Running the CHKDSK utility might also help you resolve the PNP_DETECTED_FATAL_ERROR Blue Screen error. If your hard drive has issues with integrity, the update will really fail as the system will think that it’s not healthy and that’s where the CHKDSK utility comes in. The CHKDSK utility repairs hard drive errors that might be causing the problem.
  • Open Command Prompt with admin privileges.
  • After opening Command Prompt, execute the following command and hit Enter:
chkdsk /f /r
  • Wait for the process to be completed and then restart your computer.

Option 5 – Try to uninstall programs you’ve installed recently

Chances are, some programs that you just installed might be the one that’s causing the BSOD error. Thus, you need to uninstall the program to resolve the problem.
  • In the search box, type in “control” and then click on Control Panel (desktop app) among the search results.
  • After that, select Programs and Features from the list which will give you a list of all the programs installed on your computer.
  • From there, look for the concerned program and select it and then uninstall it.

Option 6 – Update the Device drivers

  • Tap the Win + R keys to launch Run.
  • Type in devmgmt.msc into the box and tap Enter or click OK to open the Device Manager.
  • After that, a list of device drivers will be displayed. Look for the device driver you and then select either “Update driver” or “Uninstall device”. And if you find any “Unknown device”, you need to update it as well.
  • Select the “Search automatically for updated driver software” option and then follow the instructions to complete the process.
  • If you have chosen to uninstall the driver, follow the screen options to complete the process and then restart your PC.
  • Connect the device and Scan for hardware changes – you can see this option under Device Manager > Action.

Option 7 – Perform a System Restore

Performing System Restore might help you in fixing the PNP_DETECTED_FATAL_ERROR Blue Screen error. You can do this option either by booting into Safe Mode or in System Restore. If you are already in the Advanced Startup Options, just directly select System Restore and proceed with the next steps. And if you have just booted your PC into Safe Mode, refer to the steps below.
  • Tap the Win + R keys to open the Run dialog box.
  • After that, type in “sysdm.cpl” in the field and tap Enter.
  • Next, go to the System Protection tab then click the System Restore button. This will open a new window where you have to select your preferred System Restore point.
  • After that, follow the on-screen instructions to finish the process and then restart your computer and check if the problem is fixed or not.
Read More
A Quick Guide to Resolving Error 0146 on Your Dell Laptop

Fix Error 0146 on Your Dell Pc

Error 0146 - What is it?

Dell laptop is a great choice for laptop users who like to have the best configuration, fast working platform, and long warranty period. But this does not mean that your errors can’t pop up on Dell laptops. Users can experience a variety of hardware and software-related issues on Dell laptops. And one such error is the error code 0146. This is a typical Dell laptop hard drive-related error code. It can cause your Dell laptop to freeze and system applications to stop responding for a long period of time. Therefore, it is recommended to fix the error immediately.

Solution

Restoro box imageError Causes

Error 0146 may be triggered due to several reasons on your system. These include:
  • Program corruption
  • Viral infection
  • Hard drive issues

Further Information and Manual Repair

The good news is that error 0146 is easy to fix. Here are some of the easy do it yourself methods that you can try to resolve error 0146 on your system:

Method 1 - Run a Virus Scan

Malware and viruses can corrupt and damage the hard drive and trigger error 0146. In such an event, it is recommended that you open your antivirus, update it and run a full virus scan on your PC. Once the scan is complete, remove all the viruses. This will hopefully resolve the error 0146.

Method 2 - Run Your Laptop in Safe Mode and Clean Boot

Another alternative is to run your Dell laptop in safe mode and clean boot. To do this, simply disconnect all the attached devices like wireless printers, routers, and USB keys and turn off your laptop. Turn it on again and then press and hold the F8 key. Make sure you do it quickly before the Windows logo comes up. Now select ‘Safe mode with networking’ and press enter. After that, open System Configuration Utility by going to the start menu and typing ‘msconfig’ in RUN, and then click OK. In the System Configuration Utility click General then selective startup. Now uncheck the load startup items box ad select services and then check the hide all Microsoft services box and disable all. To apply these changes, click ‘Apply’ and then OK.  Now restart your laptop.

Method 3 - Change to SATA Drive

Sometimes error 0146 may pop up due to hard drive configuration changes. If this is the reason for error occurrence, then simply go to Dell Laptop BIOS. Check whether the hard drive configuration has been changed to AHCI SATA from SATA Drive. If it has changed, then it is advisable to change it back to SATA Drive. When you are done back up all your data, and then format your hard drive. It is important to create a backup because formatting will make you lose all your data. Once you format the hard drive, reinstall Windows from scratch.

Method 4 - Run a Registry Scan

If the error 0146 results due to program corruption then there is a possibility that the underlying reason might be registry damage. Therefore it is advisable to run a registry scan and repair it. To do so, download Restoro. This is a cutting-edge and user-friendly PC Fixer integrated with a registry cleaner. Run it to scan for registry issues. It removes all obsolete files corrupting and damaging the registry, repairs important and damaged system files and cleans the registry in the shortest time. Click here to download Restoro and resolve error 0146.
Read More
1 2 3 162
Logo
Copyright © 2022, ErrorTools. All Rights Reserved
Trademarks: Microsoft Windows logos are registered trademarks of Microsoft. Disclaimer: ErrorTools.com is not affiliated with Microsoft, nor claim direct affiliation.
The information on this page is provided for information purposes only.
DMCA.com Protection Status